You have built an HTML document, and you like it the way it is. You don't want to mess around with its layout or content, but somehow you would like it to be a bit more responsive to the user's input, or just a bit more flashy. Otherwise, you'd like the document to stay put. A classic example is highlighting a particular detail when an onMouseOver event occurs.
The way to achieve this kind of effect is to change style sheet properties. This is straightforward for Internet Explorer 4.0. Netscape 4.0 browsers require a more complicated approach, unless you abandon style sheets and go back to image swaps, as discussed in Chapter 4.
The important style properties for this class of effects are:
These style properties can be set as described earlier. The following common tasks illustrate some useful ends for this functionality.
Before dynamic HTML, onMouseOver highlighting meant swapping images, which wasn't always that fast. Not anymore as the Internet Explorer 4.0 example shows:
<HTML><BODY>
Pick any item ... <BR>
<OL>
<LI ONMOUSEOVER="this.style.color='green'" ONMOUSEOUT="this.style.color='black'">
Pick me!
<LI ONMOUSEOVER="this.style.color='green'" ONMOUSEOUT="this.style.color='black'">
No, pick me!
<LI ONMOUSEOVER="this.style.color='green'" ONMOUSEOUT="this.style.color='black'">
Don't listen to them! Pick me!
<LI ONMOUSEOVER="this.style.color='green'" ONMOUSEOUT="this.style.color='black'">
Pick me, or else I'll cry.
</OL>
</BODY></HTML>
The background color, or in fact any combination of style information, can be just as easily set. However, the background color in particular is a little trickier. This is because the tag might not end on the screen where you think it ought to—try replacing 'color' with 'backgroundColor' in the above example. The solution is to use <SPAN> tags to give finer control to the script:
<HTML><BODY>
Pick any item ... <BR>
<OL>
<LI>
<SPAN ONMOUSEOVER="this.style.backgroundColor='yellow'"
      ONMOUSEOUT="this.style.backgroundColor='white'"
>
Don't pick me!
</SPAN>
<LI>
<SPAN ONMOUSEOVER="this.style.backgroundColor='yellow'"
      ONMOUSEOUT="this.style.backgroundColor='white'"
>
Don't pick me either!
</SPAN>
</OL></BODY></HTML>
There's always a catch. In this case, it's Netscape browsers. You can't set style properties in Navigator 4.0. However, there is an escape hatch: all Netscape Window objects can have their background color changed, and that includes layers. So this will work:
<HTML><BODY>
Before layer.
<BR>
<LAYER ONMOUSEOVER="this.bgColor='red'" ONMOUSEOUT="this.bgColor='white'">
MouseOver me!
</LAYER>
<BR>
After layer.
</BODY></HTML>
With Netscape, for changes more general than just the background color you must resort to more desperate tactics. See 'Making a fancy entrance' below for a solution.
Again, prior to Dynamic HTML, your choices for menus were restricted to the <SELECT> tag, and image swap tricks. The ability to clip HTML elements after the page is displayed opens up whole new possibilities. Again, here is an Internet Explorer 4.0-specific example:
<HTML><BODY>
<STYLE TYPE="text/css">
#menu1 { position: absolute; clip: rect(auto auto 32 auto) }
#item  { background-color: red }
</STYLE>

<SCRIPT>
  function   pick(obj) { obj.style.backgroundColor="yellow"; return true; }
  function unpick(obj) { obj.style.backgroundColor="red"; return true;}
</SCRIPT>

<STRONG><PRE>
<DIV id="menu1"
   ONMOUSEOVER="this.style.clip = 'rect(auto auto auto auto)'"
   ONMOUSEOUT ="this.style.clip = 'rect(auto auto 32 auto)'"
>
  <SPAN ID="item">File  </SPAN>
  <SPAN ID="item">      </SPAN>
  <SPAN ID="item" ONMOUSEOVER="pick(this)" ONMOUSEOUT="unpick(this)">Open  </SPAN>
  <SPAN ID="item" ONMOUSEOVER="pick(this)" ONMOUSEOUT="unpick(this)">Edit  </SPAN>
  <SPAN ID="item" ONMOUSEOVER="pick(this)" ONMOUSEOUT="unpick(this)">Export</SPAN>
  <SPAN ID="item" ONMOUSEOVER="pick(this)" ONMOUSEOUT="unpick(this)">Import</SPAN>
  <SPAN ID="item" ONMOUSEOVER="pick(this)" ONMOUSEOUT="unpick(this)">Save  </SPAN>
  <SPAN ID="item">      </SPAN>
  <SPAN ID="item" ONMOUSEOVER="pick(this)" ONMOUSEOUT="unpick(this)">Exit  </SPAN>
</DIV>
</PRE></STRONG>
</BODY></HTML>
The keys to this example are the two handlers in the first <DIV> tag. They expose and hide most of the content of that element in response to the mouse, leaving only the word 'file ' permanently visible. Without clipping, the menu of seven items and two blank lines would always appear. By the position of the bottom clip, the menu is exposed or removed as desired.
Note that this example is only an illustration. It needs quite a bit more handler work to be a fully working system: the onMouseOver/onMouseOut handlers for the ID="menu1" tag should be replaced with a fancier onClick handler; the <SPAN> tags require onClick handlers; the menu does not "roll up" in all cases because event bubbling is not fully managed (try exposing the menu and moving off the side, compared with off the top).
This kind of behavior is still possible in Netscape 4.0, but is not nearly as simple. The highlighting of singular menu items requires a significant amount of work, since each one must be a layer. Using layers can be as non-portable as sticking to Internet Explorer 4.0-only features.
Normally a document appears in the browser window as it downloads. The visibility style property can be used to alter this behavior. This Internet Explorer 4.0 example mimics the kind of behavior you might typically see from a Java applet:
<HTML><HEAD>
<STYLE TYPE="text/css">
  #loading { position: absolute }
  #content { position: absolute; visibility: hidden }
</STYLE>
<SCRIPT>
function display_it()
{
  document.all.content.style.visibility='visible';
  document.all.loading.style.visibility='hidden';
}
</SCRIPT>
</HEAD>
<BODY ONLOAD="setTimeout('display_it()', 4000)">
<DIV ID="loading" STYLE="color: orange">
  <H1>Loading, please wait ...</H1>
</DIV>
<DIV ID="content">
  Regrettably, anticipation exceeds the event in this case.
</DIV>
</BODY>
</HTML>
The setTimeout() call is only present to help simulate a slow-loading document—normally you would call display_it() immediately from the onLoad handler. To achieve the same effect in Netscape, just replace the display_it() function as follows:
function display_it()
{
  document.layers.content.visibility='visible';
  document.layers.loading.visibility='hidden';
}
This next example uses visibility to support fancy onMouseOver style changes for Netscape browsers:
<HTML><BODY>
<STYLE TYPE="text/css">
.alternate { visibility: hidden; color: red; background-color: yellow; }
</STYLE>
Before layer.
<BR>
<LAYER ONMOUSEOVER="
   window.document.layers[1].visibility='visible';
   this.visibility='hidden'
">
MouseOver me!
</LAYER>
<LAYER CLASS="alternate" ONMOUSEOUT="
   window.document.layers[0].visibility='show';
   this.visibility='hidden'
">
MouseOver me!
</LAYER>
<BR>
After layer.
</BODY></HTML>
In this example there are two layers, one exactly on top of the other, both with the same content. When the mouse moves over one, it disappears and the other appears. When the mouse moves out again, the reverse happens.
For Internet Explorer 4.0, filters are a further trick you can pull to control visibility of HTML elements. Filters are a Microsoft proprietary extension to style sheets that provide a grab-bag of special effects. The effects can be applied to <DIV> tags and images. If used without thought, the effects produced can look very amateurish. The invert, chroma, and blendtrans options are the safest in terms of style. Refer to Wrox's Instant IE4 Dynamic HTML for a detailed discussion of filters.
Border style properties are yet another way of highlighting content in an HTML document. An extremely simple use for Internet Explorer 4.0:
<HTML><BODY><CENTER>
<H3 STYLE="color: green">Easy games of the Paeolithic Age #3: Trap the Rock</H3>
<DIV ID="prey"> One Rock </DIV>
<FORM>
<INPUT TYPE="button"
     VALUE="Trap it now"
     ONCLICK="document.all.prey.style.border='medium solid'"
>
</FORM>
</CENTER></BODY></HTML>
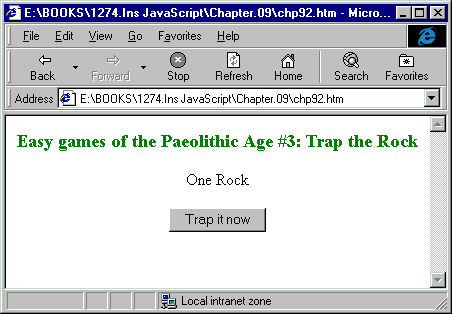
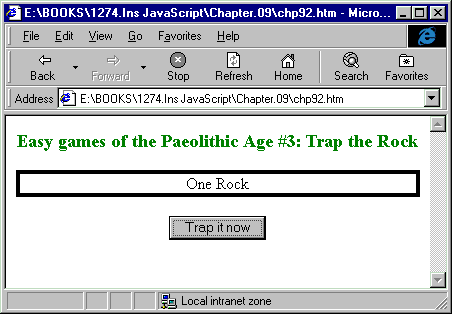
Here are the before and after images:


At first glance this example might not seem to reveal anything new, but look closely: when the button is pressed, the <DIV> tag is boxed, expanding slightly in the process, and the button moves slightly down the window to compensate (observe the after case has earned a scrollbar). Reload the document and press the button again to repeat the effect. The change in the <DIV> tag has resulted in the rest of the document being re-organized
This behavior is a powerful feature specific to Internet Explorer 4.0 called reflowing the document. In simple examples as above it is very handy, taking care of the layout changes for you much like a modern word processor. In fact, most of the style properties not touched on yet in this chapter are likely to cause reflow to occur. All the margin, font, padding, border, spacing and text attributes are implicated.
It's worth being aware of this effect. There are several cases where you might not want reflow to occur:
All the style properties illustrated earlier don't cause any reflow. 'Modifying content and structure' below explains how to deliberately exploit the reflow feature of Internet Explorer 4.0. Netscape browsers don't have this capability.