
The other major topic that you need to understand how to apply to your site, if you want to pass sensitive information from client to server and vice versa, is how you can provide a secure communication path between the two. This is where we come to look at encryption, and it is a huge topic in total. Here we'll take an overview of how it works—just enough so that you can see what is required to set it up.
A Simple Guide to Encryption
There are two basic techniques for encrypting information, symmetric encryption (usually called secret key encryption) and asymmetric encryption (usually called public key encryption). We've chosen the names symmetric and asymmetric encryption because they are less confusing than secret key and public key encryption—ultimately both methods use a 'secret' key.
Symmetric Encryption
Symmetric encryption is the oldest and best-known technique based on the one you used at school to encode your love letters or 'secret gang' messages. A secret key, which can be a number, a word, or just a string of random letters, is applied to the text of a message so as to change the content in a particular way. It might be as simple as shifting each letter along by a number of places in the alphabet. As long as both sender and recipient know the secret key, they can encrypt and decrypt all messages that use this key.

Asymmetric Encryption
The problem with secret keys is how do you exchange them over the Internet or large network while preventing them from falling into the wrong hands? Anyone who knows the secret key can decrypt the messages. The answer is asymmetric encryption, where there are two related keys—a key pair. A public key is made freely available to anyone who might want to send you a message. A second private key is kept secret, so that only you know it.
The way it works is that any message (text, binary files, documents, etc) encrypted using the public key can only be decrypted by applying the same algorithm to it, but using the matching private key. Vice versa, any message encrypted using the private key can only be decrypted using the matching public key.

This means that you don’t have to worry about passing public keys over the Internet— after all they're supposed to be public. The one problem with asymmetric encryption, however, is that it's quite slow compared to symmetric encryption, because it requires far more processing power to both encrypt and decrypt the content of the message.
About Digital Certificates
In order to use asymmetric encryption, there has to be a way for users to discover each other's public keys. The usual technique is the use of digital certificates, or just certificates for short. A certificate is simply a package of information that identifies a user or a server, containing things like the organization name, the organization that issued the certificate, the user's email address, country, and of course their public key.
When a server and client require a secure encrypted communication, they send a query over the network to the other party, who sends back a copy of their certificate. The other party's public key can simply be extracted from the certificate. However, certificates can do more than this. Here we come back to authentication, because a certificate can also be used to uniquely identify the holder.
Certificate Authorities
Recognized and trusted organizations, called Certificate Authorities (CAs), issue certificates to individuals and corporations. These certificates contain not only details about the holder and their public key, but also the public key of the CA. Because reputable CAs apply rigorous checks to see that applicants actually are who they claim to be (using tax and business registers, etc.) you are deemed to be able to trust the information in certificates they issue to be accurate. They also make available (through their Web site) their own public key certificate—this is their root certificate. Many browsers come with the popular CA root certificates already installed:
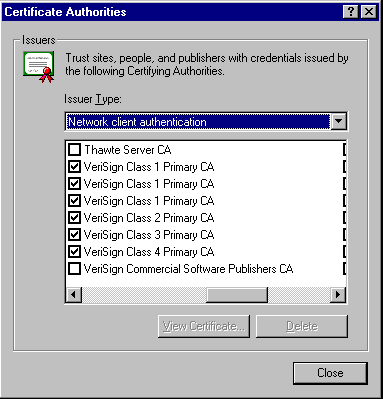
Before issuing a user with their own personal certificate, the CA digitally 'signs' it using their (the CA's) private key. This means that if you can decrypt this signature using the CA's public key, you know that it's a 'real' valid certificate from that CA.
Verifying Certificates
So, one party can provide the other with their certificate, and at the same time send them an extract of it, which is encrypted with that party's private key. This extract is usually called the message digest. The recipient can then check that they are who they claim to be by decrypting the message digest using the public key in the certificate, and seeing if the results agree with the certificate contents. If they do, the sender must know the private key that matches this certificate, and so they must be the legitimate holder of the certificate. All this usually happens behind the scenes automatically, but if you want to work with certificates you need to know the principles.
Of course this all falls apart if the real holder of the certificate has allowed someone else to discover their private key, and it indicates how important it is to keep your own private keys safe. For a detailed explanation of the principles of digital certificates, check out the Tutorials available at http://www.verisign.com/repository/index.html.
Using Digital Certificates
One way of easily adding security to our DNA applications is to use certificates in our communication with clients. This can be done in two main ways.
We'll look at these two techniques next. The process of setting up a digital certificate on your server is quite complex, and is not covered in detail here. For more information check out the Help files for both IIS and Certificate Server that are supplied with the NT4 Option Pack and as part of NT5.
Server certificates and client certificates are fundamentally the same. IIS can use the certificates that are stored in the browser, which is installed on the server. This is one reason why you must install IE4 on your server when you install the Windows NT4 Option Pack.
Authentication And NT Account Mapping
In the Secure Communications dialog (available from the IIS Properties dialog) for a directory or virtual site, you can tell IIS whether to accept certificates for that directory, and whether to actually demand them:
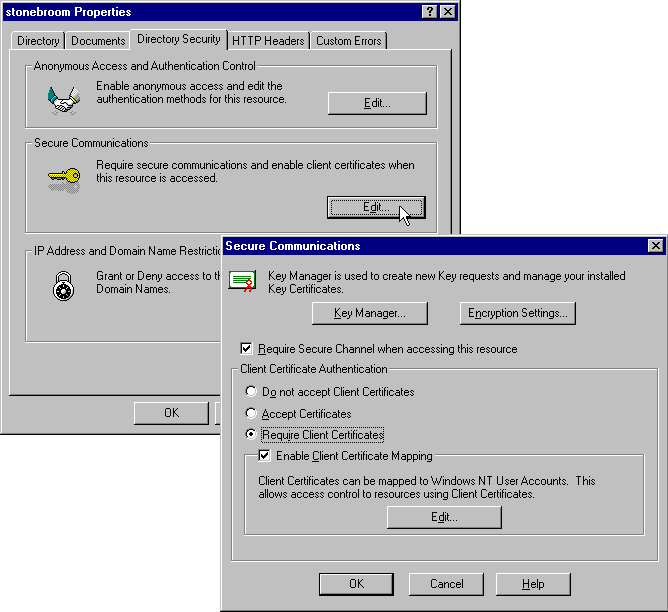
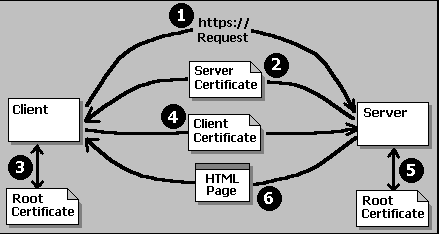
When IIS connects with a client that requires access to this directory, it will send the client its own (server) certificate together with a request for the client's certificate. The client checks the server's certificate against it's copy of the appropriate CA root certificate, then sends confirmation of success back to the server together with a copy of it's client certificate. The server can then verify the client's certificate against its copy of the appropriate CA root certificate, and once happy with the result, start normal communication with the client:
The clever part is that IIS can use the contents of the client's certificate to map that user to an existing NT user account on the server. This can be done as a basic one-to-one mapping, where a separate account is required for each client. In the Secure Communication dialog, turn on Enable Client Certificate Mapping and click Edit. Here, we've linked the certificate for our salesperson to the Windows NT external sales account:
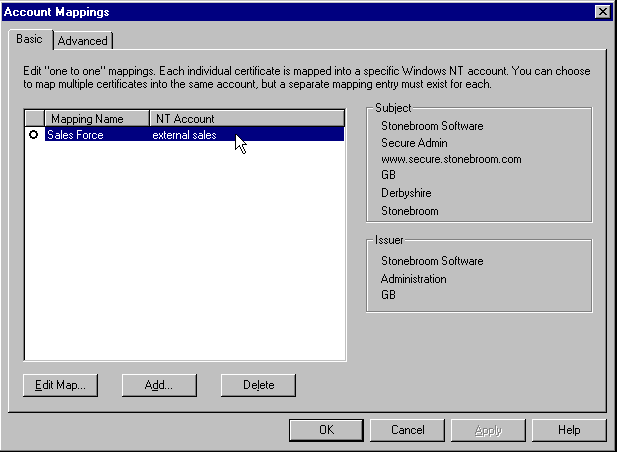
You can also set up a many-to-one mapping using the Advanced page of this dialog. In this case, certain parts of the certificate are matched (rather like wildcards) to a single user account. For example, you could map all users who have Joe's Car Co as the Organization in their certificate to a NT user single account that provides access to data appropriate to all employees of that company.
Secure Communication With SSL Or PCT
The above discussion has only used certificates to identify the client and server to each other. As well as this, we can use the information in the certificate to implement secure encrypted communication. The common standard for this is Secure Sockets Layer (SSL), but IIS also supports the upcoming Private Communication Technology (PCT) standard as well.
By setting the Require Secure Channel option in the Secure Communications dialog that we saw in the previous section, we instruct IIS to set up encrypted communication with the browser. This requires that the browser connect to an address that uses the https:// rather than http:// protocol in the URL. The connection is made, and the server and client exchange certificates, in the same way as we saw earlier.
However now there is one extra step. One party (usually the client) creates a new and unique session key, and encrypts it using the other party's public key—obtained, of course, from their certificate. The other party can decrypt it using their private key, and from that point on this 'secret' key is used to encrypt all communication between the client and server. This is symmetric encryption, which is much faster than asymmetric (public key) encryption. At the same time the browser will display a 'lock' symbol, and sometimes a message, to show that a secure connection is established.
The secret session key is only used for the current secure connection, and is destroyed when the browser shuts down or when it leaves the secure site. A new one is created for each connection, so although symmetric encryption is easier for an intruder to crack, the keys will be constantly changing.
SSL and PCT are useful in many situations—for example they are used by MSMQ to pass encrypted messages between servers. They also allow secure authentication for browsers that don’t support the Challenge/Response method. Once the secure connection is established, you can use Basic authentication to collect username/password combinations from the user as they access different resources without risk.
Using Digital Certificates With ASP
While certificates provide a way to automatically map visitors to a specific Windows NT user account, they can be used in a more flexible way with ASP. The ASP
object provides a collection called Request
, which is normally empty when users access your site anonymously. However, when they present a client certificate along with their request for a resource, the values it contains are placed into the ClientCertificate
collection.ClientCertificate
The following example simply lists all the members of the
collection in the browser, by looping through it with a Request.ClientCertificate
construct:For Each .. Next
<HTML>
<HEAD><TITLE>Reading a Client Certificate</TITLE></HEAD>
<BODY>
<B>The contents of your Client Certificate are:</B><P>
<TABLE CELLPADDING=0 CELLSPACING=0>
<%
For Each keyItem In Request.ClientCertificate()
strValue = Request.ClientCertificate(keyItem)
If Len(strValue) > 90 Then strValue = Left(strValue, 60) & ".. etc."
Response.Write "<TR><TD>" & keyItem & " = " & strValue & "</TD></TR>"
Next
%>
</TABLE>
</BODY>
</HTML>The result when accessing a secure site of a local software provider looks like this:
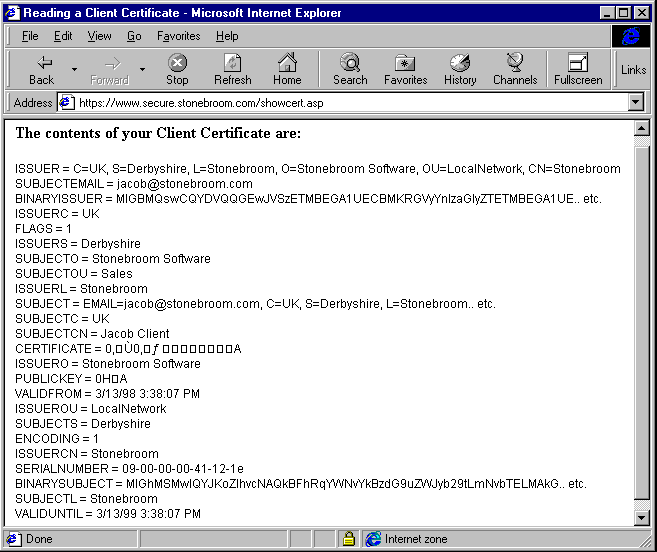
You can see that the issuer of this certificate was not a publicly-renown CA like Verisign or Thawte Consulting, but in fact our own company—this is a self-issued certificate. The values shown are those of the client's certificate (the one they presented to our server with the request for this page) and you can see that the ISSUER and SUBJECT (client) values are basically the same. You'll see more of how this is done when we look at Windows Certificate Server next.
So if we can retrieve the details of the client's certificate, we can use them to change the way our application behaves. For example, we can redirect all visitors from an organization called Joe's Car Company to a specific area of our Web site using:
<%
strOrg = Request.ClientCertificate(SUBJECTO) 'organization
If strOrg = "Joe's Car Company" Then
Response.Redirect "/JoesCars/Default.htm"
End If
%>More mundane uses are to welcome you visitors by name:
<%
strName = Request.ClientCertificate(SUBJECTCN) 'common name
strLocat = Request.ClientCertificate(SUBJECTL) 'location
%>
...
<H2>Hello <% = strName %><H2>
We hope the weather in <% = strLocat %> is better than it is here!And of course you might like to keep a record of your visitors' email addresses for future communication. All the information in their certificate is available, though remember that it will only be presented if you set up your server to Require A Client Certificate—as we have done in our earlier example. If you select Accept Certificates, the browser will not send one even if it has a suitable one available.
Windows NT Certificate Server
In an earlier example, you saw a site set up to provide authentication and encryption by using digital certificates. Normally, to obtain a certificate, you would visit a CA's Web site and fill in the details required. However, now you can issue your own digital certificates using the new Certificate Server service that is supplied with the Windows NT4 Server (not Workstation) Option Pack, and as an integral part of Windows NT5.
At the time of writing, Certificate Server suffered a couple of limitations—particularly the inability to create a certificate hierarchy based on a CA's root certificate. However you can use it to create your own root certificate, and use Certificate Server to automatically generate and distribute client certificates to your visitors. The problem is that because your certificates are rooted outside a widely-renowned CA, visitors will get a warning in their browser that the certificate is not from a known issuer.
Whether this really is a problem depends on what you are using the certificates for. They will still provide secure communication across the network using encryption, so they are useful for Intranet and Extranet applications even if you decide against using them on the Web as a whole.
If you are planning to set up your own CA using Certificate Server, remember that it's the CA itself that people have to trust and respect, not just the certificates. If the CA is unknown or cannot be trusted, the certificates it issues are worthless for the purpose of reliably identifying users.
Installing Root Certificates
When you install Certificate Server, it prompts for the details of your company and automatically generates your enterprise's root certificate From that, you can create client and server certificates by applying for them via a special Web page that is supplied with Certificate Server. You can also use the Certificate Server Web pages to install your root certificate on other machines (which you'll need to do if they are to be able to verify your client and server certificates), and to monitor requests for certificates from users. The main menu page is in the folder where you installed Certificate Server:
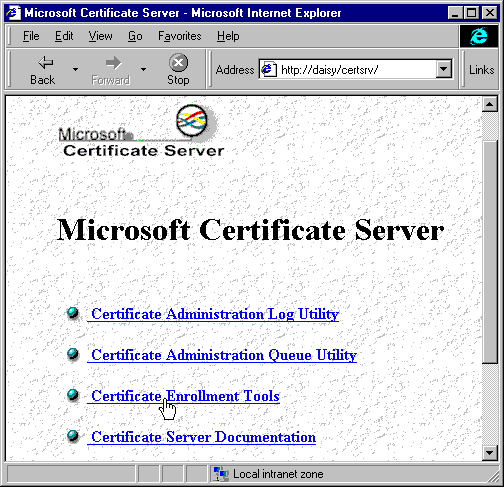
As an example, here the browser is fetching the root certificate for the DAISY enterprise from our server using the special Web page supplied with Certificate Server:
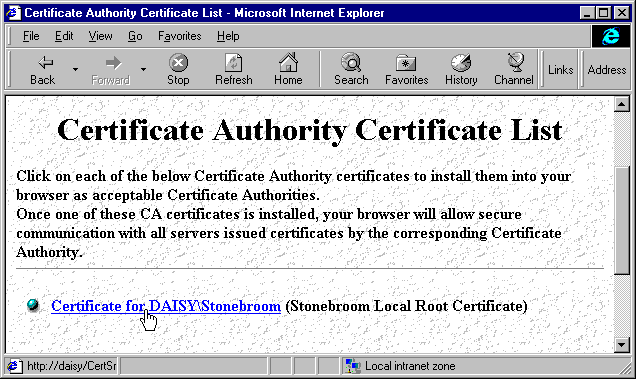
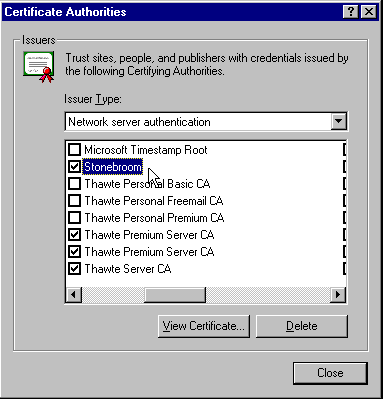
Once installed, it appears in the list of certificate authorities in the browser's Internet Options | Content | Authorities dialog:
Delivering Client Certificates
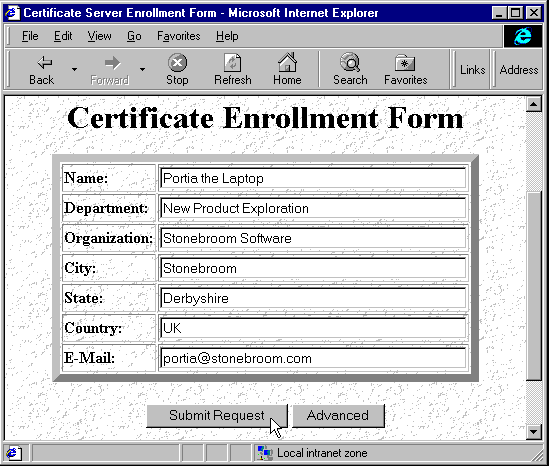
The next step is for the user to apply for a client certificate. This is done from another of the standard Certificate Server pages, where clients fill in the details about themselves that will appear in the certificate:
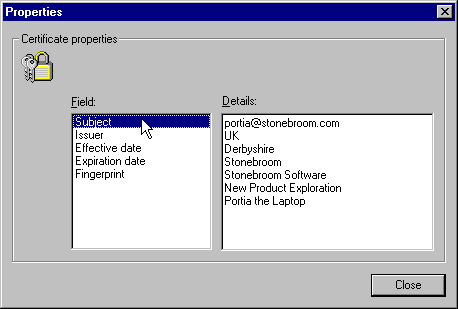
The certificate request is then submitted to Certificate Server. By default, it will just issue a valid certificate by return, and this is automatically installed in the browser. Afterwards, the user can view the installed client (or Personal) certificates from the Internet Options | Content | Personal dialog:
Of course, we can personalized the Certificate Server Web pages to suit our own enterprise, and even create new ones using the same URLs as targets for the links in our new pages.
Installing Server Certificates
Server certificates are really just the same as client certificates, but are installed on the server so that IIS can use them instead of the browser. To get IIS to recognize the root certificates that are supplied with IE4, you run the
program that comes with Certificate Server (and is placed in your iisca.exe
directory) in an NT Command window.\winnt\system32
Using Windows NT Key Manager
To request and install a server certificate in IIS, you use the Key Manager utility. From the Directory Security page any directory's Properties dialog open the Secure Communications dialog (the one we used to require a client certificate earlier) and click Key Manager. Here we can create a new key, which can be processed by Certificate Server to produce a server certificate. This starts a Wizard that collects all the information required:
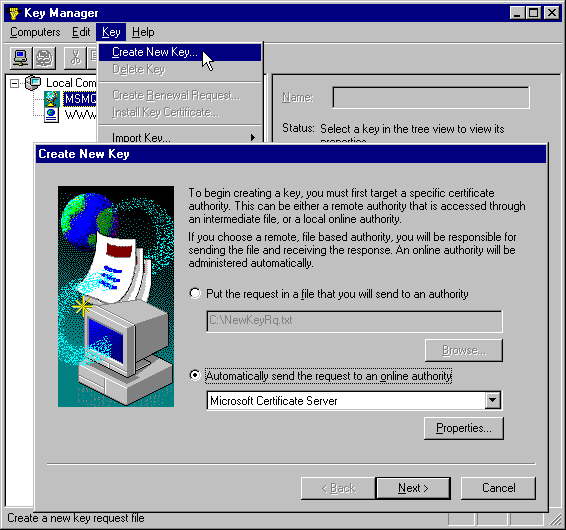
The Wizard can also be used to create key requests for submission to an independent CA for verification.
Once your new certificate is returned from a CA it is installed using the Install Key Certificate option in Key Manager. If you're using Certificate Server it will return and begin installing your new key certificate automatically. Part of the installation process is to bind the certificate to the appropriate Web site. If you host multiple Web sites on your server, a server certificate can be bound to one or more of these. Alternatively it can be used with all 'unassigned' requests.
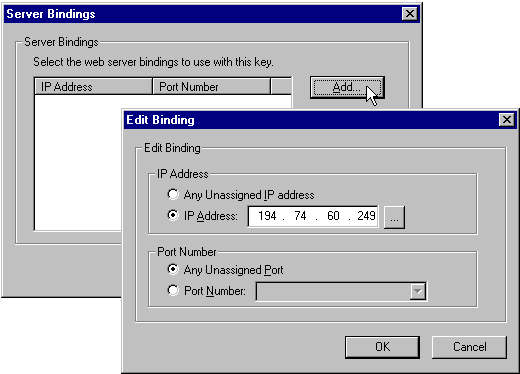
However, when you implement a separate section of your server as a secure area, it's often useful to create it as a separate virtual site and assign a different IP address to it. The Server Bindings dialog appears as you install your certificate, and here we're assigning it to a virtual site:
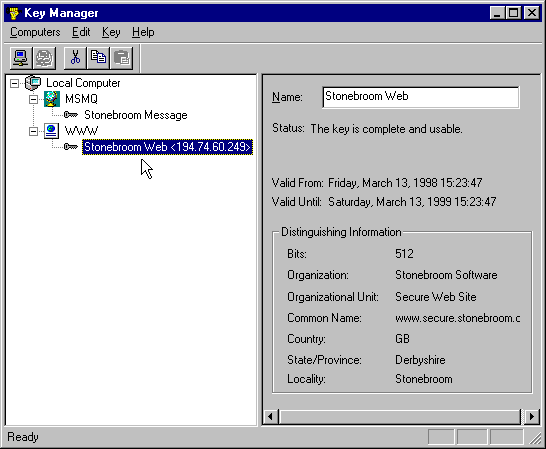
Once complete the certificate and binding appear in Key Manager. Notice the certificate for Microsoft Message Queue Server (MSMQ) that is already there. This is created and installed as part of the MSMQ setup, and is used for encrypting messages as they are passed between and stored in message queues:
This is another reason why you need to know a little about certificates, and we’ll come back to it when we look at MSMQ Security issues later on.
Certificate Issuing Policies
For the certificates you issue to be of any value, you'll want to confirm the details about users who request certificates before you issue them. By default—as you've just seen—Certificate Server will accept the request and issue a certificate immediately. This is useful while you set up and test the system, then when you are ready you can configure Certificate Server to do more detailed checking of requests.
Detailed control of certificate issuing can be achieved by creating custom policy modules as COM components in VB or C++, and installing them into Certificate Server. For more information see the Writing Custom Policy Modules section of the Certificate Server Help pages