With all our data available, we can now create a list of cars models. This is the page
that we loaded at the end of the frameset page's carmodels.htm
event. As all the data is cached on the client in our arrays, we need to use client-side script code to build the page dynamically. window_onload()
Building Pages Dynamically
The main part of the model list page is a table containing the name and description of each car, and a small image. To make it look attractive we alternated the image alignment between left and right. This means that we can't just loop through the array using the same code for each model, we have to do two in each pass. Here's the complete script section that creates the table—the second row is just a mirror of the first:
<TABLE ID="tblModels" STYLE="border-style:none" CELLPADDING=10>
<SCRIPT LANGUAGE="VBScript">
'build the table of car models
BS = Chr(47) 'slash character '/'
QUOT= Chr(34) 'double quote
intNumCars = UBound(top.arrCars, 2)
intThisCar = 0
Do While intThisCar <= intNumCars
'table row with picture on left
Document.Write "<TR><TD ALIGN=RIGHT STYLE=" & QUOT & "cursor:hand" _
& QUOT & "><IMG ID=" & QUOT & "Img" & top.arrCars(0, intThisCar) _
& QUOT & " SRC=" & QUOT & "images/150" & top.arrCars(6, intThisCar) _
& QUOT & " BORDER=0 HSPACE=15><P><" & BS & "TD>"
Document.Write "<TD ALIGN=LEFT><SPAN ID=" & QUOT & "Car" _
& top.arrCars(0, intThisCar) & QUOT & " CLASS=" & QUOT
If top.arrCars(0, intThisCar) = top.selectedModel Then
Document.Write "SELNAME" 'selected model
Else
Document.Write "MODNAME" 'not selected model
End If
Document.Write QUOT & ">The Wrox " & top.arrCars(1, intThisCar) _
& "<" & BS & "SPAN><BR>" & top.arrCars(7, intThisCar) _
& "<P><" & BS & "TD><" & BS & "TR>"
'move to the next car (if there is one)
intThisCar = intThisCar + 1
If intThisCar <= intNumCars Then
'table row with picture on right
'{repeat of code above but with image and text swapped over}
End If
intThisCar = intThisCar + 1
Loop
</SCRIPT>
</TABLE>
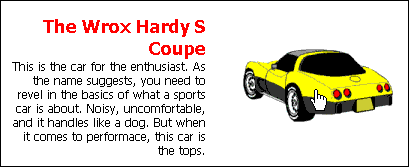
The result for one row of the table is shown here. A couple of things to notice are that there are no
tags in the code, because we're going to detect mouse clicks with script code, and that we use a different style for the car name if it's the currently selected one (i.e. its <A>
is the same as the value stored in the global variable CarID
).top.selectedModel

You'll also see we use a string variable
to write the slash character 'BS
' into the page. HTML 4.0 says that when using client-side script to write HTML code into a page, any combination of '/
' followed by a letter should be treated as the end of a script section. This would mean that the browser would stop writing the HTML at that point, and you'd get a syntax error caused by the 'real' </
tag. IE4 doesn’t actually do this, but we're sticking to the rules here.</SCRIPT>
The Problem With Document.Write
Using client-side script to create the page's HTML code dynamically can be a real pain. It's easy to omit a closing '
' or double-quote and get a page that looks nothing like you expected. Unlike a page created with ASP, you can’t 'view the source' and see what your code actually produced—all you see is the client-side script code.>
To make life easier, we developed a very simple tool that allows you to see the actual HTML that is created in IE4 or better. It uses the fact that we can read the
property of an element to get a string containing the 'virtual' HTML that the browser uses to create the page. If we write this string back to the innerHTML
(rather than innerText
) property of another element, it isn’t parsed by the browser but just displayed as text.innerHTML
What we do is place a temporary
(document division) section around the entire contents of the <DIV>
of the page, positioning it so that it doesn't change the layout of the existing elements:<BODY>
</HEAD>
<DIV ID="ToBeRead" STYLE="position:absolute; left:0; top:0>
<BODY STYLE="background-color:white; text-align:center">
...
... page content here including <SCRIPT> sections with Document.Write
...
</BODY>
</DIV>
</HTML>
Then, in the script code in the page, we add a
event (or add the code to an existing event) to open our special page window_onload
page in a new browser window, and place the content of the page into it:read_doc.htm
Sub window_onload()
Set objNewWin = window.open("read_doc.htm")
objNewWin.document.all("Output").innerText _
= document.all("ToBeRead").innerHTML
End Sub
The
page contains a heading and some instruction on use. However the main part is the read_doc.htm
named <DIV>
into which we are placing the page content:Output
<DIV ID="Output">
... default text and insrtructions here
</DIV>You can run this page from our Web site at http://rapid.wrox.co.uk/books/1460/
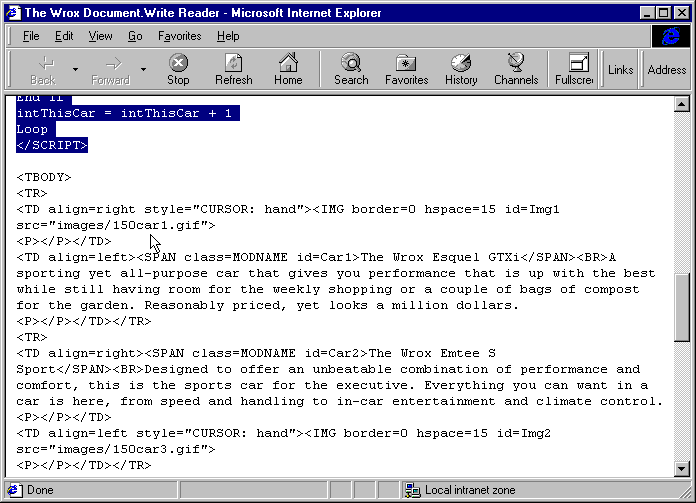
Here's the result from the first two rows of the car models page table. The last few lines of the script code we saw earlier, which creates the table, are highlighted. The remainder is the HTML that is created dynamically by that script code:

It's interesting to note how the browser has changed the code we wrote to the page. (IE4 does this with all pages, including plain HTML ones, as it converts them from the text HTML source into the 'virtual' page it displays). For example, it sorts the attributes for each element into alphabetical order, and changes their case—all the style property names come out in capital letters, for example.
Caching Images
The car models list displays small images, named
, 150car1.gif
, etc. However the details page uses a larger image, named 150car2.gif
, 300car1.gif
, etc instead. When the user selects a model we want to display the details as quickly as possible, and we can do this by downloading and caching the larger images while they are viewing the model list. At the end of model list page we create a set of hidden image tags:300car2.gif
...
<SCRIPT LANGUAGE="VBScript">
'preload the main car pictures for use later
For intLoop = 0 To intNumCars
Document.Write "<IMG WIDTH=1 HEIGHT=1 SRC=" & QUOT & "images/300" _
& top.arrCars(6, intLoop) & QUOT _
& " STYLE=" & QUOT & "visibility:hidden" & QUOT & ">"
Next
</SCRIPT>
</BODY>
</HTML>The resulting virtual HTML code looks like this—again IE4 has changed the case and ordering of some of the attributes:
<IMG height=1 src="images/300car1.gif" style="VISIBILITY: hidden" width=1>
<IMG height=1 src="images/300car3.gif" style="VISIBILITY: hidden" width=1>
<IMG height=1 src="images/300car4.gif" style="VISIBILITY: hidden" width=1>
<IMG height=1 src="images/300car2.gif" style="VISIBILITY: hidden" width=1>
<IMG height=1 src="images/300van1.gif" style="VISIBILITY: hidden" width=1> Indicating The Selected Model
The final task in the main page is to allow the user to select a car model, and indicate to them which model is currently selected. The small car images and the car model names are not actually hyperlinks, although we used the
attribute to make them appear as if they are. So we need to detect a mouse-click on them another way. The standard IE4 Dynamic HTML technique is shown in the code below:STYLE="cursor:hand"

Sub document_onclick()
Set objSource = window.event.srcElement
If Left(objSource.id, 3) = "Car" Or Left(objSource.id, 3) = "Img" Then
'a car image or name was clicked, get the CarID key
intCarID = CInt(Mid(objSource.id, 4))
'change the style of the car names as appropriate
document.all("Car" & intCarID).className = "SELNAME"
If top.selectedModel > 0 And top.selectedModel <> intCarID Then
document.all("Car" & top.selectedModel).className = "MODNAME"
End If
'store the selection in the frameset page variables
top.selectedModel = intCarID
top.selectedColor = 0
'update the 'salespersons comment' window
strMessage = document.all("Car" & intCarID).innerText_
& ", an excellent choice."
top.frames("menu").document.all("divMessage").innerText = strmessage
End If
window.event.cancelBubble = true
window.event.returnValue = false
End Sub
We can get the
from the CarID
attribute of the image or car name, because we put it there ourselves when we created the page. Then we only have to swap the text style of the previously selected item (if there was one and it's not the same as the current one) and the currently selected one. This makes the currently selected model name appear in red rather than gray—the style definitions are in the ID
of the page and aren't shown in the code here.<HEAD>
The final task is to update the salesperson's comments that appear in the top left section of the page, above the navigation buttons. We do this by writing to the
property of a innerText
on that page. We'll look at this page in detail later on.<DIV>