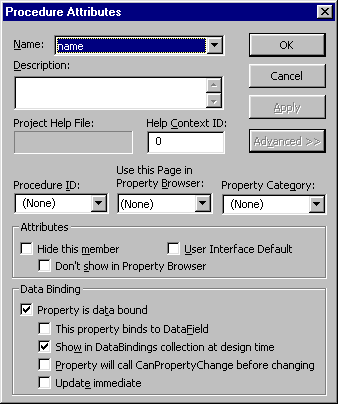
All right, now that all of the properties have been added, we now need to do something special. Because our control will be data aware - remember it will be taking data from an ADO data control - we must set up the text boxes to be able to talk to the recordset so that its values can be displayed. We want to bind the text boxes to the data fields in the recordset. It's very simple to do this, but it is a critical step.
1. From the main VB menu, click on Tools-Procedure Attributes… The names of the three properties we added will be in the Name drop-down box. Click on name and then click the Advanced>> button to expose the rest of the dialog box. For the name, check the Property is data bound in the Data Binding frame. Then check Show in DataBindings collection at design time.

As you can see, VB 6.0 allows us to mark properties of our ActiveX control as bindable. This lets us to create data-aware controls. We can associate bindable properties with fields in any data source, making it easier to use our control in database applications.
2. Click Apply to make the changes. Now do the same thing for the other two properties, the
and id
. When you are finished, click on OK to save the changes and dismiss the box.company
Now we are ready to make our control.
3. From the main VB menu, click File-Make and name the control
. The default will be pubCtl
reflecting the name of our project. So the name controlPrj.ocx
is a bit more descriptive of what our control is doing. Now press OK. This step does a couple of things for us. It will create the pubCtl
file and also register it in the registry. Now Windows will know how to find our control when we need it:.OCX
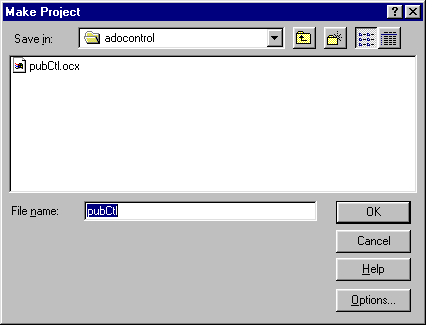
When you press OK you will hear some disk activity. When it stops, the control is ready to use. As in the previous project, an
file is created and can be included in any project. Like any ActiveX control, it does not do us much good until there is a host to use the control. So we want to add another project to the existing one. Adding a new project to the existing one will automatically create a project group for us. .OCX
4. From the main menu, select File-Add Project. Select a Standard EXE project. This will host our newly minted control. We will select the
project as our startup and it will host our control. This way we can easily go between projects until our control is working the way we want it to. ctlHost
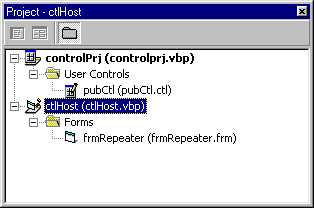
5. Rename the new project and form as shown to
and ctlHost.vbp
. Bring up the frmRepeater.frm
form. You will actually see your new control in the tool palette. Neat, eh? frmRepeater
6. OK, we want to add the data repeater control to our project. This new project,
, will be responsible for hosting our new ActiveX control. Right-click on the tool palette and bring up the Components dialog box and select both the Microsoft DataRepeater Control 6.0 and the Microsoft ADO Data Control 6.0:ctlHost
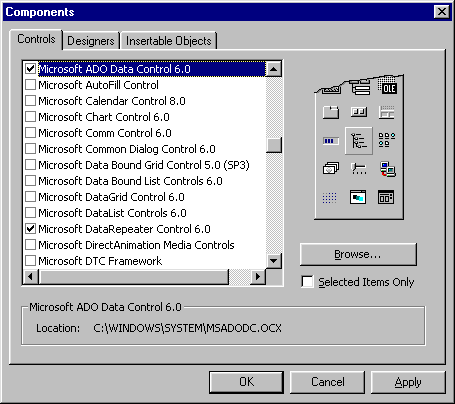
Press OK.
The data repeater control icon looks like this: 
7. OK, now both the data repeater control and the ADO data control have been added to your tool palette. Once the controls are on your palette, draw each of the controls on your form as shown in the next screenshot.
Since we have a project group, we cannot work on the control while the host is open. So if you need to go back and tweak the control, be sure to close the host form.
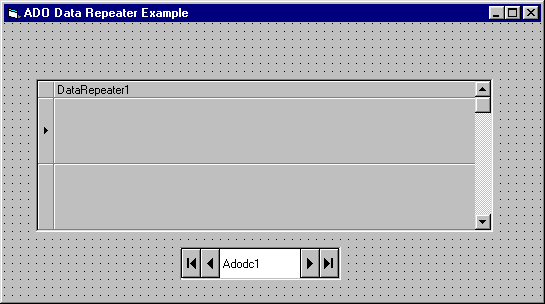
8. The first thing we want to do is wire up our ADO data control to the
database. We went over how to create the connection string in the last chapter under the heading Review of steps to set up the ADODC ConnectionString. So just repeat those steps and connect the ADO data control to the Biblio.mdb
database and select the Biblio.mdb
table. Publishers
9. Next, set the
property of the ADO data control to Visible
. We will use it to link to the database, but we will navigate the recordset using the data repeater control. So the ADO data control is important to our project, but it does not need to be seen by our users.False
Now we need to tell the data repeater which data control it will be using. Right-click on the control and set the DataSource property to Adodc1.
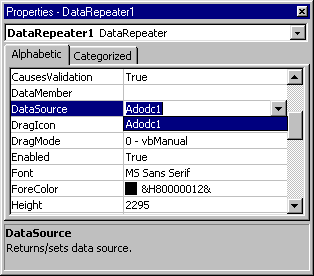
Now we have linked the control to the database. Notice how this is exactly the same as the standard data control set up.
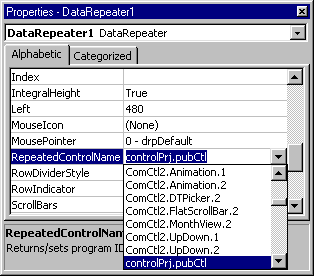
10. Next, we need to tell the data repeater which control it will be repeating. Of course, it will be the new control we just created. So click the drop-down button for the RepeatedControlName property and you will see all of the registered controls on your machine. Since our control (controlPrj.pubCtl) was automatically registered when we made the
, it will be in the list. There will probably be a ton of controls that will be displayed. So you can see why it is important to provide our control with a descriptive name so we can easily find it..OCX
By the way, ensure that the
property is set to IntegralHeight
. This handy property tells the control only to show another record if another entire version of the control can be shown. This ensures that we won't be seeing only half of our control in the data repeater:True
11. The last thing we need to do is bind our user control properties to the ADO data control. Once our control is contained by the data repeater, we want to bind the control's properties to the record source which is, of course,
. So this time we want to look at the custom property box for the data repeater. Right-click on the data repeater control and select Properties.Publishers
12. Click on the RepeaterBindings tab. The PropertyName drop-down box will contain the three properties we added to our control. Remember when we told our control to display the properties in the bound properties collection? Well, here they are. For the PropertyName company, select Company Name in the DataField drop-down box. This will map our
property to the company
field in the database. Click Add to add the grouping.Company Name
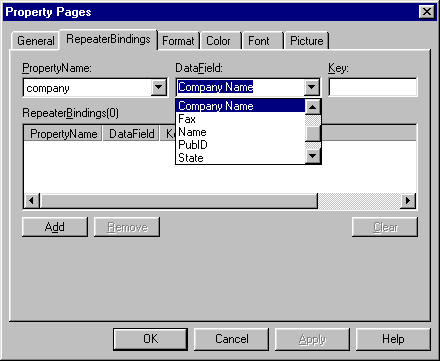
13. Now map the
property to the id
data field and the PubID
property to the name
data field. Be sure to add each one. When the three properties are mapped, press OK. That's it! Name
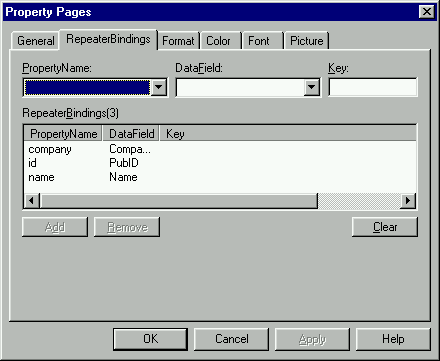
When each of the property names have been bound to the data field, your property page should look like the screen shot above.
14. Since we have two projects in a single project group, we must tell VB which project to use for startup. Right-click the
in the Project Explorer and click Set as Start Up. Now click on controlPrj and select Properties, select (None) from the drop-down box under Startup Object.ctlHost.prj
15. Save your project group and press F5 to run your new data control. Use the scroll bar to navigate the recordset. While you are scrolling, consider that the data repeater is actually displaying two instances of your control simultaneously and each instance is holding a record from the
table. Now that is amazing for 10 minutes work! OK, maybe 15 minutes tops.Publishers
This next screenshot shows the data repeater in action:
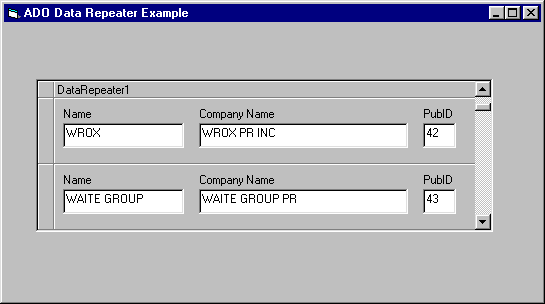
Go ahead and scroll through the recordset with the vertical scroll bar provided by the data repeater, and consider what you have just done. You created a brand new
ActiveX control, learned about the project group feature, data bindings, not to mention how to use the data repeater control. That's not bad; and all using ActiveX Data Objects..OCX
I'm sure that you can think of all sorts of uses for the data repeater control. We built a pretty straightforward control. You could easily build a control that displays images in a database, or tracks your personal finances. The uses of this new control are really only limited by your imagination.