Our project will take the data from the
file that comes with VB 6.0. We will display the various Categories, and the Products within the categories to analyze. Our program will use a combination of SQL and add a dash of the ID3 algorithm to find any hidden meaning in the data. The product manager can click on a category of product. Then, only the products for that category will be displayed in the Products list box. Then the user clicks the Analyze button and the ID3 program attempts to find any possible hidden relationships in the data. I think you will like this one. Nwind.mdb
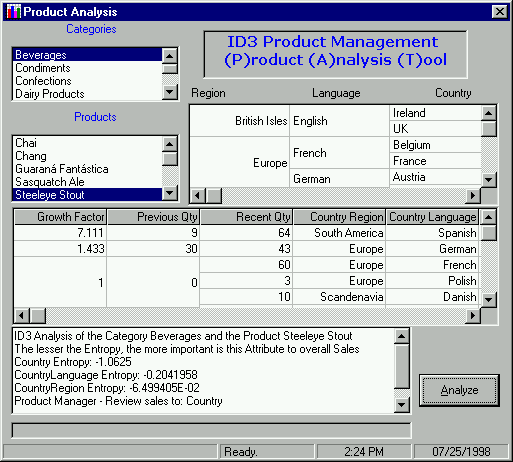
However, before we start to work, let's look at the finished product so you can get an idea of where we are going:
What does this all mean? Well, the product manager can select a category from the list box. When a category is selected, all of the relevant products are placed in the Products list box. When the Analyze button is clicked, our program goes to work. It takes a look at the selected data as well as some handy extra data we placed in the database. So instead of a garden-variety, one-line SQL statement that might retrieve the top 10% of revenue generating products, our program will do much more. It will determine how important each country is to a specific product, and it also looks at regions of the world. It could be that growth is experienced in the Mediterranean countries in general. Or, possibly, Spanish speaking countries are scooping up our product. This might mean that in Spain and Venezuela - two opposite parts of the world, our new pasta is really taking off. These are things that probably wouldn't be easily found by the product manager on their own. For our program though, it's a snap! So our program will look for that hidden data we were talking about earlier.
The program considers the various countries, country regions, and languages as part of its analysis. It then generates a number, called entropy, which indicates the relative importance of each of these categories to our sales growth. Like a golf score, a lower number here is better than a higher one. The user simply clicks on another product and the analysis can be run again.
Once we get our program in shape, in the next chapter we will create an export feature that will permit the product manager to send the data to a spreadsheet, the corporate Intranet, or any package that accepts a comma delimited file (such as Access, Excel or just about any analysis package).
The first step in this project is - as ever - to build our prototypical user interface.
1. Start a new project. Name the project
. Rename the default form for the project \Chapter14\ID3.vbp
.frmID3
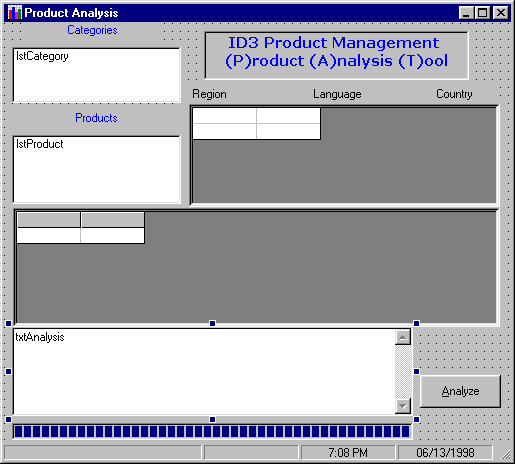
2. For the user interface, we need to add two list boxes to display the Categories and Products. Then, we add two MSFlexGrid controls. One will display the various regions, languages and countries, and the other will display the results of our ID3 algorithm's results. Another text box will provide the product manager with English-like text on how to best proceed with the results. And of course, our status bar will keep the userinformed as the program is working. For good visual measure, we add a progress bar. We can update this as our program is crunching those numbers to ensure the product manager that all is well. Create your visual interface now using the following screenshot and the table that follows for guidance:
| Control | Property | Value |
| List Box | |
|
| List Box | |
|
| MSFlexGrid | |
|
|
|
|
|
|
|
| MSFlexGrid | |
|
|
|
|
|
|
|
| Command Button | |
|
| Status Bar | |
|
|
|
|
|
|
|
|
|
|
|
|
|
|
|
|
|
|
|
|
|
|
|
|
|
| Label | |
|
|
|
|
| Label | |
|
|
|
|
| Label | |
|
|
|
|
| Label | |
|
|
|
|
| Progress Bar | |
|
| Text Box | |
|
|
|
|
|
|
|
|
|
One of the things that we do with data mining is to re-aggregate much of the information we spent a lot of time breaking down into various tables. Recall how we took pains to break our data into small tables during the normalization process earlier in the book? Well, now we find ourselves in the position of taking data from several tables and lumping it together (i.e. re-aggregating) so our program can look at a lot of data at one time.
3. Rather than change any data in existing tables, add another table to your copy of the
database and call it Nwind.mdb
. We will be aggregating much of the information extracted from various tables and placing the results here. We will be discussing how each of the fields will be used, but please add this table now. ID3
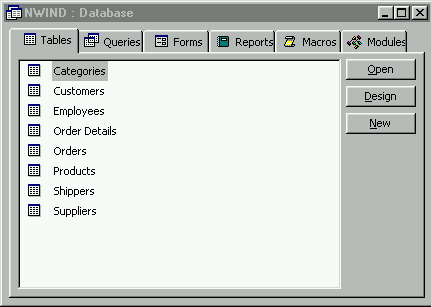
If you have Microsoft Access, please just open the
. Notice that there are several normalized tables that are included. Each of the tables contains data on the fictitious Northwind company: [Drive letter]\BegDB\Nwind.mdb
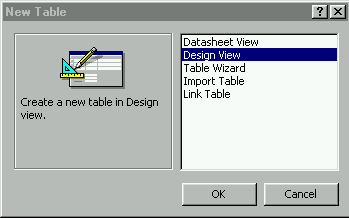
4. Click on the New button that is to the right-hand side of the tabbed form. We want to add a new table to the
database. The New Table dialog box is presented. Select the Design View and click OK. This will bring up the view that permits us to add our fields to the new table.Nwind.mdb
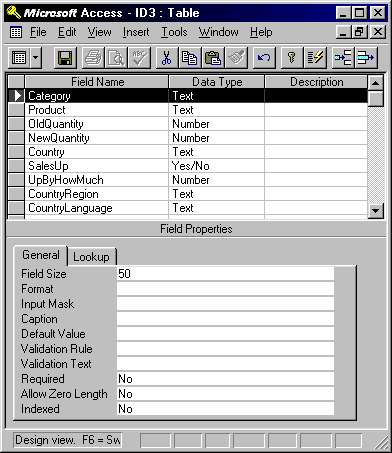
Add the fields and data types as shown below. As you can see, what we will be doing is aggregating data and entering the results in the ID3 table. This way we don't have to modify any of the data in the
tables. We will group information we retrieve from these tables using SQL and aggregate the results in our own ID3 table:Nwind
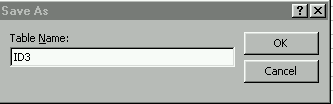
5. When you are finished, select File-Save from the main Access menu. You will be prompted with a Save As dialog box. Give your new table the name ID3 and click OK:
The new table will now be added to the
database.Nwind.mdb
6. If you aren't using Access, create the new table using VisData. We already know how to add a new table using VisData. Open the database and right-click inside the Database Window. From there select New Table. We covered this process earlier in the book, so it should be familiar to you:
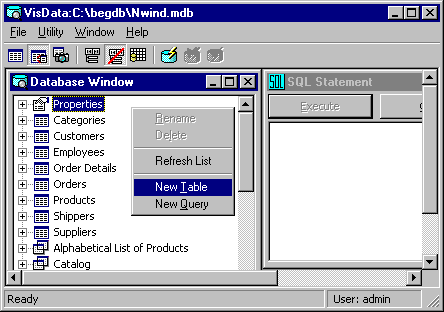
Use this table to lay out the new VisData
table: ID3
| Field | Type | Length |
| Category | Text | 50 |
| Product | Text | 50 |
| OldQuantity | Number | Long Integer |
| NewQuantity | Number | Long Integer |
| Country | Text | 50 |
| SalesUp | Yes/No | |
| UpByHowMuch | Number | Single |
| CountryRegion | Text | 50 |
| CountryLanguage | Text | 50 |
Now that we have a table all to ourselves, we can start to write some code to see if there are any patterns that can be deduced. And from this exercise, you will get some ideas on how to apply this approach to any real world problem that you might need to solve.