The List class includes but a single data element:
Dim liHead As ListItemThe liHead item provides a reference to the first item in the linked list. (If thereís nothing yet in the list, liHead is Nothing.) The List class also includes three public methods: Add, Delete, and DebugList. The Add method adds a new node to the list, in sorted order. The Delete method deletes a given value from the list if itís currently in the list. The DebugList method walks the list from one end to the other, printing the items in the list to the Debug window.
Both the Add and Delete methods count on a private method, Search, which takes as parameters a value to find and the current and previous items (which it fills in as it performs its search). The function returns a Boolean value indicating whether it actually found the requested value. The function, shown in Listing 6.9, follows these steps:
Listing 6.9: Use the Search Function to Find a Specific Element in the List
Function Search(ByVal varItem As Variant, _
ByRef liCurrent As ListItem, ByRef liPrevious As ListItem) _
As Boolean
Dim fFound As Boolean
fFound = False
Set liPrevious = Nothing
Set liCurrent = liHead
Do While Not liCurrent Is Nothing
With liCurrent
If varItem > .Value Then
Set liPrevious = liCurrent
Set liCurrent = .NextItem
Else
Exit Do
End If
End With
Loop
' You canít compare the value in liCurrent to the sought
' value unless liCurrent points to something.
If Not liCurrent Is Nothing Then
fFound = (liCurrent.Value = varItem)
End If
Search = fFound
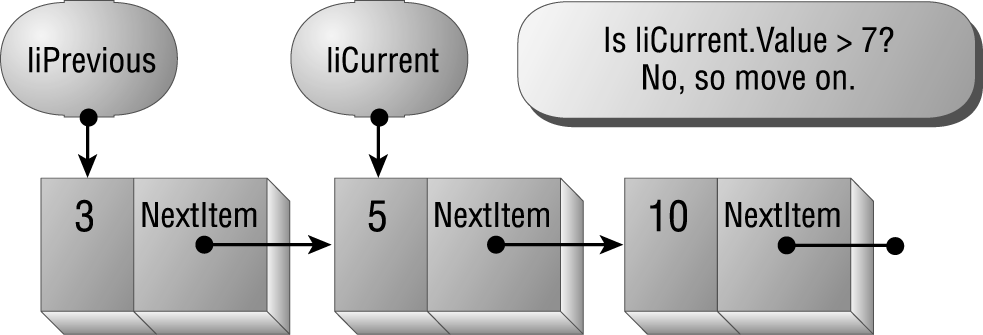
End FunctionTaking the most common case (searching for an item in the middle of an existing list), the diagrams in Figures 6.16, 6.17, 6.18, and 6.19 demonstrate the steps in the logic of the Search method.

Figure 6.16: Check to see if itís time to stop looping, based on the current value and the value to find.
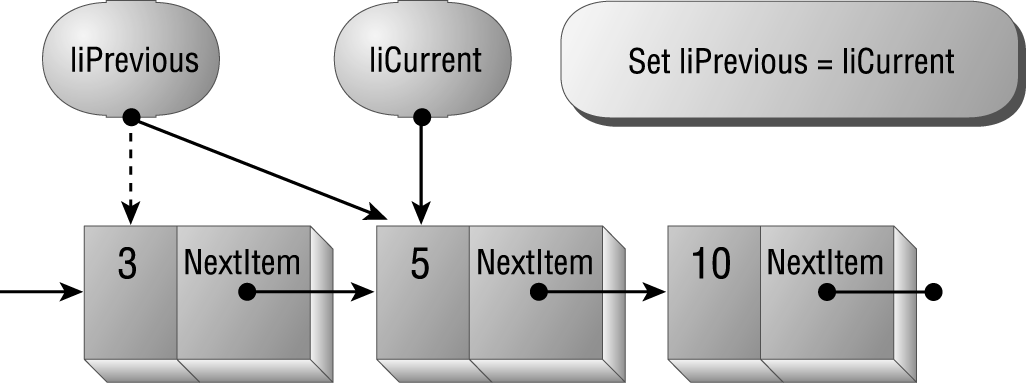
Figure 6.17: Set the previous pointer to point to the current node.
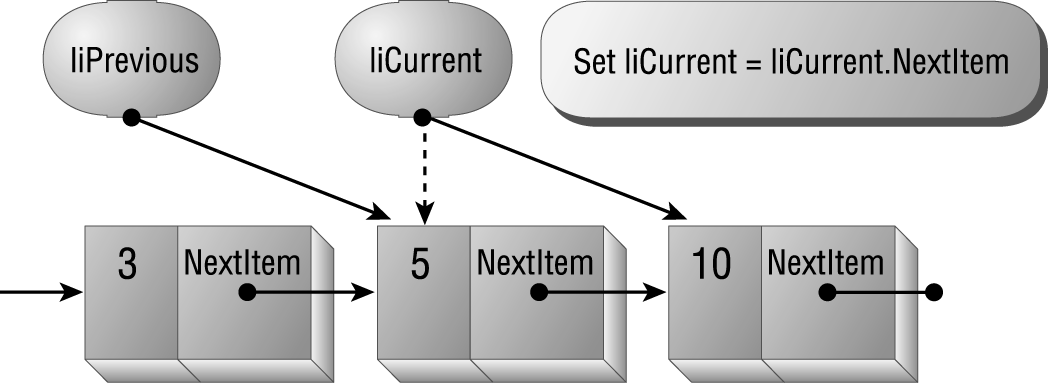
Figure 6.18: Set the current pointer to point tothe next node.
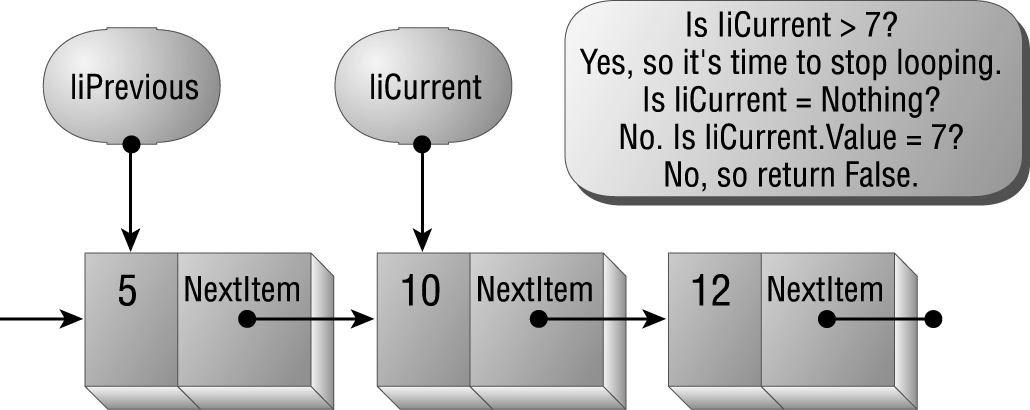
Figure 6.19: Itís time to stop looping. Return True if the item was found.
What happens in the borderline cases?
Once youíve found the right position, using the Search method of the List class, inserting an item is almost trivial. The Add method, shown in Listing 6.10, takes the new value as a parameter, calls the Search method to find the right position in which to insert the new value, and then inserts it. The procedure follows these steps:
Listing 6.10: Use the Add Method to Add a New Item to a List
Public Sub Add(varValue As Variant)
    Dim liNew As New ListItem
    Dim liCurrent As ListItem
    Dim liPrevious As ListItem
    liNew.Value = varValue
    ' Find where to put the new item. This function call
    ' fills in liCurrent and liPrevious.
    Call Search(varValue, liCurrent, liPrevious)
    If Not liPrevious Is Nothing Then
        Set liNew.NextItem = liPrevious.NextItem
        Set liPrevious.NextItem = liNew
    Else
        ' Inserting at the head of the list:
        ' Set the new item to point to what liHead currently
        ' points to (which might just be Nothing). Then
        ' make liHead point to the new item.
        Set liNew.NextItem = liHead
        Set liHead = liNew
    End If
End Sub
Inserting an item at the head of the list is easy. All you need to do is make the new nodeís NextItem pointer refer to the current head of the list and then make the list head pointer refer to the new node. The diagrams in Figures 6.20, 6.21, and 6.22 show how you can insert an item at the head of the list.
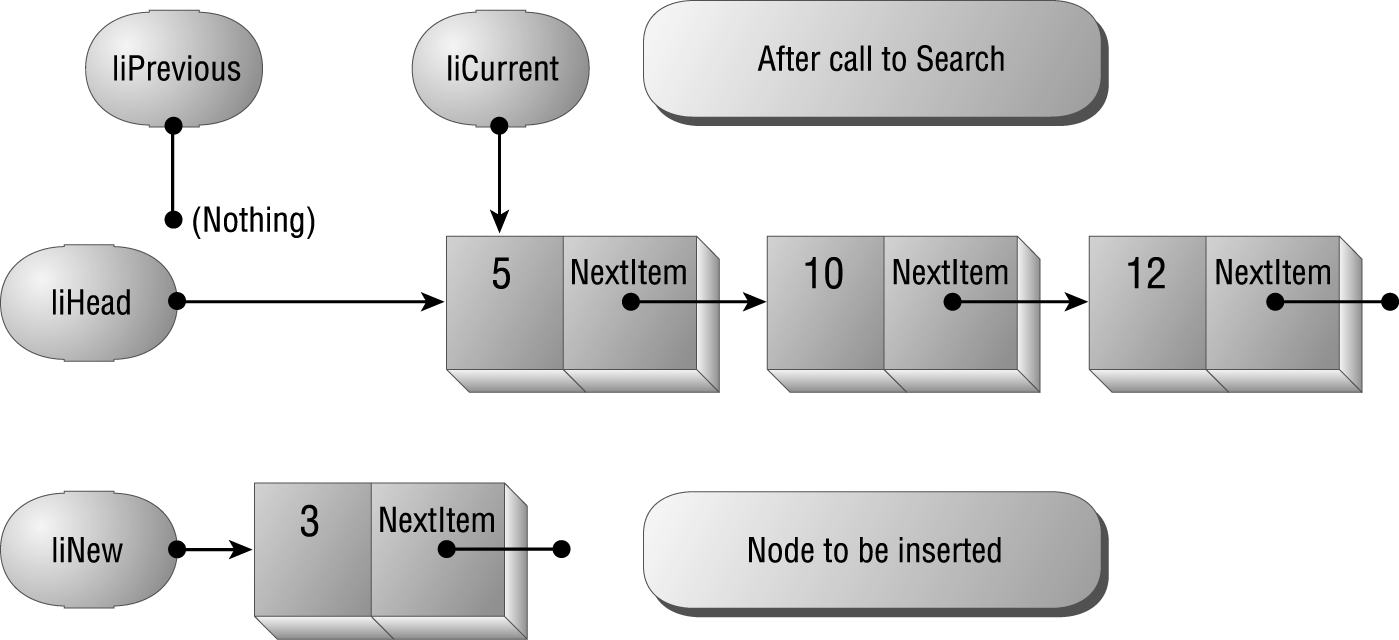
Figure 6.20: After Search is called, liPrevious is Nothing, indicating an insertion at the head of the list.

Figure 6.21: Make the new nodeís NextItem pointer refer to the item currently referred to by liHead.

Figure 6.22: Make the list header point to the new node.
Inserting an item anywhere in the list besides at the head works similarly, but the steps are a bit different. If liPrevious isnít Nothing after the Add method calls Search, you must make the new nodeís NextItem point to what liPrevious currently points at and then make whatever liPrevious is pointing at point at liNew instead. The diagrams in Figures 6.23, 6.24, and 6.25 illustrate an insertion in the middle (or at the end) of the list.
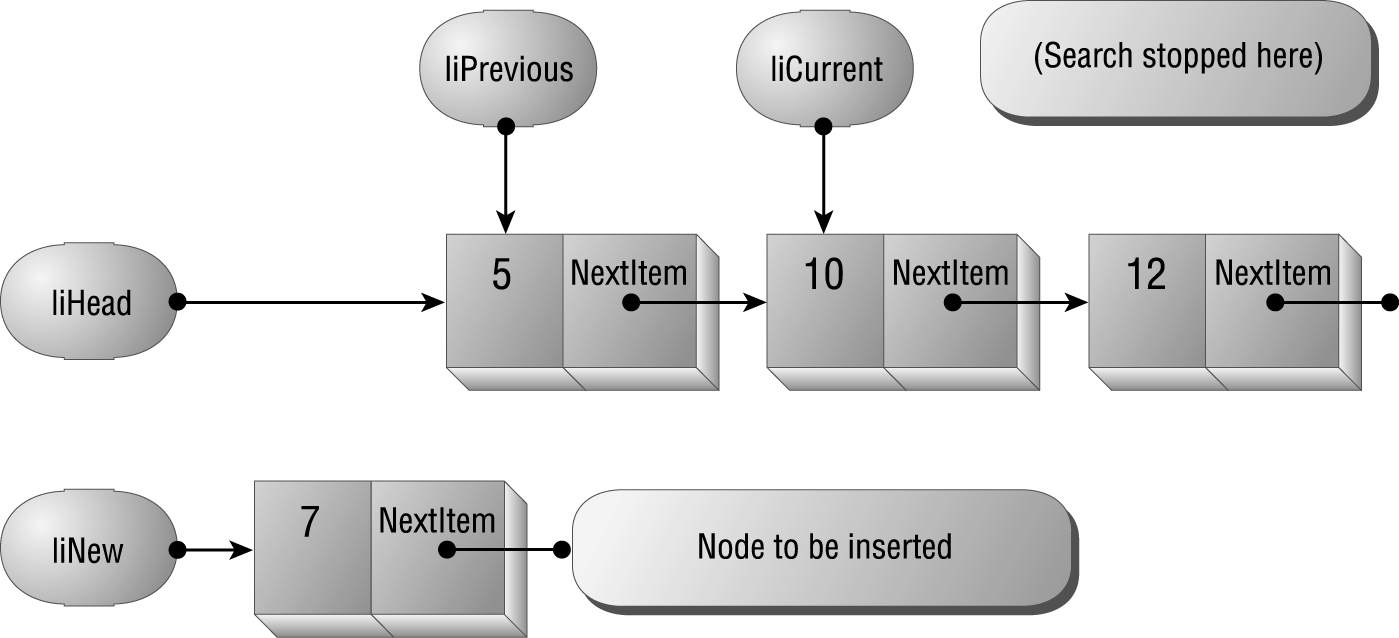
Figure 6.23: After the Add method calls Search, liPrevious isnít Nothing, indicating an insertion after the head of the list
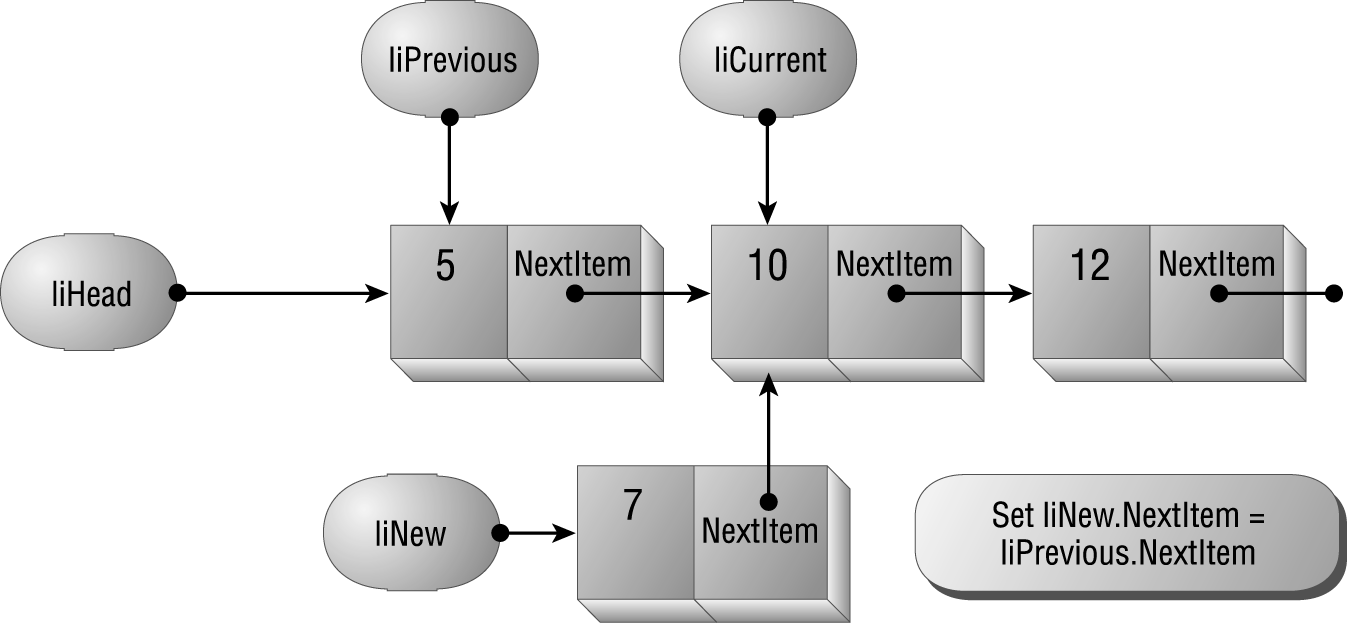
Figure 6.24: Make the new item point to the item after the one liPrevious points to.
Again, just as with adding an item, once youíve found the right position using the Search method of the List class, deleting an item is simple. The Delete method, shown in Listing 6.11, takes the new value as a parameter, calls the Search method to find the item to be deleted, and if itís there, deletes it. The procedure follows these steps:
Figure 6.25: Make the item that liPrevious points to point to the new item, linking it into the list.
Public Function Delete(varItem As Variant) As Boolean
    Dim liCurrent As ListItem
    Dim liPrevious As ListItem
    Dim fFound As Boolean
    ' Find the item. This function call
    ' fills in liCurrent and liPrevious.
    fFound = Search(varItem, liCurrent, liPrevious)
    If fFound Then
        If Not liPrevious Is Nothing Then
             ' Deleting from the middle or end of the list.
             Set liPrevious.NextItem = liCurrent.NextItem
        Else
            ' Deleting from the head of the list.
            Set liHead = liCurrent.NextItem
        End If
    End If
    Delete = fFound
End Function
To delete an item from the head of the list, all you need to do is make the headerís pointer refer to the second item in the list. The diagrams in Figures 6.26, 6.27, and 6.28 show how you can delete an item at the head of the list.
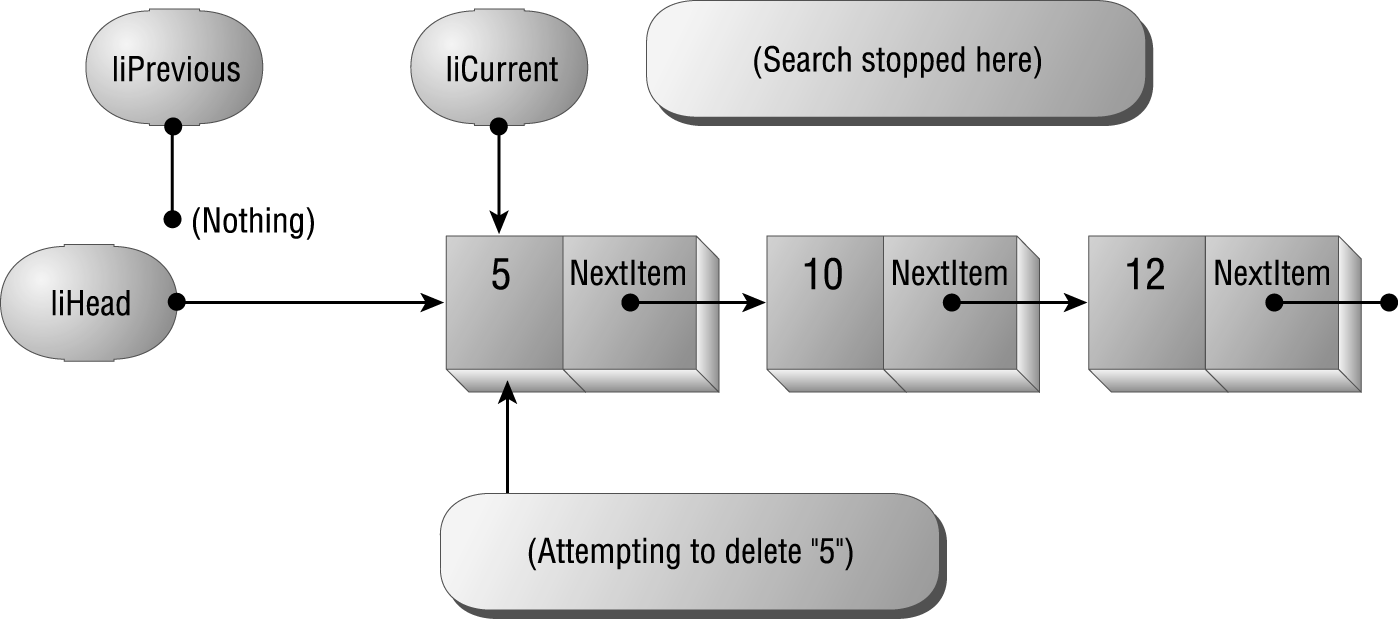
Figure 6.26: If the search ends at the head of the list, liPrevious will be Nothing.
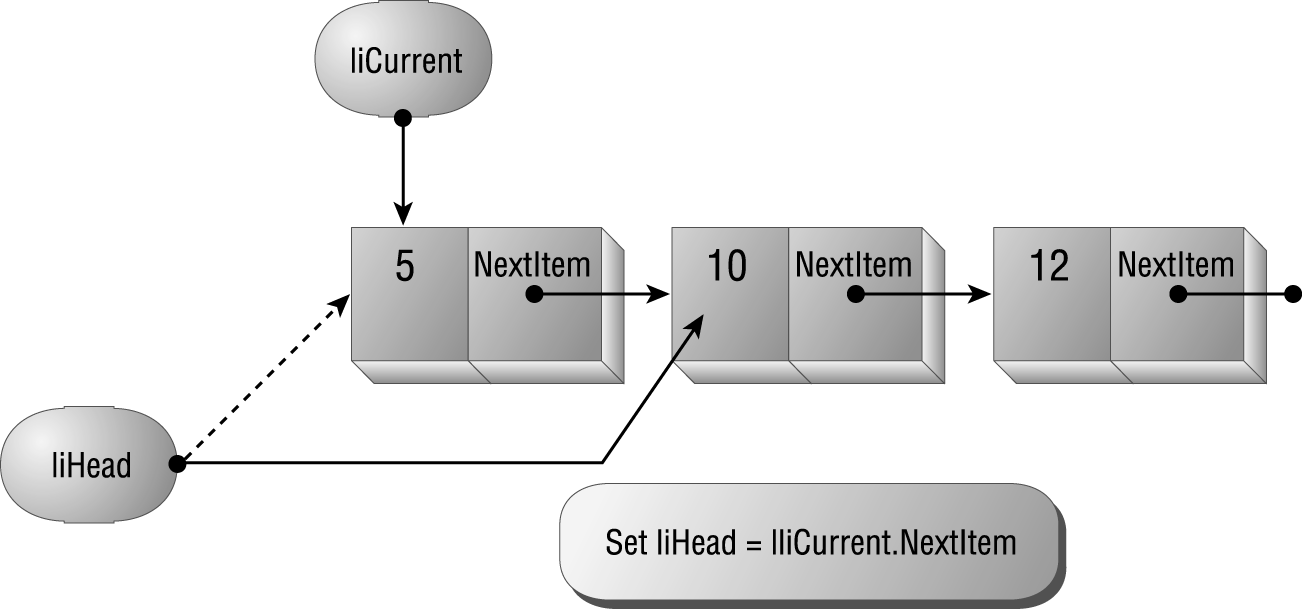
Figure 6.27: To delete the first item, make liHead point to the second item in the list.
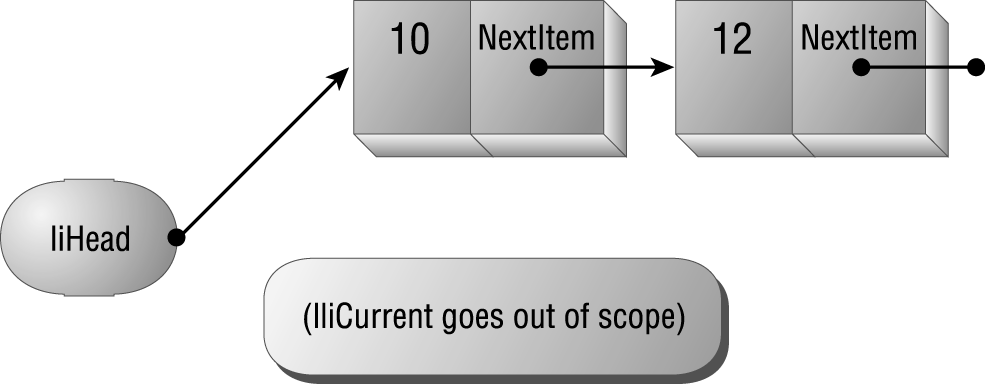
Figure 6.28: When liCurrent goes out of scope, VBA destroys the deleted item.
What about deleting an item other than the first? Thatís easy too: just link around the item to be deleted. The diagrams in Figures 6.29, 6.30, and 6.31 show how you can delete an item thatís not the first item in the list.
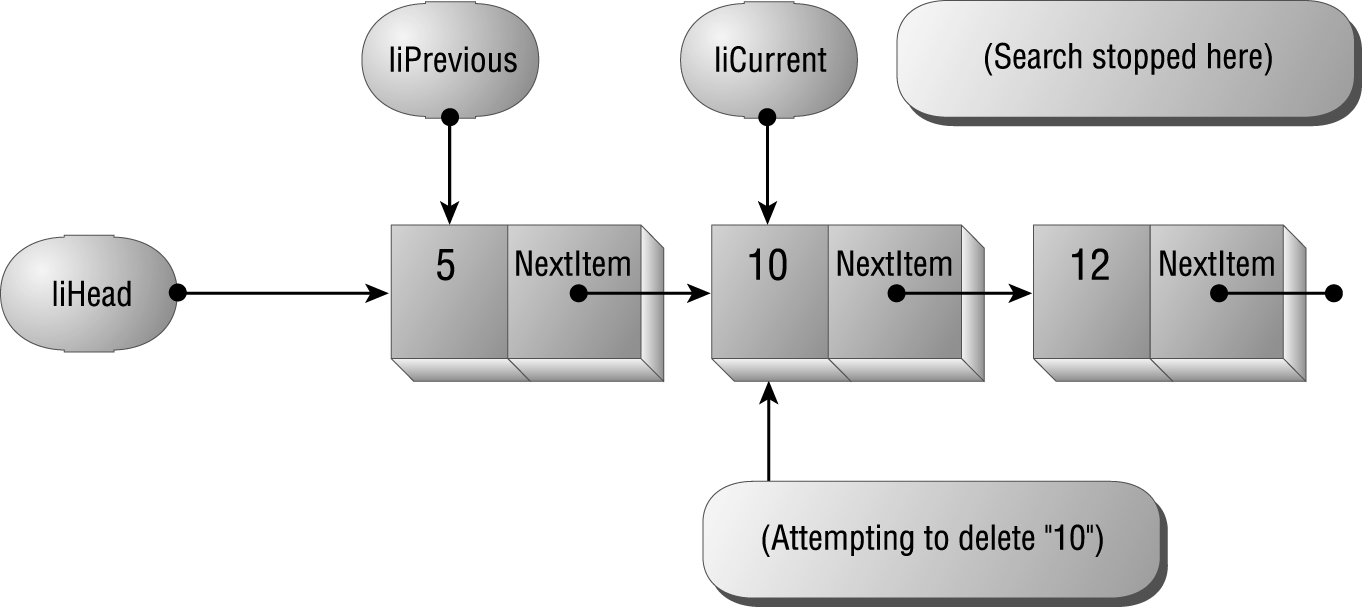
Figure 6.29: The search found the node to be deleted. (liCurrent points to it.)
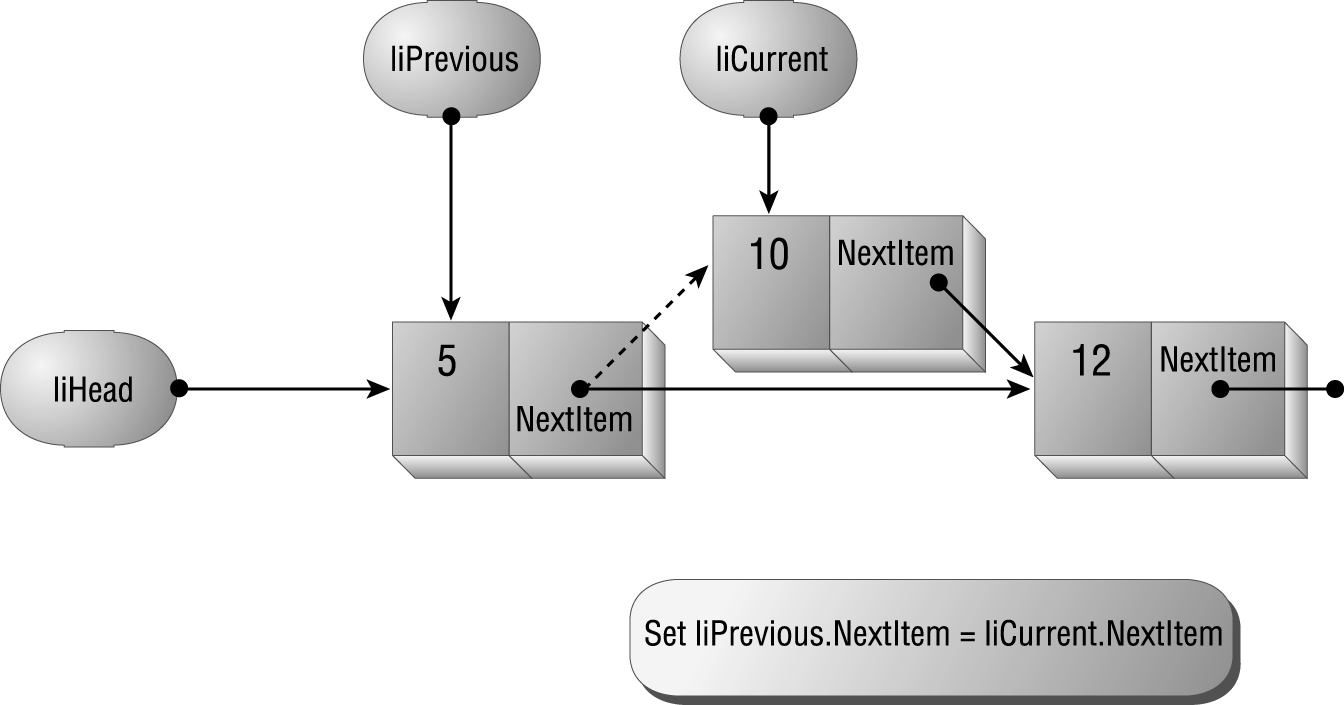
Figure 6.30: Link around the node to be deleted.

Figure 6.31: When liCurrent goes out of scope, VBA destroys the deleted item.
A list wouldnít do you much good if you couldnít traverse it, visiting each element in turn. The example project includes a DebugList method of the List class. Calling this method walks the list one item at a time, printing each value in turn to the Immediate window:
Public Sub DebugList()
    ' Print the list to the Immediate window.
    Dim liCurrent As ListItem
    Set liCurrent = liHead
    Do While Not liCurrent Is Nothing
        Debug.Print liCurrent.Value
        Set liCurrent = liCurrent.NextItem
    Loop
End Sub
To do its work, the code in DebugList first sets a pointer to the head of the list. Then, as long as that pointer isnít Nothing, the code prints out the current value and sets the current node pointer to refer to the next item in the list.
The ListTest module includes a simple test procedure that exercises the methods in the List class. When you run this procedure, shown in Listing 6.12, the code will add the ten items to the list, display the list, delete a few items (including the first and last item), and then print the list again.
Listing 6.12: Sample Code Demonstrating the Ordered Linked List
Sub TestLists()
    Dim liTest As New List
    With liTest
        .Add 5
        .Add 1
        .Add 6
        .Add 4
        .Add 9
        .Add 8
        .Add 7
        .Add 10
        .Add 2
        .Add 3
        Call .DebugList
        Debug.Print "====="
        .Delete 1
        .Delete 10
        .Delete 3
        .Delete 4
        Call .DebugList
    End With
End SubThatís a good question, because the native VBA Collection object provides much of the same functionality as a linked list, without the effort. Internally, collections are stored as a complex linked list, with links in both directions (instead of only one), and the data structure also includes pointers that make it possible to traverse the collection as though it were a binary tree. This way, VBA can traverse the collection forward and backward, and it can find items quickly. (Binary trees provide very quick random access to elements in the data structure.)
Itís just this flexibility that makes the overhead involved in using VBAís collections onerous. You may find that you need to create a sorted list, but working with collections is just too slow, and maintaining collections in a sorted order is quite difficult. In these cases, you may find it more worthwhile to use a linked list, as demonstrated in the preceding example, instead.