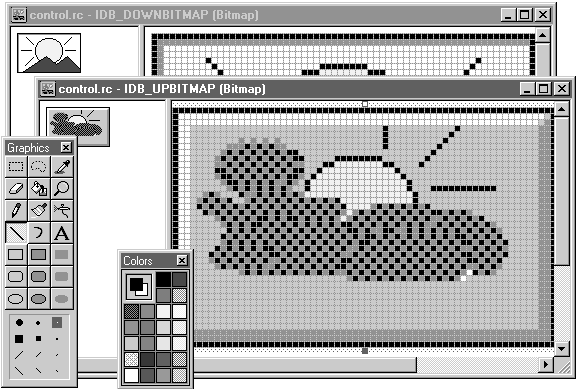
We want our control to display a cloudy day before it is pressed (when the button is up), and a sunny day when it is pressed (when the button is down). To do that, we'll create the customized button bitmaps IDB_UPBITMAP (cloudy day) and IDB_DOWNBITMAP (sunny day). We select the Visual C++ Insert|Resource menu item and select Bitmap in the Insert Resource box that appears. This action opens the bitmap editor, as shown in Figure 9.6.

Figure 9.6 We design a custom bitmap.
This new bitmap has the default ID IDB_BITMAP1; change that to IDB_UPBITMAP using the bitmap's property page. Open that page by selecting Properties in the Visual C++ Edit menu. This opens the property page for the bitmap, and you can change the bitmap's ID directly. Next, draw a representation of a cloudy day in the IDB_UPBITMAP bitmap, as shown in Figure 9.6. Similarly, create a new bitmap with the ID IDB_DOWNBITMAP and draw a sunny day in it.
The customized images for CONTROL are now ready. Using these bitmaps, we'll see how to change the control's appearance. We will also have access to all the events a button normally has, such as click events, in ClassWizard. We'll also see how to add customized events, properties, and methods to control.ocx and how to install our new control in a Visual C++ program.
As before, the control support file, CONTROLCTL.CPP, will be the most important. Here is how our control is created, based on the Windows button control (from CONTROLCTL.CPP). Note that the program derives this control from the Windows button type.
BOOL CControlCtrl::PreCreateWindow(CREATESTRUCT& cs)
{
    cs.lpszClass = _T("BUTTON");
    return COleControl::PreCreateWindow(cs);
}
We want to draw the button, so we will modify this code a little. PreCreateWindow() is called when our control is first created, and we are passed a reference to a creation structure (a structure of type CREATESTRUCT). One of the members of this creation structure is the style member, which holds the style of the control we are creating. We OR the button style with two new button styles: BS_PUSHBUTTON and BS_OWNERDRAW.
BOOL CControlCtrl::PreCreateWindow(CREATESTRUCT& cs)
{
    cs.lpszClass = _T("BUTTON");
--> cs.style |= BS_PUSHBUTTON | BS_OWNERDRAW;
    return COleControl::PreCreateWindow(cs);
}
Using BS_OWNERDRAW means that now we are responsible for drawing the button. If we wanted to draw an unchanging control, we could place code in the OnDraw() function, and whatever we drew there would appear in our OLE control. However, we want to do more than that. We want to draw the button in both a pressed and an unpressed state as the user clicks it. This means that we will have to intercept the message that tells the button control when to show itself as pressed and when as released—which OnDraw() alone will not do.
To draw an active button, we intercept the OCM_DRAWITEM message. The prefix OCM stands for OLE control message, which OLE custom controls receive (in addition to Windows messages starting with the WM_ prefix). When we receive OCM_DRAWITEM, we will get information such as whether the button is supposed to be up or down. This information will enable us to draw the button with the correct bitmap (sunny day or cloudy day).
To attach a function to the OCM_DRAWITEM message, we edit the message map in CONTROLCTL.CPP directly. (ClassWizard will not work with OCM messages.) Find the message map in CONTROLCTL.CPP:
// ControlCtl.cpp : Implementation of the CControlCtrl OLE control class.
#include "stdafx.h"
#include "control.h"
.
.
        .
BEGIN_MESSAGE_MAP(CControlCtrl, COleControl)
    //{{AFX_MSG_MAP(CControlCtrl)
    ON_MESSAGE(OCM_COMMAND, OnOcmCommand)
    //}}AFX_MSG_MAP
END_MESSAGE_MAP()
        .
        .
        .
We intercept the OCM_DRAWITEM message by connecting it to the function OnOcmDrawItem() (add this line of code):
// ControlCtl.cpp : Implementation of the CControlCtrl OLE control class.
#include "stdafx.h"
#include "control.h"
        .
        .
        .
BEGIN_MESSAGE_MAP(CControlCtrl, COleControl)
    //{{AFX_MSG_MAP(CControlCtrl)
    ON_MESSAGE(OCM_COMMAND, OnOcmCommand)
--> ON_MESSAGE(OCM_DRAWITEM, OnOcmDrawItem)
    //}}AFX_MSG_MAP
END_MESSAGE_MAP()
        .
        .
        .
In addition, we add the prototype of OnOcmDrawItem() to CONTROLCTL.H (note that this function returns an argument of type LRESULT, as we'll see soon):
// ControlCtl.h : Declaration of the CControlCtrl OLE control class.
/////////////////////////////////////////////////////////////////////////////
        .
        .
        .
    DECLARE_OLECREATE_EX(CControlCtrl)    // Class factory and guid
    DECLARE_OLETYPELIB(CControlCtrl)      // GetTypeInfo
    DECLARE_PROPPAGEIDS(CControlCtrl)     // Property page IDs
    DECLARE_OLECTLTYPE(CControlCtrl)        // Type name and misc status
    // Subclassed control support
    BOOL PreCreateWindow(CREATESTRUCT& cs);
    WNDPROC* GetSuperWndProcAddr(void);
    LRESULT OnOcmCommand(WPARAM wParam, LPARAM lParam);
--> LRESULT OnOcmDrawItem(WPARAM wParam, LPARAM lParam);
        .
        .
        .
Now create the OnOcmDrawItem() function in CONTROLCTL.CPP by typing it in:
LRESULT CControlCtrl::OnOcmDrawItem(WPARAM wParam, LPARAM lParam)
{
}
As with most direct Windows message handlers, we are passed two parameters: wParam and lParam, the standard low-level parameters that accompany Windows messages. Here, lParam is a long pointer to a structure of type LPDRAWITEMSTRUCT; because this structure contains additional information about what we're supposed to be drawing, it will allow us to draw our button in both the pressed and the released states. For example, from the hDC member of the LPDRAWITEMSTRUCT structure we get a pointer to the device context we're supposed to draw in. The hDC member is actually a handle to a device context, and it is simply a numerical index standing for that device context as far as Windows is concerned. We create a pointer to the device context from hDC using the Visual C++ CDC class function FromHandle():
LRESULT CControlCtrl::OnOcmDrawItem(WPARAM wParam, LPARAM lParam)
{
--> CDC *pdc;
--> pdc = CDC::FromHandle(((LPDRAWITEMSTRUCT)lParam)->hDC);
      .
      .
      .
}
Now that we have a pointer to the device context we want to draw in, the next step is to load the bitmap from the disk. We use the two bitmaps we created—IDB_DOWNBITMAP for the button-down bitmap and IDB_UPBITMAP for the button-up bitmap—and we load the appropriate bitmap depending on whether the button is up or down. We check the itemState member of the DRAWITEMSTRUCT structure that we were passed a pointer to. If the ODS_SELECTED bit in itemState is set, we draw the button as pressed; otherwise, we draw it as released. Based on itemState, then, we load the correct bitmap into an object of class CBitmap named bmpObj:
LRESULT CControlCtrl::OnOcmDrawItem(WPARAM wParam, LPARAM lParam)
{
    CDC *pdc;
--> CBitmap bmpObj;
    pdc = CDC::FromHandle(((LPDRAWITEMSTRUCT)lParam)->hDC);
--> bmpObj.LoadBitmap((((LPDRAWITEMSTRUCT)lParam)->itemState &
        ODS_SELECTED) ? IDB_DOWNBITMAP : IDB_UPBITMAP);
        .
        .
        .
At this point, we have loaded the bitmap to display into a bitmap object of the MFC class CBitmap. The next step is to display the bitmap. We need the dimensions of the bitmap, which we get by filling a structure of type BITMAP:
typedef struct tagBITMAP {
            int     bmType;
            int     bmWidth;
            int     bmHeight;
            int     bmWidthBytes;
            BYTE    bmPlanes;
            BYTE    bmBitsPixel;
            LPVOID  bmBits;
        } BITMAP;
We fill the BITMAP structure, named bmp, using the CBitmap member function GetObject():
LRESULT CControlCtrl::OnOcmDrawItem(WPARAM wParam, LPARAM lParam)
{
    CDC *pdc;
    CBitmap bmpObj;
--> BITMAP  bmp;
    pdc = CDC::FromHandle(((LPDRAWITEMSTRUCT)lParam)->hDC);
    bmpObj.LoadBitmap((((LPDRAWITEMSTRUCT)lParam)->itemState &
        ODS_SELECTED) ? IDB_DOWNBITMAP : IDB_UPBITMAP);
--> bmpObj.GetObject(sizeof(BITMAP), &bmp);
        .
        .
        .
To determine the dimensions of the bitmap, we use the BITMAP members bmWidth and bmHeight to fill a CRect object named rect:
LRESULT CControlCtrl::OnOcmDrawItem(WPARAM wParam, LPARAM lParam)
{
    CDC *pdc;
    CBitmap bmpObj;
    BITMAP  bmp;
--> CRect rect;
    pdc = CDC::FromHandle(((LPDRAWITEMSTRUCT)lParam)->hDC);
    bmpObj.LoadBitmap((((LPDRAWITEMSTRUCT)lParam)->itemState &
        ODS_SELECTED) ? IDB_DOWNBITMAP : IDB_UPBITMAP);
    bmpObj.GetObject(sizeof(BITMAP), &bmp);
--> rect.right = bmp.bmWidth;
--> rect.bottom = bmp.bmHeight;
        .
        .
        .
}
Now we have the bitmap and its size, so all that's left is to draw it. We'll use a shortcut method: the Visual C++ class CPictureHolder. A popular property (we'll see more about properties soon) for ActiveX controls is the Picture property, which holds the image of the control. Reloading the Picture property with a new bitmap changes the appearance of the control. We won't support the picture property here, but we will use the CPictureHolder class, because it is designed to hold a control's bitmap (its graphical representation) and display it easily. Because the CPictureHolder class is specially made to work with the image of our control, we will create a CPictureHolder object here and load our bitmap into it:
LRESULT CControlCtrl::OnOcmDrawItem(WPARAM wParam, LPARAM lParam)
{
    CDC *pdc;
    CBitmap bmpObj;
    BITMAP  bmp;
--> CPictureHolder picHolderObj;
    CRect rect;
    pdc = CDC::FromHandle(((LPDRAWITEMSTRUCT)lParam)->hDC);
    bmpObj.LoadBitmap((((LPDRAWITEMSTRUCT)lParam)->itemState &
        ODS_SELECTED) ? IDB_DOWNBITMAP : IDB_UPBITMAP);
    bmpObj.GetObject(sizeof(BITMAP), &bmp);
    rect.right = bmp.bmWidth;
    rect.bottom = bmp.bmHeight;
--> picHolderObj.CreateFromBitmap((HBITMAP)bmpObj.m_hObject, NULL, FALSE);
        .
        .
        .
}
To draw the item, we need only call the CPictureHolder member function Render(). We pass it the size of the control's bounding rectangle (which we get as rcItem in the DRAWITEMSTRUCT structure passed to us) and the bounding rectangle of the bitmap we want to draw. Finally, we return a value of 1 from OnOcmDrawItem(), indicating success:
LRESULT CControlCtrl::OnOcmDrawItem(WPARAM wParam, LPARAM lParam)
{
    CDC *pdc;
    CBitmap bmpObj;
    BITMAP  bmp;
    CPictureHolder picHolderObj;
    CRect rect;
    pdc = CDC::FromHandle(((LPDRAWITEMSTRUCT)lParam)->hDC);
    bmpObj.LoadBitmap((((LPDRAWITEMSTRUCT)lParam)->itemState &
        ODS_SELECTED) ? IDB_DOWNBITMAP : IDB_UPBITMAP);
    bmpObj.GetObject(sizeof(BITMAP), &bmp);
    rect.right = bmp.bmWidth;
    rect.bottom = bmp.bmHeight;
    picHolderObj.CreateFromBitmap((HBITMAP)bmpObj.m_hObject, NULL, FALSE);
--> picHolderObj.Render(pdc, ((LPDRAWITEMSTRUCT)lParam)->rcItem, rect);
--> return 1;
}
We create and support control.ocx by selecting the Build control.ocx menu item in the Visual C++ Project menu, followed by Register Control in the Tools menu.
Now let's see our control in action. Find control.ocx's uuid value (from the corresponding .odl file or from the Windows registry by using regedit.exe) and create an .html file:
<HTML>
<HEAD>
<TITLE>Control Page</TITLE>
</HEAD>
<BODY LANGUAGE = VBS ONLOAD = "Page_Initialize">
<CENTER>
<H1>Control Page</H1>
</CENTER>
<!- control.ocx>
<CENTER>
<OBJECT CLASSID="clsid:D96FBCC1-090A-101C-BAC7-040224009C02"
        HEIGHT=80 WIDTH=100 ID=Ctrl1></OBJECT>
</BODY>
</HTML>
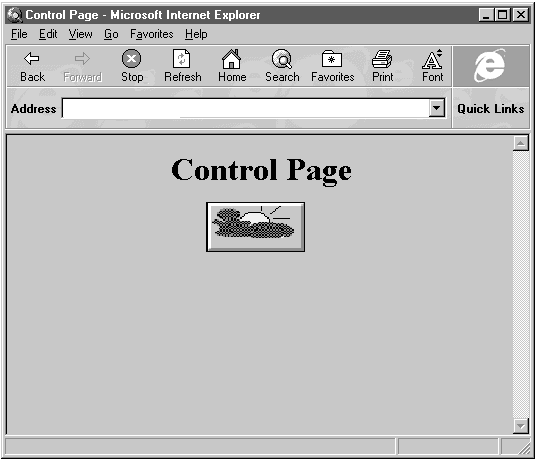
The result appears in Figure 9.7; when you click this CONTROL button, the image displayed turns from the cloudy day to the sunny one and back again. Even though we've subclassed our control from an existing Windows control (a command button), we now know how to draw it ourselves. So far, then, control.ocx is a success.

Figure 9.7 Our control.ocx control.
There is far more to learn about controls. For example, controls may support properties, methods, and custom events. After we add our custom control to a VBScript page, we simply use VBScript to connect subroutines to our custom events, just as we would for the events of any other control.
Properties are useful. If you had a custom control that displayed text, for example, you might set the text simply by setting the control's Text property. Methods are also useful: if you had a custom control that displayed data in a graph, you might pass it the data to graph in a method named SetData().
We will also support custom events in our control. Let's say our control supports a custom event named posEvent, which we fire (firing an event causes its event-handing function to be called) when the mouse button is pushed. We could place our custom control in a VBScript page, and the control would display its cloudy or sunny day image as required. In addition, we could set up a VBScript subroutine named Ctrl1_posEvent() to handle the control's event (assuming we had given our control the ID Ctrl1) just as it might handle a button control's click event with a function named Button1_OnClick(). In this way, as far as VBScript is concerned, our new OCX acts just like any other control (such as a button or textbox). As another example, if we had a custom control named DATE that displayed the date, we could give it an event named DateChanged, which would be fired every time the date changed. Then, in VBScript, we could connect a subroutine, DateCtrl_DateChanged(), to an embedded DATE control.
Properties, methods, and events are integral parts of ActiveX controls, so let's examine them now.