The grid control presents us with a spreadsheet-like display, and we can place text and graphics in each cell. Let's assume that we have a grid control in our Web page like this:
	-----------------------------------------------
          |           _____________________________       |
          |          |_____|_____|_____|_____|_____|      |
          |          |_____|_____|_____|_____|_____|      |
          |          |_____|_____|_____|_____|_____|      |
          |          |_____|_____|_____|_____|_____|      |
          |          |_____|_____|_____|_____|_____|      |
          |          |_____|_____|_____|_____|_____|      |
          |          |_____|_____|_____|_____|_____|      |
          |          |_____|_____|_____|_____|_____|      |
          |          |_____|_____|_____|_____|_____|      |
          |          |_____|_____|_____|_____|_____|      |
           -----------------------------------------------
To become more familiar with this control, let's make this example a spreadsheet, allowing the user to enter data into the grid by typing it. However, the grid control cannot respond directly to key press events, so we will enter the data in a separate textbox, making the example look something like this:
	-----------------------------------------------
          |         ---------------   ------------        |
          |        |               | | Enter Data |       |
          |         ---------------   ------------        |
          |          _____________________________        |
          |         |_____|_____|_____|_____|_____|       |
          |         |_____|_____|_____|_____|_____|       |
          |         |_____|_____|_____|_____|_____|       |
          |         |_____|_____|_____|_____|_____|       |
          |         |_____|_____|_____|_____|_____|       |
          |         |_____|_____|_____|_____|_____|       |
          |         |_____|_____|_____|_____|_____|       |
          |         |_____|_____|_____|_____|_____|       |
          |         |_____|_____|_____|_____|_____|       |
          |         |_____|_____|_____|_____|_____|       |
           -----------------------------------------------
The user clicks the grid, highlighting a cell, and then types the data for that cell into the textbox. When the data is ready to be transferred to the highlighted cell, the user clicks the control button we have called Enter Data.
This is a common way of entering data into a grid control. Another, more complicated way is to place code in a Grid_MouseDown() event handler so that when the user clicks a certain cell, you position a borderless textbox exactly over that cell and make it visible. The user gets the impression that it's possible to enter text directly into the grid. After the user presses, say, the Enter key, you can move the text from the textbox into the underlying grid cell and hide the textbox once again.
In addition to allowing the user to enter data into the grid, let's label the first row and the first column of cells just as they might appear in a spreadsheet:
	-----------------------------------------------
          |         ---------------   ------------        |
          |        |               | | Enter Data |       |
          |         ---------------   ------------        |
          |          _____________________________        |
          |         |_____|__A__|__B__|__C__|__D__|       |
          |         |__1__|_____|_____|_____|_____|       |
          |         |__2__|_____|_____|_____|_____|       |
          |         |__3__|_____|_____|_____|_____|       |
          |         |__4__|_____|_____|_____|_____|       |
          |         |__5__|_____|_____|_____|_____|       |
          |         |__6__|_____|_____|_____|_____|       |
          |         |__7__|_____|_____|_____|_____|       |
          |         |__8__|_____|_____|_____|_____|       |
          |         |__9__|_____|_____|_____|_____|       |
           -----------------------------------------------
Create a new Web page named grid.htm. Next, add a rich text box, RichText1, to the page:
<HTML>
<HEAD>
<TITLE>The Grid Page</TITLE>
</HEAD>
<BODY LANGUAGE = VBScript ONLOAD = "Page_Initialize">
<CENTER>
<H1>The Grid Page</H1>
</CENTER>
<CENTER>
<!- RichText - richtx32.ocx>
<OBJECT CLASSID="clsid:3b7c8860-d78f-101b-b9b5-04021c009402"   <--
        HEIGHT=40 WIDTH=300 ID=RichText1></OBJECT>
        .
        .
        .
Now we add a 3-D button, with the ID Cmd1, to the page; we'll give this button the caption Enter Data in a minute:
<HTML>
<HEAD>
<TITLE>The Grid Page</TITLE>
</HEAD>
<BODY LANGUAGE = VBScript ONLOAD = "Page_Initialize">
<CENTER>
<H1>The Grid Page</H1>
</CENTER>
<CENTER>
<!- RichText - richtx32.ocx>
<OBJECT CLASSID="clsid:3b7c8860-d78f-101b-b9b5-04021c009402"
        HEIGHT=40 WIDTH=300 ID=RichText1></OBJECT>
<!- SSCommand - threed32.ocx>
<OBJECT CLASSID="clsid:0ba686b4-f7d3-101a-993e-0000c0ef6f5e"   <--
        HEIGHT=30 WIDTH=150 ID=Cmd1></OBJECT>
</CENTER>
     .
     .
     .
Finally, we add the grid control:
<HTML>
<HEAD>
<TITLE>The Grid Page</TITLE>
</HEAD>
<BODY LANGUAGE = VBScript ONLOAD = "Page_Initialize">
<CENTER>
<H1>The Grid Page</H1>
</CENTER>
<CENTER>
<!- RichText - richtx32.ocx>
<OBJECT CLASSID="clsid:3b7c8860-d78f-101b-b9b5-04021c009402"
        HEIGHT=40 WIDTH=300 ID=RichText1></OBJECT>
<!- SSCommand - threed32.ocx>
<OBJECT CLASSID="clsid:0ba686b4-f7d3-101a-993e-0000c0ef6f5e"
        HEIGHT=30 WIDTH=150 ID=Cmd1></OBJECT>
</CENTER>
<!- Grid - grid32.ocx>
<PRE>
<OBJECT CLASSID="clsid:a8c3b720-0b5a-101b-b22e-00aa0037b2fc"   <--
        HEIGHT=200 WIDTH=500 ID=Grid1></OBJECT>
</PRE>
   .
   .
   .
Now our Web page is almost finished:
	-----------------------------------------------
          |         ---------------   ------------        |
          |        |               | | Enter Data |       |
          |         ---------------   ------------        |
          |          _____________________________        |
          |         |_____|__A__|__B__|__C__|__D__|       |
          |         |__1__|_____|_____|_____|_____|       |
          |         |__2__|_____|_____|_____|_____|       |
          |         |__3__|_____|_____|_____|_____|       |
          |         |__4__|_____|_____|_____|_____|       |
          |         |__5__|_____|_____|_____|_____|       |
          |         |__6__|_____|_____|_____|_____|       |
          |         |__7__|_____|_____|_____|_____|       |
          |         |__8__|_____|_____|_____|_____|       |
          |         |__9__|_____|_____|_____|_____|       |
           -----------------------------------------------
The next step is to prepare the grid by labeling the first row with the letters A, B, C, and so on, and the first column with the numbers 1, 2, 3, and so forth. By default, the first row and column of a grid control appear gray and are usually used to label the cells; such label rows and columns, called fixed rows and columns, are controlled by the FixedRows and FixedCols properties. If you do not want to label the cells, simply set FixedRows and FixedCols to 0. To label the cells, create the Page_Initialize subroutine:
Sub Page_Initialize
        .
        .
        .
    End Sub
As we saw before, each grid control has both a Row and a Col property, and they hold the (Row, Col) location of the currently active cell. (Don't confuse the Row and Col properties with the Rows and Cols properties, which hold the total number of rows and columns in the grid.) We start by giving our grid control 21 rows and 11 columns with the Rows and Cols properties:
Sub Page_Initialize
 -->          Grid1.Rows = 21
 -->          Grid1.Cols = 11
                .
                .
                .
In addition, we set the caption of the button (Cmd1) to Enter Data this way:
Sub Page_Initialize
        Grid1.Rows = 21
        Grid1.Cols = 11
 -->    Cmd1.Caption = "Enter Data"
                .
                .
                .
When we transfer data to the grid control, the data will appear in the cell at the location (Row, Col). To label the first column, column 0, with numbers, we start by setting Grid1's Col property to 0 with this new code:
Sub Page_Initialize
        Grid1.Rows = 21
        Grid1.Cols = 11
        Cmd1.Caption = "Enter Data"
 -->    Grid1.Col = 0
                .
                .
                .
Next, we loop over all rows, setting the Row property accordingly (note that we start at Row 1):
--> Dim loop_index
    Sub Page_Initialize
        Grid1.Rows = 21
        Grid1.Cols = 11
        Cmd1.Caption = "Enter Data"
        Grid1.Col = 0
-->     For loop_index = 1 To 20
-->         Grid1.Row = loop_index
                .
                .
                .
-->     Next
        .
        .
        .
    End Sub
Now that we've set the Row and Col properties of the grid, we are free to enter text in the grid's Text property. That text will appear in the cell at the current (Row, Col) location (which the user has set by clicking the grid control with the mouse). We place ascending numbers in the first column like this:
Dim loop_index
    Sub Page_Initialize
        Grid1.Rows = 21
        Grid1.Cols = 11
        Cmd1.Caption = "Enter Data"
        Grid1.Col = 0
        For loop_index = 1 To 20
            Grid1.Row = loop_index
  -->       Grid1.Text = CStr(loop_index)
        Next
          .
          .
          .
    End Sub
Now we label the first row with letters. We set Row to 0 and loop over the columns:
Dim loop_index
    Sub Page_Initialize
        Grid1.Rows = 21
        Grid1.Cols = 11
        Cmd1.Caption = "Enter Data"
        Grid1.Col = 0
        For loop_index = 1 To 20
            Grid1.Row = loop_index
            Grid1.Text = CStr(loop_index)
        Next
  -->       Grid1.Row = 0
  -->   For loop_index = 1 To 10
  -->       Grid1.Col = loop_index
                  .
                  .
                  .
  -->   Next
    End Sub
All we have to do is to convert the loop index into a character starting at "A" and place it into the grid's Text property:
Dim loop_index
    Sub Page_Initialize
        Grid1.Rows = 21
        Grid1.Cols = 11
        Cmd1.Caption = "Enter Data"
        Grid1.Col = 0
        For loop_index = 1 To 20
            Grid1.Row = loop_index
            Grid1.Text = CStr(loop_index)
        Next
            Grid1.Row = 0
        For loop_index = 1 To 10
            Grid1.Col = loop_index
  -->       Grid1.Text = Chr(Asc("A") + loop_index - 1)
        Next
    End Sub
Now our grid control's cells are labeled.
The next step is to allow the user to enter data. When the user clicks the grid control, the Row and Col properties are automatically set to the location of the clicked cell. After that, the user enters the data in the textbox RichText1 and clicks the command button marked Enter Data. We need only transfer the data from the textbox to the currently active cell and then clear the textbox. Add the subroutine Cmd1_Click() to intercept button clicks, and place this code in it:
Sub Cmd1_Click()
--> Grid1.Text = RichText1.Text
--> RichText1.Text = ""
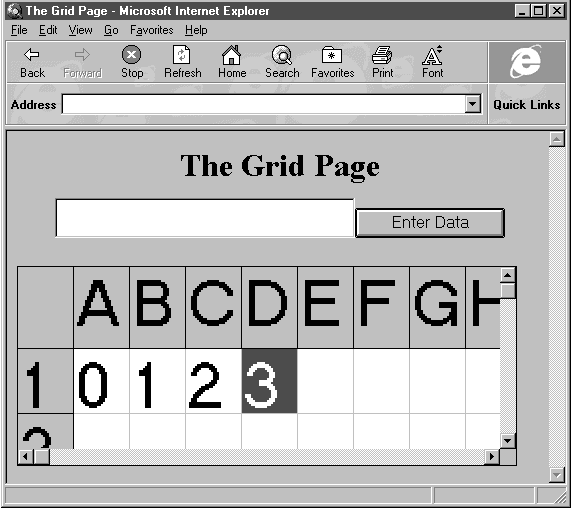
End SubAnd that's it—our Grid example is complete. Run it now, as shown in Figure 6.5, and enter data by clicking the correct cell with the mouse, typing into the textbox, and clicking the Enter Data button. The grid page is a success.
Figure 6.5 Our grid control allows the user to enter and display data.
Note that if you were creating a spreadsheet and the cells were tied together—such as a running sum being kept at the bottom of every column—you could perform any required operations (such as adding the column) when the new data was entered into the cell.
The code for this Web page, grid.htm, appears in Listing 6.2.
Listing 6.2 grid.htm
<HTML>
<HEAD>
<TITLE>The Grid Page</TITLE>
</HEAD>
<BODY LANGUAGE = VBScript ONLOAD = "Page_Initialize">
<CENTER>
<H1>The Grid Page</H1>
</CENTER>
<CENTER>
<!- RichText - richtx32.ocx>
<OBJECT CLASSID="clsid:3b7c8860-d78f-101b-b9b5-04021c009402"
        HEIGHT=40 WIDTH=300 ID=RichText1></OBJECT>
<!- SSCommand - threed32.ocx>
<OBJECT CLASSID="clsid:0ba686b4-f7d3-101a-993e-0000c0ef6f5e"
        HEIGHT=30 WIDTH=150 ID=Cmd1></OBJECT>
</CENTER>
<!- Grid - grid32.ocx>
<PRE>
<OBJECT CLASSID="clsid:a8c3b720-0b5a-101b-b22e-00aa0037b2fc"
        HEIGHT=200 WIDTH=500 ID=Grid1></OBJECT>
</PRE>
<SCRIPT LANGUAGE = VBScript>
    Dim loop_index
    Sub Page_Initialize
        Grid1.Rows = 21
        Grid1.Cols = 11
        Cmd1.Caption = "Enter Data"
        Grid1.Col = 0
        For loop_index = 1 To 20
            Grid1.Row = loop_index
            Grid1.Text = CStr(loop_index)
        Next
            Grid1.Row = 0
        For loop_index = 1 To 10
            Grid1.Col = loop_index
            Grid1.Text = Chr(Asc("A") + loop_index - 1)
        Next
    End Sub
    Sub Cmd1_Click()
        Grid1.Text = RichText1.Text
        RichText1.Text = ""
    End Sub
</SCRIPT>
</BODY>
</HTML>
That's it for our coverage of the grid control. The next custom control we'll cover is also an extremely popular one: the graph control.