February 2000
Understanding and Implementing RAID
by Brian Hartman
Your data is the most important part of your network. But how well is
it protected from hardware failure? Is it protected at all? Windows NT
provides support for both hardware and software based RAID. In this
article, we'll describe the similarities and differences between the two
types of RAID, how to implement software based RAID, and how to recover
form a disk failure.
Understanding RAID
You can implement RAID (redundant array
of inexpensive disks) in several ways. There are five levels of RAID:
- RAID 1: Mirroring
- RAID 2: Disk striping with error correction code (ECC)
- RAID 3: Disk striping with ECC stored as parity
- RAID 4: Disk striping large blocks, parity stored on one drive
- RAID 5: Disk striping with parity distributed across multiple drives
Windows NT only supports RAID levels 1 and 5. Another disk technique
known as striping without parity is sometimes called RAID level 0. This
technique, however, doesn't offer any protection for data and won't be
discussed here.
Hardware based RAID
Companies such as Compaq
(http://www.compaq.com/),
Adaptec
(http://www.adaptec.com/),
and Mylex
(http://www.mylex.com/)
among others, offer hardware based RAID solutions for Windows NT. Any
hardware based RAID solution will bypass the NT disk drivers, so five 9 GB
disks in a RAID array will appear as a 45 GB disk to NT's Disk
Administrator program. Other features of hardware based RAID include the
ability to hot swap failed disks, power supplies, or both. These companies
also offer superior reporting, diagnostic, and preventative maintenance
capabilities. All this comes at a price, however. Entry level hardware
RAID products can cost several thousands of dollars. As with any other
component of your network, you must sit down and do a thorough cost
benefit analysis of the alternatives.
Configure mirroring (RAID level 1)
Let's take a look first at how
to configure a mirror set for Windows NT. Software based RAID can only be
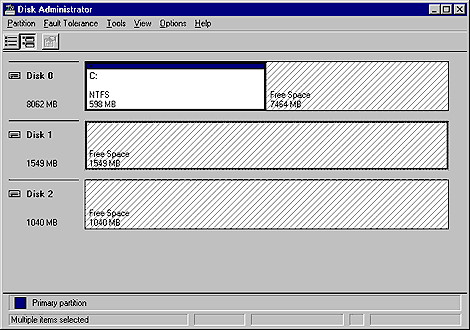
configured on a Windows NT Server. As you see in Figure A, Disk
Administrator shows two disks, and we want to mirror the C partition on
disk 0 with disk 1.
Figure A: Here you can see how to create a mirror of the C:
partition on disk 0 with disk 1.

After selecting the partition you wish to mirror, hold down the [Ctrl]
key to select an area of equal free space on disk 1. The area selected
must be equal or greater in size or the mirror won't be created. After
selecting the space on disk 1, select the Establish Mirror option under
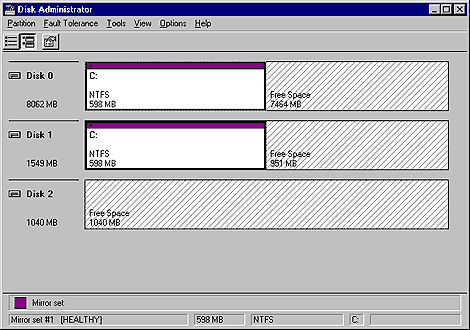
the fault tolerance menu choice in disk administrator. Figure B shows the
newly created mirror.
Figure B: Here you can see the mirroring of the C: drive on disk
0 with disk 1.

After the mirror has been created, the area on disk 1 takes on the same
drive letter as the partition on disk 0. When implementing mirroring on
your system, you need to be aware of the following advantages and
disadvantages:
- Mirrors the system/boot partition
- Uses less system memory
- Has good read/write performance
- Supports either the FAT or NTFS file systems, as well as IDE or SCSI
disks
- Costs more per disk (50 percent disk utilization)
Configuring striping with parity (RAID level 5)
Striping
with parity (RAID level 5) requires a minimum of three disks. You can have
as many as 32 in a stripe set with parity. Like a mirror set, the amounts
of space used to create the stripe set on the disks must be equal. If not,
NT will automatically calculate the smallest amount of space available,
and use that amount as the basis for the stripe set. The space on each
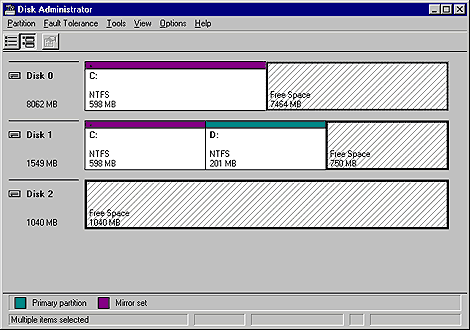
disk must be free space as well. Figure C shows three disks selected in
disk administrator, which are ready to create the stripe set.
Figure C: Disks 0 and 1 have over 1 GB of free space, but disk 2
only has 750 MB of free space, thus the largest stripe set we can create
is 3 x 750 or 2.25 GB.

The fault tolerance menu in disk administrator is also used to select
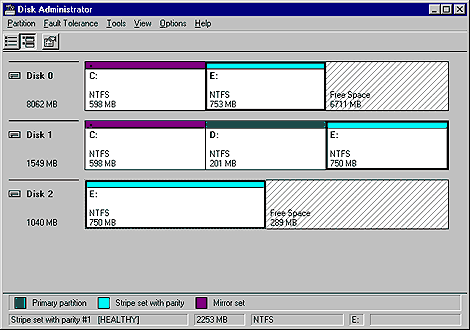
the creation of the stripe set. Figure D shows the created stripe set
appearing as a single drive letter.
Figure D: Any space not used by the creation of the stripe set
is left as free space.

Striping with parity offers a lower cost per disk. Since the parity
information is written equally over each disk, the equivalent of one disk
in the set is used for parity. Since the minimum number of disks in a
stripe set is three, you achieve a lower cost per disk. When choosing to
implement RAID level 5, you need to be aware of the following advantages
and disadvantages:
- Is the preferred fault tolerance solution
- Performs disk reads very quickly
- Supports either the FAT or NTFS file systems, as well as IDE or SCSI
disks
- Can't stripe the system/boot partition
- Uses more system memory (additional 16 MB minimum recommended)
Recovering from disk failure
What a wonderful world it
would be if hardware never failed. Since that isn't a practical line of
thinking, let's take a look at how to recover from disk failure. If either
a mirror set or stripe set with parity fails, the system will still
function, albeit more slowly than before. Since we're looking at software
based RAID, we'll need to replace the failed disk and reboot the machine.
Hardware detection of new disks is dynamic in NT, so you can go into disk
administrator and either re-create the mirror set, or regenerate the
stripe set with parity.
However, if the mirrored system/boot partition fails, the system won't
boot, since the necessary boot files will reside on the failed mirror
disk. To remedy this, you need to have a fault tolerant boot disk
available. To create a fault tolerant boot disk, you must perform the
following steps:
- Format a floppy disk under Windows NT.
- Copy the appropriate boot files to the floppy disk.
- Modify the ARC path in the boot.ini file to point to the other
member of the mirror set.
- Test the disk. Don't wait to give it a trial by fire.
The following files are needed for the floppy disk:
- ntldr--The NT boot loader
- ntdetect.com--The hardware detection program
- boot.ini--The menu of operating system choices to boot to
- ntbootdd.sys--A driver used to boot SCSI controllers without the on
board BIOS (this file is used primarily when you have more than one SCSI
controller in a machine, and their BIOS conflict)
Understanding ARC paths
We think of the ARC path as the
roadmap to the WINNT directory. To get to that directory, the roadmap
takes us through the controller, disk, and partition that NT is loaded on.
Here's an example of an ARC path:
Multi(0)disk(0)rdisk(0)partition(1)
The first value can be either multi or scsi. Multi refers to IDE or
SCSI disks that boot from the on board BIOS. SCSI refers to SCSI disks
that aren't using their BIOS, and would boot using the ntbootdd.sys file
mentioned earlier. The next two items make for some redundancy. If the
first item is multi, the value we look to is rdisk. If it is scsi, we look
to disk. It's redundant because both exist in every boot.ini file, even
though if it's a multi drive, the disk value will read 0.
Finally we get to the partition value. Unlike the disk parameters,
which show 0 as the first instance of that particular type, the partition
value will start at 1 for the C: drive. You'll need to modify this text
file to point to the secondary member of the mirror set in order to boot
NT and re-create the mirror set.
Your data is important, so protect it
Estimates vary, but it isn't
hard to say that between wages, lost productivity, potential customer
inconvenience, etc. that every hour of server downtime can cost your
company several thousand dollars. While not as flashy or full featured as
hardware based RAID solutions, NT Server has the ability to effectively
protect your disks and data from the inevitable systems failure. In this
article, we compared the two types of software based RAID, how to
configure them, and how to use them to recover form disk failure.
Copyright © 2000, ZD
Inc. All rights reserved. ZD Journals and the ZD Journals logo are trademarks of ZD
Inc. Reproduction in whole or in part in any form or medium without
express written permission of ZD Inc. is prohibited. All other product
names and logos are trademarks or registered trademarks of their
respective owners.


