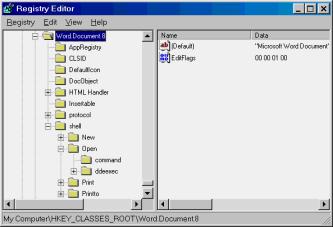
FIGURE 2: Settings for the Word.Document.8 file type
When the first version of WinWord came out, it had one giant competitor: WordPerfect (WP). WP was still a DOS application then, and as such, didn't need to bother with file-name extensions; you could use any extension for your WP documents, or no extension at all.
As the first word processor for Windows, Word had to have an extension. Otherwise, it wouldn't be able to register its file type in the operating system. Because Microsoft had the first choice, it claimed "doc" as the three-letter suffix for documents created by its novel graphical application. Now, ten years later, everybody who has a computer automatically associates a .doc file with Word, and the few competitors left won't dare to claim the same extension.
Boring blue. Great as the concept of default file extensions for Windows applications may be, it also has its drawbacks. Whether you use Word to write letters, books, invoices, contracts, articles, memos, faxes, resumes, newsletters, or catalogs, they must all end with the .doc extension. Otherwise, the operating system doesn't recognize them. Neither can you filter different types of documents in Word's File | Open dialog box. And in Windows Explorer, all your creations have the same boring blue WinWord icon.
Wouldn't it be nice to create a greater variation in document types, and make it easier to find and open them? That's what we'll explore in this edition of VBA Hacker.
Each Windows application that supports a default file-name extension registers its file type in the HKEY_CLASSES_ROOT section of the registry. FIGURE 1 shows the entries for Word 8 (aka 2000). The .doc key points to the Word.Document.8 file type, and the Word.Document.8 key contains all the information Windows needs to identify the file type, and to open or print files with the .doc extension (see FIGURE 2).
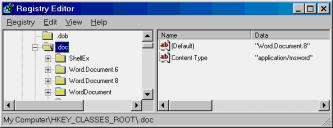

FIGURE 2: Settings for the Word.Document.8 file type
There are at least three ways to register a new file type: interactively, manually, and programmatically. Let's look at each.
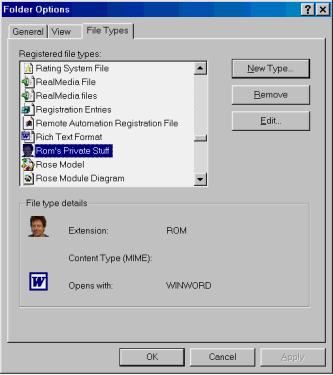
Interactively. You can use Windows Explorer to create new file types and associate them with Word, but it's a lengthy process. In any Explorer window, choose View | Folder Options, select the File Types tab, and click the New Type button. You can then specify a description and extension, pick an icon (more about that later), and define the actions you want to perform on files of this type. After you've confirmed your settings, your new file type is registered in the operating system, and is automatically associated with the application you specified. (FIGURE 3 shows how I created a "rom" file type for my personal documents.)
Manually. You can bypass the Edit File Type dialog box by creating the required entries directly in the Registry Editor. FIGURE 4 gives a schematic overview of the keys and data you would have to create for the registration of a new file type you want to use with Word.
|
Key |
Data for the [Default] value |
|
.ext |
NameID |
|
| |
|
NameID |
Description |
|
DefaultIcon |
IconFilePath, Index |
|
Shell |
|
|
Open |
"&Open" |
|
Command ddeexec Application Topic |
CommandString DDE Commandstring "Winword" "System" |
|
|
"&Print" |
|
Command ddeexec Application ifexec Topic |
CommandString DDE Commandstring "Winword" DDE Commandstring "System" |
|
Data |
Description |
|
ext |
The extension to register, preceded by a period, e.g. ".inv" for a file type with the .inv extension. |
|
NameID |
A unique identifier for the name of the file type. The common format is to use the extension itself, followed by a "file" suffix, e.g. "invfile". |
|
Description |
The string to describe the file, e.g. "Invoice". This string will be used in Explorer and on property pages. |
|
IconFilePath,Index |
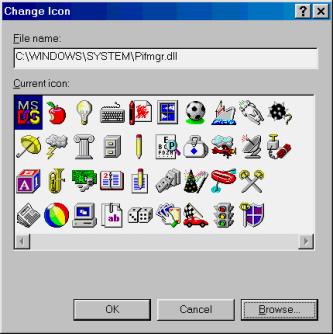
The address of the icon you want to use when files of this type are displayed in an Explorer window, common dialog box, or property sheet. This value (a string) must contain the full path of the file that contains the icon, followed by a comma, and the (zero-based) index of the icon inside that file, e.g. "C:\Windows\System\Pifmgr.dll,10". |
|
CommandString |
The command string required for opening and printing the file in Word. Because this syntax is the same for all Word files, you can simply duplicate the strings that Word uses under the Word.Document.8 key. |
|
DDE Commandstring |
The Dynamic Data Exchange command string used for opening or printing the file in Word. Again, you can duplicate the strings that Word uses under Word.Document.8. |
Programmatically. Because editing the registry manually is at least as cumbersome - and definitely more dangerous - than the first method, it's a lot simpler to write a macro that does the work for you (see FIGURE 5). The macro uses the Windows Scripting Host (WSH) as the interface to access the registry. (WSH is part of all recent versions of Windows and Internet Explorer.)
' Create a file type
      with inv as the extension
      ' and Invoice as the
      description.
      Sub
      Demo1()
        RegisterFile type "inv",
      "Invoice"
      End Sub

      Sub
      RegisterFileType(Ext As String, Desc As String)
        On
      Error Resume Next
        ' Create an
      object variable.
        Dim
      WSH As Object


        Set
      WSH = CreateObject("WScript.Shell")
        ' Make sure
      the extension is specified without a period.
        Ext = Replace(Ext, ".",
      vbNullString)
        With WSH
           ' Bail out if the extension is already taken.

           Dim Test As String
          Test =
      .RegRead("HKCR\." & Ext & "\")
           ' If RegRead returns a valid entry, we jump out.

           If Err = 0 Then Exit Sub

           ' Create a unique Name ID.
          NameId = Ext &
      "file"
           ' See which commands are used to Open and
      Print
          ' Word docs.
          OpenCmd =
      _
            .RegRead("HKCR\Word.Document.8\shell\open\command\")

          PrintCmd =
      _
            .RegRead("HKCR\Word.Document.8\shell\print\command\")

          DDEOpenCmd =
      _
            .RegRead("HKCR\Word.Document.8\shell\open\ddeexec\")

          DDEPrintCmd =
      _
            .RegRead("HKCR\Word.Document.8\shell\print\ddeexec\")

          DDEPrintIfexecCmd =
      .RegRead( _
            "HKCR\Word.Document.8\shell\print\ddeexec\ifexec\")

           ' Create the entry for the extension,
          ' and register the name ID.

          .RegWrite "HKCR\."
      & Extension & "\", NameId
           ' Create the entry for the name ID and its Desciption.

          .RegWrite "HKCR\"
      & NameId & "\", Description
           ' Create a Shell/Open and Shell/Print branch,
      and
          ' specify the menu string that
      appears on Explorer
          ' context menus.
          .RegWrite "HKCR\"
      & NameId & "\shell\open\", "&Open"
          .RegWrite "HKCR\"
      & NameId & "\shell\print\", "&Print"
           ' Duplicate the command strings for
      opening
          ' and printing.
          .RegWrite "HKCR\"
      & NameId & _
                    "\shell\open\command\",
      OpenCmd
          .RegWrite "HKCR\"
      & NameId & _
                    "\shell\print\command\",
      PrintCmd
          .RegWrite "HKCR\"
      & NameId & _
                    "\shell\open\ddeexec\",
      DDEOpenCmd
          .RegWrite "HKCR\"
      & NameId & _
                    "\shell\print\ddeexec\",
      DDEPrintCmd
          .RegWrite "HKCR\"
      & NameId & _
             "\shell\print\ddeexec\ifexec\",
      DDEPrintIfexecCmd
          .RegWrite "HKCR\"
      & NameId & _
            "\shell\open\ddeexec\Application\",
      "WinWord"
          .RegWrite "HKCR\"
      & NameId & _
            "\shell\print\ddeexec\Application\",
      "WinWord"
          .RegWrite "HKCR\"
      & NameId & _
            "\shell\open\ddeexec\Topic\",
      "System"
          .RegWrite "HKCR\"
      & NameId & _
            "\shell\print\ddeexec\Topic\",
      "System"
        End
      With
End SubIt can't be stressed enough: Modifying the registry can be dangerous. It's very easy to create keys and values that upset your system. That's why the macro in FIGURE 5 has some code that prevents you from overwriting the settings for an existing extension. Just imagine what would happen if you decide to create an "Executive Summary" file type with the .exe extension!
The only data the demo in FIGURE 5 doesn't set is the one for the DefaultIcon value. Finding a suitable icon for your file types isn't always easy. There are hundreds of files on your computer, each holding up to dozens of fancy pictures. One of my favorite icon sources is the Pifmgr.dll file in the Windows\System folder. FIGURE 6 shows what this file has to offer.
The DIY icon. You can also design your own icons. You don't even need a sophisticated icon editor to create one. Just start the Windows Paint program, and draw a 32x32-pixel, 256-color bitmap. If you don't feel artistic enough, you can also scan drawings or photos, and reduce them to icon size. FIGURE 3 demonstrates how I used my passport photo as an icon. (Vanity knows no boundaries.)
Save the picture under an appropriate name and take note of the path where the file is stored. In the registry, specify for the DefaultIcon value the full path and file name, followed by a comma and a zero, e.g. C:\My Documents\My Pictures\Invoice.bmp,0. From that point on, your picture will be used as the default icon for your file type.
Refreshing the icons. When you run the routines in FIGURE 5, nothing visible happens. If you already have files with the specified extension, their description and icon don't change. One way to refresh the icons is by restarting Windows. The other way is by using a smart hack that I found at http://www.mvps.org/vbnet/ (a great source of Visual Basic code that you can use in your VBA projects). You can force Windows to erase and reload all system icons by temporarily changing the icon size used by the system, and then changing it back to its original value. After each change, use the SendMessageTimeout API function to tell all running applications there has been a change in the system's metrics. You'll find the code in the RefreshSystemIcons routine in Listing One.
Another thing that doesn't change when you associate a new file type with Word is the Files of type list at the bottom of Word's Open dialog box. It will continue to display the same file types as before, even if you restart your computer. Does this mean that you can't add entries to create filters for your invoices, reports, articles, and other document types?
No. But it requires another hack to make it happen.
Most of the file types listed in the Open dialog box are there because you told Office Setup that you wanted them. If, during the installation of Word, you specified that you want to be able to open WP files, you'll see them as an option in the list of file types. Because Word wasn't designed to read WP files, it needs a text converter that "translates" WP files into a Word-compatible format. Office installs these converters in the C:\Program Files\Common Files\Microsoft Shared\Textconv folder. At the same time, a number of registry entries are created under HKEY_LOCAL_MACHINE\Software\Microsoft\Office\9.0\Word\Text Converters\Import (see FIGURE 7). When Word starts, it reads each registry entry and, if the text filter is physically installed, adds the file type to the list.
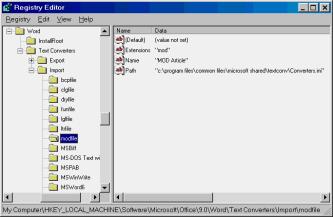
Although Word can't open non-native files without the help of a converter, it does recognize many of them. Most files have a so-called "header" that's unique to the file type. If this header identifies an "alien" document, Word tries to establish which application created the file. If the file format is recognized, and if the appropriate text filter is installed, the file is converted and opened in Word.
If the header identifies a native file format (even if the extension isn't "doc"), Word doesn't bother about converters, and opens the file immediately.
This is crucial for our hack, so let's recap:
1) The only way to add a new file type to Word's Open dialog box is by installing a text converter for that file type.
2) It doesn't matter which converter you install, because Word ignores converters if it recognizes the file format as a native format.
What can we conclude from this? Elementary, dear Watson. We simply create our private registry entries in the required syntax, and install a dummy converter in the C:\Program Files\Common Files\Microsoft Shared\TextConv folder. Word reads the registry at startup, sees that a converter is available, and adds our new file type to the Open dialog box. When Word opens a file of our private type (with an unknown extension), it finds out that it's just a regular document, and displays it without using our dummy converter.
To make a file type appear in the Open dialog box, you must create a registry key under HKEY_LOCAL_MACHINE\Software\Microsoft\Office\9.0\Word\Text Converters\Import that identifies the converter's class name. This can be any string, as long as it doesn't duplicate an existing class name. Under that key, you need three values:
The code in FIGURE 8 takes care of this.
Sub
      Demo2()
        RegisterConverter "inv",
      "Invoice"
      End Sub

      Sub
      RegisterConverter(Ext As String, Desc As String)
        On
      Error Resume Next
        ConvertersPath = _
          Options.DefaultFilePath(wdTextConvertersPath)

        DummyConverter = ConvertersPath
      & "\Converters.ini"
        ' Create an
      initialization file as a dummy converter, and
        ' add new
      Description/Extension combination.
        Call WritePrivateProfileString("File
      types", Ext, Desc, _
                                       DummyConverter)

        ' Create an
      object variable.
        Dim
      WSH As Object
        Set
      WSH = CreateObject("WScript.Shell")
        ' Make sure
      the extension is specified without a period.
        Ext = Replace(Ext, ".",
      vbNullString)
        NameId = Ext & "file"

        RegKey =
      "HKLM\Software\Microsoft\Office\9.0\Word\" _ &
                 "Text
      Converters\Import\" & NameId
        WSH.RegWrite RegKey &
      "\Extensions", Ext
        WSH.RegWrite RegKey &
      "\Name", Desc
        WSH.RegWrite RegKey &
      "\Path", DummyConverter
End SubWhat is interesting is that the Path value doesn't point to a valid text converter at all. Instead, I chose the format of a Windows initialization (.ini) file, and used the opportunity to create a catalog of the file types I add to Word's Open dialog box (you'll soon read why). FIGURE 9 shows how your brand new file types appear in the list at the bottom of Word's Open dialog box.

Alas, the above trick doesn't work for the Save As dialog box. Word can save files in many different formats without using text converters. The only way to add your private document types and extensions to the Save As dialog box is by associating the type with a non-native file format. I tried it, got it to work, but dropped the idea immediately. Apart from the fact that you're guaranteed to lose all macrocode in the file (and possibly much of the formatting), Word will continuously prompt you to save the file as a normal document, which is too bothersome to be useful.
You can still save documents with non-doc extensions, though. Just make sure to type the file name within double quotes. Otherwise Word will add the .doc suffix to your private extension, and you'll end up with a file name like "February 2000.inv.doc" (an annoying "feature" of most Windows applications).
Because the creation of new file types takes quite a bit of code, it's an ideal candidate for encapsulating the routines in a class module. The download file included with this article contains the complete source code for the module, plus a separate module that demonstrates how to use the class (see end of article for download details).
The FileType class exposes the five properties and two methods shown in FIGURE 10.
|
Property |
Description |
|
Extension |
String. The extension for the file type. If you use an extension that's used by another application, an error message is displayed, and the file type is neither created nor deleted. |
|
Description |
String. The description of the file type as it appears in Explorer and the Open dialog box. |
|
IconFile |
String. The full path of the file that contains the icon you want to use. This can be a .dll or .exe file, but can also be a bitmap. If no value is specified, the class assumes the icon file is Pifmgr.dll in the \Windows\System folder. |
|
IconIndex |
Integer. The (zero-based) index of the icon in the icon file. For a bitmap file, use zero, or omit this property. |
|
RefreshOnCreation |
Boolean. True to force Windows to refresh all system icons, False to skip this action. Because this operation can take several seconds, consider a True value only when you create your last file type. |
|
Method |
Description |
|
Create |
Creates the file type and installs the dummy converter. Note: Use this method after you've specified all properties! |
|
Delete |
Deletes the file type. Requires the Extension property to be set first. Other properties are ignored. |
When you've included the FileType class in your project, you can use it as shown in the following examples.
The following code doesn't specify a value for the IconFile property, which means that the Pifmg.dll file in the \Windows\System folder is used. An IconIndex value of 18 means that icon 19 is used (icon indexes are zero-based):
Sub
      CreateFiletypeWithPifmgrAsIconFile()
        On
      Error Resume Next
        With New
      FileType
          .Extension = "ltr"

          .Description =
      "Letter"
          .IconIndex =
      18
          .RefreshOnCreation
      = True
          .Create
        End
      With
      End Sub
The following example uses a bitmap as icon file. No value is specified for the IconIndex property, which means that zero is assumed:
Sub
      CreateFiletypeWithBitmapAsIcon()
        On
      Error Resume Next
        With New
      FileType
          .Extension = "fun"

          .Description =
      "Funny Joke"
          .IconFile =
      "C:\Windows\Triangles.bmp"
          .RefreshOnCreation
      = False
          .Create
        End
      With
      End Sub
This final example deletes a previously created file type with the .inv extension:
Sub
      DeleteFileType()
        On
      Error Resume Next
        Dim
      FT As FileType
        Set
      FT = New FileType
        With FT
          .Extension = "inv"

          .Delete
        End
      With
End SubMost of Listing One covers code that I've discussed in this article. The comments should help you understand what's happening inside the class. Here's some additional background about the built-in safety procedures:
[FileTypes]
      inv=Invoice
      mod=MOD Article
      ltr=Letter
      clg=Catalog
      bcp=Book Chapter
lgl=Legal DocumentsAgain, modifying the registry requires a lot of care and understanding, and is always hazardous. Feel free to use the FileType class and incorporate it in your applications, but as the author, I decline any responsibility for the effects of using it!
The purpose of this column is to demonstrate that there's a lot more to VBA programming than you may think. With a bit of hacking, you can create powerful new tools to enhance your Office environment. In this article, I demonstrated how you can create an unlimited number of new document types that can be opened in Word. By creating a dummy text converter, you can even fool Word into adding them as "alien" file types in the File | Open dialog box.
The VBA source referenced in this article is available for download.
Dutchman Romke Soldaat was hired in 1988 by Microsoft to co-found the Microsoft International Product Group in Dublin, Ireland. That same year, he started working with the prototypes of WinWord, writing his first macros long before the rest of the world. In 1992 he left Microsoft and created a number of successful add-ons for Office. Currently living in Italy, he divides his time between writing articles for this magazine, enjoying the Mediterranean climate, and steering his Land Rover through the world's most deserted areas. Romke can be contacted at rsoldaat@hotmail.com.
 ' Windows API functions
      used in this class.
      Private Declare Function
      SystemParametersInfo _

      Lib "user32" Alias
      "SystemParametersInfoA" ( _

      ByVal uAction As Long, ByVal uParam As Long, _
        lpvParam As Long, ByVal fuWinIni As Long) As Long
      Private Declare Function
      SendMessageTimeout _

      Lib "user32" Alias
      "SendMessageTimeoutA" ( _

      ByVal hwnd As Long, ByVal msg As Long, _

      ByVal wParam As Long, ByVal lParam As Any, _

      ByVal fuFlags As Long, ByVal uTimeout
      As Long,
      _
        lpdwResult As Long) As Long
      Private Declare Function
      WritePrivateProfileString _

      Lib "kernel32" Alias
      "WritePrivateProfileStringA" ( _

      ByVal lpApplicationName As String, _

      ByVal lpKeyName As Any, ByVal lpString
      As Any,
      _

      ByVal lpFileName As String) As Long
      Private Declare Function
      GetPrivateProfileString _

      Lib "kernel32" Alias
      "GetPrivateProfileStringA" ( _

      ByVal lpApplicationName As String, _

      ByVal lpKeyName As Any, ByVal lpDefault
      As String,
      _

      ByVal lpReturnedString As String, _

      ByVal nSize As Long, ByVal lpFileName
      As String) As Long
      Private Declare Function
      GetSystemDirectory _

      Lib "kernel32" Alias
      "GetSystemDirectoryA" ( _

      ByVal lpBuffer As String, ByVal nSize
      As Long) As Long

      Private
      strExtension As String
      Private
      strDescription As String
      Private
      strIconFile As String
      Private
      intIconIndex As Integer
      Private
      boolRefreshOnCreation As Boolean


      Dim
      DummyConverter As String
      Dim WSH As Object

      ' Registry location of
      the import text converters.
      Const
      REG_IMPORTCONVERTERS As String = _
        "HKLM\Software\Microsoft\Office\9.0\Word\" &
      _
        "Text Converters\Import\"


      ' Remove any leading
      period, convert to lowercase.
      Property Let Extension(strExt As
      String)
        strExtension = LCase(Replace(strExt, ".", vbNullString))

      End Property

      ' Used by the Create
      and Delete methods.
      Property Get Extension()As String
        Extension =
      strExtension
      End Property

      Property Let Description(strDesc As String)
        strDescription =
      strDesc
      End Property

      ' Used by the Create
      method.
      Property Get Description()As
      String
        Description =
      strDescription
      End Property

      Property Let IconFile(strFile As
      String)
        strIconFile =
strFile
      End Property

      ' Used by the Create
      method.
      Property Get IconFile()As String
        IconFile =
      strIconFile
      End Property

      Property Let IconIndex(intIdx As
      Integer)
        intIconIndex =
intIdx
      End Property

      ' Used by the Create
      method.
      Property Get IconIndex()As Integer
        IconIndex =
      intIconIndex
      End Property

      Property Let RefreshOnCreation(Switch As Boolean)
        boolRefreshOnCreation = Switch
      End Property

      ' Used by the Create
      method.
      Property Get RefreshOnCreation()As Boolean
        RefreshOnCreation =
      boolRefreshOnCreation
      End Property

      ' This method creates
      the filetype and installs
      ' the dummy text
      converter.
      Sub
      Create()
        If
      Extension = vbNullString Then
          MsgBox "You must
      specify an extension!"
           Exit Sub
        ElseIf Not
      IsExtensionAvailable(Extension) Then
          MsgBox "The
      extension is already in use!"
           Exit Sub
        End
      If

        If
      Description = vbNullString Then
          MsgBox "You must
      specify a description!"
           Exit Sub
        End
      If

        ' If no
      icon file is specified, use PIFMGR.DLL in
        ' the
      Windows\System folder.
        If
      IconFile = vbNullString Then
           Dim SysDir As String
           Dim Buff As String * 255
           Dim LenReturn As Long
          LenReturn =
      GetSystemDirectory(Buff, 255)
          SysDir = Left(Buff,
      LenReturn)
          IconFile = SysDir
      & "\Pifmgr.dll"
        End
      If

        Dim
      NameId As String,
      IconIdx As String
        Dim
      OpenCmd, PrintCmd
        Dim
      DDEOpenCmd, DDEPrintCmd, DDEPrintIfexecCmd

        ' Create a
      filetype identifier.
        NameId = Extension & "file"

        ' Combine
      IconFile and IconIndex in a single string.
        IconIdx = IconFile & ","
      & CStr(IconIndex)
        With WSH
           ' See which commands are used to Open
          ' and Print Word documents.

          OpenCmd =
      _
            .RegRead("HKCR\Word.Document.8\shell\open\command\")

          PrintCmd =
      _
            .RegRead("HKCR\Word.Document.8\shell\print\command\")

          DDEOpenCmd =
      _
            .RegRead("HKCR\Word.Document.8\shell\open\ddeexec\")

          DDEPrintCmd =
      _
            .RegRead("HKCR\Word.Document.8\shell\print\ddeexec\")

          DDEPrintIfexecCmd =
      .RegRead( _
            "HKCR\Word.Document.8\shell\print\ddeexec\ifexec\")

           ' Create the entry for the extension,
          ' and register the name ID.

          .RegWrite "HKCR\."
      & Extension & "\", NameId
           ' Create the entry for the Icon ID.
          .RegWrite "HKCR\"
      & NameId & "\", Description
           ' Create the entry for the name ID and its Description.

          .RegWrite "HKCR\"
      & NameId & "\DefaultIcon\", IconIdx
           ' Create a Shell/Open and Shell/Print branch,
      and
          ' specify the menustring that
      appears on Explorer
          ' context menus.
          .RegWrite "HKCR\"
      & NameId & "\shell\open\", "&Open"
          .RegWrite "HKCR\"
      & NameId & "\shell\print\", "&Print"
           ' Duplicate the command strings for
      opening
          ' and printing.
          .RegWrite "HKCR\"
      & NameId & _
                    "\shell\open\command\",
      OpenCmd
          .RegWrite "HKCR\"
      & NameId & _
                    "\shell\print\command\",
      PrintCmd
          .RegWrite "HKCR\"
      & NameId & _
                    "\shell\open\ddeexec\",
      DDEOpenCmd
          .RegWrite "HKCR\"
      & NameId & _
                    "\shell\print\ddeexec\",
      DDEPrintCmd
          .RegWrite "HKCR\"
      & NameId & _
                "\shell\print\ddeexec\ifexec\",
      DDEPrintIfexecCmd
          .RegWrite "HKCR\"
      & NameId & _
            "\shell\open\ddeexec\Application\",
      "WinWord"
          .RegWrite "HKCR\"
      & NameId & _
            "\shell\print\ddeexec\Application\",
      "WinWord"
          .RegWrite "HKCR\"
      & NameId & _
            "\shell\open\ddeexec\Topic\",
      "System"
          .RegWrite "HKCR\"
      & NameId & _
            "\shell\print\ddeexec\Topic\",
      "System"
           ' Register the text converter.
          .RegWrite
      REG_IMPORTCONVERTERS & NameId & _
                    "\Extensions",
      Extension
          .RegWrite
      REG_IMPORTCONVERTERS & NameId & _
                    "\Name",
      Description
          .RegWrite
      REG_IMPORTCONVERTERS & NameId & _
                    "\Path",
      DummyConverter
        End
      With
        ' Force a
      rebuild of the icon cache.
        If
      RefreshOnCreation Then
      RefreshSystemIcons
        ' This line
      creates an entry for the filetype in an
        '
      initialization file. If the file doesn't exist, it's
        '
      automatically created. We use this file as a dummy
        ' text
      converter.
        Call
      WritePrivateProfileString("FileTypes", Extension, _
          Description,
      DummyConverter)
      End Sub

      ' This method deletes
      the file type.
      Sub
      Delete()
        On
      Error Resume Next
        If
      Extension = vbNullString Then
          MsgBox "You must
      specify an extension!"
           Exit Sub
        End
      If
        ' If
      extension wasn't created by the Create method
        ' it won't
      be deleted.
         If
      Not IsExtensionPrivate(Extension) Then
          MsgBox "You cannot
      delete this extension!"
           Exit Sub
        End
      If

        Dim
      NameId As String
        NameId = Extension & "file"

        With WSH
          .RegDelete "HKCR\"
      & "." & Extension & "\"
          .RegDelete "HKCR\"
      & NameId & "\"
          .RegDelete
      REG_IMPORTCONVERTERS & NameId & "\"
        End
      With
        Call
      WritePrivateProfileString("FileTypes", Extension, _
          vbNullString,
      DummyConverter)
      End Sub

      ' This routine runs
      when a FileType object is created.
      Private Sub Class_Initialize()
        On
      Error Resume Next
        Set
      WSH = CreateObject("WScript.Shell")
        DummyConverter =
      Options.DefaultFilePath( _
          wdTextConvertersPath) &
      "\Converters.ini"
      End Sub

      ' This routine runs
      when a FileType object is deleted.
      Private Sub Class_Terminate()
        Set
      WSH = Nothing
      End Sub

      ' Security feature:
      This procedure returns only True
      ' if the extension is
      not in use by another application
      ' or if the filetype
      was created with the Create method.
      Private Property Get
      IsExtensionAvailable(Ext As String)
        On
      Error Resume Next
        Dim
      CurNameID As String
        CurNameID =
      WSH.RegRead("HKCR\." & Ext & "\")
        IsExtensionAvailable =
      _
           (CurNameID =
      vbNullString) Or IsExtensionPrivate(Ext)

      End Property

      ' Security feature:
      This procedure returns only True
      ' if it is recorded in
      the CONVERTERS.INI file by
      ' the Create method.

      Private Property Get
      IsExtensionPrivate(Ext As String)
        Dim
      Buff As String *
      255
        Buff = String(10, vbNullChar)
        Dim
      LenReturn As Long
        LenReturn =
      GetPrivateProfileString("FileTypes", Ext, _
          vbNullString, Buff,
      255, DummyConverter)
        IsExtensionPrivate = (LenReturn
      > 0)
      End Property

      ' Forces Windows to
      delete and recreate its cache of
      ' system icons.

      Private Sub RefreshSystemIcons()
        Const HWND_BROADCAST As Long =
      &HFFFF&
        Const WM_SETTINGCHANGE As Long =
      &H1A
        Const SPI_SETNONCLIENTMETRICS As Long = 42
        Const SMTO_ABORTIFHUNG As Long =
      &H2
        Const REG_ICONSIZE_KEY = "HKCU\Control
      Panel\" & _
          "Desktop\WindowMetrics\Shell Icon Size"


        On
      Error Resume Next
        ' Get
      current icon size.
        Dim
      CurIconSize
        CurIconSize =
      WSH.RegRead(REG_ICONSIZE_KEY)


        ' If no
      default size, assume 32.
        If
      Err Then CurIconSize = 32


        ' Change
      the icon size to 1 pixel less.
        WSH.RegWrite REG_ICONSIZE_KEY,
      CurIconSize - 1
        ' Tell the
      world.
        Call SendMessageTimeout(HWND_BROADCAST,
      _
          WM_SETTINGCHANGE,
      SPI_SETNONCLIENTMETRICS, _
          0&,
      SMTO_ABORTIFHUNG, 10000&, Result)
        ' Restore
      the original icon size.
        WSH.RegWrite REG_ICONSIZE_KEY,
      CurIconSize
        ' Tell the
      world again.
        Call SendMessageTimeout(HWND_BROADCAST,
      _
          WM_SETTINGCHANGE,
      SPI_SETNONCLIENTMETRICS, _
          0&,
      SMTO_ABORTIFHUNG, 10000&, Result)
End SubCopyright © 2000 Informant Communications Group. All Rights Reserved. • Site Use Agreement • Send feedback to the Webmaster • Important information about privacy