You can use Microsoft Active Server Pages (ASP) to develop powerful Web applications that are not dependent on the capabilities of the browser. This power of ASP comes not from the built-in libraries of the ASP object model, but rather from Active Server components you call from your ASP programs. This series of articles will cover one of those Active Server components: Collaboration Data Objects, or CDO, which enables you to develop messaging and collaboration applications for the Web. You can use CDO for other purposes as well, such as in client- or server-based applications that you develop. In this series, you'll learn what CDO is and how it compares to other technologies, what objects are in the CDO library, and how you can start developing ASP and Microsoft Visual Basic applications that take advantage of this library.
CDO is an object library that exposes the interfaces of the Messaging Application Programming Interface (MAPI), but instead of requiring the C/C++ language as MAPI does, CDO can be programmed using any development tool that creates COM objects, such as ASP, Visual Basic, and Microsoft Visual C++.
CDO has had several incarnations, and previous versions shipped with different names and functionality. For example, in Microsoft Exchange Server version 4.0, CDO was named OLE Messaging, and in Exchange Server 5.0, CDO was named Active Messaging. With the advent of Exchange Server version 5.5 and Microsoft Outlook 98, the library was renamed Collaboration Data Objects to better describe its services - CDO provides much more than messaging functionality. Even though the names have changed from version to version, any older applications using a previous version of CDO are compatible with the latest version of the library.
You install CDO by installing either Outlook 98 on your machine, or Outlook Web Access on your Web server. CDO is actually divided into two DLLs: CDO.dll and CDOHTML.dll. CDO.dll contains the core collaborative functionality of CDO, such as sending messages, accessing the directory, and viewing free/busy calendar information. CDOHTML.dll is the CDO Rendering library. This library allows you to automatically convert information stored inside Exchange Server to HTML by using custom views, colors, and formats. The CDO Rendering library is installed when you install Outlook Web Access on your Web server. Throughout this series, you will learn how to use both CDO libraries in your applications.
CDO and the Outlook object library are complementary technologies. You might be wondering when to use each library. To help you make a decision, take into consideration account criteria, such as where the application will run and what type of information the application will access. As you develop applications, you will find that deciding whether to use the Outlook library or the CDO library will almost never be simple. Use the Outlook object library to do the following:
Use the CDO library to do the following:
When you install Microsoft Internet Information Server (IIS) 4.0, you have the option to install an SMTP component and an NNTP component on your Web server. These components are subsets, functionally, of the CDO library named CDO for NTS. The CDO for NTS library allows you to quickly build applications that do not require the complete functionality of CDO. For example, if on your Web page you wanted to build a simple way for users to send comments through e-mail, you would use the CDO for NTS object library rather than CDO. If your application required looking up a user in a directory server, however, you would want to use the advanced functionality of the full CDO library. Another difference between CDO and CDO for NTS is that CDO for NTS uses only SMTP and NNTP to communicate with a server. The use of these protocols to talk with the server limits the functionality that the CDO for NTS library can provide. With that said, you should use the CDO for NTS library to do the following:
Use the CDO library to do the following:
The CDO library is a hierarchical library consisting of objects and collections. Throughout this hierarchy, you can create children objects from their parent objects. As you read the chapter, you'll find the same collection for different objects. While these duplicated collections might have the same name, the information each accesses is specific to the object each refers to.
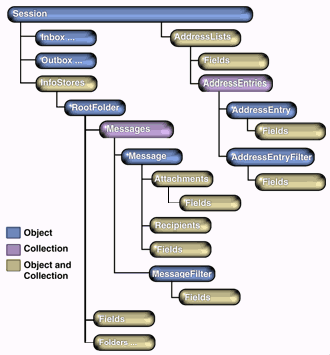
In the CDO library, the Session object is the highest-level parent of all the other objects and contains all objects and collections. This makes sense since you need some type of session, either an Exchange Server session or an offline session, to start accessing information stored in an Exchange Server database. FIGURE 1 shows the hierarchy of the CDO library, which begins with the Session object.
(Note: If you're familiar with ActiveX Data Objects [ADO], it might be helpful to know that the Session object is similar to the ADO Connection object. However, do not confuse the Session object in ASP with the Session object in CDO. They are two entirely different objects.)
As you can see from FIGURE 1, the CDO library is quite logical in its layout of collections and objects. Below the Session object are the major collections and objects of the CDO library, such as the InfoStores collection, which contains the data stores for your application, and the AddressLists collection, which contains the address entries your application can use. Below these major collections are other collections such as the Folders collection, which contains the folders for a particular InfoStore, and the Messages collection, which contains the messages for a particular folder. The CDO library is one of the most approachable Microsoft object libraries and allows you to quickly build powerful collaborative applications.
While this chapter provides an overview of the CDO library, you might also want to look at the CDO Help file, which provides useful information, as well as code samples. The CDO Windows Help file (cdo.hlp) can be found on the Exchange Server 5.5 CD or on the Outlook 98 CD. The CDO compiled HTML Help file (cdo.chm) is included with this article; see end of article for download details. It is also available as part of the Platform SDK section of the MSDN Library, which can be accessed online at http://msdn.microsoft.com/library/psdk/portals/mainport.htm.
For additional CDO information, refer to the "Programming Outlook and Exchange Supplement" (also included with this article). Use it to learn about the CDO library methods and properties not discussed in this series. Also refer to the section at the end of this series that contains some tips and tricks for building CDO applications.
The easiest way to learn any new object library is to look at the objects in action. For this reason, the rest of this series will show you four sample applications that demonstrate different technologies in the CDO library: a Helpdesk application, a Calendar of Events application, an Intranet News application, and a CDO Visual Basic application. From these four samples, you will learn how to use the CDO library in your applications and become aware of the technical considerations when building CDO applications. Before we dive into the details of these four sample applications, we'll first look at the necessary Exchange Server logon step.
Whether you build CDO applications by using ASP, or by using some other development tool, the most important point to remember is that you cannot create any other objects in the CDO library if you do not successfully create a Session object. Further, you cannot access any data in Exchange Server unless you successfully log on to the server using the Session object. Before we can look at the code in the CDO applications, you need to understand how to log on to an Exchange Server by using the Session object.
The Session object is the top-level object in the CDO hierarchy. It contains session-wide settings and properties that return top-level objects. When using the CreateObject method in your applications, you use the ProgID of the Session object - MAPI. Session - to create a CDO object. CDO does not allow you to access any other objects in the library until you have successfully logged on using the Logon method of the Session object. The only exception to this is the SetLocaleIDs method, which sets the Locale and CodePage IDs for the user.
The Logon method takes a number of different parameters, as shown in the following code; the parameter you use depends on the needs of your application:
objSession.Logon( [ProfileName] [, ProfilePassword] [,
      ShowDialog]
[, NewSession] [, ParentWindow] [, NoMail] [, ProfileInfo] )
The two common ways to log on to a CDO session are by passing in a MAPI profile name and by passing in the specific information CDO needs to dynamically generate a profile. Dynamically generated profiles are the preferred method when building ASP applications with CDO. Since ASPs cannot access client profiles, CDO has no way to pull information from a profile located on the machine of the user.
To log on using a profile, pass the profile name as the first parameter, ProfileName, to the Logon method. If you don't know which profile name to use, set the ShowDialog parameter to True, and CDO will prompt the user to pick a profile. The second parameter, ProfilePassword, specifies the profile password. You could leave this parameter blank and set the ShowDialog parameter to True, and CDO will prompt the user for a password. By setting the NewSession parameter to False, you can have CDO take advantage of an existing MAPI session, eliminating the unnecessary overhead from creating a new MAPI session on the user's machine. The following code snippet shows you how to use the Logon method with a profile named MS Outlook Settings:
oSession.Logon ProfileName:="MS Outlook Settings", _ showDialog:= TrueNewSession:= TrueWhen your application is running in an environment where profiles or the ability to prompt a user for a profile might not be available, CDO allows you to dynamically generate a profile for the user by passing in the user's server name and mailbox name to the Logon method. To get this information, you can have your application prompt the user for his server name and mailbox name. Alternatively, CDO can pull the default Exchange Server name from the Registry by using the ConfigParameter properties in the CDO Rendering library, which you will learn about later in this chapter. For now, the code sample assumes that you know at least one Exchange Server name in your organization. The following code shows you how to log on to CDO using a dynamically generated profile:
strServer = "Exchange Server Name"
      strMailbox = "User Alias Name (Not Display Name)"
      strProfileInfo = strServer + vbLf + strMailbox
      oSession.Logon "", "", False,
      True, 0, True,
      strProfileInfo
      ' Check for a valid logon.
      set oInbox = oSession.GetInbox

      if err.number <> 0 then   ' Not Successful.
        oSession.Logoff
        Response.write "Unsuccessful Logon!"
      end if
(Note: For the user's mailbox name, don't use the display name, such as Thomas Rizzo. Instead use the alias name of the user, such as thomriz. Also, when using the ProfileInfo parameter, attempt to access an item in a CDO message store, such as the first message in the Inbox, since the Logon method will return success even if the parameters in ProfileInfo are incorrect. If attempting to access items returns an error, the user was not successfully logged on.)
CDO also allows users to anonymously access the Exchange Server public folder store as well as the Exchange Server directory. Anonymous access must be enabled by the administrator of the Exchange Server system. Also, the administrator or developer can control which folders and which directory entries the anonymous user can see by setting some options in the Exchange Administrator program. These options are discussed in more detail throughout this series.
To use anonymous access, you must pass in to the ProfileInfo parameter the distinguished name of the Exchange Server and the anon account. You do this by using the following format:
server distinguished name & vbLf & vbLf & "anon"
The server's distinguished name takes the form of:
/o=enterprise/ou=site/cn=Configuration/cn=Servers/cn=server
The enterprise parameter corresponds to the Exchange Server organization, and the site parameter corresponds to the Exchange Server site you want to access. The following code shows you how to log on using anonymous access:
strProfileInfo = "/o=" & "Your Exchange Org" &
      "/ou=" & _
        "Your Site" &
      "/cn=Configuration/cn=Servers/cn=" & _
          "Your Server" & vbLF & vbLF
      & "anon"
      oSession.Logon "", "", False,
      True, 0, True,
      strProfileInfo
      if err.number <> 0 then
        oSession.Logoff
        response.write "Unsuccessful Logon!"
end ifNow that we know how to successfully log on to the Exchange Server, let's take a look at our first sample application, the Helpdesk application. The Helpdesk application is a Web-based application that allows users to submit new help requests. Help technicians can, in turn, use their Web browser to view and answer help requests as well as schedule meetings with the users to go on site to solve their problems. This application allows the technicians to use different views for the help tickets stored in the system so that they can quickly see who the ticket is from, when it was sent, and its status. (A help ticket for the Helpdesk application is shown in FIGURE 2.) When browsing help tickets, the technicians are presented with machine-configuration information from a Microsoft Access 97 database, making it easier for them to track down whether the issue is related to hardware, software, or a user error.
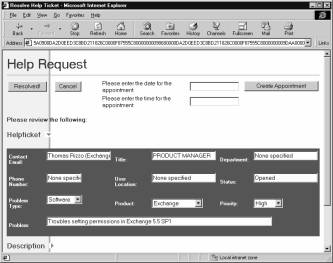
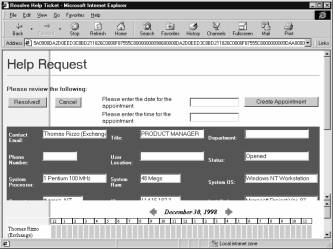
This is a complex sample application, but the code for it is easy to follow and shows you how to use many of the objects in the CDO library. There are actually two versions of the application included with this article. The version you use depends on the Web browser you want to target. One version implements a user interface for the helpdesk tickets by using Dynamic HTML (DHTML). The other version uses HTML tables. A screen from the non-DHTML version is shown in FIGURE 3.
Before you can install the application, you must have a Windows NT 4.0 Server and a client with certain software installed. FIGURE 4 outlines the installation requirements.
|
Required Software |
Installation Notes |
|
Exchange Server 5.5 SP1 with Outlook Web Access |
|
|
IIS 3.0 or higher with Active Server Pages |
IIS 4.0 is recommended. |
|
CDO library (cdo.dll) CDO Rendering library (cdohtml.dll) |
Exchange Server 5.5 SP1 installs CDO library 1.21 and CDO Rendering library 1.21. Outlook 98 installs CDO library 1.21. |
|
ActiveX Data Objects |
IIS 4.0 installs ADO 1.5. Visual Basic 6.0 installs ADO 2.0. For more information on ADO, consult http://www.microsoft.com/data/. |
|
Access 97 (optional) |
Install Access 97 if you want to utilize the database access feature. |
|
For the client: A Web browser Outlook 98 |
For the Web browser, Microsoft Internet Explorer 4.0 is recommended. You can run the client software on the same machine or on a separate machine. |
To use the Helpdesk application, you will need to have some e-mail users. You can either select currently set-up e-mail users or add new ones using the Exchange Administrator program. Be sure to fill in the directory information for your users; this information should include their office locations, phone numbers, titles, and departments. The Helpdesk application dynamically retrieves this information using the CDO library. If the information is not available in the directory, the application will display the text "None specified" for these fields.
To install the application, download the Helpdesk folder to your Web server where you want to run the application. If you are going to use a browser that does not support DHTML, such as Internet Explorer 3.0, copy the three .asp files from the nondhtml subfolder to the Helpdesk folder, overwriting the current files. These files will replace the DHTML versions of the Helpdesk with the HTML versions.
Start the IIS administration program. The user interface you see depends on what version of IIS you have. Create a virtual directory that points to the location where you copied the help desk files, and name the virtual directory "Helpdesk". Make sure you enable the Execute permissions option for the virtual directory or you will receive an HTTP error when attempting to access the application. You will be able to use the following URL to access your help desk: http://yourservername/helpdesk.
Included with the helpdesk files (again, see end of article for download details) is a sample Access 97 database (smsdata.mdb) that allows the application to query for system information about the current user. To use this database, you must set up a system DSN for it on the server machine by using the ODBC Data Source Administrator in the Control Panel. Point the system DSN at the smsdata.mdb file, and name the DSN Helpdesk. Make sure that the read-only flag is unchecked for the smsdata.mdb file. Open smsdata.mdb in Access and edit the Userid fields for all three tables to reflect the display names of the users you have in Exchange.
Launch Microsoft Outlook. (You can launch it on any machine because you are going to create a public folder that will contain the help tickets for the application. The only requirement is that the Exchange Server with which the IIS server is communicating can access the public folder you create.) Create a new public folder under All Public Folders. Name the folder "Helpdesk" and select Task Items as the default item type for the folder.
(Note: You must install the Helpdesk folder under All Public Folders or the application will not work. If you cannot install the application there, you can modify the code contained in the Helpdesk application so that it looks for the folder in another location, or you can retrieve the folder by using its EntryID.)
Among the helpdesk files, you will find a file named helpdesk.fdm. This file is a form definition file that will be used to import the correct fields needed by the Helpdesk application. In this case, the form is a Help Request task form with multiple custom fields.
To install the Help Request form, you need to import this file in to the Helpdesk public folder. To do this, right-click on the Helpdesk public folder and select Properties. Click on the Forms tab, and click Manage to display the Forms Manager, as shown in FIGURE 5.
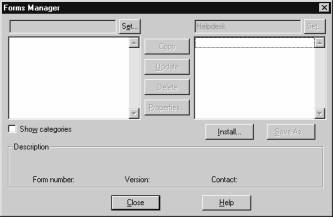
In the Forms Manager dialog box, click Install to display the Open dialog box. Select the All Files option from the Files Of Type drop-down list so that Outlook does not search only for files with a .cfg extension. Locate and double-click on the helpdesk.fdm file to display the Form Properties dialog box. Click Cancel, and then click Close and OK. When you have the Helpdesk public folder selected, you should see a new option on the Actions menu named New Helpdesk Request.
You will need to create some views in the Outlook client so that these views are available to the Web browser client. This is one of the powerful features of CDO. These views will include some of the custom fields from the Help Request form just installed. Using the Define Views dialog box and the information in FIGURE 6, create the Helpdesk, From, and Status views for the Helpdesk public folder.
|
View Name |
Type |
Fields |
Group By |
|
Helpdesk |
Table |
Flag, From User (select from Help Request form) Received, Subject (select from All Mail Fields) |
None |
|
From |
Table |
Flag (select from Help Request form) Received, Subject (select from All Mail Fields) |
From User, in ascending order |
|
Status |
Table |
From User (select from Help Request form) Received, Subject (select from All Mail Fields) |
Flag, in ascending order |
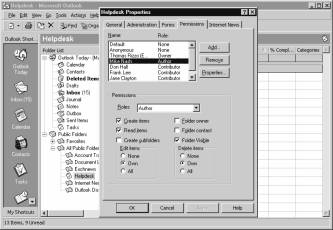
Using the Properties dialog box in Outlook for the Helpdesk public folder, set the permissions for your users. Give regular users who will submit help tickets Create Items permission. Give technicians who can submit, view, and resolve help tickets Create Items and Read Items permissions. FIGURE 7 shows a sample permissions setup for the Helpdesk folder. As you will see, the application checks the permissions of the current user for the Helpdesk folder to determine whether the user is a technician or just a regular user. If you do not give yourself at least Read Items permissions, you will not be able to see the menu option View Current Help Tickets in the Helpdesk application.
You're finished setting up the application. Try connecting your browser to http://yourservername/helpdesk to access the application.
From Programming Microsoft Outlook and Microsoft Exchange by Thomas Rizzo. Reproduced by permission of Microsoft Press. All rights reserved.
The files referenced in this article are available for download.
Thomas Rizzo works as a Product Manager in the Microsoft Exchange Server Product Unit in Redmond, WA. He specializes in evangelizing development features in both Exchange and Outlook. You can reach Tom at thomriz@microsoft.com.
Copyright © 2000 Informant Communications Group. All Rights Reserved. • Site Use Agreement • Send feedback to the Webmaster • Important information about privacy