![]()
This article assumes you're familiar with VBA, HTML, HTTP
|
Site Server Personalization and Membership for Intranets
William Oellermann |
|
Site Server plays an important role in scores of commercial sites. But its features can also provide unique benefits for internal Web applications. |
|
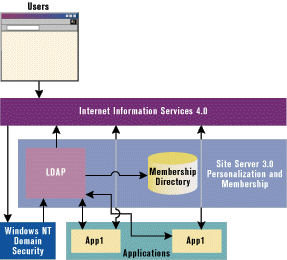
Site Server Personalization and Membership, part of both Microsoft® Site Server 3.0 and Site Server Commerce Edition 3.0, is a powerful feature that allows programmers to quickly add security and authentication to applications. Up until now Web sites have been the primary implementors of personalization and membership to control user access. With the growth of intranets and internalized Web applications, however, security and personalization have become increasingly important to the internal client as well. If you take a site built on Microsoft Internet Information Services (IIS) 4.0, Microsoft Transaction Services (MTS), databases, and a number of COM objects and add Site Server to this infrastructure, it may be hard at first to envision this architecture as effective or efficient. Additionally, in an intranet environment there can often be several independent groups or departments responsible for developing internal applications. Each group may have its own ideas and methods for implementing security or personalizing content. By taking a truly programmatic approach, you can utilize Site Server Personalization and Membership to make your Web-based applications quicker, as well as easier to develop and manage. In this article, I'll explore how to make Personalization and Membership an integral and productive piece of your intranet infrastructure. Since I'll assume that all applications are for internal use, I'll use Windows NT authentication for my membership model. (Even in an extranet scenario, this is a viable solution for security.) To effectively implement the Windows NT authentication model, every computer user needs to be assigned a Windows NT account and have Microsoft Internet Explorer 4.0 or 5.0 installed (other browsers don't support this authentication model). Figure 1 shows the infrastructure of a Web-based environment using Windows NT authentication. |
 |
| Figure 1: Authentication and Access Control |
|
The alternative to Windows NT authentication is membership authentication, which creates a model that is independent of any other system and thus requires its own user name and password to authenticate. This means the Web site and application will have their own accounts separate from a user's workstation account. For more information on the membership authentication model, refer to the Site Server documentation. When implemented properly, Site Server acts as a broker for your Windows NT security, user attributes, application access rights, and application properties. Lightweight Directory Access Protocol (LDAP) is an open standard that allows you to communicate with various data sources in a very efficient matter. Without going into too much detail, think of LDAP as your interface into the membership model. It will take your requests for information and turn them into SQL queries to retrieve the information from your model. It also includes caching functionality to help reduce the number of direct calls to your database.
Initialization and Configuration
|
 |
| Figure 2: Site Server Service Administrator |
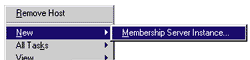 |
| Figure 3: New Membership Server |
|
You should choose the Custom Installation and select the Active User Object (AUO) and the LDAP service. You should also create a new membership directory. The next step is to select the Authentication Mode. For your intranet, make sure you select Windows NT Authentication, as shown in Figure 4. |
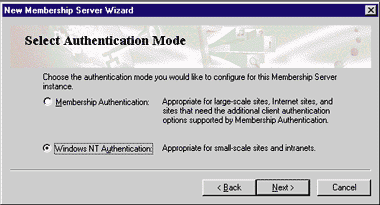 |
| Figure 4: Choosing Authentication Method |
|
Next, the wizard will ask you to name your membership directory. This will be used as the name of your organization. You won't be able to change this later, so make sure you use a name that is relevant to the model. You'll see where this name is used later. Next, you must specify the database to use. If you are using SQL Server™ to hold your membership model—which I highly recommend—make sure you already have the empty database created because the wizard will only allow you to reference an existing database. If you have any problems at this point, be sure to check the Site Server help; it includes tutorials for various processes, including setting up a new membership. To include membership for your intranet, you will need to map the site to the appropriate membership model. You can only map one membership model to a site. However, you can map multiple sites to a single membership model. To enable your site for membership, open the Site Server Administration module, select the Web site on which you want to enable authentication, and choose All Tasks | Membership Server Mapping (see Figure 5). If you have more than one LDAP service installed, select the appropriate membership model. If you only have one service available, it will be selected for you. |
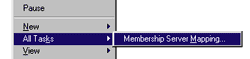 |
| Figure 5: Mapping |
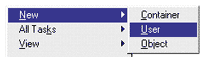
Once you have mapped the model to your Web site, you will need to add at least one user before you can debug and test your code. For Windows NT authentication, you don't need to add a member to authenticate (all that is required is a valid Windows NT account), but you'll want to add some attributes to a user to validate your access methods. If you want to add an object to the model, simply right-click on the container you want to add the object to and select New | User, as shown in Figure 6.
Authenticating Users
|
|
|
This will set objAUO to the User object that's specific to the user running this page. In case you missed it, you have just authenticated the user—it's that simple! For this to work, however, the user accessing this page needs a user account established in the membership model. Otherwise, you will get an error. I will discuss error-handling later on. You can use either the Get or the GetEx method to reference an attribute of the object. GetEx is simply an extended form of the Get method that allows you to reference an attribute with multiple values. The GetEx method can be called on a single-value attribute as well, but the return value will need to be treated as an array, which makes extraction of the data a little messier. The first attribute I'll look at is the common name. All objects and attributes will have a unique common name with which they can be identified and referenced. This name is in an X.500-compliant format so that it meets compatibility requirements. Each object also has a display name. This is typically a more readable name to help you understand what the object or attribute actually is. For example, the attribute that has the display name of "city" has a common name of l (for local). Similarly, "common name" is the display name for the cn attribute. For referencing the user name (the cn value for each user), which is a single-valued attribute, you can use this code: |
|
| The AUO lets you implicitly call attributes as if you had used the Get method. This call can also be made implicitly by using: |
|
|
I'll stick with explicit calls in this discussion to clearly identify whether Get or GetEx is being used. When you're dealing with an object (the User object in this case), the common name is simply an attribute of the object. In making this call you are referencing the common name of the attribute called "common name". Similarly, you can access any attribute of the user by merely referencing the common name of the attribute in the Get call. For example, if you want to retrieve the first name attribute and you know its cn is givenName, the call becomes: |
|
| A user can belong to more than one group. You can reference this list of groups with the groups cn, but you have to use the GetEx call because the return value will be an array: |
|
|
Now that you know how to authenticate users and obtain information about them, you'll want to add this to your applications. But first you need to make a couple of decisions that will affect how you'll implement this functionality.
Design Decisions
Implementing Authentication
|
|
|
Placing this line at the top of every ASP page allows access to the functionality contained in pm_check.asp. If all of your applications are stateless—as Web-based applications typically are—you will need to reference this include file in every page to prevent security loopholes. If you were to use Session variables or cookies to maintain state, authentication routines might only be necessary on the first page of the application. Inside this page you could place into subroutines all the code necessary for your authentication or group calls. I decided earlier to allow script writers to maintain this code, and I will also refrain from using subroutines. So the basic authentication code looks like this: |
|
| As you can see, I catch any errors during this process and redirect the user to another location. This location is defined in the variable errorpage, which should be defined before the include statement that references this file: |
|
|
Users will trigger this error if they are accessing the page without a valid Windows NT account or if they do not have the required attributes set. With this code, I now can identify users, extract information for personalization, and handle any errors caused by accessing the AUO. Next, I want to reference an attribute I created called Available Applications. This is a multivalue attribute that defines a list of applications that the user can access. To establish a strict definition of application names, I will restrict the values via the site vocabulary, which is simply a collection of terms that you can define for just such a purpose. These terms are located under the Admin container (see Figure 7). |
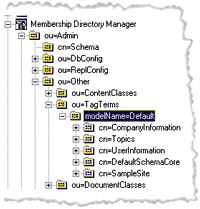 |
| Figure 7: Defining Names |
|
The TagTerms class defines each object in the vocabulary. These tag terms follow a hierarchy such that, if you wanted to develop a collection of sports, you would create the term sports directly under the default modelName container and create each individual sport underneath it. When you define an attribute with a string value, you have the option of selecting a collection from the site vocabulary. For
example, if you select sports, all the sports tag terms would be valid values for that attribute. Since you may need to look through several applications at the user level or through several groups, you'll want to avoid just passing all available applications to the authenticating page. Therefore, I will create a variable called appname before the include file to tell me what application to look for. Also, I will establish a third variable called noaccess that tells the code where to direct users who do not have access to this application. |
 |
| Figure 8: Checking Access |
|
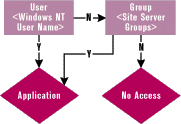
In the model, the user's attributes replace the group's attributes, so let's look at the User object first. If no applications are listed there, I will go on to each of the groups and look there. Figure 8 shows the process for looking up application access.
Accessing Other Objects in Your Model
|
|
|
This path identifies the LDAP service running on the local machine using port 1002, and identifies the groups container. The o=intranet value is simply the organization name, which you established during the creation of your LDAP service. There are several different formats for defining paths, but I prefer the direct addressing approach shown here. (For more information on the different path formats, refer to the Site Server documentation.) Now you can identify specific objects in this location by referencing the established path: |
|
|
You can make this call in a single statement, but since you may be looking up multiple groups, I wanted to establish a path to the group container that will allow me to look up any group quickly. After adding the error handling and array navigation, the code for application availability lookup now looks like that in Figure 9 . Now that you have basic user authentication and application access functionality in place, you can really start extending the use of Site Server in your applications. To start with, you might determine that there are settings for certain applications that will be specific to each user or group that has access. You could store this information in application-specific databases, but since a membership directory with built-in authentication is available, it's probably the best solution for your needs.
Extending Your Membership Model
|
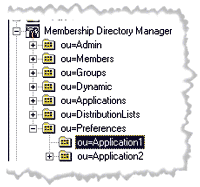 |
| Figure 10: Preferences |
|
I could have located these preferences under the application object, but since other objects might be located there, I decided to create a custom container. However, at some point this location could change, or could even vary from application to application. Instead of hard-coding this path into the application, the path to each application's preferences should be contained in an application attribute. I created a new attribute called Application Settings Path (cn=AppSettingsPath). This attribute is a distinguished name type, which means it is the path of an object in the membership model. Think of this as Site Server's version of pointers. I created a preferences class in the schema that defines the object for each of these preference objects. Along with this class, additional custom attributes may need to be defined for your applications. In all cases under this model, I will create a default preferences object named DefaultPreferences in the root of each application preferences container. This will free administrators from having to create custom preferences for each user or group when they are not necessary. As with application access, preferences are resolved in a bottom-to-top priority and override all higher preferences: |
|
|
Figure 11 illustrates this process. |
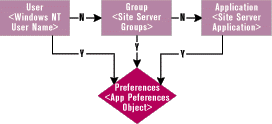 |
| Figure 11: Preferences Architecture |
|
I used ADSI to look up these objects and reference their attributes. The code in Figure 12 will look up the common name of the object as a test to determine whether the object exists. This code can be extended to extract further information from the application object, such as global variables or paths. This approach can be used to help eliminate INI files, registry entries, and hardcoded values. If established as a standard, Site Server Personalization and Membership can facilitate the migration from development to production systems. You can also smooth out the update process by allowing administrators, rather than programmers, to perform modifications on application settings. Imagine making the process of changing the path for output files as easy as changing an application attribute through the MMC. As I stated previously, by placing this code in a COM object you can make it more efficient and more accessible to other objects. In some cases, you might want some membership model access defined in objects and in scripts to take advantage of the benefits of each. Just make sure you are aware of future maintenance resources and needs in your environment. Hopefully, this will help you get started thinking about how Site Server Personalization and Membership can help meet the application needs of your intranet and make application maintenance easier. |
|
|
|
Site Server Personalization and Membership Tutorial at: http://msdn.microsoft.com/workshop/server/nextgen/perstutor.asp |
From the January 2000 issue of Microsoft Internet Developer.