Figure A: The xmlConvert component transforms multiple ADO
recordsets into an XML hierarchy.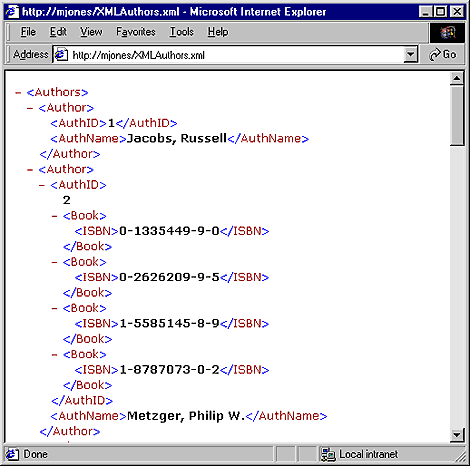
Basic single-table conversion
In a nutshell, when converting ADO records into XML, you loop through each record, and then create a node for each field. For example, if you have a table of authors, which in turn consists of author IDs (AuthID) and names (AuthName), you create a node named AuthID, populate it with the data, then create a node for the author's name, and fill it with the corresponding data. However, this is where we run into the first sticky aspect of dynamically generating an XML document. Listing A shows the code we might use to implement this basic technique. It takes the RootName parameter in which you indicate what you want to name the XML document's root node. If we ran the procedure, it would generate XML like that shown in Figure B.
Listing A: Basic ADO conversion
<% Sub BasicConversion(RootName)
Dim ADORst, XMLDoc, XMLRoot, XMLChild
Dim strConn As String, SQLString, fld
Set XMLDoc = Server.CreateObject("Microsoft.XMLDOM")
strConn = "Provider=Microsoft.Jet.OLEDB.4.0;" & _
	"Data Source=D:\Inetpub\wwwroot\Biblio.mdb"
SQLString = "Select Au_ID AS AuthID, Author as AuthName FROM Authors"
Set ADORst = Server.CreateObject("ADODB.Recordset")
ADORst.Open SQLString, strConn, 1
ADORst.MoveFirst
Set XMLRoot = XMLDoc.createElement(RootName)
XMLDoc.appendChild XMLRoot
Do Until ADORst.EOF
	For Each fld In ADORst.Fields
		Set XMLChild = XMLDoc.createElement(fld.Name)
		If Not IsNull(fld.Value) Then XMLChild.Text = CStr(fld.Value)
		XMLRoot.appendChild XMLChild
	Next
	ADORst.MoveNext
Loop
XMLDoc.save "D:\InetPub\wwwroot\XMLBasic.xml"
Set XMLChild = Nothing
Set fld = Nothing
Set ADORst = Nothing
Set XMLDoc = Nothing
End Sub
%>
Figure B: Using our basic conversion technique, we generated an
XML document.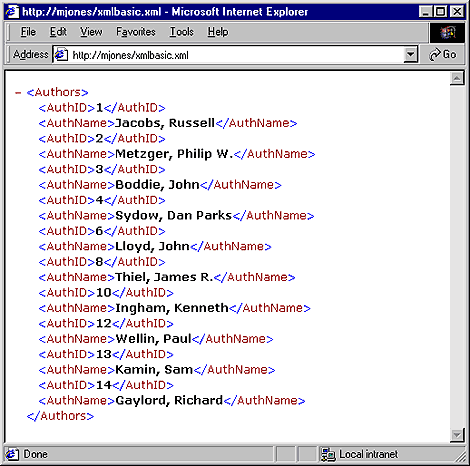
Warning: XML tag names can't contain the special characters in Table A, or spaces. Therefore, when you use ADO field names as XML tags, make sure to rename the table fields, if necessary, in the SQL statement.
Table A: Reserved XML characters
| < | < |
| & | & |
| > | > |
| " | " |
| ' | ' |
The first glitch
Notice, however, that while the procedure created an XML document with the appropriate fields, it destroyed the data integrity. In the document, there's no way to programmatically determine which ID belongs with which name, especially since nodes can be moved around within the hierarchy. Therefore, any solution we build must include the concept of a data entity. That is, just as the Authors table holds individual records, the XML Authors document must include Author entities. Each Author entity tag should contain an AuthID/AuthName pair. Listing B shows the modifications we made to the code in Listing A to accommodate this weakness. As you can see, it accepts the EntityName parameter, and then creates a parent node based on this string for each record in the recordset. Next, it attaches the child nodes to this element instead of the root node. Finally, it creates the XML structure seen in Figure C.Listing B: Modified conversion procedure
<%
Sub BasicConvEntity(RootName, EntityName)
Dim ADORst, XMLDoc, XMLRoot, XMLChild
Dim strConn, SQLString, fld, XMLParent
Set XMLDoc = Server.CreateObject("Microsoft.XMLDOM")
strConn = "Provider=Microsoft.Jet.OLEDB.4.0;" & _
	"Data Source=D:\Inetpub\wwwroot\Biblio.mdb"
SQLString = "Select Au_ID AS AuthID, Author as AuthName FROM Authors"
Set ADORst = Server.CreateObject("ADODB.Recordset")
ADORst.Open SQLString, strConn, 1
ADORst.MoveFirst
Set XMLRoot = XMLDoc.createElement(RootName)
XMLDoc.appendChild XMLRoot

Do Until ADORst.EOF
	Set XMLParent = XMLDoc.createElement(EntityName)
	XMLRoot.appendChild XMLParent
	For Each fld In ADORst.Fields
			Set XMLChild = XMLDoc.createElement(fld.Name)
			If Not IsNull(fld.Value) Then
				XMLChild.Text = CStr(fld.Value)
			End If
			XMLParent.appendChild XMLChild
	Next fld

	ADORst.MoveNext
Loop
XMLDoc.save "D:\InetPub\wwwroot\XMLBasic.xml"
Set XMLChild = Nothing
Set fld = Nothing
Set ADORst = Nothing
Set XMLDoc = Nothing
End Sub
%>
Figure C: Our modified procedure created an Author tag for each
record.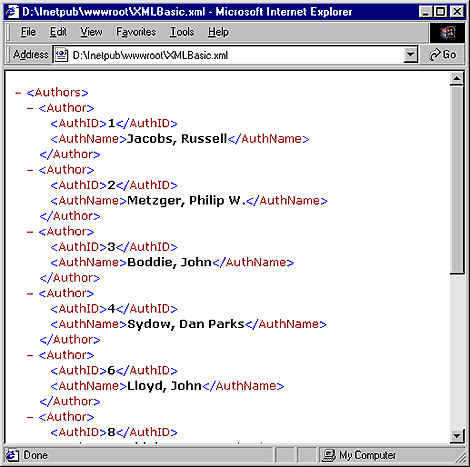
The second glitch
Again, however, while this procedure works just fine for recordsets based on a single data source--a single table or a recordset based on a single table--most likely when you add data to a Web page, you'll want to add parent/child data. For example, in addition to the authors, we might want to add all the books assigned to each author--a classic one-to-many relationship. To do so, we could use the following SQL statement:Select Authors.Au_ID AS AuthID,
Authors.Author as AuthName,
[Title Author].ISBN FROM Authors
LEFT JOIN [Title Author] ON
Authors.Au_ID = [Title Author].Au_ID;
If we used our basic procedure with this SQL statement, the resulting document would contain a lot of repetitive data, as shown in Figure D. Also, the document doesn't describe the data's hierarchy very well, and after all, isn't that the whole point of XML? If we wanted static, flat data we could have stayed with HTML output. So, as an added feature, our XML conversion component must accommodate one to many relationships.
Figure D: Our basic conversion script can't accommodate
one-to-many relationships.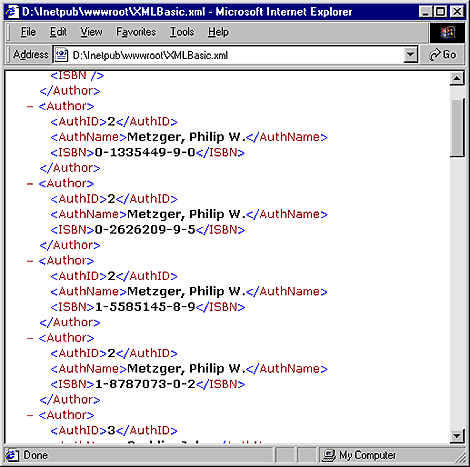
Accommodating parent/child data in an XML conversion
To accommodate parent/child data in our XML conversion component, we'll still use the same basic idea we've discussed previously. We'll loop through each record in a recordset and then all the fields, creating the appropriate tag as we go. And we'll still do all of this to each data source separately. That is, instead of combining the parent/child data into one recordset, we'll add the data fields form the parent first, reopen the XML document, and add the child fields to the appropriate parent nodes. Of course, doing so requires a little more complicated code than we've outlined so far. As a result, we'll need a Script component to help us out, so let's build that next.Building the xmlConvert WSC component
We used the Windows Script Component Wizard to build our conversion component. (If you don't already have the wizard, you'll find it at http://msdn.microsoft.com/scripting/.)To begin, launch the Windows Script Component Wizard. Name the component xmlConvert, and create the properties and methods shown in Table B. When you've finished adding them, click finish. The wizard creates the component and adds it to your desktop.
Table B: xmlConvert's properties and methods
| Property | Type | Default |
| XMLEntityName | Read/Write | Item |
| XMLRootName | Read/Write | Items |
| SQLString | Read/Write | |
| ConnectString | Read/Write | |
| XMLFile | Read/Write | Server.MapPath("XMLDoc" & Day(Now) & ".xml") |
| Method | Parameters | |
| AppendFields | blnNewFile, LinkChildFld, LinkParFld |
At this point, we still need to add the main portion of code. To do so, double-click on the xmlConvert shortcut on your desktop. Windows now displays the stub code in Notepad. Listing D shows the modified code for the AppendFields method. Also, we changed the variable names to better represent internal, or member, variables. Replace the existing line of code in the AppendFields function with the provided script. When you've finished, we'll create an ASP page that generates the requested XML document.
Listing D: The WSC component methods
Option Explicit

Dim mSQLString, mConnectString, mXMLFile, mXMLRootName
Dim mXMLEntityName, mXMLNodeList, mXMLDoc

mXMLFile = Server.MapPath("XMLDoc" & Day(Now) & ".xml")
mXMLRootName = "Items"
mXMLEntityName = "Item"

function AppendFields(blnNewFile, LinkChildFld, LinkParFld)
Dim ADORst, x, fld, XMLRoot, XMLChild, XMLParNodes, XMLItem
Dim mXMLDoc, XMLParent, blnParRecs, blnEnd, strCrit
Const adFilterNone = 0
blnEnd = False
blnParRecs = CBool(Len(LinkParFld) = 0)

Set mXMLDoc = Server.CreateObject("Microsoft.XMLDOM")
Set ADORst = Server.CreateObject("ADODB.Recordset")
ADORst.Open mSQLString, mConnectString, 1
ADORst.MoveFirst

If blnNewFile Then
	Set XMLRoot = mXMLDoc.createElement(mXMLRootName)
	mXMLDoc.appendChild XMLRoot
Else
	mXMLDoc.Load mXMLFile
	Set XMLRoot = mXMLDoc.documentElement
End If

Set XMLParNodes = mXMLDoc.getElementsByTagName(LinkParFld)
x = 0
Do Until blnEnd
	If blnParRecs Then
		Set XMLParent = XMLRoot
	Else
		Set XMLParent = XMLParNodes(x)
		ADORst.Filter = LinkChildFld & " = " & XMLParent.Text
	End If
	Do Until ADORst.EOF
		Set XMLItem = mXMLDoc.createElement(mXMLEntityName)
		XMLParent.appendChild XMLItem
		For Each fld In ADORst.Fields
			If fld.Name <> LinkParFld Then
				Set XMLChild = mXMLDoc.createElement(fld.Name)
				If Not IsNull(fld.Value) Then
					XMLChild.Text = CStr(fld.Value)
				End If
				XMLItem.appendChild XMLChild
			End If
		Next
		ADORst.MoveNext
	Loop
	If blnParRecs Then
		blnEnd = True
	Else
		blnEnd = (x = XMLParNodes.length - 1)
	End If
	x = x + 1
	ADORst.Filter = adFilterNone
Loop
mXMLDoc.save mXMLFile
ADORst.Close
Set ADORst = Nothing
Set XMLParNodes = Nothing
Set XMLItem = Nothing
Set XMLChild = Nothing
Set XMLParent = Nothing
Set XMLRoot = Nothing
Set mXMLDoc = Nothing
end function
Create the XML document of authors and books
To take advantage of our component, we'll need to create an instance of it in an ASP page. We'll then set its ADO-related properties and run the AppendFields method. Listing E shows the basic Web page that we created to generate and display the XML document shown in Figure A. When you run the ASP page, it automatically generates the XML document indicated. Of course, if you wanted, you could modify the page to use input field data for the component's properties.Listing E: Calling our component from an ASP page
<%
Dim objXMLConv
Set objXMLConv = Server.CreateObject("XMLConvert.WSC")

With objXMLConv
	.ConnectString = "Provider=Microsoft.Jet.OLEDB.4.0;" & _
		"Data Source=D:\Inetpub\wwwroot\Biblio.mdb"
	.XMLFile = Server.MapPath("XMLAuthors.xml")
	.XMLRootName = "Authors"
	.XMLEntityName = "Author"
	.SQLString = "SELECT Au_ID AS AuthID, Author AS " & _
		"AuthName FROM Authors"
	.AppendFields True, "", ""
' Add child Book records to Authors
	.XMLEntityName = "Book"
	.SQLString = "SELECT Au_ID as AuthID, ISBN FROM [Title Author]"
	.AppendFields False, "AuthID", "AuthID"

End With

strPath = objxmlconv.XMLFile
Set objXMLConv = Nothing
%>
<FORM >
<INPUT TYPE=button onClick="window.open('<%=strPath%>')"
	VALUE="View XML"></FORM>
Adding tag attributes
You probably noticed that our component still has one major piece missing. Namely, it doesn't let you add attributes to an XML tag. For example, suppose you wanted to store the publisher ID associated with each book (probably not the best use of an attribute, but it can still serve as an example). To accommodate this feature, we can add two new methods to our component, AddAttribName, and RemoveAttribName. We'll store prospective attributes in a VBScript array, and then add them in during the AppendFields method. To add these two methods, enter them directly into the xmlConvert component. Listing F shows the completed script. Don't forget to add the corresponding XML tags to the script component.Listing F: The AddAttribName and RemoveAttribName methods
'add to general declarations
Dim mXMLRootAttribs()
ReDim mXMLRootAttribs(0)

Function AddAttribName(newAttrib)
Dim iTotal
Dim x, blnFound
blnFound = False
iTotal = UBound(mXMLRootAttribs)
For x = 0 To iTotal
	If newAttrib = mXMLRootAttribs(x) Then blnFound = True
Next
If Not blnFound Then
	If iTotal = 0 And mXMLRootAttribs(0) = "" Then
		iTotal = 0
	Else
		iTotal = iTotal + 1
		ReDim Preserve mXMLRootAttribs(iTotal)
	End If
	mXMLRootAttribs(iTotal) = newAttrib
End If
End Function

Function RemoveAttribName(Attrib)
Dim iTotal
Dim x, FoundIndex
FoundIndex = -1
iTotal = UBound(mXMLRootAttribs)
For x = 0 To iTotal
	If newAttrib = mXMLRootAttribs(x) Then
		FoundIndex = x
		Exit For
	End If
Next
If FoundIndex > -1 Then
	For x = FoundIndex To iTotal
		mXMLRootAttribs(x) = mXMLRootAttribs(x + 1)
	Next
	ReDim Preserve mXMLRootAttribs(iTotal - 1)
End If
End Function
Next, in the AppendFields procedure after the
Set XMLParNodes = mXMLDoc _
	.getElementsByTagName(LinkParFld)
statement, enter
For X = 0 To UBound(mXMLRootAttribs)
	strAttrib = strAttrib & "," _
		& mXMLRootAttribs(X)
Next
Finally, modify the code as shown in Listing G, which actually does the work of adding the attributes to the node. To add an attribute, use
objXMLConvert.AddAttribName "PubID"
and then make sure the same name appears in the extracted recordset. Figure E shows the XML document with the PubID attribute.
Listing G: Modifications to the AppendFields procedure
For Each fld In ADORst.Fields
	If InStr(LCase(strAttrib), "," & LCase(fld.Name)) Then
		XMLItem.setAttribute fld.Name, fld.Value
	Else
		If fld.Name <> LinkParFld Then
			Set XMLChild = mXMLDoc.createElement(fld.Name)
			If Not IsNull(fld.Value) Then
				XMLChild.Text = CStr(fld.Value)
			End If
			XMLItem.appendChild XMLChild
		End If
	End If
Next
Figure E: We added the PubID attribute to the XML
document.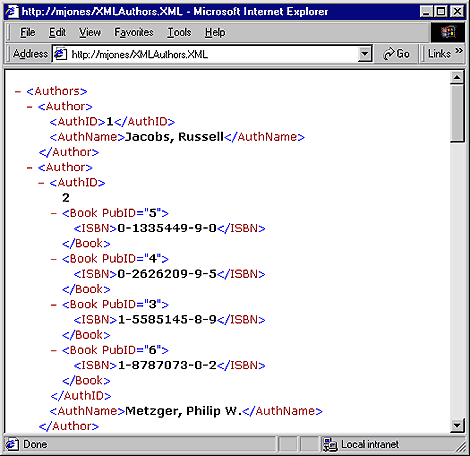
Many thanks go to Scot Johnson, regular contributor extraordinaire, who provided the idea for this component.
Copyright © 2000, ZD Inc. All rights reserved. ZD Journals and the ZD Journals logo are trademarks of ZD Inc. Reproduction in whole or in part in any form or medium without express written permission of ZD Inc. is prohibited. All other product names and logos are trademarks or registered trademarks of their respective owners.
