April 1996
![]()
Programming Windows 95 with MFC, Part VIII: Printing and Print Previewing
Jeff Prosise
Jeff Prosise writes extensively about programming in Windows and is a contributing editor of several computer magazines. He is currently working on a book, Programming Windows 95 with MFC, to be published this spring by Microsoft Press.
Click to open or copy the EZPRNT project files.
Click to open or copy the HEXDUMP project files.
I demonstrated previously ("Programming Windows® 95 with MFC, Part VII: The Document/View Architecture," MSJ, February 1996) how the document/view architecture simplifies the development of SDI and MDI applications by letting the framework take over key aspects of a program's operation. Now I'll show you how the same document/view architecture simplifies printing and print previewing. Even MFC-style printing isn't something to be taken lightly, but thanks to the support lent by the framework, the tedium of writing and testing code that renders documents on printers and other hardcopy devices is sharply reduced. And once you've implemented Print, Print Preview comes almost for free.
The MFC print architecture is built around core API print functions and protocols built into the Windows GDI. To understand what's on the outside, it helps to first understand what's on the inside. In this article I will:
Printing a document from a Windows-based application without the benefit of the framework involves a number of grueling steps. The application normally begins by obtaining a device context for the printer. Just as you need a screen DC to send output to the screen, you need a printer DC to send output to a printer. If you know the device name of the printer you want, you can create a device context with the ::CreateDC function in Windows or CDC::CreateDC in MFC.
 CDC dc;
dc.CreateDC (NULL, "HP LaserJet IIP", NULL, NULL);
The device name specified in the second parameter is the same one that appears in the control panel and Print Setup dialog. By the way, this syntax is simpler than Windows 3.1, which requires the driver name and other information. If you don't know the device name but would like to print to the default printer (the one whose context menu has a check mark by the "Set As Default" menu item), you can use the handy MFC CPrintDialog::GetDefaults and CPrintDialog::GetPrinterDC functions.
 CDC dc;
CPrintDialog dlg (FALSE);
dlg.GetDefaults ();
dc.Attach (dlg.GetPrinterDC ());
If you'd like to let the user select a printer, you can display a Print dialog (one of the common dialogs supplied for you by the operating system) with CPrintDialog::DoModal, then call CPrintDialog::GetPrinterDC after the dialog is dismissed.
 CDC dc;
CPrintDialog dlg (FALSE);
if (dlg.DoModal () == IDOK)
    dc.Attach (dlg.GetPrinterDC ());
A printer device context obtained by any of these methods should be deleted when it's no longer needed. If you create a CDC object on the stack, deletion is automatic.
Once you have a printer DC in hand, you're ready to print. The next step is to call ::StartDoc or its MFC equivalent, CDC::StartDoc, to mark the beginning of the print job. CDC::StartDoc accepts just one parameter: a pointer to a DOCINFO structure containing a string with a descriptive name for the document that's about to be printed, the name of the file that output will go to (if you're printing to a file), and other information about the print job. The statements
 DOCINFO di;
::ZeroMemory (&di, sizeof (DOCINFO));
di.cbSize = sizeof (DOCINFO);
di.lpszDocName = "Budget Figures for the Current Fiscal
                  Year";
dc.StartDoc (&di);
start a print job on the printer associated with the CDC object dc. If the user examines the print queue while the document is printing, the string "Budget Figures for the Current Fiscal Year" will appear in the Document Name column. If StartDoc fails, it returns a zero or less-than-zero value. If it succeeds, it returns a positive integer that identifies the print job. The print job ID can be used in conjunction with Win32® print-control functions such as ::GetJob and ::SetJob.
Next comes output to the printed page. Text and graphics are rendered on a printer with GDI functions. If dc refers to a screen device context, the statement
dc.Ellipse (0, 0, 100, 100);draws an ellipse 100 logical units wide and 100 logical units high on the screen (that is, a circle). If dc refers to a printer device context, the circle is drawn on the printer instead. Pages of output are framed between calls to CDC::StartPage and CDC::EndPage that mark the beginning and end of each page. A document that contains nPageCount pages of output could be printed as follows:
 dc.StartDoc (&di);
for (int i=1; i<=nPageCount; i++) {
    dc.StartPage ();
    // Print page i
    dc.EndPage ();
}
In a very simplified sense, calling EndPage is like sending a form-feed character to the printer. In between StartPage and EndPage, you print the page by calling CDC member functions. Even if the document contains only one page, you must call StartPage and EndPage.
One mistake programmers often make the first time they write printing code is that they fail to initialize the printer DC for each page. In Windows 95, the device context's default attributes are restored each time you call StartPage. You can't select a font or set the mapping mode right after the DC is created and expect those attributes to remain in effect indefinitely the way you can for a screen DC. Instead, you must reinitialize the printer DC for each page. (In Windows NTÔ 3.5 and later, a printer DC retains its settings across calls to StartPage and EndPage-but even in a Windows NT-based application, you should reinitialize the device context at the beginning of each page if you want your code to work under Windows 95 too.) If you print using the MM_LOENGLISH mapping mode, for example, you must call CDC::SetMapMode at the beginning of each new page.
 for (int i=1; i<=nPageCount; i++) {
    dc.StartPage ();
    dc.SetMapMode (MM_LOENGLISH);
    // Print page i
    dc.EndPage ();
}
If you do it this way instead,
 // Don't do this!
dc.SetMapMode (MM_LOENGLISH);
for (int i=1; i<=nPageCount; i++) {
    dc.StartPage ();
    // Print page i
    dc.EndPage ();
}
printing will be performed in the default MM_TEXT mapping mode.
After the final page is printed, you terminate the print job by calling CDC::EndDoc-unless a previous call to EndPage returned a code indicating that the print job was already terminated by GDI. EndPage returns a signed integer value that is greater than zero if the page was successfully printed. A zero or negative return value indicates that either an error occurred or the user canceled the print job while the page was being printed. In either event, the return value is one of the codes shown in Figure 1.
The following loop demonstrates the correct use of EndDoc.
 if (dc.StartDoc (&di) > 0) {
    BOOL bContinue = TRUE;
for (int i=1; i<=nPageCount && bContinue; i++) {
dc.StartPage ();
// Initialize the device context
// Print page i
if (dc.EndPage () <= 0)
bContinue = FALSE;
} if (bContinue)
dc.EndDoc ();
else
dc.AbortDoc ();
}CDC::AbortDoc aborts an uncompleted print job just as EndDoc ends a successful print job. You can also call AbortDoc at any time to terminate a print job before the job is done.
If that's all there were to printing, it wouldn't be such a big deal. But there's more; because a large print job can take minutes or even hours to complete, the user should be able to terminate a print job before it is finished. Windows-based applications traditionally let the user cancel a print job by clicking a Cancel button in a dialog box. The Cancel button cancels printing by forcing EndPage to return SP_APPABORT.
The mechanism that links the Cancel button to the printing code in your application is a function that Windows calls an "abort procedure." An abort procedure is an exported callback function that Windows calls repeatedly as it processes printed output. It's declared like this:
BOOL CALLBACK AbortProc (HDC hDC, int nCode)hDC holds the handle of the printer device context. nCode is zero if printing is proceeding smoothly or SP_OUTOFDISK if the print spooler is temporarily out of disk space. nCode is usually ignored because the print spooler responds to an SP_OUTOFDISK condition by waiting for more disk space to free up. The abort procedure's job is twofold:
A very simple abort procedure looks like this:
 BOOL CALLBACK AbortProc (HDC hDC, int nCode)
{
    MSG msg;
    while (::PeekMessage (&msg, NULL, 0, 0,
           PM_NOREMOVE))
        AfxGetThread ()->PumpMessage ();
    return TRUE;
}
The message loop inside AbortProc allows the WM_COMMAND message (generated when the print-status dialog's Cancel button is clicked) to make it to your window procedure even though the application is busy printing. In 16-bit Windows, the message loop plays an important role in multitasking by yielding so the print spooler and other processes running in the system can get CPU time. In Windows 95, yielding in the abort procedure enhances multitasking performance when 32-bit applications print to 16-bit printer drivers by reducing contention for the Win16Mutex-the flag inside Windows that locks 32-bit applications out of the 16-bit kernel while a 16-bit application executes code in the kernel.
Before calling StartDoc, the application calls SetAbortProc to set the abort procedure, then disables its own window by calling CWnd::EnableWindow (FALSE), and displays the print-status or "abort" dialog-a modeless dialog containing a Cancel button and usually one or more static controls to show the document name and number of pages printed. Disabling the main window ensures that no other input will interrupt the printing process. The window is reenabled when printing is finished and the dialog box is destroyed. The dialog, meanwhile, sets a flag-call it bUserAbort-from FALSE to TRUE if the Cancel button is clicked, and the abort procedure returns FALSE to abort printing if bUserAbort is TRUE.
 BOOL CALLBACK AbortProc (HDC hDC, int nCode)
{
    MSG msg;
    while (!bUserAbort &&
        ::PeekMessage (&msg, NULL, 0, 0, PM_NOREMOVE))
        AfxGetThread ()->PumpMessage ();
    return !bUserAbort;
}
Printing proceeds unimpeded until/unless the user cancels, whereupon bUserAbort changes from FALSE to TRUE, the next call to AbortProc returns zero, and Windows terminates the print job. EndPage returns SP_APPABORT and the call to EndDoc is subsequently bypassed.
Everything I've described up to this point constitutes the "front end" of the printing process-the portion that the application is responsible for. Windows handles the back end, which is a joint effort on the part of GDI, the print spooler, the printer driver, and other components of the 32-bit print subsystem. If enhanced metafile (EMF) print spooling is enabled, GDI calls executed through the printer DC are written to an enhanced metafile on the hard disk and stored there until the print spooler, which runs in a separate thread, unspools the commands and "plays" them into the printer driver. If "raw" print spooling (the only option on PostScript printers) is enabled instead, output is processed through the printer driver and spooled to disk in raw form. If spooling is disabled, GDI commands are transmitted directly to the printer driver each time EndPage is called. Print spooling speeds the return-to-application time by letting a program do all its printing to a metafile so the user doesn't have to wait for the printer to physically print each page. Metafiles further speed things up by decoupling the performance of the application from the performance of the printer driver. That's one reason why Windows 95 seems to print so much faster than Windows 3.1. In Windows 3.1, GDI commands are processed by the printer driver before they're spooled to disk. In Windows 95, output is spooled first and played through the printer driver later, so the translation of GDI commands into device-dependent printer data is performed entirely in the background.
Fortunately, you can safely ignore what happens on the back end of the printing process and concentrate on printing your document. Still, there's a host of details to fret before you can get down to the real business of printing-paginating the output and executing GDI calls between StartPage and EndPage to render each page on the printer. With this background in mind, let's see how MFC makes printing easier.
The simplified print architecture in MFC is just one more reason that programmers are migrating away from the SDK and toward object-oriented development environments such as Visual C++®. When you print from a document/view application, you can forget about most of the code samples in the previous section. The framework creates a printer DC for you and deletes the DC when printing is finished. The framework also calls StartDoc and EndDoc to begin and end the print job, and StartPage and EndPage to bracket GDI calls for each page. It even supplies a Cancel dialog and abort procedure. In some cases, the very same OnDraw function you use to render your document on screen can do printing and Print Preview too.
The key to printing in document/view is a set of virtual CView functions that the framework calls at various stages during the printing process. These functions are summarized in Figure 2. Which CView functions you override and what you do in the overrides is highly dependent upon the content of your printed output. At the very least, you must override OnPreparePrinting to call DoPreparePrinting so the framework will display a Print dialog and create a printer DC.
 BOOL CMyView::OnPreparePrinting (CPrintInfo* pInfo)
{
    return DoPreparePrinting (pInfo);
}
A nonzero return from OnPreparePrinting begins the printing process, while a zero return cancels the pending print job. DoPreparePrinting returns zero if the user cancels the print job by clicking the Cancel button in the Print dialog, if there are no printers installed, or if the framework is unable to create a printer DC.
The CPrintInfo object passed to OnPreparePrinting contains information describing the parameters of the print job, including the minimum and maximum page numbers. The minimum and maximum page numbers default to 1 and 0xFFFF, with the latter value signaling to the framework that the maximum page number is unknown. If you know how many pages your document has, you should call CPrintInfo::SetMaxPage before calling DoPreparePrinting.
 BOOL CMyView::OnPreparePrinting (CPrintInfo* pInfo)
{
    pInfo->SetMaxPage (nMaxPage);
    return DoPreparePrinting (pInfo);
}
The framework, in turn, will display the maximum page number in the "to" box of the Print dialog.
SetMaxPage is one of several CPrintInfo member functions you can call to set printing parameters or query the framework about print options entered by the user. SetMinPage lets you specify the minimum page number. GetMinPage and GetMaxPage return the minimum and maximum page numbers, while GetFromPage and GetToPage return the starting and ending page numbers entered in the Print dialog's "from" and "to" boxes. CPrintInfo also includes several public data members, including m_pPD, which points to the initialized CPrintDialog object. You can use this pointer to customize the Print dialog before it's displayed, or get information from it. I'll show you an example of this later in the article.
Often the maximum page number depends on the size of the printable area of each page. Unfortunately, you don't know what that is until after the user has selected a printer and the framework has created a printer DC. If you don't set the maximum page number in OnPreparePrinting, you should set it in OnBeginPrinting if at all possible. OnBeginPrinting receives a pointer to an initialized CPrintInfo structure and a pointer to a CDC object representing the printer DC. You can determine the dimensions of the printable page area by calling CDC::GetDeviceCaps twice-once with a HORZRES parameter, and once with a VERTRES parameter.
 void CMyView::OnBeginPrinting (CDC* pDC,
                               CPrintInfo* pInfo)
{
    int m_nPageHeight = pDC->GetDeviceCaps (VERTRES);
    int nDocLength = GetDocument ()->GetDocLength ();
    int nMaxPage = max (1, (nDocLength +
                        (m_nPageHeight - 1)) /
        m_nPageHeight);
    pInfo->SetMaxPage (nMaxPage);
}
In this example, GetDocLength is a document function that returns the length of the document in pixels. CPrintInfo contains a data member, m_rectDraw, that describes the printable page area in logical coordinates-but don't try to use it in OnBeginPrinting because it isn't initialized until shortly before OnPrint is called.
Calling SetMaxPage in either OnPreparePrinting or OnBeginPrinting lets the framework know how many times it should call OnPrint to print a page. If it's impossible (or simply not convenient) to determine the document length before printing begins, you can perform "print-time pagination" by overriding OnPrepareDC and setting CPrintInfo::m_bContinuePrinting to TRUE or FALSE each time OnPrepareDC is called. FALSE terminates the print job. If you don't call SetMaxPage, the framework assumes the document is only one page long. Therefore, you must override OnPrepareDC and set m_bContinuePrinting to print additional pages.
OnBeginPrinting is also the best place to create fonts and other GDI resources that you need to print. Suppose your view's OnCreate function creates a font that OnDraw uses to draw text on the screen, and the font height is based on screen metrics returned by GetDeviceCaps. To print a WYSIWYG version of that font on the printer, you must create a separate font that's scaled to printer metrics rather than screen metrics. One solution is to let OnDraw create the font each time it's used so the font is scaled for whatever device the CDC corresponds to-printer or screen. An alternative solution is to create the printer font in OnBeginPrinting and delete it in OnEndPrinting. Then you avoid the extra overhead of creating and deleting a font each time OnDraw is called.
OnEndPrinting is the counterpart to OnBeginPrinting. It's a great place to free fonts and other resources allocated in OnBeginPrinting. If there are no resources to free, or if you didn't override OnBeginPrinting to begin with, then you probably don't need to override OnEndPrinting either.
MFC calls OnPrepareDC once for each page of your document. One reason for overriding OnPrepareDC is to perform print-time pagination as described in the previous section. Another reason is to calculate a new viewport origin from the current page number so OnDraw will render the appropriate page in your document. Like OnBeginPrinting, OnPrepareDC receives a pointer to a device context and a pointer to a CPrintInfo object. Unlike OnBeginPrinting, OnPrepareDC is called prior to screen repaints as well as in preparation for outputting a page to the printer. In the case of screen rendering, the CDC pointer refers to a screen DC and the CPrintInfo pointer is NULL. For printing, the CDC pointer is a printer DC and the CPrintInfo pointer is non-NULL. In the latter case, the number of the page that's about to be printed can be obtained from CPrintInfo::m_nCurPage. You can determine whether OnPrepareDC was called for the screen or printer by calling CDC::IsPrinting.
The following implementation of OnPrepareDC moves the viewport origin in the y direction so the device point (0, 0)-the pixel in the upper-left corner of the printed page-corresponds to the upper-left corner of the current page. m_nPageHeight is a CMyView data member that holds the printable page height.
 void CMyView::OnPrepareDC (CDC* pDC, CPrintInfo* pInfo)
{
    CView::OnPrepareDC (pDC, pInfo);
    if (pDC->IsPrinting ()) { // If printing...
        int y = (pInfo->m_nCurPage
                 - 1) * m_nPageHeight;
        pDC->SetViewportOrg (0, -y);
    }
}
Setting the viewport origin this way ensures that an OnDraw function attempting to draw the entire document will actually only draw the portion that corresponds to the current page. This is a simple example of OnPrepareDC that assumes you want to use the entire printable area of the page. Sometimes it's also necessary to set a clipping region to restrict the printed portion of the document to something less than the page's full printable area. Rectangular regions are created with CRgn::CreateRectRgn and selected into DCs to serve as clipping regions with CDC::SelectClipRgn.
As a rule, you only need to override OnPrepareDC to print multipage documents for which OnDraw does the printing. If you do all of your printing from OnPrint, as one of my sample programs does, then there's no need to override OnPrepareDC. When you do override OnPrepareDC, you should call the base class before doing anything else so the default implementation will get a chance to do its thing. This is especially important when your view class is derived from CScrollView, because CScrollView::OnPrepareDC sets the viewport origin for screen DCs to match the current scroll position. When CScrollView::OnPrepareDC returns, the DC's mapping mode is set to the mapping mode specified when you called SetScrollSizes. If your view class is not derived from CScrollView, OnPrepareDC is a good place to call SetMapMode.
After calling OnPrepareDC, but prior to physically printing each page, the framework calls CView::OnPrint. The default implementation in Viewcore.cpp verifies the validity of pDC and passes the buck to OnDraw.
 void CView::OnPrint(CDC* pDC, CPrintInfo*)
{
      ASSERT_VALID(pDC);

      // Override and set printing variables based on
      // page number
      OnDraw(pDC);                    // Call Draw
}
If you prepared the printer DC for printing in OnPrepareDC, or if the document contains only one page, you don't have to override OnPrint; you can let the default implementation call OnDraw to do the printing.
In practice, OnPrint is frequently overridden to perform page-specific printing tasks. Probably the most common reason to override OnPrint is to print headers, footers, page numbers and other visual elements that appear on the printed page but not on the screen (with the exception of print previews). The following OnPrint function calls local member functions PrintHeader and PrintPageNumber to print a header and page number before calling OnDraw to print the page:
 void CMyView::OnPrint (CDC* pDC, CPrintInfo* pInfo)
{
    PrintHeader (pDC);
    PrintPageNumber (pDC, pInfo->m_nCurPage);
    // Set the viewport origin and/or clipping
    // region before calling OnDraw...
    OnDraw (pDC);
}
Note that any adjustments made to the printer DC with SetViewportOrg or SelectClipRgn should now be made in OnPrint rather than OnPrepareDC so headers and page numbers won't be affected. An alternative approach is to forego the call to OnDraw and do all your printing in OnPrint. If your drawing and printing code are substantially different, doing the printing in OnPrint draws a clearer boundary between how you print a document and how you render it on screen.
Printing usually begins when the user selects the Print command from the File menu. MFC provides a CView::OnFilePrint that you can connect to the ID_FILE_PRINT menu item through the view's message map. Figure 3 summarizes what happens when the user prints. It also shows how the MFC print architecture meshes with the Windows print architecture because, if you take away the round rectangles representing the virtual CView functions that the framework calls, you're left with a pretty good schematic of the Windows printing model. Note that OnPrepareDC is called twice per page when your code executes under Windows 95. The first call to OnPrepareDC is made to preserve compatibility with 16-bit versions of MFC, which called OnPrepareDC before StartPage (and got away with it because in 16-bit Windows, it's EndPage, not StartPage, that resets the device context). The second call is made because, in Windows 95, changes made to the device context in the first call to OnPrepareDC are nullified when StartDoc is called.
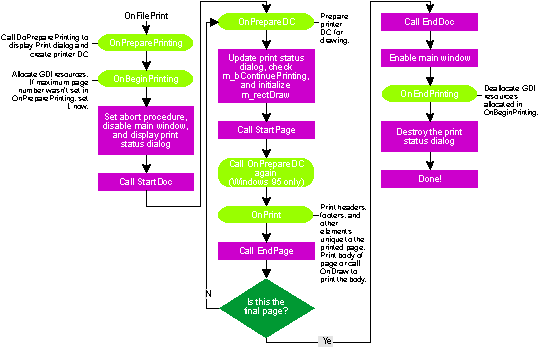
Figure 3 Overwiew of the MFC Print Architecture
MFC also provides predefined command IDs and default command handlers for the File menu's Print Preview and Print Setup commands. The Print Preview command (ID=ID_FILE_PRINT_PREVIEW) is handled by CView::OnFilePrintPreview, and Print Setup (ID=ID_FILE_PRINT_SETUP) is handled by CWinApp::OnFilePrintSetup. Like OnFilePrint, these command handlers are not prewired into the message maps of the classes to which they belong. To enable them, you must do the message mapping yourself. Of course, if you use AppWizard to generate the skeleton of an application that prints, the message mapping is done for you. AppWizard also maps ID_FILE_PRINT_DIRECT to CView::OnFilePrint to enable "direct" printing-printing performed not by selecting Print from the File menu, but by dropping a document icon onto a printer.
Once a document/view application can print, adding print preview is as simple as adding a Print Preview command and hooking it up to CView::OnFilePrintPreview. There's a lot of code in the class library to support OnFilePrintPreview (see Viewprev.cpp for details), but what happens is pretty simple. OnFilePrintPreview takes over the frame window and fills it with a view created from a special CScrollView-derived class named CPreviewView. It adds a toolbar with buttons for going to the next or previous page, switching between one-page and two-page views, zooming in and out, and so on. CPreviewView::OnDraw draws a white rectangle representing a printed page (or two rectangles if two-page view is selected), sets some scaling parameters so the "printable area" of the white rectangle matches the printable area of a real page, and calls OnPrint to draw in the rectangle. As far as your application is concerned, output is sent to the printer; the same virtual functions that get called during printing also get called during print preview. But in reality, output goes to the print preview window instead.
Part of the magic that makes print preview work is the fact that the device context referenced in the pDC parameter passed to CView printing functions is actually two device contexts in one. Every CDC object contains two device context handles: one for an "output" DC (m_hDC) and another for an "attribute" DC (m_hAttribDC). MFC uses the output DC for calls that produce physical output and the attribute DC for calls that ask for attribute information-for example, the current text color or background mode. Most of the time, m_hDC and m_hAttribDC hold the same device context handle. But during print preview, m_hDC references the screen DC where pages are previewed and m_hAttribDC references the printer DC. The result? If your application uses GetDeviceCaps or other CDC functions to query the GDI about the printer's capabilities or the properties of the printed page, the information it gets back is genuine because it comes from the printer DC. But all physical output is directed to the screen DC. Pretty cool!
When the user closes the print preview window, the framework calls a virtual CView function, OnEndPrintPreview, to notify the application that print preview is about to end. The default implementation calls OnEndPrinting, reactivates the original view, and destroys the print preview window. Programmers sometimes override OnEndPrintPreview in order to scroll to the last page displayed in print preview mode. (By default, the scroll position is preserved.) The following fragment shows how.
 void CMyView::OnEndPrintPreview (CDC* pDC,
                                 CPrintInfo* pInfo,
                                 POINT point,
                                 CPreviewView* pView)
{
    nPage = pInfo->m_nCurPage;
    POINT pt;
    // Convert nPage into a scroll position in pt...
    ScrollToPosition (pt);
    CScrollView::OnEndPrintPreview (pDC, pInfo, point,
                                    pView);
}
You'll have to supply the code that converts the current page number into a scroll position yourself. Don't rely on the point parameter passed to OnEndPrintPreview to tell you anything; in current versions of MFC, it's always (0, 0). Don't forget to call the base class version of OnEndPrintPreview so the framework can exit print preview mode and restore the frame window to its original state.
If you need to discriminate between real printing and print preview, you can check CPrintInfo::m_bPreview. Likewise, you can inspect CPrintInfo::m_nNumPreviewPages to determine whether one or two pages are displayed.
The EZPrint application whose source code appears in Figure 4 demonstrates the bare minimum amount of work a document/view app must do to support printing and print preview. An EZPrint "document" is simply a blue circle whose diameter is 10 centimeters (1,000 units in the MM_LOMETRIC mapping mode) with a yellow interior. The application's File menu contains just four items: Print, Print Preview, Print Setup, and Exit. The Print and Print Preview commands are mapped to CView::OnFilePrint and CView::OnFilePrintPreview in CPrintView's message map, and the Print Setup command is mapped to CWinApp::OnFilePrintSetup in CPrintApp's message map. The Print command displays a Print dialog box that lets you specify printing options such as the printer, the print range, and the number of copies. Print Preview invokes print preview mode (see Figure 5). Print Setup displays a Print Setup dialog box, which lets you choose a printer, select the paper size, specify the page orientation (portrait or landscape), and so on.
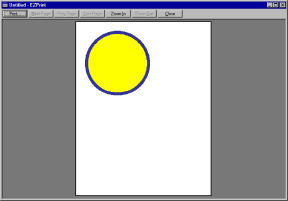
Figure 5 EZPrint in Print Preview
CPrintView::OnDraw does all the drawing, whether the output is destined for the screen, a printer, or a print preview window. To ensure the circle has the same proportions wherever it's drawn, OnDraw uses the MM_LOMETRIC mapping mode. That's important, because pixel-per-inch values for screens and printers are rarely the same. If you drew to the screen and the printer in the MM_TEXT mapping mode, the circle would be a lot smaller on a 600 DPI printer than it would be on the screen. To get WYSIWYG results, you'd have to scale the circle's height and width manually during printing and print previewing by using ratios derived from pixel-per-inch counts for the screen and printer. Using a mapping mode in which logical units scale to physical distances rather than pixel counts makes GDI do all that.
The framework's print preview support is not perfect. EZPrint's preview page shows the circle in full-blown color even if the only printer attached to your PC is black-and-white. Naturally, the circle will be printed in color if you have a color printer, but previewing pages in color is not very realistic when printing will be done in black-and-white. You can add a nice touch to your print preview code by doing your rendering in shades of gray if both of the following two conditions are true: CPrintInfo::m_bPreview is nonzero, and pDC->GetDeviceCaps (NUMCOLORS) returns 2, indicating that the printer is a monochrome device.
You can convert RGB color values into shades of gray with the following formula:
greylevel = (red * 0.30) + (green * 0.59) + (blue * 0.11)This statement creates a gray brush that simulates how yellow (RGB (255, 255, 0)) will look on a monochrome output device:
CBrush brush (RGB (227, 227, 227));The value 227 was computed by plugging the color components 255, 255, and 0 into the color conversion formula. To see a simple demonstration of black-and-white print preview, replace these lines in EZPrint's CPrintView::OnDraw function
 CPen pen (PS_SOLID, 50, RGB (0, 0, 255));
CBrush brush (RGB (255, 255, 0));
with these:
 BOOL bMono = (pDC->GetDeviceCaps (NUMCOLORS) == 2) &&
    (pDC->m_hDC != pDC->m_hAttribDC);
        // Only true for preview mode
CPen pen (PS_SOLID, 50,
          bMono ? RGB (28, 28, 28) : RGB (0, 0, 255));
CBrush brush (bMono ? RGB (227, 227, 227) : RGB (255, 255, 0));
Print preview output is now rendered in shades of gray when the default printer is a black-and-white model. Comparing m_hDC to m_hAttribDC is a sneaky way to detect print preview mode when CPrintInfo information isn't available.
EZPrint is okay for a start, but it hardly reflects the kinds of applications one finds in the real world. It doesn't have to deal with the issue of pagination because its documents have only one page. It creates the GDI resources it needs each time OnDraw is called, so there's no reason to override OnBeginPrinting and OnEndPrinting to allocate printer-specific resources. Even OnPrepareDC and OnPrint aren't necessary because there's nothing in EZPrint that distinguishes a printed view from a screen view.
The HexDump application shown in Figure 6 is more representative of the kind of application you're liable to write. HexDump is a hexadecimal viewing program that displays the contents of any file in binary form. Printed documents have a header at the top that includes the file name (prefaced with a path name if there's room) and the page number. The header is underscored with a thin horizontal line. The line is drawn with CDC::MoveTo and CDC::LineTo; all other output is performed with CDC::TextOut. Figure 7 shows a close-up view of a page header in print preview mode. When a document is printed, HexDump queries the CDC for the dimensions of the printable page area and adjusts its output accordingly. The page height is used to compute the number of lines printed per page, and the page width is used to center the output horizontally no matter what the page size. HexDump's source code is reproduced in Figure 8.
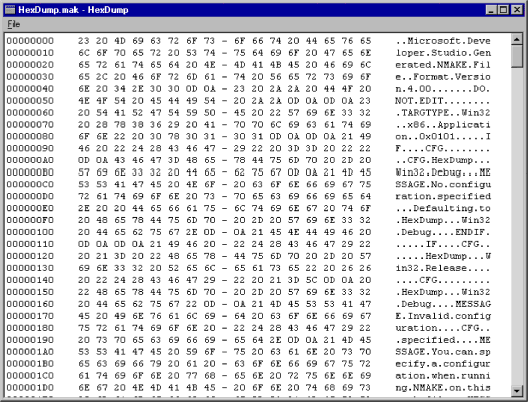
Figure 6 A HexDump document
Figure 7 DexDump header in Print Preview mode
The heart of HexDump is the code in the view class CHexView, which renders the document on the screen or on the printer. CHexView does all its screen painting with OnDraw. CHexView::OnCreate initializes CHexView::m_screenFont with a 10-point, Courier New font sized for the screen, and initializes CHexView::m_cyScreen with the vertical distance (in pixels) separating consecutive lines of text on the screen. CHexView::OnDraw repaints the view by using CDC::GetClipBox to identify the rectangle that needs repainting, converting the y coordinates of the rectangle's top and bottom into starting and ending line numbers in the document, and drawing just those lines that need repainting. The scroll position is factored into the output automatically because CHexView is derived from CScrollView. Because OnDraw is smart enough to paint the fewest lines necessary, scrolling performance is acceptable even if the document is very large. To see how sluggish a CScrollView can be when a large document is loaded and OnDraw isn't optimized, try rewriting CHexView::OnDraw so it draws the entire document each time it's called.
 void CHexView::OnDraw (CDC* pDC)
{
    for (int i=0; i<m_nLinesTotal; i++) {
        FormatLine (i, string);
        pDC->TextOut (2, (i * m_cyScreen) + 2, string);
    }
}
Load a file whose size is 10KB or 20KB and do some scrolling up and down. It will quickly become apparent why it's worth the trouble to convert the clip box into a range of line numbers.
HexDump does all its printing in OnPrint. CHexView::OnPrint calls CHexView::PrintPageHeader to print the header at the top of the page and CHexView::PrintPage to print the body of the page. OnBeginPrinting paves the way by initializing CHexView::m_printerFont with a separate 10-point, Courier New font sized for the printer, CHexView::m_cyPrinter with the interline spacing, CHexView::m_nLinesPerPage with the number of lines that will be printed per page (based on the height of the printable page area), CHexView::m_cxOffset with the x indent required to center printed lines on the page, and CHexView::m_cxWidth with the width of each line of text. CHexView::PrintPage calculates starting and ending line numbers from the current page number and the number of lines per page. The for loop that does the drawing is similar to the for loop in OnDraw, differing only in how it aligns the text on the page and in the fact that it uses m_printerFont for its output instead of m_screenFont. When printing (or print previewing) is complete, OnEndPrinting deletes the printer font created by OnBeginPrinting.
Could CHexView::OnDraw have been written so that it handled output to both the screen and printer? Sure. But the code is arguably simpler and more straightforward the way I've written it. You can always put common functionality in a separate routine you call from both OnDraw and OnPrint. Programmers working with MFC sometimes make the mistake of feeling as if they have to do both printing and screen updating in OnDraw. HexDump not only demonstrates that it doesn't have to be that way, but also provides a working example of an application that does its printing and screen updating separately.
HexDump handles serialization in a rather unusual way. When CHexDoc::Serialize reads a document from disk, it doesn't read objects from the archive. Instead, it allocates a buffer, then reads the file into it. With exception-handling statements removed, here's how it looks:
 if (ar.IsLoading ()) {
    CFile* pFile = ar.GetFile ();
    m_nDocLength = (UINT) pFile->GetLength ();
    m_pFileData = new BYTE[m_nDocLength];
    pFile->Read (m_pFileData, m_nDocLength);
}
CHexDoc::DeleteContents frees the buffer when the document is destroyed or reused.
delete[] m_pFileData;HexDump doesn't ever write to disk because it's a hex viewer, not an editor, but if it did, it would use CFile::Write to write the contents back to disk the same way it uses CFile::Read to read them into memory.
Allocating a buffer whose size equals the file size isn't the most efficient approach to serializing and viewing large documents because it means the entire document has to fit in memory at once. There are workarounds, but in HexDump's case it turns out to be a moot point because the limitations imposed by the CScrollView are typically more constricting than limitations imposed by available memory. To see what I mean, find a file that's a few hundred kilobytes in length and load it into HexDump. No matter how big the file is, HexDump won't display more than a couple of thousand lines (and often not even that). How come?
The problem is related to the 16-bit heritage of Windows 95-specifically, to the fact that scroll bar ranges are 16-bit values. When CHexView::OnInitialUpdate sets the limits of the scrolling view with SetScrollSizes, it computes the view's virtual height by multiplying the number of lines in the document by the number of pixels per line. If the height of a line is 16 pixels and the document contains 1,000 lines, then the view's virtual height is 16,000. For small documents that's fine, but a CScrollView can't handle heights greater than 32,767 (the largest positive value that can be represented with a signed 16-bit integer) because that's the maximum upper limit of a scroll bar's range. The result? If you load a document that contains more than about 2,000 lines, the CScrollView will only show a portion of the document even though printing and previewing will work just fine. To fix HexDump to handle large documents, you'll have to create a CView with a scroll bar and process scroll bar messages yourself. (The easiest way to add a scroll bar to a CView is to override CView::PreCreateWindow and add WS_VSCROLL or WS_HSCROLL to the window style.) CScrollView is great for small and medium-sized documents, but for very large documents there is often no choice but to strike out on your own and implement the scrolling logic yourself.
Here are a few tips, tricks, and answers to frequently asked questions to help you write better printing code and resolve problems that aren't addressed in my sample programs here.
The standard Print dialog includes a Selection radio button that the user can click to print the current selection rather than the entire document or a range of pages. By default, the button is disabled. You can enable it by adding the following statement to your OnPreparePrinting override just before the call to DoPreparePrinting:
pInfo->m_pPD->m_pd.Flags &= ~PD_NOSELECTION;To select the radio button after it's enabled, add this line as well:
pInfo->m_pPD->m_pd.Flags |= PD_SELECTION;m_pPD points to the CPrintDialog and CPrintDialog::m_pd holds a reference to the PRINTDLG structure the dialog is based upon. PRINTDLG's Flags field holds bit flags that define the dialog box's properties. Removing the PD_NOSELECTION flag added by CPrintInfo's constructor enables the Selection button, and adding a PD_SELECTION flag selects the button. If DoPreparePrinting returns a nonzero value (indicating that the dialog was dismissed with the OK button), you can find out whether the Selection button was selected by calling CPrintDialog::PrintSelection.
 if (pInfo->m_pPD->PrintSelection ()) {
    // Print the current selection
}
PrintSelection and other CPrintDialog functions that return information about settings entered in a Print or Print Setup dialog can be called through the pInfo parameter passed to OnPreparePrinting after DoPreparePrinting returns. They can also be called through the pInfo parameter passed to OnBeginPrinting and other CView print overridables.
You can modify the default properties and behavior of the standard Print dialog by modifying the values in the PRINTDLG structure. Refer to the documentation accompanying your compiler or the Win32 SDK for more information about PRINTDLG.
When you print, it's generally a mistake to assume anything about the printable area on the page. Even if you know you're printing to an 8.5 ´ 11-inch page, the printable page area can differ for different printers. The printable page area can even differ for the same printer and the same paper size depending on which printer driver is installed, and the horizontal and vertical dimensions of the printable page area are of course switched if the user selects landscape rather than portrait mode. Rather than assuming you have a given amount of space to work with, do as HexDump does and call GetDeviceCaps to determine the printable page area each time you print, or use CPrintInfo::m_rectDraw in your OnPrint function. This simple precaution will make your code work with any printer Windows can throw at it and will greatly reduce the number of bug reports you get from users.
Figure 9 lists other values you can pass to GetDeviceCaps to obtain additional information about a printer or other hardcopy device. You've already seen how to use NUMCOLORS to detect a black-and-white printer. PHYSICALOFFSETX and PHYSICALOFFSETY are useful to set margin widths based on information entered in a Page Setup dialog. (The MFC CWinApp::OnFilePrintSetup function displays a Print Setup dialog instead of a Page Setup dialog, but you can display a Page Setup dialog yourself using CPageSetupDialog.) If the user wants one-inch margins on the left side of the page, for example, you can subtract GetDeviceCaps(PHYSICALOFFSETX) from GetDeviceCaps(LOGPIXELSX) to get the x offset from the left of the printable page area where printing should begin. If the printer driver returns accurate information, the resulting margin will fall within a few pixels of being exactly one inch. HORZRES, VERTRES, LOGPIXELSX, LOGPIXELSY, PHYSICALWIDTH, PHYSICALHEIGHT, PHYSICALOFFSETX, and PHYSICALOFFSETY values can be combined to characterize the printable area of a page and pinpoint exactly where on the page the printable area lies.
If you're concerned about the occasional hardcopy device that won't draw bitmaps, you can find out whether CDC::BitBlt and CDC::StretchBlt are supported by calling GetDeviceCaps with a RASTERCAPS parameter and checking the return flags. For the most part, this is only a concern when output is directed to a vector device such as a plotter. If the driver for a raster device doesn't support blitting directly, the GDI will compensate by doing the blitting itself. You can determine outright whether printed output is destined for a plotter by calling GetDeviceCaps(TECHNOLOGY) and checking for DT_PLOTTER.
One thing you'll find when you conduct widespread testing on an application that prints is that printer drivers are maddeningly inconsistent in the information they report and the output they produce. For example, some printer drivers return the same values for PHYSICALWIDTH and PHYSICALHEIGHT that they return for HORZRES and VERTRES. Sometimes an ordinary GDI function such as CDC::TextOut will work fine on hundreds of printers but will fail on one particular model due to a driver bug. Other times, a GDI function won't fail outright but will behave differently on different printers. I once ran across a printer driver that defaulted to the TRANSPARENT background mode even though other drivers for the same family of printers correctly set the device context's default background mode to OPAQUE. Printer drivers are notoriously flaky, so it's important to anticipate problems and test as thoroughly as you can on as many printers as possible. The more ambitious your printing needs, the more likely you'll have to write work-arounds for quirky drivers.
HexDump calls CPrintInfo::SetMaxPage from OnBeginPrinting rather than OnPreparePrinting for two reasons. First, the pagination process needs to know the printable page area. Second, OnBeginPrinting is the first virtual CView function MFC calls with a pointer to a printer DC. However, because the maximum page number isn't set until after OnPreparePrinting returns, the "from" page number in the Print dialog is filled in with a 1 but the "to" page number is unknown. Some users may think it strange that an application doesn't know the maximum page number. In addition to displaying the maximum page number correctly, many commercial applications display page breaks outside of print preview and "Page mm of nn" strings in status bars. How do these applications know how the document will be paginated when they don't know what printer the document will be printed on or what the page orientation will be?
The answer is that they don't know for sure, so they take their best guess based on the properties of the default printer. The following code snippet initializes a CSize object with the pixel dimensions of the default printer's printable page area. You can call it from OnPreparePrinting or elsewhere to compute the maximum page number.
 CSize size;
CPrintDialog dlg (FALSE);
if (dlg.GetDefaults ()) {
    CDC dc;
    dc.Attach (dlg.GetPrinterDC ());
    size.cx = dc.GetDeviceCaps (HORZRES);
    size.cy = dc.GetDeviceCaps (VERTRES);
}
CPrintDialog::GetDefaults initializes CPrintDialog::m_pd with values for the system's default printer without displaying a dialog box. A zero return from GetDefaults means the function failed, which usually indicates there are no printers installed or a default printer has not been designated. CPrintDialog::GetPrinterDC returns the DC handle copied to m_pd by GetDefaults. Because it's up to the application to delete the device context, even though Windows created it, the handle is not detached before dc goes out of scope so it will be deleted by the object's destructor. It's important to pass the CPrintDialog constructor a FALSE parameter instead of TRUE, or GetPrinterDC will return a NULL device context handle.
Sometimes it's useful to build a list of all the printers available so the user can select a printer outside of a Print or Print Setup dialog box. The routine shown in Figure 10 uses ::EnumPrinters to enumerate the local installed printers, and adds an entry for each to a combo box. In Windows 95, network printers are included in the list as well because local and network printers are treated identically. The first call to ::EnumPrinters retrieves the number of bytes needed to hold an array of PRINTER_INFO_5 structures describing individual printers. The second call loads the info. On return, dwPrinters holds the number of printers. Each structure's pPrinterName field holds a pointer to an ASCIIZ string containing the device name of the associated printer. Enumerating printers with PRINTER_INFO_5 structures is fast because no remote calls are required; all information needed to fill the buffer is obtained from the registry. For fast printer enumerations in Windows NT 3.51, use PRINTER_INFO_4 structures instead.
The resulting CDC object can be used just like a CDC object passed by address to OnBeginPrinting and other CView print functions.
This article is adapted from the forthcoming book, Programming Windows 95 with MFC, by the author and to be published by Microsoft Press, spring 1996, and here is reproduced from Microsoft Systems Journal.
From the April 1996 issue of Microsoft Systems Journal.