![]()
|
Pay No Attention to the Man Behind the Curtain! Write Your Own C++ AppWizards Walter Oney
Working with MFC makes it easy to build great Windows®-based applications—but only if you really know your way around the library. AppWizard helps you get started by creating skeleton projects jam-packed with boilerplate code. In Microsoft® Visual C++® 4.x, AppWizard even offers a "metawizard" that lets you build your own custom wizards. A custom wizard in turn helps you build project skeletons with any combination you select of standard or custom MFC features. |
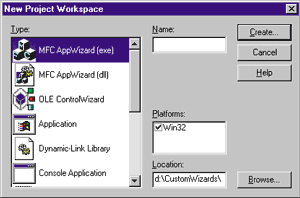 |
| Figure 1 Creating a new project |
|
The Type pane in the New Project Workspace dialog contains a list of all application types AppWizard knows how to generate. The items in the list actually come from several places. AppWizard itself contains most of them; they live in the files MFCAPWZ.DLL and MSVCBLD.PKG (a regular 32-bit DLL despite its nonstandard file extension) that you'll find in the BIN\IDE subdirectory of your Developer Studio directory. AppWizard automatically populates the Type pane with those standard application types, which include the entries for MFC Application (exe), MFC Application (dll), Application, and a few more. More interesting is where entries like OLE ControlWizard come from. An OLE control is not one of the standard application types. Rather, it has its own custom wizard that someone generated using the techniques I'll be discussing in this article. The OLE ControlWizard is in the file MFCTLWZ.AWX in the IDE subdirectory. The .AWX file extension means Application Wizard Extension, and the standard Windows 95 file association for .AWX includes the description "Custom AppWizard." If you browse the IDE subdirectory, you'll find MFCTLWZ.AWX and CUSTMWZ.AWX. CUSTMWZ is the wizard for generating other custom wizards, and it's what I'm calling a metawizard in this article. Later, I'll show you how to use the metawizard to generate your own custom wizards. The .AWX file for a custom wizard will end up in Developer Studio's Template subdirectory, where it will be safe from the Setup program as you upgrade your compiler. Since AppWizard searches the Template subdirectory (in addition to the IDE subdirectory) for .AWX files, your custom wizards will automatically end up in the New Project Workspace dialog along with all the wizards Microsoft ships with Visual C++. What's In a Wizard?
.AWX files are nothing more than 32-bit MFC extension DLLs that AppWizard calls on to lead you through the steps of creating a particular type of application. Since an .AWX is a DLL, it can contain resources like string tables, dialogs, and so on. In fact, AppWizard constructs an item in the Type list by combining the first icon in the .AWX file with the ProductName field of the version resource. |
#pragma comment(lib, "mfcapwz.lib")
|
The #pragma forces the linker to use MFCAPWZ.LIB as one of the standard libraries, thereby resolving symbols like SetCustomAppWizClass to MFCAPWZ.DLL. The argument to SetCustomAppWizClass is the address of a wizard object derived from CCustomAppWiz, which is also declared in CUSTOMAW.H and implemented in MFCAPWZ.DLL. The CCustomAppWiz class contains a CMapStringToString member named m_Dictionary and nine virtual functions (see Figure 4). The purpose of DllMain's call to SetCustomAppWizClass is to register the custom wizard object with AppWizard. AppWizard then calls the various virtual functions in the wizard object to present the user with an appropriate set of wizard steps and to build the final skeleton application. AppWizard's first call to the custom wizard object is to InitCustomAppWiz. In general, every wizard calls SetNumberOfSteps to indicate how many steps it will present to the user to fully specify the project being built. Thereafter, AppWizard will call the Next and Back functions to obtain the addresses of CAppWizStepDlg objects representing those steps. CAppWizStepDlg is a derivative of the standard CDialog class. Some custom wizards derive one or more classes from CAppWizStepDlg—one for each step they present. (Some wizards don't present any steps, so they don't deal with this class at all.) I'll use the generic term "step dialog class" to describe a class derived from CAppWizStepDlg. In addition to a constructor and destructor, a step dialog class has the virtual functions listed in Figure 5. Each step dialog class corresponds to a dialog resource in the .AWX file. The dialog resource uses the DS_CONTROL, WS_CHILD (instead of WS_POPUP), and WS_TABSTOP styles and omits DS_ MODALFRAME, WS_CAPTION, and WS_SYSMENU. If these styles sound familiar, it's because earlier versions of MFC property sheets required you to specify them for individual page dialogs. The job of a step dialog class is to present a logically related set of choices to the user and to communicate the user's selections to the engine that actually generates the skeleton project. The engine I'm referring to is a macro processor built into AppWizard (but you can replace it). I'll call it the "macro engine" from now on. It expands a set of template resources by reference to the contents of a macro dictionary. Since the macro dictionary and template resources are central to the way AppWizard works, I'll discuss them now. The Macro Dictionary
The macro dictionary is the m_Dictionary member of the custom wizard object. It's just an instance of the regular CMapStringToString class, which provides a way to implement a simple keyword-and-value database in an MFC application. Custom wizards use three of CMapStringToString's member functions heavily: Lookup, SetAt (or the equivalent operator[] overload), and RemoveKey. Lookup looks up a macro name (that is, a string used as a key in the database) and returns the associated value. SetAt and operator[] insert or replace the string value of a macro. RemoveKey removes a macro from the dictionary. Both the names and values of macros are case-sensitive. |
 m_Dictionary[_T("DOC_CLASS")] = _T("C") +
     m_Dictionary.Lookup(_T("Safe_root")) + _T("Doc");
| In other cases, you'll want to treat a macro as a Boolean value. By convention, AppWizard treats a macro as having the Boolean value TRUE if it's in the dictionary (no matter what value it has), and as having the Boolean value FALSE if it's not in the dictionary. You can control the value of a Boolean macro named VERBOSE with statements like these two: |
 m_Dictionary[_T("VERBOSE")] = _T("1"); // TRUE because exists
 m_Dictionary.RemoveKey(_T("VERBOSE")); // FALSE because absent
|
In the TRUE example, the actual value used in the assignment doesn't matter. All that matters is that the VERBOSE macro has some value. I could use the values "0" or "FALSE" if I wanted to confuse everyone reading my code, and AppWizard would still treat VERBOSE as having the Boolean value TRUE. AppWizard predefines a few macros before it even invokes a custom wizard (see Figure 6). The most important of the predefined macros are the ones involving "root." When I created the TippyDialog wizard in the D:\CustomWizards directory, I ended up with root and Root set to "TippyDialog," ROOT set to "TIPPYDIALOG," Safe_root and safe_root set to "TippyDialog," and SAFE_ROOT set to "TIPPYDIALOG." The difference between the safe root macros and the others would show up if I had used a project name like Fix Bug containing characters that C and C++ don't permit in variable names. Then Safe_Root would be "FixBug" and SAFE_ROOT would be "FIXBUG." Template Resources
A template resource is an example of a generic class of custom resources that anyone can create within Developer Studio. The custom resource feature allows you to define your own named class of resource objects. The first time you want to create a particular kind of custom resource, you follow this procedure. From within the Project Workspace you select the Resource View of your project, right-click on the top-level folder, and select Insert from the resulting context menu. Instead of selecting one of the predefined resource types, press the Custom button to bring up the New Custom Resource dialog (see Figure 7). Enter a name for your custom resource type and press OK. Henceforth, each time you want to insert a new resource, your custom resource type will be among the choices (see Figure 8). |
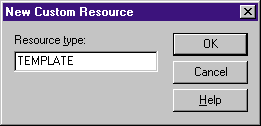 |
| Figure 7 Defining a resource |
|
As used by AppWizard, template resources are a custom resource type named TEMPLATE that contains multiline text values or binary data. To create a new template resource, you first create a disk file in the Template subdirectory of your wizard project. Then you import the disk file into a new TEMPLATE resource. To modify a template resource, you simply edit the disk file. Since Developer Studio understands that your resource script depends on the disk file, it will automatically run the resource compiler the next time you build the wizard project. |
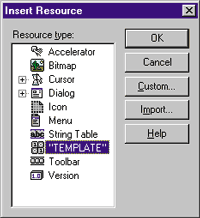 |
| Figure 8 Inserting your custom resource |
| Text-valued template resources may contain raw text and macro references. Macro references use $$ as delimiters around the name of a macro in the dictionary. $$Root$$, for example, denotes substitution by the value of the dictionary entry named Root—namely, the mixed-case name of the project being created. The real power of AppWizard arises from the fact that it performs macro substitution on text-valued template resources as it builds the corresponding files in the new project. You can also place $$-delimited directives into a template resource. The most important of these directives is $$IF and its relatives, which allow you to conditionally include or exclude lines in the generated file: |
 $$IF(expressionA)
     textA
 $$ELIF(expressionB)
     textB
 $$ELSE
     textC
 $$ENDIF
|
$$IF and $$ELIF (yes, $$ELIF) evaluate macro expressions that involve a very limited syntax. The general form of one of these expressions is a list of macro names separated by logical-OR operators ( || ). You can also use the unary NOT operator (!) immediately before a macro name. The expression evaluator works from left to right. As I mentioned earlier, the macro engine treats a term as TRUE if the named dictionary entry exists, regardless of what the entry's value might be. The macro engine doesn't understand parentheses or a logical-AND operator, so if you want to conditionally generate a block of code if MACROA and MACROB are both defined, you'd have to use code like this: |
 $$IF(MACROA)
 $$IF(MACROB)
     text
 $$ENDIF
 $$ENDIF
|
You can nest $$IF statements up to five levels deep. But if you have very complicated macro expressions, I'd recommend evaluating them in your C++ code and defining a single macro to contain the final result. If you put lots of conditional logic into a template, you'll probably want to add commentary just so you can keep track of your own logic. You can use $$// as a comment statement, and you can also add //-comments to other directive lines. $$// comment lines won't appear in the final output files. For example, you could code the preceding example more redundantly as follows: |
 $$IF(MACROA)
 $$IF(MACROB)
 $$// Following generated if MACROA && MACROB:
     text
 $$ENDIF // MACROB
 $$ENDIF // MACROA
| The template language supports limited looping capabilities in addition to conditional logic. To code a loop, first define (in your C++ code) a vector of macros with names of the form name_n, where n takes on consecutive integral values starting with zero. Then define one more macro whose text value equals the length of the series. |
 m_Dictionary[_T("paneclass_0")] = _T("CTreePane");
 m_Dictionary[_T("paneclass_1")] = _T("CDataPane";)
 m_Dictionary[_T("paneclass 2")] = _T("CStdPane");
 m_Dictionary[_T("NumPaneClasses")] = _T("3");
| In your template, use the $$BEGINLOOP and $$ENDLOOP directives as shown in this example: |
 $$BEGINLOOP(NumPaneClasses)
 class $$paneclass$$; // forward declaration
 $$ENDLOOP
| Within the loop, AppWizard automatically appends "_n" to every macro name it sees, with n taking on the consecutive integral values 0, 1, and so on. Thus, this example would generate the following: |
 class CTreePane; // forward declaration
 class CDataPane; // forward declaration
 class CStdPane; // forward declaration
|
There are two fine points to keep in mind when working with $$BEGINLOOP and $$ENDLOOP. First, AppWizard will look for a macro using the macro's undecorated name if it doesn't find one with "_n" at the end. This allows you to mix scalar and vector macros within a loop. Second, you can't nest loops. Since AppWizard interprets $$ as a macro directive, you need some way to insert literal "$$" strings into templates. You do that by coding $$$$. Required Template Resources
Every wizard has template resources named NEWPROJ.INF and CONFIRM.INF. NEWPROJ basically lists the files that AppWizard is to generate when it builds the skeleton project. CONFIRM contains the explanatory text that AppWizard generates to summarize the user's specification of the project. Like other template resources, these templates can use macro substitution and conditional logic to tailor the project. Building Custom Wizards
You build a custom wizard in the same way you build other MFC applications. Start by creating a new project. Use the metawizard selected by the Custom AppWizard choice in the New Project Workspace. The metawizard presents the step shown in Figure 11, allowing you to specify the name of the new wizard and the starting point for creating it. |
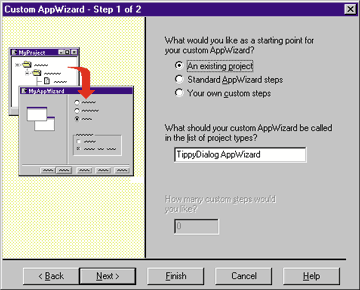 |
| Figure 11 Building a custom wizard |
|
There are three choices of starting points. When you say you want to start with an existing project, the metawizard will ask you to specify an existing MFC project. I call this a cloning wizard because it basically allows the user to very easily copy a project and rename all of the files and classes within it. A cloning wizard contains no steps, and you have very little work to do as its author. You might create a cloning wizard when you need to generate a series of very similar applications starting from an application that differs only a little bit from the standard MFC AppWizard skeleton. The second starting point for a new wizard is labeled "Standard AppWizard steps." I call this a semicustom wizard because it incorporates your own steps and templates in addition to the ones provided by the standard MFC AppWizard. A semicustom wizard is actually the hardest to write because it requires you to completely understand the template resources and macro values that the standard wizard uses. While the macro values are documented in the online help, the only way to learn about MFCAPWZ's standard template resources is to export them to disk files and examine them. Therefore, I won't say any more about how to build this type of custom wizard. The third method is to tell the metawizard you want to build a wizard using your own custom steps. I call this a full custom wizard. You might create a custom wizard like this to make it easier to build new types of applications. That's what Microsoft did to support OLE custom controls, for example. I built the TippyDialog wizard as an example of a cloning wizard. I wanted to make it easy to build new projects where the controls in all of my dialogs would have tool tip balloons that explain their purpose. Figure 12 shows an example of a tippy dialog in which an explanation of the OK button appears when you move the mouse cursor over the button. |
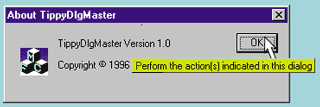 |
| Figure 12 Tippy dialog |
|
When you build a cloning wizard, you always start with an existing MFC project. It's best if you build this master project by first running the standard MFC AppWizard and then making minimal changes. (The metawizard has only limited ability to turn your project files into template resources.) Thus, I built an SDI application called TippyDialogMaster, and I then added the minimum amount of code to provide a new base class (CTippyDialog) for future dialogs. Since this article isn't a treatise on MFC programming, I'll describe my approach in the sidebar ("The TippyDialogMaster Application"). Since I'm primarily a systems programmer (some people who see my applications tell me this fact is so obvious it needn't be mentioned), I seldom want to build document-centric Windows applications. MFC works just fine for applications that don't use documents and views, but I've always found it unreasonably hard to get my projects configured correctly for precompiled headers and Class Wizard and to setup the appropriate hierarchy of frame and view-like windows. I therefore decided to create an Undoc fully custom wizard that would generate MFC applications that don't use the document/view architecture. Undoc will generate a project containing a frame window that, in turn, contains up to three panes in a splitter window. One of the panes can be a tree control, another can be a list control, and the third can be a generic window. In contrast to a cloning wizard, a fully custom wizard like Undoc has one or more steps. Each step requires a dialog template and a step dialog class. When you first define the wizard, the metawizard asks you how many steps will be presented. A little planning will pay off for you here, since it's tricky to change your mind about the number of steps later on. Let's say you plan to present one step, as I do in Undoc. The skeleton project built by the metawizard will then have a step dialog class named CCustom1Dlg packaged in files named cstm1dlg.cpp and cstm1dlg.h. Furthermore, the project resources will have a generic step dialog named IDD_CUSTOM1 with all the correct style bits already configured. From this point on, your job as wizard author is threefold. You need to create the dialog templates for your wizard steps and build the dialog functions to make the user interface in those step dialogs work the way you want them to. This part of the job is the same as building any dialog, so you probably already know (oh so well) how to do it. You also need to build the template resource files as outlined earlier in the article. Finally, you need to write the OnDismiss functions for your step dialog classes to transfer the information you gather from the user into macro variables so the AppWizard macro engine can appropriately customize your template resources. |
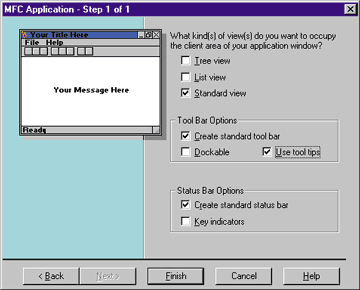 |
| Figure 13 The Undoc wizard |
|
Figure 13 illustrates the Undoc wizard's step dialog as it might appear in action. I went to some trouble in preparing this example to achieve the effect of having a sample window floating over the dialog. The standard AppWizard displays similar thumbnails to help you understand the effect of various choices in its step dialogs. To get this effect, I first defined a dialog template with all the controls positioned in the right half of a 303 X 197 window (that being the standard size of a wizard step dialog) as shown in Figure 14. Note in particular that I didn't put a 3D client edge vertical line into the template. Doing so would have involved an extended style bit; due to what looks like a bug, AppWizard won't display step dialogs that have extended style bits. (This appears to have been fixed in an upcoming version of Visual C++.) |
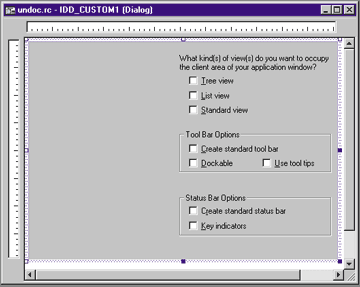 |
| Figure 14 The IDD_CUSTOM1 resource template |
A Guide to Template Resources
I can't show you all of the template resources for the Undoc wizard here, but they are included with the source code (see page 5 for download sources). I do want to mention several fine points about template resources in general, though. |
 [CLS:CAboutBox]
 Type=0
 HeaderFile=$$root$$.h
 ImplementationFile=$$root$$.cpp
 BaseClass=CDialog
 Filter=D
 LastObject=CAboutBox

 [DLG:IDD_ABOUT]
 Type=1
 Class=CAboutBox
 ControlCount=2
 Control1=IDOK,button,1342242817
 Control2=IDC_STATIC,static,1342308353
|
The last thing I want to mention about template resources concerns the project make file. The only information AppWizard appears to use in building the make file is the information in NEWPROJ.INF that specifies which files are in the project and a few settings (such as the target platform and whether the project is an .EXE or a .DLL) that it gathers directly from the user. Importantly, the make file doesn't start life as a template resource. AppWizard and the custom wizards Microsoft distributes use an undocumented set of interfaces to control the initial project settings that govern the names of the target files, the tools used to build them, and the command-line options for those tools. This situation is unfortunate for the wizard author who wants to create types of application not foreseen by the Visual C++ development team. For example, I'd like very much to build a custom wizard for VxD projects, but I can't exercise the necessary control over the project settings to automate much of the process. (Again, this appears to have been fixed in an upcoming version of Visual C++.) The OnDismiss Function
When you build ordinary applications, you write code that transforms user input into the values of program variables. Most likely, you use the data exchange capabilities of the CDialog class to copy ephemeral dialog control values into class member variables, and you later copy the member variables into still other program variables that outlast the dialog. Similarly, you need to capture the user's interaction with your step dialogs when you write a custom wizard. |
 #define d Undocaw.m_Dictionary
 #define ds(n,v) d[_T(#n)] = _T(#v)
 #define dr(n) d.RemoveKey(_T(#n))
| (The # keyword in a preprocessor macro definition places double quotes around the succeeding macro argument.) So, to set a Boolean macro named treepane to TRUE, I call the ds macro with arguments of treepane and 1 |
ds(treepane, 1);
| which generates this code: |
Undocaw.m_Dictionary[_T("treepane")] = _T("1");
| To set the same macro to FALSE, I call the dr macro |
dr(treepane);
| which generates this code: |
Undocaw.m_Dictionary.RemoveKey(_T("treepane"));
| To follow every last detail of this example, you'd need to understand details of the Undoc wizard that I don't want to go into here. The use of the paneclass and numclasses variables is worth explaining in more detail, however. I use these variables to help build the .CLW file. Numclasses starts out as zero, and paneclass as an empty string. OnDismiss increments numclasses and adds some string data to paneclass for each of the three possible child windows the user requests as part of the frame window. For example, this is the code that deals with the pane containing a tree control: |
 if (m_treepane)
     {                       // tree pane included
     ds(treepane, 1);
     paneclass += csprintf("Class%d=CTreePane\n",
                           numclasses+4);
     ++numclasses;
     }                       // tree pane included
 else
     dr(treepane);
| By the way, csprintf is a local helper function that I use to build a formatted CString: |
 CString csprintf(const char* ctl, ...)
     {                           // csprintf
     char buffer[512];
     wvsprintf(buffer, ctl, (char*) (&ctl + 1));
     return buffer;
     }                           // csprintf
|
I'd have liked to use CString::Format instead. My function relies on wvsprintf, which is easy to use when you start with a variable list of arguments. There's no equivalent vector version of CString::Format, unfortunately. If the user specifies a tree control and a list control, then both m_treepane and m_datapane will be TRUE. Numclasses will end up with the value "2", and paneclass with the value "Class4=CTreePane\nClass5=CDataPane\n". Further on, I use these variables to define some macros. The macro numclasses will be set to "5", and paneclass to "Class4=CTreePane\nClass5=CDataPane\n". Then, when AppWizard generates the .CLW file, these lines of the template resource |
 ClassCount=$$numclasses$$ // 3 + # window panes
 Class1=CMainWindow
 Class2=CAboutBox
 Class3=C$$Safe_root$$App
 $$paneclass$$
| will generate the following: |
 ClassCount=5
 Class1=CMainWindow
 Class2=CAboutBox
 Class3=CTestApp
 Class4=CTreePane
 Class5=CDataPane
|
I needed this complication to insure that Class Wizard would eventually know about all of my child window classes. I needed the .CLW file to indicate the total number of classes, whereas only some of that total number depend on user selections. Hence the use of C variables and extra macros to make the .CLW file come out right. Debugging a Wizard
Debugging a custom wizard turns out to be quite a technical challenge, but you'd never know it because Microsoft did such a good job of crafting a debugging environment that's compatible with the one you use for regular applications. A custom wizard project has both release and pseudo-debug configurations. The pseudo-debug configuration relies on the PSEUDO_DEBUG preprocessor symbol instead of _DEBUG, and it uses release versions of all libraries. The pseudo-debug configuration of your project actually resembles a release configuration in all ways except that your code will be compiled with no optimizations and with debugging information usable by the Developer Studio debugger. In particular, the memory allocation routines your wizard will use are the release versions rather than the debug versions. Using release functions is necessary because your code is interacting closely with AppWizard code that uses the release versions. Advanced Features
There are many other things you can do with the custom application wizard facility if you want to exert yourself. You can build localization support in a semicustom wizard, for example. The standard MFC AppWizard allows you specify which language should be used for resources in the generated application. Your specification controls which of several language-dependent DLLs (APPWZENU.DLL, APPWZDEU.DLL, and so on) AppWizard uses for language-sensitive data. The metawizard tries to help you fit your own semicustom wizard into this support by letting you indicate which languages your wizard will support. Conclusion
The Microsoft Visual C++ Custom Application Wizard support is a powerful feature that makes it possible to extend the functionality of AppWizard to suit your own needs. Building a wizard to clone an existing project is very easy, and practically any programmer who has a standard way of beginning an MFC project will find it simple and useful to build a wizard to automate the process. Building a completely custom wizard is more difficult, however, and a semicustom wizard that extends the standard document/view wizard is hardest of all. Companies that need to build many highly custom applications may be willing to invest in one of these wizards, as may a software tools vendor. |
|
From the March 1997 issue of Microsoft Systems Journal. |