![]()
This article assumes you're familiar with
Visual J++,
DAO/RDO,
JDBC-ODBC,
ASP
Download the code (117KB)
Download the database (1,169KB)
|
This article may contain URLs that were valid when originally published, but now link to sites or pages that no longer exist. To maintain the flow of the article, we've left these URLs in the text, but disabled the links.
|
|
Exploring Data Access with Visual J++ Joseph C. Fung |
| Is Microsoft Visual J++ just another Java tool? Mais non! It’s the hottest way to build database apps today! |
|
You can use Visual J++™ to build browser-hosted data aware applets that add interactivity and simple business logic to HTML pages. You can also create fully windowed applications and server components that communicate with database servers across the Internet or intranet. With Java, there are numerous methods for building data access into these types of applications. You can use low-level protocols such as sockets where you essentially send a stream of bytes and perform your own custom marshalling, or you can use higher-level protocols like JDBC, which provide objects that let you work with SQL. Figure 1 lists some of the connectivity methods that you can use for data access with Visual J++. In this article, I will discuss three of the techniques: DAO/RDO, JDBC, and HTTP. Future articles will discuss other techniques and issues related to building client/server and enterprise applications for the Web.
Before you begin implementing any new data access functionality, you should know about the architectural design issues associated with building client/server and enterprise applications for the Web. The first thing I'll describe is the two types of architectures you can choose for your application: two-tier and three-tier. Which architecture you choose affects how and where you can use the techniques I will show you. After you've got a basic understanding of two-tier and three-tier architectures, you can begin learning about each of the three data access techniques and where they fit into place in a Web-based client/server model. Two-Tier Architecture Early client/server applications used a logical and physical two-tier architecture, also known as the fat client or fat server model (see Figure 2). These traditional implementations partition an application between a client and a server with some form of middleware to handle the communications between them. A Visual Basic® program that uses Data Access Objects (DAO) to talk to a Microsoft SQL Server™ database is an example of a two-tier application. In the two-tier model, you place the presentation logic in the client, making it responsible for handling the UI and any interaction with the user. The server is typically a database server that processes queries and performs database-related services. Each client initiates and keeps open a connection to the server to send requests and process results. |
 |
| Figure 2: Two-tier Model |
You typically code the core application logic either in the client, using a 3GL or 4GL programming language, or in the server, as triggers and stored procedures. Depending on where you place this application logic, you end up with either a fat client or fat server application. Although the "fat" designation refers to the amount of application logic in the component and not to the physical footprint of the application, two-tier applications have an unsavory reputation as behemoths. This is because the inflexible nature of the model makes two-tier applications hard to maintain, difficult to scale well, and cumbersome to deploy. For instance, any change to the application logic or data access technique in a fat client requires you to "visit" every user and update the application. In an enterprise with hundreds or thousands of desktops, this can be very difficult. Also, because
the number of open connections to the database server affects
system performance, the number of active clients is limited. Finally, the sheer amount of application logic in the client places a heavy burden on each of the machines used to
run the application.
Three-Tier Architecture
Many newer client/server applications and the majority of Web applications follow a logical three-tier component model (see Figure 3). In the three-tier model, the application is split into a presentation tier, application tier, and data services tier. These applications are inherently more flexible
than two-tier apps. Each of the logical tiers or components performs only the function that it is responsible for. In most situations, any updates to a component affect only that tier and none of the others. The presentation tier displays data and handles the user interaction. The application tier contains the application logic and business components. And, surprisingly enough, the data services tier takes care of the data services.
 |
| Figure 3: Three-tier Model |
All requests from the client are handled through the application tier. When the client needs to make a request for data, it does so indirectly. This has important benefits. First, it means that no database drivers, such as ODBC software, need to be installed on the client. This reduces some of the management issues and system requirements of the client machine. Second, the application server acts as a sort of "funnel" by maintaining a handful of database connections while servicing a larger number of clients. Third, the application tier serves as an abstraction layer that isolates the client from the back-end data source. In fact, the database server and data access techniques can be changed or new data sources such as Microsoft Exchange stores can be added without significantly affecting the client.
An illustrative example of a three-tier application is an Active Server Page (ASP) application consisting of the browser, ASP pages, and a database server. The browser client handles only the user interface function and displays HTML to the user. The ASP scripts and any dependent application components contain all of the application logic. The database server services all database requests made by the application tier. HTTP is used as the communications middleware between the browser and Web server, while traditional database middleware can be used to connect the application component to the database server. In this model, the issues of scalability, performance, and manageability are addressed. The application logic is centrally maintained on the Web server and can be updated more easily. The client machine needs only to handle the presentation tasks so it can have lower system requirements. Finally, the clients do not communicate directly with the database server, but through the application tier so that the number of database connections, and thus the load on the database server is reduced.
A subtle distinction between a non-browser three-tier application and a Web application is that the browser adds the benefit of automatic deployment of all of the presentation components, and even some application logic, to the user. This feature makes it possible to build logical two-tier applications using a physical three-tier architecture.
DAO and RDO
Data Access Objects (DAO) and Remote Data Objects (RDO) are two sets of objects that let you access and manipulate data in local or remote databases. Developers using Visual Basic and Visual C++® are familiar with them since they are an integral part of those tool sets. These objects let you perform common data operations such as opening connections, executing queries, and updating database tables. DAO supports two workspace objects that let you access data stored in Microsoft Jet databases, installable ISAM data sources, and ODBC data sources, while RDO communicates only with ODBC data sources. The two options have similar programming models, but RDO is designed specifically for relational databases like Microsoft SQL Server and has a few features that are not found in DAO.
Developers using Visual J++ 1.1 can use either DAO or RDO for data access. If you are new to these data access objects, you can find online references installed as part of Visual J++. If you are already familiar with them, you will still need to get accustomed to the Java way of accessing the objects and their methods and properties.
One of the features of Visual J++ 1.1 that facilitates this is the new Database Wizard for Java. The Database Wizard walks you through a series of steps to create a Java applet that can be used to perform basic database access functions such as viewing, editing and navigating through records in a table. Although the applet that gets generated is very limited, you can use its source code to learn how to use DAO or RDO objects from within a Java program.
The DAO and RDO objects are implemented as native libraries and are accessible via COM. Before you can use the Database Wizard, you must create Java interface classes for the data access objects that your applet will be using. The Java objects defined in the interface classes act as proxies for the COM objects. When the Microsoft Java Virtual Machine sees that you are accessing an object in an interface class, it translates your method invocations into the corresponding function invocations on the COM class. All of this happens with no extensions to the Java language because of the
transparent built-in Java/COM integration in the Microsoft Java Virtual Machine.
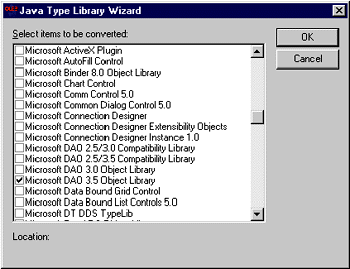
You can create interface classes for a COM component using the Java Type Library Wizard. When you invoke the Java Type Library Wizard, the dialog in Figure 4 appears. This dialog lists all of the objects in your local computer that have type libraries associated with them. The Java Type Library Wizard uses the type library to generate the Java interface classes, then places them into a directory below the trusted library directory with the same name as the type library. The wizard also generates a summary file, Summary.txt, which lists the interfaces for the classes. This file is located in the same directory as the classes and is useful in helping you compare the Java method names to the equivalent DAO methods
and properties.
 |
| Figure 4: Java Type Library Wizard |
After you have generated the necessary Java interface classes, you can invoke the Database Wizard from the Visual J++ New Project dialog. When you do so, the Database Wizard displays the first dialog shown in Figure 5. This dialog prompts you to name your applet. It also asks you for the name of a Microsoft Access database file or ODBC data source name and whether you want to open the database in read-only mode. After you have answered these questions, you can continue on to the next two dialogs that prompt for the table name and list of fields to include in the applet. Finally, the last dialog asks if you want comments inserted into the generated source code.
The Database Wizard generates two Java source files and a sample HTML page to host the applet. One of the source files, Alert.java, contains a utility class that displays alert
messages. The other source file contains your applet class and two helper classes, DBField and DBFrame, that abstract a database field and construct the applet's frame. The core of the data access logic is found in the source for the applet itself. For this example, I'll point out the useful code fragments that you can use with DAO objects.
Developers who have worked with DAO before will recognize the DAO object types from their names. Before you begin accessing a database, you must first initialize the database engine by creating a DBEngine object using the license manager. All other objects are derived from this object. The following code creates m_IEngine:
|
|
The DBEngine object contains an OpenDatabase method. This method has four arguments that ask for the database name and other options such as concurrency and connection settings. These values are passed to the method as COM Variants. The code generated by the wizard opens the database using the read-only option you specified.
|
|
OpenDatabase returns a reference to a Database object that you can use to access and manipulate the database. For instance, this object has methods to issue action queries to update data or select queries to retrieve data using one of four Recordset objects (see Figure 6).
The applet calls the Database's OpenRecordset method to return a dynaset-type Recordset object that you can use to display and update data in your table. |
|
|
After you have obtained a Recordset object, you can call methods such as MoveFirst and MoveNext to navigate through the records. You can also access individual fields in the table using the Recordset's getFields method or perform additional functions by choosing from the rich set of objects that are part of DAO. |
 |
| Figure 7: Java DAO |
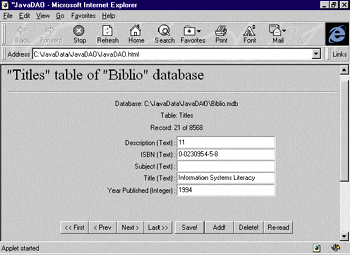
That's the gist of the code. The final applet is shown in Figure 7.
There are some final notes to be aware of if you select this technique for your data access. As noted earlier, the DAO/RDO method requires native binaries to be installed on the client machine. For two-tier applications, this restricts you to using the method with only intranet and desktop scenarios where you can preload or install the DAO/RDO files on 32-bit Windows® machines. If you want to build a cross-platform Internet application that can be accessed by anonymous users, you can use a three-tier architecture. You'll need to install the native binaries only on the application server where all of the data access occurs. Browser clients, Java and/or HTML-based, can use any cross-platform communications middleware, such as HTTP, to make requests of the application server. The three-tier model frees you from concerns over cross-platform clients by letting you place the platform-specific code in the application server. As you can see, you can use native code and still build a cross-platform application.
Using JDBC with Visual J++
Developers wishing to use a pure Java data access solution will want to investigate JDBC. JDBC is a low-level Java API that defines a simple class hierarchy of objects and interfaces for accessing databases from a Java program. With JDBC, you can connect to relational databases and use SQL to query and manipulate them. JDBC is similar to the C-based Open Database Connectivity (ODBC) API, but is more natural for Java developers and offers the benefit of a cross-platform solution. Like ODBC, JDBC is based on the X/Open SQL CLI (call level interface) and allows for higher-level APIs to be built on top of the specification.
To connect to a particular database, a vendor-supplied JDBC driver is required. JDBC drivers are categorized into four types: JDBC-ODBC bridge (Type 1), Native API partly Java (Type 2), JDBC-Net (Type 3), and Native protocol (Type 4). The first two require the use of native binaries on the client. The last two are pure Java implementations. The JDBC-ODBC bridge translates JDBC method calls into the equivalent ODBC function calls. To use this bridge, you'll also need an ODBC driver to connect to the desired database. A Native API partly Java driver maps JDBC calls into the client API calls understood by a particular database. Similar to
the JDBC-ODBC bridge, this method requires the installation of vendor-supplied client libraries for each database server. A JDBC-Net driver maps JDBC calls into a network protocol that is then mapped to a DBMS protocol by a middleware server. This type of driver is useful when the network protocol and the DBMS protocol are different. A Native API driver converts the JDBC calls directly into the network protocol used by the database server. A typical Native API driver works with a database server that is configured to use the TCP/IP networking protocol of the Internet. You'll find a list of these JDBC driver vendors at the end of this article.
Getting Started
To begin using JDBC, you must have the JDBC support files installed. JDBC support comes as part of the Java Development Kit 1.1 (JDK); however, the current shipping release of Visual J++ only supports JDK 1.0.2. To add JDBC support to Visual J++ 1.1, you'll need to install the JDBC 1.22 add-on kit, which is available from the JavaSoft Web site. This kit contains the necessary JDBC class files that work with JDK 1.0.2 environments. If you also want to use the JDBC-ODBC bridge, you'll need to download the Microsoft SDK for Java 2.0 Preview that is available from the Microsoft Java site. One of the components of the Microsoft SDK for Java is a custom JDBC-ODBC bridge that works specifically with the Microsoft Java VM.
Getting started with JDBC is easy. For instance, the steps required to query a database consist of opening a connection, sending some SQL, then working with the result set. The JDBC class hierarchy supplies the Connection, Statement, and ResultSet objects for this purpose.
The first step in opening a connection is to register a JDBC driver that the JDBC driver manager, DriverManager, can use. You can have many different types of JDBC drivers registered at once. It is the job of the JDBC driver manager to maintain the list of drivers and to select the correct driver to connect to a database server when you request a connection.
There are two ways to register a driver. One is to add the driver to the java.lang.System property jdbc.drivers. The other way is to call the method Class.forName to explicitly load the driver class. This is illustrated by the following code.
|
|
If the driver class has been written properly, it will register itself with the driver manager so that it is available to use. I recommend the latter method of registering the driver because it is simpler and more straightforward to use.
Opening a Connection Once you have registered a driver, you can call the DriverManager's getConnection method to establish a connection to the database server. This method returns a Connection object that represents the connection. GetConnection takes a single JDBC URL as an argument to identify the driver protocol and database server. Unlike a standard URL, a JDBC URL is identified by three parts: the protocol, subprotocol, and subname. The protocol is always JDBC. The subprotocol can be the name of the driver or ODBC if you are using the JDBC-ODBC bridge. The last part of the URL, the subname, identifies the database server itself or in the case of the ODBC subprotocol, it is the DSN. The following call attempts to open a connection via the JDBC-ODBC bridge: |
|
|
Once you have called this method, the driver manager iterates through its list of registered drivers and checks each to see which will one will connect to the URL. When the first connection is made, the driver manager stops iterating and returns a Connection object.
Sending SQL The Connection object provides three objects that you
can use to issue SQL statements: Statement, PreparedStatement, and CallableStatement. The Statement object is used to execute simple queries and return result sets. The PreparedStatement is useful for issuing precompiled queries and stored procedures. In addition, PreparedStatement supports input parameters if you require them. The CallableStatement is used to execute stored procedures and adds output parameter support. Using these objects, you can pass through any valid SQL statement that the database can understand, including using escape syntax to send DBMS-independent statements.
|
|
| In addition to basic data access, JDBC provides support for advanced features such as transactional control.
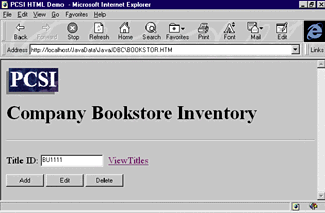
An Example of Data Access with JDBC Now that you're familiar with some of the capabilities of JDBC, I can show you some sample code in action. Figure 8 shows a sample corporate bookstore that lets you view and update the books in the inventory. This application uses a mixture of HTML, Java, and ASP. There are links on the main page that let you add, edit, and delete from the database. Each link illustrates a different mechanism to access the database by using the Statement, PreparedStatement, and CallableStatement objects. |
 |
| Figure 8: PCSI HTML Demo |
In this sample, the books are stored in the sample pubs database installed with Microsoft SQL Server 6.5. You'll need to create a stored procedure that is used by the demo. The following listing shows the SQL for update_title_sp.sql that you can issue to create the stored procedure.
|
|
Before you run the sample, you'll also need to install a JDBC driver that you can use to access Microsoft SQL Server. The sample uses the FastForward type 4 JDBC driver from Connect Software. You can download a free evaluation copy from their Web site (listed at the end of this article).
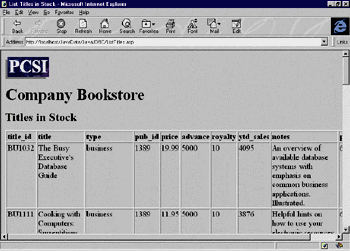
The main page, bookstor.html (see Figure 9), contains three JavaScript functions called when you click on a hyperlink to add, edit, or delete a book from the inventory. These functions in turn open up the individual ASP pages that host the applet responsible for the corresponding function and pass it the title ID of the book. Another link on the main page leads to an ASP page, ListTitles.asp, that displays a page with an HTML table of all of the books in the inventory. Figure 10 shows this page. |
 |
| Figure 10: ListTitles.asp |
As an example, if you enter a title id into the text field then click the Delete hyperlink, the DeleteTitle.asp is executed. This loads the ASP page and the DeleteTitle applet. The HTML for DeleteTitle.asp follows:
|
|
Figure 11 shows the resulting page. The DeleteTitle applet displays the record and prompts you for confirmation before deleting it. |
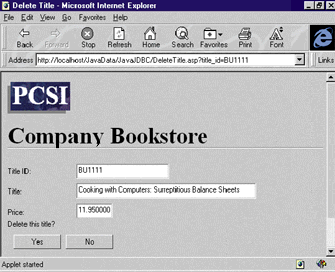 |
| Figure 11: DeleteTitle.asp |
The init method of the applet reads the title ID parameter from the ASP page and creates the dialog elements. The Java Resource Wizard was used to create the basic dialog for the applet.
|
The URL for the database is defined as a private variable of the applet.
|
|
|
The Start method (shown in Figure 12) loads the JDBC driver, then opens a connection to the URL. Next, it issues
a query to retrieve the desired record. Finally, the elements of the dialog
are initialized with the field values of the
record. (Note: the error checking code is removed from this sample to focus on the actual JDBC calls.)
After the applet is displayed, you can press either the Yes or No buttons to confirm or cancel the deletion. The action method handles the response. If Yes is pressed, a delete query is issued, then the list of remaining books is displayed. If No is pressed, you are returned to the main page. Figure 13 shows how the action is implemented. Using HTTP and Active Server Pages So far I've discussed two techniques that require some sort of additional software, either database or communications middleware, to be available on the client. If you are deploying a browser-based application, the time it takes to download these components can be unacceptable. The next technique requires no additional drivers to be installed on the client. In fact, it can be used to build three-tier Java solutions when you do not or cannot resort to using JDBC, Distributed COM (DCOM), or Remote Method Invocation (RMI) to connect the client to the application server. You can also use it without concern for the JDK version supported by the client. This technique can also be used to augment HTML with interactivity, advanced controls, and client logic.
|
 |
| Figure 14: HTTP/ASP Solution |
To send a request to an Active Server Page, you open a connection to the ASP's URL. You can do this by using two objects from java.net: URL and URLConnection. The URL object is used to encapsulate an Internet URL. To open a connection, you create a URL object and call its openConnection method. This returns a URLConnection object that represents the connection.
The following code creates a URL and connects to an ASP.
|
Once you've connected to the ASP's URL, the ASP executes and generates a result that it returns as HTML. You can read from the URL and retrieve the result by using the DataInputStream object. DataInputStream has methods that you can use to read values from any underlying input stream, including that of the URL connection. You create the DataInputStream by passing it an InputStream object that you can get by calling your URLConnection's getInputStream method.
|
|
|
You can begin reading by using the DataInputStream's readLine method. This method returns a String retrieved from the HTML stream. To read the entire HTML result, you call readLine repeatedly until there are no more lines to read, at which point readLine will return null.
|
|
In addition to DataInputStream, you can use the StreamTokenizer object to parse the HTML stream into tokens. StreamTokenizer can recognize values separated by delimiters, and other tokens such as quoted strings and numbers. It can be very useful if you design the ASP to return a tabular result set as a delimited stream of field values. To create a StreamTokenizer, you pass an InputStream to the constructor. The StreamTokenizer has fields and methods you can use to interrogate the token and retrieve its value.
The following code illustrates how to read strings from a delimited HTML stream. |
|
|
An Example Using HTTP and ASP
There are times that you'll want to add interactivity to your Web page without resorting to crude HTML tricks. You may want to add controls that are more sophisticated than the basic form elements that are part of HTML, such as data-driven charts or grids. Let's see how to add a data-aware Java applet to a Web page without relying on JDBC.
|
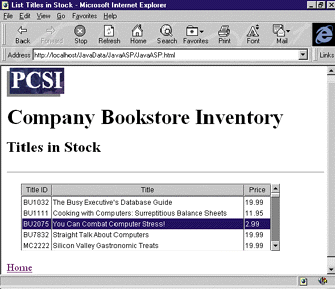 |
| Figure 15: JavaASP.html |
The JavaASP class defines two variables, titlesGrid and res, that represent the grid and a resource object used to set the grid properties. These objects are specific to the Microline grid component.
|
When the applet is loaded, the init method is called. The init method sets the background color of the applet and initializes several display properties of the grid. Finally, it calls the applet's fillGrid method to populate the grid.
|
|
| The fillGrid method (see Figure 16) opens a connection to an ASP, ShowTitles.asp, that queries the titles table and returns HTML containing all of the records. The HTML is returned as a comma-delimited ASCII text stream that contains a row of field values for each record. The fillGrid method iterates through each row using readLine and calls the grid's setString method to add it into the grid. Normally, you would have to tokenize the field values from the HTML, but it's unnecessary here because the grid's setString accepts a comma-delimited string as direct input.
The ASP, ShowTitles.asp (see Figure 17), contains the logic to query the database and generate the result set. In a more elaborate three-tier scenario, this ASP could contain extensive application logic or call on other server components. This VBScript uses ADO to issue a select query on the titles table, then uses the Response object to return the HTML. |
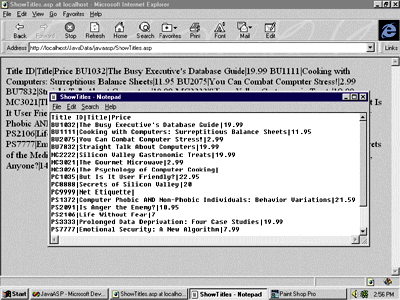 |
| Figure 18: ShowTitles.asp |
If you open the ASP directly by typing in the URL in your browser, you can view or debug the text stream that the Java applet sees. The HTML of the result set is shown in Figure 18.
Conclusion
There are many ways to access databases using Java. When building data access into an application, you should not only evaluate the specific technique but also the overall architecture. I have shown you how you can use three methods with two-tier and three-tier architectures.
You can use DAO or RDO to build desktop and intranet applications or to implement the data access in the application tier of a three-tier system. The latter implementation lets you build a cross-platform solution even when using native code. You can also use JDBC to build both logical two-tier and three-tier applications. In the two-tier model, your Java client uses JDBC to issue requests directly to the database server. This client can be a Java application or a Java applet in an HTML page. In the three-tier scenario, your application components can use JDBC for data access to the database server. The client can use any other communications middleware to connect to the application server. For instance,
JDK 1.1 contains the RMI classes for Java-to-Java communications, while Microsoft Internet Explorer 4.0 ships with DCOM capabilities. Finally, HTTP and Active Server Pages can be used to build three-tier Java applications or add data access into Java applets. Although using HTTP is not as sophisticated as using JDBC or DCOM, it offers the benefits of three-tier architecture and frees you from the JDK version of the browser.
| A partial list of vendors that provide JDBC drivers | |
| Connect Software | http://www.connectsw.com |
| IBM | http://www.ibm.com |
| Intersolv | http://www.intersolv.com |
| I-Kinetics | http://www.i-kinetics.com |
| KonaSoft | http://www.konasoft.com |
| Oracle | http://www.oracle.com |
| Sybase | http://www.sybase.com |
| VisiBroker | http://www.inprise.com/visibroker/ |
| WebLogic | http://www.weblogic.com |
| Links to many sources of Java components | |
| Gamelan | http://www.gamelan.com |
| KLG | http://www.klg.com/jclass/index.html |
| JARS (Java Applet Rating Service) | http://www.jars.com |
| Microsoft | http://www.microsoft.com/java |
| Neuron Data | http://www.neurondata.com/Products/Java |
| Shafir Inc. | http://www.shafir.com |
| StingRay | http://www.stingray.com |
| Roguewave | http://www.roguewave.com |
| Taligent |
http://www.taligent.com |

From the November 1997 issue of Microsoft Interactive Developer.