Rob Macdonald
The title says it all. In this article, Rob shows you how VB5's OLE Drag and Drop beats the pants off "plain old" drag and drop.
Remember that Visual Basic training course you took? The one with the exercise where you pick up the "Airplane" image control and make it disappear when you drag it over the control labelled "Bermuda Triangle"? Let me guess -- you took it home, showed it to your Mum, and that was the last time you ever used drag and drop.
Let's face it. While we know that drag and drop is used all over the Windows user interface, and while we might have learned from those nice guys at Apple that "direct manipulation" interfaces are more user-friendly, there was only so much you could do with drag and drop in VB3 or VB4. But everything has changed in VB5 with the introduction of "OLE Drag and Drop". For one thing, OLE Drag and Drop is data-oriented, rather than control-oriented. In other words, you don't pass controls around in the drag-and-drop event procedures, but custom-designed data. And more importantly, OLE Drag and Drop is inter-application -- you can drag a paragraph from a Word document right into a multiline text control, and back again, a feat that was just a dream less than a year ago. For sure, the old-style drag and drop is still supported, but in this article, I want to take you into the grown-up world of OLE Drag and Drop.
To show you what OLE Drag and Drop can do, I've built a complete application that you might even find genuinely useful. If you have a bunch of trusted VB code snippets, or even power-paragraphs to use in e-mail or word processing documents, I've created a simple desktop "Text Tidy" that lets you save and retrieve these snippets using drag and drop to and from any applications you like. It's available in the accompanying Download file, but not before you've seen how it works.
To get a feel for OLE Drag and Drop, start a VB project and place a text box on Form1. Make it Multiline, and set its OLEDragMode and OLEDropMode to "Automatic". Then add a TreeView control (this is available in the Microsoft Common Windows 5.0 component library) and set its OLEDragMode to Automatic. Code Form1's Form_Load event procedure like this:
Private Sub Form_Load()Text1.Text "Drop in any time"TreeView1.Nodes.Add , , "k1", "This is a drag"TreeView1.Nodes.Add , , "k2", "This is a drag too"TreeView1.Nodes.Add , , "k3", "This is a drag three"End Sub
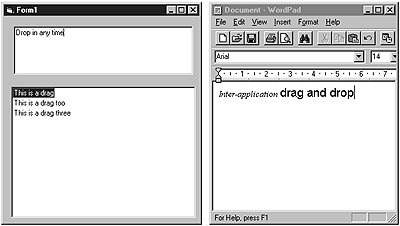
Run the program, and line it up alongside a copy of Word or WordPad, as shown in Figure 1. Then start dragging and dropping between the controls and the word processor. You should be able to drag and drop in any direction, apart from dropping into the TreeView. This is because TreeView controls don't support automatic drop mode. We'll see later how to enable dropping into a TreeView using manual mode. We'll also find out what happens to the fancy formatting in WordPad and how we can retain it in the VB application.
Figure 1. Stop Dreaming-VB5 really does support inter-application drag and drop
You've probably discovered that most VB5 controls have some support for OLE Drag and Drop. Where an obvious default operation exists, automatic drag and drop is supported, allowing inter-application data exchange to be provided without coding. Usually this covers fairly simple operations, as shown in the preceding example, but there are exceptions. For instance, VB's data bound grid supports automatic dragging and dropping from VB to and from Excel worksheets and Word tables.
In the true nature of all computing, real power and control only comes at the expense of coding and a bit of theory, so I'll spend the rest of this article dealing with OLE Drag and Drop in manual mode. As a gentle but relevant interlude, let me first introduce this month's sample application, the Text Tidy. This is a small VB5 application that uses a simple Access database to store code snippets. Figure 2 should give you an idea of how it works.
Text Tidy and COMThe node labelled "Stuffing a List Box" in Figure 2 has been dragged into the VB text editor, creating some stock code for filling a list box. The figure also shows the options provided by the Text Tidy's menu. How did the stock code get into the Text Tidy? Simply by dragging the code from VB onto the "VB Stuff" node and supplying a label for the new node when prompted.
Simple stuff. But remember, VB5's code window knows nothing about the Text Tidy and vice versa. The Text Tidy works just as well with any application that supports OLE Drag and Drop (including other VB5 programs).
How is it that programs written by unknown people miles apart are able to cooperate in this way? The answer is that Window's Component Object Model (COM) defines a set of standard interfaces whose definition is publicly available. Any application capable of supporting these interfaces can play the game. It's called OLE Drag and Drop, but OLE, like ActiveX, is no more than a brand name used by the Microsoft marketing folks for different bits of the Component Object Model. Everything that's interesting about OLE and ActiveX technology is pure COM. COM defines three interfaces that are used in drag and drop:
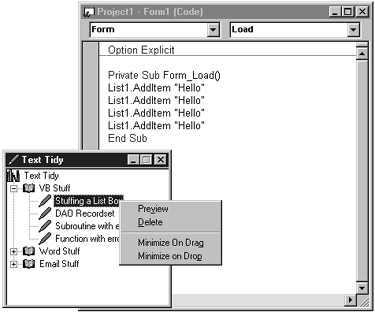
Figure 2. Text Tidy at work
·IDropSource and IDropTarget define the protocol of data exchange between two objects (a source and a target), which might or might not be in different programs. Most of the details of these interfaces are taken care of by VB5, but you'll get a sense of how they work when we look at the OLE Drag and Drop methods and event procedures.
·IDataObject defines the actual data to be passed from source to target during the exchange protocol. VB5 provides a special class called DataObject, which provides a VB-like representation of the IDataObject interface. Anything you place in a DataObject conforms to the Drag and Drop data representation understood by all Windows applications.
The VB DataObject supports four methods: GetFormat, GetData, SetData, and Clear. Their function is fairly straightforward, but it's essential to understand exactly what they do to have success in OLE Drag and Drop.
A single DataObject can support multiple formats of the same data at the same time. To see why this is useful, consider an application that wants to place "I am some text" in a DataObject, so that it can be passed to a target application or object. If the target is a simple text processor, the source application will want to provide the data in ASCII format. However, a more complex target might be able to make use of the formatting and retrieive not only the characters themselves, but also the fact that they're bold, italic, and of a particular font. In this situation, Rich Text Format (RTF) might be more appropriate. A similar argument applies to different types of image data. VB has several predefined data formats that can be safely used with most applications, such as vbCFText, vbCFRTF, vbCFMetafile, and so on. The "CF" is a reminder that the DataObject has its roots in the old clipboard formats. Custom formats can be designed and registered with Windows, but these will only be useful if other applications know about them.
A target object can check whether a source is able to provide data in a particular format by calling the GetFormat method, with a given format as an argument. The method returns true if the DataObject contains data in the requested format. The GetData method can then be used to retrieve data in the desired format. Here's some code that a target object might use to make sense of a DataObject it's just been passed:
If Data.GetFormat(vbCFText) ThensTextValue = Data.GetData(vbCFText)End If
Here, "Data" is an instance of the built-in class DataObject, and "sTextValue" is a string that's to receive data in text format, if it exists.
A source object uses the SetData method, both to put data into the DataObject to be retrieved by the target, and also to specify which formats it's going to provide. Here are three valid calls to the SetData method (although you wouldn't make all three at once!):
Data.SetData dbRec!itemText, vbCFTextData.SetData , vbCFTextData.SetData dbRec!itemText
The first call takes data from a recordset field and places it in the DataObject using the vbCFText format. This might seem the obvious thing to do, but it could be quite wasteful if you want to supply a large piece of data in several formats, as the target will typically only want data in one of the available formats. Therefore, it's possible to call SetData without providing any data, and instead supply a format the source is able to supply. The target will then be able to check for its preferred format (a VB target would do this by calling GetFormat) and then request data just for its favored format, in which case the source could respond along the lines of the third call in the preceding code sample.
I've written Text Tidy to use both Text and RTF formats, wherever they're supported by other applications. This means that when exchanging code fragments with VB, Text Tidy uses vbCFText, and when working with Word or WordPad, it will retrieve both Text and RTF and store them in its database. It will supply RTF format where it has it, or Text format when no RTF has been saved -- an example of this would be when text is dragged into Text Tidy from VB, and then is dragged out into Word, which is precisely what I've done to place the code samples in this article.
Methods and eventsThe DataObject determines what's exchanged, but the process of exchange is controlled by the Drag and Drop protocol, as defined by the two COM interfaces -- IDropSource and IDropTarget. In VB5, the workings of these interfaces are all wrapped up in a sequence of event procedures, some of which fire for the source object, and some which fire for the target. As you can see in Figure 3, there are several events, but you only need to handle all of them if you want to write very sophisticated drag and drop. In order to get the ball rolling, there are two options. If you're using Automatic mode in the source, the drag and drop protocol begins (as you might expect) automatically. If you're using Manual mode, then you need to call the OLEDrag method on the source control.
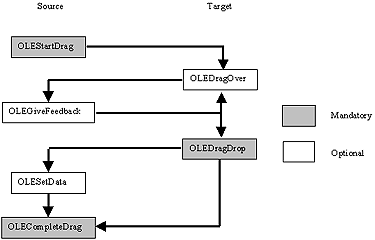
Figure 3. OLE Drag and Drop events
There are many more events in OLE Drag and Drop than in old-style VB, which you should see as a good thing. The only events that must be handled are those shown in gray; the others just allow you to refine the whole process, should you want to. Before we look at some actual code, I'll say a few words about how to use the events. OLEStartDrag is triggered on the source, right after the OLEDrag method (in Manual mode) or as soon as Automatic drag and drop is triggered. One of the arguments to OLEStartDrag is a DataObject created by VB for you to set up. Use the event to say what formats you're going to offer (via the SetData method on the DataObject). You can also provide the actual data for the DataObject at this point, but it's more efficient to do this later, when the target tells you what format it wants.
During the dragging process, OLEDragOver events fire in the target -- this is the first thing a target knows about the drag and drop operation. The target can use this event to inspect the DataObject and can modify its own appearance, or pass information back to the source, which the source receives in the OLEGiveFeedback event that fires on the source immediately after the OLEDragOver fires on the target. For example, the target might say, "I can't take this data," in which case the source could modify the mouse cursor to give some visual feedback to the user. Pairs of these events fire in quick succession until the user releases the mouse. You can safely ignore both these events without upsetting the data transfer (although you might upset the users if they can't see what's going on).
When the user releases the mouse, the first event to fire is the OLEDragDrop event on the target. This is the point at which the target gets the data, using the GetData method on the DataObject that appears in the OLEDragDrop event procedure's argument list. A well-behaved target will check first to see if the format is supported by calling GetFormat. If the DataObject already contains the required data, the target gets its data with no further involvement from the source. However, if the source has only placed formats in the DataObject, then the target's call to GetData will trigger an OLESetData event in the source. The source can check what format has been requested and oblige the target by calling SetData and providing the required data. Which approach is used has no impact on the target, but the latter is more efficient and elegant.
Finally, the OLECompleteDrag event fires in the source, telling it that the operation is complete. The source can use this event to release any resources it was maintaining to service the operation.
It's (finally) time to look at the Text Tidy application, and only a few more few words of introduction are necessary. The application stores text and code snippets in a simple Jet database. For each snippet, both the text and RTF formats are stored, if the original source can provide them. A standard Windows common control is used to provide the user interface, with a popup menu supplying a set of options. These include "autominimize" options so that the Text Tidy window can automatically retire to the task bar when not in use. In addition to the main window, a single dialog box is used to request a title for a snippet that's been dragged in, and to preview a snippet. This dialog box uses the "Forms as Objects" approach I discussed in the November 1997 issue. OLE Drag and Drop mode is set to manual for the TreeView control. Listing 1 shows the MouseMove and OLEStartDrag event procedures.
Listing 1. The MouseMove and OLEStartDrag event code.
Private Sub TreeView1_MouseMove(Button As Integer, _Shift As Integer, x As Single, y As Single)' begin the OLEDrag operation IF the left button is' down and a tree node has been selectedIf (Button And vbLeftButton) And _(Not (TreeView1.SelectedItem Is Nothing)) Then'don't allow the root node to be draggedIf TreeView1.SelectedItem <> "k0" ThenSet mSourceNode = TreeView1.SelectedItemTreeView1.OLEDragEnd IfEnd IfEnd SubPrivate Sub TreeView1_OLEStartDrag(Data As _ComctlLib.DataObject, AllowedEffects As Long)Debug.Print "StartDrag"'create a record set to provide the data when requestedSet mdbRec = mDB.OpenRecordset("select itemText, " & _" itemRTF from TextItem " & _" where key = '" & mSourceNode.Key & "'")' initialize the data objectAllowedEffects = vbDropEffectCopy' notify the supported formatsIf Len(mdbRec!itemText) > 0 Then Data.SetData , vbCFTextIf Len(mdbRec!itemRTF) > 0 Then Data.SetData , vbCFRTFEnd Sub
The drag process is kicked off inside the MouseMove (when the conditions are right, of course), and the OLEDrag method triggers the OLEStartDrag event. This code reads the record associated with the selected node and checks to see if text and RTF formats are stored. The available formats are posted accordingly. The recordset will be kept open until the drag and drop process is over.
Text Tidy doesn't code the OLEGiveFeedback event, relying on VB's default behavior. However, the OLEDragOver event code is shown in Listing 2. DragOver uses the application's caption bar to indicate the data format provided by the target (remember that this event is triggered by the target). If neither text nor RTF is supported (for instance, if a file or desktop icon is dragged onto the application), the "Effect" argument is set to vbDropEffectNone. This setting goes back to the source, and the source uses it (in its own OLEGiveFeedback event) to change the mouse cursor to the "no entry" sign. In addition to using the Effect argument, Text Tidy makes use of the "State" argument, which contains the value vbLeave when the cursor moves out of the TreeView control. This allows the caption to be reset to its passive value.
Listing 2. The OLEDragOver code.
Private Sub TreeView1_OLEDragOver( _Data As ComctlLib.DataObject, Effect As Long, _Button As Integer, Shift As Integer, x As Single, _y As Single, State As Integer)Debug.Print "DragOver"Dim objHitNode As Node' check which formats the source can provide' (give preference to RTF)If Data.GetFormat(vbCFRTF) ThenMe.Caption = "RTF Tidy"ElseIf Data.GetFormat(vbCFText) ThenMe.Caption = " Text Tidy"ElseMe.Caption = ""Effect = vbDropEffectNoneEnd If' set the caption back to normal when' the drag operation leavesIf State = vbLeave Then Me.Caption = "Text Tidy"'highlight the node under the mouse (if the' source is another program)If mSourceNode Is Nothing ThenTreeView1.DropHighlight = TreeView1.HitTest(x, y)End IfEnd Sub
The code in Listing 2 uses the TreeView's "DropHighLight" property to provide a visual indication of which node is under the cursor. The following code switches back to the application's role as a drag source, showing the SetData event procedure code:
Private Sub TreeView1_OLESetData( _Data As ComctlLib.DataObject, DataFormat As Integer)Debug.Print "SetData" & DataFormat' supply data in the format requested in DataFormatSelect Case DataFormatCase vbCFTextIf Len(mdbRec!itemText) > 0 ThenData.SetData mdbRec!itemText, vbCFTextEnd IfCase vbCFRTFIf Len(mdbRec!itemRTF) > 0 ThenData.SetData mdbRec!itemRTF, vbCFRTFEnd IfEnd SelectEnd Sub
The OLESetData informs the source which of the available formats the target would like (via the DataFormat argument) and invites the source to provide the data by calling the SetData method on the DataObject.
Listing 3 shows the OLEDragDrop code that Text Tidy uses to get hold of data from a source (we're back into the role of being a target again!), save it in the database, and update the tree.
Listing 3. The OLEDragDrop code.
ConclusionPrivate Sub TreeView1_OLEDragDrop( _Data As ComctlLib.DataObject, Effect As Long, _Button As Integer, Shift As Integer, _x As Single, y As Single)Debug.Print "DragDrop"Dim objHitNode As NodeDim sTitle As String, sTextValue As StringDim sRTFValue As StringDim sKey As String, sParent As StringDim iImage As IntegerDim dbRec As RecordsetMe.Caption = "Text Tidy"If Not (mSourceNode Is Nothing) Then Exit Sub'get the node under the mouseSet objHitNode = TreeView1.HitTest(x, y)If objHitNode Is Nothing Then Exit SubsTitle = frmDetails.getTitle(Data)If Len(sTitle) = 0 Then Exit Sub'increment the max key value countmDB.Execute "update SystemValues " & _"set SystemValues.Number = SystemValues.Number" & _" + 1 where ValueName = 'KeyCount'"mMaxNode = mMaxNode + 1' find the parent node, and select the correct icon' for the new nodesParent = objHitNode.KeysKey = "k" & mMaxNodeIf sParent = "k0" TheniImage = IMG_BOOKElseiImage = IMG_ITEMEnd If' get the RTF and the text format and store them bothIf Data.GetFormat(vbCFRTF) ThensRTFValue = Data.GetData(vbCFRTF)End IfIf Data.GetFormat(vbCFText) ThensTextValue = Data.GetData(vbCFText)End If' save the snippet dataSet dbRec = mDB.OpenRecordset("TextItem", dbOpenTable)dbRec.AddNewdbRec!Key = sKeydbRec!Parent = sParentdbRec!Name = sTitledbRec!itemText = sTextValuedbRec!itemRTF = sRTFValuedbRec.Update'update the treeTreeView1.Nodes.Add sParent, tvwChild, sKey, _sTitle, iImageobjHitNode.Expanded = TrueIf mnuDrop.Checked ThenMe.WindowState = vbMinimizedEnd IfEnd Sub
It's not often that an article can present a real application in its entirety. For sure, Text Tidy needs a few more hours of work, but the fact that a useful, generic tool can be created so quickly says something for the power of OLE Drag and Drop.
There's a great deal of attention being focused right now on using component technology to create server objects, and I'm all for it. Much less, though, is written about the scope for writing client components, and OLE Drag and Drop provides one way to create them. If you think of Multiple Document Interfaces (MDI) as being one step from single document interfaces, then OLE Drag and Drop allows applications to go one step further. By this I mean that you do away with the MDI frame and create each major part of an application as a separate desktop component. OLE Drag and Drop can then be used by users to move data from one application to the other using the desktop metaphor as it was originally conceived.
Even if this approach doesn't grab you, OLE Drag and Drop is an excellent way to allow your application to share data with other programs, and it can also be used within an application as a more controllable and powerful alternative to the traditional drag-and-drop features of VB.
Download sample code here.Rob Macdonald is an independent software specialist based in London and southern England. In addition to consulting and training in Windows, client/server, VB, COM, and systems design and management, he also runs the UK ODBC User Group and is author of RDO and ODBC: Client Server Database Programming with Visual Basic, published by Pinnacle. Rob can be contacted in England at +44 1722 782 433. salterton@msn.com.