Craig McQueen
A well-behaved application installs and removes itself from a computer system with minimal intervention from the user. Registry entries are a part of installation that requires proper handling. ATL introduces the ATL Registrar Component, which automatically registers and unregisters COM components. Developers can add their own automated Registry settings using the Registrar.
A well-made application or component makes installation and uninstallation as easy as possible for a user. One aspect of component installation that needs particular attention is setting the Registry. A really poorly behaved application would ask the user to manually enter Registry settings. When the user is no longer interested in having this application on his or her system, it would be up to that user to remember which Registry settings should be removed.
It's a small improvement to gather the registration instructions into .reg files. The person installing the component no longer has to manually edit the Registry. However, now an extra file must be kept with the component. It's also difficult to keep the .reg file and component synchronized. The user is also still responsible for removing the entries in the Registry when the component is no longer wanted. A better solution is for the component itself to be responsible for registration and unregistration.
Recently, self-registration has become expected of COM components and in fact is a requirement of components used in Microsoft Transaction Server (MTS). To facilitate self-registration, two entry points for registering and unregistering the component are available: DllRegisterServer and DllUnregisterServer. The Registry could be configured programmatically from within these functions, but it would be more elegant if the Registry configuration could be written in script. This is exactly what the ATL Registry Component does.
ATL Registry Component (Registrar)ATL eases Registry configuration with the Registrar. The Registrar provides optimized access to the system Registry through a custom COM interface. The Registrar is available in atl.dll and can also be statically linked to a C++ client. Static linking adds about 5K to a release build.
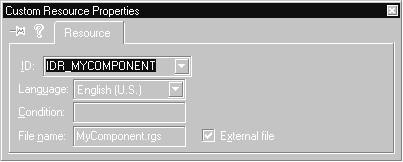
To see how ATL uses the Registrar, start with any project created with the ATL COM AppWizard. Make sure you have at least one ATL component in the project. You should see at least one file with an .rgs extension in the FileView. Open the ResourceView, and look in the REGISTRY section. The REGISTRY section makes the .rgs file a resource. If you view the properties, you'll see the filename of the resource represented as depicted in Figure 1.
Example You can create your own .rgs files. This makes your component really slick because the Registry configuration is transparent to the user. Let's walk through the steps to see how it's done with your component.
 Registrar scripts
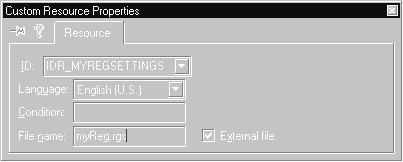
First, create a Registry resource. Open the resource editor and add a new "REGISTRY" resource. Right-click on the resource just added, and change the properties to those shown in Figure 2.

Save the resources. In the FileView of the DevelopmentStudio, there should now be a myReg.rgs file in the project. Open it and put the following script in the file.
HKEY_LOCAL_MACHINE

  {

  SOFTWARE

    {

    VCD

      {

      RegistrarExample

        {

        val MyCounter = d '1'

        val FavoriteAnimal = s 'Dog'

        }

      }

    }

  }
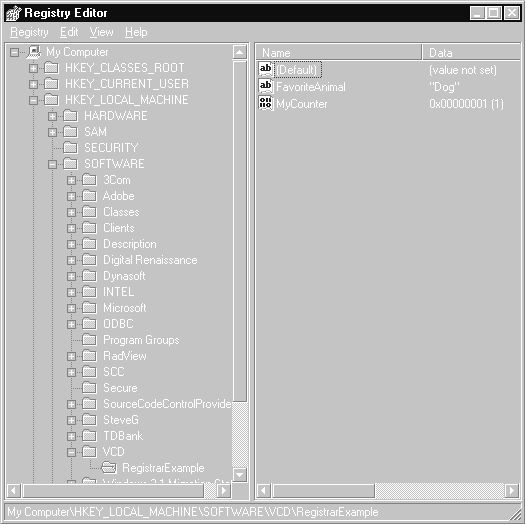
Now save myReg.rgs. The script is fairly easy to read. As you can see, the key HKEY_LOCAL_MACHINE\SOFTWARE\VCD\RegistrarExample is specified using a tree structure. With a tree structure, fewer calls need to be made by the Registry component to open and close Registry keys. The keyword val indicates that the following is a named value. The "d" indicates the value is a DWORD, and the "s" indicates the value is a string.
If you go back to the resource editor and open IDR_MYREGSETTINGS, you'll see the contents of myReg.rgs as a REGISTRY resource.
CComModule Registry methodsNext, the script is set up in the source code. Change your DllRegisterServer:
STDAPI DllRegisterServer(void)

  {

  HRESULT hr;

  hr = _Module.UpdateRegistryFromResourceD( IDR_MYREGSETTINGS, TRUE );

  if ( hr )

    {

    hr = _Module.RegisterServer(TRUE);

    }

  return hr;

  }
As well, change DllUnregisterServer like this:
STDAPI DllUnregisterServer(void)

  {

  _Module.UpdateRegistryFromResourceD( IDR_MYREGSETTINGS, FALSE );

  _Module.UnregisterServer();

  return S_OK;

  }
Note that the only new call needed is UpdateRegistryFromResourceD, which is a method of CComModule. The first parameter is the register script to run, and the second indicates whether the script is being run to enter (TRUE) or remove (FALSE) Registry settings.
Build the component. The project automatically runs regsvr32.exe. Run regedit.exe and open the keys to see the results. Your Registry should look like that shown in Figure 3.

Now, from the command line and in the directory of your component, run regsvr32.exe /u <your dll name>, where <your dll name> is the filename of your component. This will remove your component's Registry settings. Refresh regedit and confirm that the Registry settings are gone.
Replacement parametersBeing able to automatically set and remove your own Registry settings is pretty handy. However, the Registrar gives you even move power with replaceable parameters in the Registry script. Change myReg.rgs to look like the following:
HKEY_LOCAL_MACHINE

  {

  SOFTWARE

    {

    VCD

      {

      RegistrarExample

        {

        val MyCounter = d '1'

        val FavoriteAnimal = s 'Dog'

        val RegDate = s '%TODAYSDATE%'

        val RegDll = s '%MODULE%'

        }

      }

    }

  }
The Registrar automatically replaces %MODULE% with the actual location of your DLL or EXE. This is particularly useful if you're using event logging in Windows NT, as discussed in the March and April 1998 issues of Visual C++ Developer (see "The NT EventLog, Part 1: Meet the API" and "The NT EventLog, Part 2: Encapsulating the NT EventLog," respectively). To use event logging, you must put the location of your module in the Registry in a predefined key. Once scripted, the Registrar will do this automatically. See article Q166903 in the Microsoft Knowledge Base for more information about Event Logging.
The other replacement parameter, %TODAYSDATE%, has to be set up by you with a replacement map. Change DllRegisterServer to look similar to the following:
STDAPI DllRegisterServer(void)
{
HRESULT hr;
time_t ltime;
time( <ime );
wchar_t *pTime = _wctime( <ime );
// Remove newline generated by _wctime.
pTime[wcslen(pTime)-1] = '\0';
_ATL_REGMAP_ENTRY regMap[] =
{
{ OLESTR("TODAYSDATE"), pTime },
{ 0, 0 }
};
hr = _Module.UpdateRegistryFromResourceD( IDR_MYREGSETTINGS, TRUE, regMap );
if ( SUCCEEDED( hr ) )
{
// registers object, typelib and all
// interfaces in typelib
hr = _Module.RegisterServer(TRUE);
}
return hr;
}
Also include the header file time.h. The significant change made is the addition of the _ATL_REGMAP_ENTRY structure. As you can see, each entry maps a replacement parameter to a value. The structure must be terminated with an empty entry (that is, {0,0}). This structure is then passed to UpdateRegistryFromResourceD so that replacements can take place.
Build the project and have a look in the Registry to see the changes.
Unregister must have a similar change, except the actual Registry values aren't important. DllUnregisterServer now looks like the following:
STDAPI DllUnregisterServer(void)

  {

  _ATL_REGMAP_ENTRY    regMap[] =

    {

      { OLESTR("TODAYSDATE"), OLESTR( "" ) },

      { 0, 0 }

    };

  _Module.UpdateRegistryFromResourceD( IDR_MYREGSETTINGS, FALSE, regMap );

  _Module.UnregisterServer();

  return S_OK;

  }
Now when you call regsv32.exe /u <your dll name>, the Registry entries will be removed.
ConclusionThe ATL Registry Component (Registrar) not only makes the process of registering your component easier but also allows you to script your own Registry entries. The Registrar is made even more powerful with replaceable parameters. Additional script keywords and Registrar methods are also available but have not been discussed in this article. I encourage you to look in the Microsoft help under "ATL Registry Component" for details.
Download sample code here.Craig McQueen, MSc, led the development of InContext WebAnalyzer, product of the year award winner from PCComputing. He's currently a senior associate at Sage Information Consultants Inc. designing middle-tier COM components for e-commerce solutions. cmcqueen@sageconsultants.com.