This article may contain URLs that were valid when originally published, but now link to sites or pages that no longer exist. To maintain the flow of the article, we've left these URLs in the text, but disabled the links.


MIND


This article assumes you're familiar with Internet Explorer 4.0, Dynamic HTML, and JScript
Download the code (9KB)

Creating an Active Desktop Component
Josh Hochman

Looking for the easiest way to get your content onto people's desktops? It's not as hard as you think to develop a commercial-quality desktop component.
By now you've probably heard something about Microsoft's brand new batch of smartly acronymed and nifty sounding technologies, right? Do DHTML, CSSP, CDF, JavaScript, VBScript, Java, Active Desktop™, databinding, TDC, and ADO sound familiar? Well, as soon as I saw them, I had a sudden urge to build an application that incorporated as many of these technologies as possible just to make my life more interesting and to impress my friends.
      Seriously, my employer, Time Inc. New Media (the company responsible for the Pathfinder Network), assigned me the glorious task of creating an Active Desktop component that would draw a real-time chart of five major stock indexes and two stocks of the user's choice. This component would exist as a part of Fortune Online's Active Channel™ at http://www.pathfinder.com/fortune/channel/channel.cdf. Creating the component turned out to be a great way to get familiar with some new Microsoft® technologies. After an initial investigation, I found that to do what I wanted, I needed to use at least nine of the features available to programmers in the latest release of the Microsoft Internet Explorer browser. These included Cascading Style Sheets and Positioning (CSSP), Dynamic HTML (DHTML), JavaScript 1.2, VBScript, databinding, the Tabular Data Control (TDC), ActiveX® Data Objects (ADO), Channel Definition Format (CDF), and Java.

The Interface
      When designing a desktop component, it is important to keep in mind how the component will look on the user's desktop. Since the interface for the component will be displayed at all times and can live anywhere on the desktop, it needs to be as small and uncluttered as possible. You wouldn't want to look at a poorly designed Web page all day, would you? Therefore, carefully consider the design of any component. Users are picky about what sits on their desktop—all the way down to the background image and icons. For the user to accept the constant presence of any component, it must be well-designed.
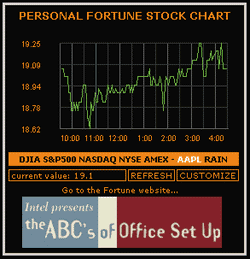
      I found that by sticking with basic Cascading Style Sheets (CSS) attributes, I could create an interface that was clean and functional, yet small in size (6.4KB). I limited myself to five basic colors, each one having a particular use and meaning within the application. Blacks and greys were used for the background and grid lines. Green was used for the plotted data. Orange was used for labels and buttons, and white was used for rollovers on the buttons. See Figure 1 for an example.

Figure 1: Fortune Personal Stock Chart


      It is also important to allow for customization. Any good component should let the user personalize it in some way. After all, it's on their desktop! For the Fortune Personal Stock Chart, the logical choice was to allow the user to select and track two stock tickers.
      To get the interface looking the way I wanted, I used a couple of new features in Internet Explorer 4.0: CSSP and DHTML. First, I linked the styles into the main HTML file like this:


 <!— link in a stylesheet —>
 <LINK REL=STYLESHEET TYPE="text/css" HREF="styles.html"
     TITLE="FPSC styles">
That was easy! Why not keep the main HTML file free of CSS info, and link to it instead? It's much cleaner that way. But remember, this will incur an additional hit on your server. If you are concerned about performance and want to keep round trips to a minimum, keep the styles in the main HTML file.
      Here is an example of one of the styles defined in the style sheet:

 #indexesDIV {
     position: absolute;
     left: 4px;
     top: 172px;
     width: 270px;
     height: 10px;
     padding: 2px;
     background-color: #FF7200;
     font-size: 7pt;
     font-family: Verdana;
     font-weight: bold; 
     text-align: center; 
     cursor: hand;
     z-index:2;
 }
In this case, I used the # notation to define a style that applies to the document object with an ID of indexesDIV. This way, I can define all if the style attributes in one spot—the style sheet—which keeps the main HTML file easier to manage and read. The complete style sheet is shown in Figure 2.
      In the main HTML file, shown in Figure 3, I defined the <DIV> that contains the stock ticker buttons like so:

 <DIV id=indexesDIV>
     <SPAN id=DJIASPAN
     onmouseover="style.color='white'" 
     onmouseout="if (0 != theChoice) style.color='black'"
     onmousedown="if (0 != theChoice) handleMouseDown(this)">DJIA</SPAN>
 . . . 
 </DIV>
In the style sheet, I also use the . notation to define styles that I want to apply to multiple objects in the component. Here is how I defined menu, which will give me orange text with a one-pixel border padded by two pixels on the left and right:

 .menu {
     position: absolute;
     height: 10px;
     padding-left: 2px;
     padding-right: 2px;
     border: 1 solid #FF7200;
     color: #FF7200;
     font-size: 7pt;
     font-family: Verdana;
     text-align: left; 
     cursor: hand;
     z-index:3;
 }
To use this style in the code for the main HTML file, I just use the class attribute within the tag. I still need to make sure that I set the left, top, and width for the element, since they are not defined in the style. I defined the REFRESH button like this:

 <DIV id=refreshMenuDIV class=menu style="left:144px;top:192px;width:55px;"
     onmouseover="style.color='white'" 
     onmouseout="style.color='#FF7200'"
     onmousedown="style.color='#FF7200';
      if (theState == 'customize'){
         event.keyCode = 27;
         keydown();
      } else {
         refresh();
      }">
 REFRESH
 </DIV>
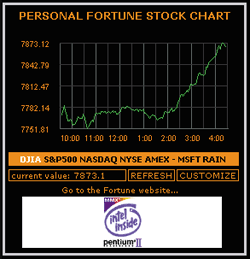
      By now, you are probably thinking "OK, it all looks pretty. But where's the JavaScript, DHTML, and rollovers?" Easy. I just code everything into the mouseover, mouseout, and mousedown handlers for each <SPAN> or <DIV>. This behavior could also be written into a scriptlet, but I'll save that for a future article. In the previous code, I use the CSS property color to change the text color to white when the mouse rolls over the button. This lets the user know that this button is active. When the mouse leaves the object, the text color returns to orange—#FF7200. (See Figure 4.)
Figure 4: Using the CSS Property Color

      As you will see later, the ticker button does double duty. Usually it is the REFRESH button, but when in customization mode, it serves as the CANCEL button. Remember, I'm trying to keep screen real estate to a minimum, so I reuse things as much as possible. Since you cannot refresh the display while in customization mode, why not use the button for something else? It's little tricks like these that keep your component smaller and less obtrusive on the desktop.
      The code behind the ticker buttons is similar, except that I check against the currently selected ticker symbol to make sure that I don't unhighlight the current symbol if the user happens to pass the mouse over the text:

 <SPAN id=DJIASPAN
     onmouseover="style.color='white'" 
     onmouseout="if (0 != theChoice) style.color='black'"
     onmousedown="if (0 != theChoice) handleMouseDown(this)">DJIA</SPAN>
      So far, you've seen three events that the user can fire: keydown, refresh, and handleMouseDown. I'll detail those functions later. First, let's look at how to retrieve and manipulate the ticker data.

The Databinding
      This is the part where I got to play with more of Microsoft's many TLA ActiveX components. Here, I used the TDC and databound it with ADO. TDCs take care of retrieving and arranging data, while ADO allows access to the data through VBScript calls. Although they are very convenient and easy to use, there are a few things to watch out for when coding with them. First, it is important that you declare objects in the correct order. For an event to fire when the data has completed downloading, you must hook into the ondata-setcomplete function—but the actual TDC object has to be declared first. I did it like this:


 <OBJECT ID=TDC CLASSID="CLSID:333C7BC4-460F-11D0-BC04-0080C7055A83">
     <PARAM NAME="TextQualifier" VALUE="&quot;">
     <PARAM NAME="FieldDelim" VALUE="|">
     <PARAM NAME="UseHeader" VALUE="False">
     <PARAM NAME="DataURL" VALUE="">
     <PARAM NAME="SortColumn" VALUE="Column1">
 </OBJECT>
 
 <SCRIPT LANGUAGE="JavaScript1.2">
     TDC.ondatasetcomplete = TDCcomplete;
 </SCRIPT>
      Second, you have to make sure that you have a place in the HTML where the data is actually used or else it will never get attached to the ADO object. In my code I hid it in an invisible <DIV> with the DATASRC attribute like so:

 <DIV id=dobbs DATASRC=#TDC DATAFLD="Column1"
 style="layout:fill;position:absolute;top:0;visibility:hidden"></DIV>
      Third, since the data access is asynchronous, I had to keep an internal state variable and use a polling routine to keep checking if the data was completely loaded. The TDC loading function looks like this:

 function loadTDC(theTDC, theURL){
     theState = "loading";
     theTDC.DataURL = theURL;
     theTDC.Reset();
     blinker = setInterval("blinkme()",500);
 }
      Finally, if your program is in JavaScript, you must use VBScript wrappers to access the data with ADO functions. When I called the functions directly from JavaScript, they didn't work. For example, look at how I defined and called the getValue function:

 function getValue (theTDC,theName)
     getValue = theTDC.Recordset(theName)
 end function
 
 var minutes = getValue(symbols[theSymbol].TDC,"Column1");
The full JavaScript code is in Figure 5. Here is a shortened example of how I made this all work together:

 function init(){
     symbols[0] = new Symbol (TDC,DJIASPAN,
         "http://quote.pathfinder.com/money/quote/qclie.cgi?dukebert=INDU");
     loadTDC(symbols[0].TDC,symbols[0].dataURL);    // load the first TDC
     theChoice = 0;
     symbols[theChoice].SPAN.style.color = "white";    // make it white
     drawTable();                // draw the table (sans data)
     loadData(theChoice);        // load in the data (asynchronous)
     drawChart(theChoice);       // draw the chart (asynchronous)
 }
There are a few new things in this code, like the Symbol object and the drawTable, loadData, and drawChart functions. I'll detail these functions later.
      Remember when I said that the TDC loading is asynchronous? I implemented a polling routine with the setTimeout function. It will keep calling itself every half second until the internal state is dataWaiting:

 TDC.ondatasetcomplete = TDCcomplete;
 
 function TDCcomplete(){
        theState = "dataWaiting";
 }
 
 function loadData(theSymbol){
        var x = 0;
        var y = 0;
        if (theState != "dataWaiting") {
            loadDataTimeout = setTimeout("loadData("+theSymbol+")",500);
        } else {
            // load the data
        }
 }
The ondatasetcomplete function just sets the state to data-Waiting so the loadData function will execute fully. When the loadData function is complete, it sets the state to idle, which the drawChart function looks for before executing.
      The other data that I needed to deal with was the user's customization. Storage of this information was executed completely on the client through the use of JavaScript and cookies. In order for the component to have some cookies to use, the user first needs to have a way to store their customizations. I implemented this by calling a function on the mousedown for the CUSTOMIZE button. This sets the state, changes the names on a few buttons, hides a <DIV>, and shows another <DIV> that contains a form (see the customize function). When the Return key or SAVE button is pressed, I set the document.cookie property to save the user's personal stock tickers (see the keydown function). This can be a very useful technique to save important information without having to deal with server-side cookies or creating personal accounts to save information. It's faster and relieves the server of one more task.
      Once the customization is saved in the cookie, it can be accessed every time the component is loaded. I wrote a simple parsing function to return the value part of the name/value pair stored in the cookie:

 function getCookie(theName){
     var theValue = document.cookie;
     if (theValue.indexOf(theName) == —1) return 0;
     theValue = theValue.substring(theValue.indexOf(theName));
     theValue = theValue.substring(0,theValue.indexOf(";"));
     return theValue.substring(theValue.indexOf("=")+1);
 }

The Push
      It's time to discuss the Channel Definition Format (CDF) file, an essential part of the component. Without this file, the application would be just another Web page. A useful page but still trapped within the frame (and performance overhead) of the Internet Explorer 4.0 browser. The CDF file allows me to do a couple of things: present the page as a desktop component and set a schedule for push content. CDF also facilitates many other useful functions that I didn't use with this component, like content caching and offline logging.
      The CDF file for the Fortune Personal Stock Chart is pretty simple:


 <?XML version="1.0"?>
 <!—NoAd—>
 <CHANNEL HREF="http://www.pathfinder.com/fortune/channel/channel.html">
 
     <ITEM HREF="http://www.pathfinder.com/fortune/channel/dtc/index.html">
        <TITLE>Fortune Stock Chart</TITLE>
        <USAGE VALUE="DesktopComponent">
             <OpenAs VALUE="HTML"/>
             <Width VALUE="280"/>
             <Height VALUE="290"/>
             <CANRESIZE VALUE="No"/>
         </USAGE>
     </ITEM>
 
     <SCHEDULE>
         <INTERVALTIME HOUR="1"/>
     </SCHEDULE>
 
 </CHANNEL>
This file defines five important pieces of information: the parent channel page, the component's home page, the title, the width and height, and how often to push the content. How does the browser know that the CDF defines a desktop item rather than a channel? It's done with the tag <USAGE VALUE="DesktopComponent">. This tag tells the browser to place this item on the desktop and makes the code a desktop component rather than a plain Web page. I found it was easier to test the component within the browser before I finalized the CDF file, so I left the <USAGE> element out during testing.

The Program
      To describe how the component works, I will explain the initialization process and show what happens when the user clicks on a stock's ticker name. On the document's onload event, the component calls an initialization function that retrieves two previously set stock tickers from the user's cookie file. Next, it creates seven Symbol objects—each used to store market information related to the particular stock ticker. It then automatically loads the data for the first ticker symbol (the Dow Jones Industrial Average) by calling the loadTDC function, passing it the TDC object and the URL where it will find the data. The initialization function also draws the background table and starts the polling functions loadData and drawChart.
      The loadTDC function sets the DataURL property of the TDC object. It then calls the TDC's Reset function, which jumpstarts the ActiveX control to retrieve the data. A server-side CGI (which I cannot describe within the scope of this article) provides delimited data (I use the pipe character, |), with each record on its own line. The first value is the number of minutes since midnight, and the second value is the ticker's value at that time. The TDC ActiveX control takes care of putting this data in a JavaScript-accessible format, as you will see in the loadData function.
      Once the data is loaded into the TDC, the loadData function iterates through the data and stores it in a JavaScript array that's part of the Symbol object. This will cache the data so when the user switches to another symbol (and possibly back), the component will not have to retrieve the data again. This speeds things up considerably, as no further connections to the DataURL need to be made. The component will only need to redraw the chart, not get the data again.
      Finally, after the data is loaded into the Symbol object, the drawChart function iterates through the data once again. It draws the line by calling functions from a simple Java applet that is embedded in the component. This applet simply draws lines on the screen. I could have used the Microsoft Active-Draw routines, but I didn't have time to learn the ins and outs of yet another ActiveX control. To make my job easier, I was provided with the code for this applet from a few friends at Microsoft.
      To see the chart for another stock, the user clicks on the ticker name. The handleMouseDown function is called from the onmouseup of the ticker's <SPAN>. This function adjusts the UI to reflect the user's selection and calls the loadTDC, loadData, and drawChart functions again.

Conclusion
      If you understand how this component was coded, you should have no problems using JavaScript to connect the power of DHTML and CSSP with the data-sourcing of Microsoft's Tabular Data Control. Just remember to keep your user interface clean and simple, and to give your users some level of customization. Since your component will be on their desktops at all times, it has to look good and be useful. It also helps to use the built-in Internet Explorer 4.0 features like DHTML and TDC to keep the component's overall size and back-end programming to a minimum. Don't be afraid of all these new acronyms. I was able to get them to act nicely together, and you should too.

From the May 1998 issue of Microsoft Interactive Developer.