This article may contain URLs that were valid when originally published, but now link to sites or pages that no longer exist. To maintain the flow of the article, we've left these URLs in the text, but disabled the links.


MIND


This article assumes you're familiar with Active Server Pages, ADO 1.5 and SQL Server 6.5.
Download the code (6KB)

Top Ten Tips:
Accessing SQL Through ADO and ASP

J. D. Meier
     
Using SQL and ADO to provide data for your Web application can seem daunting, but these ten tips can noticeably improve your results.
Retrieving data from a SQL Server™ database using ActiveX® Data Objects (ADO) and Active Server Pages (ASP) challenges many Web developers. It can be hard to maximize performance, scalability, and robustness in a specific installation. This article offers specific recommendations to help improve your data access. While much of this information can apply to other databases, I'll focus on SQL Server and use the familiar Pubs sample database for illustration purposes.
      

Tip 1: Use Stored Procedures for Performance
      Stored procedures improve the robustness of your application with very little effort on your part. When you implement SQL statements in stored procedures, as opposed to "dynamic SQL" (SQL statements that are concatenated and submitted to the server), SQL Server caches them as an execution plan. Subsequent requests can retrieve this information from the cache, resulting in peerless performance gain.
      Another advantage of stored procedures is the added level of indirection between your database and your application. Your database structure may not change often, but when it does, you will appreciate that you don't have to rewrite your client applications (assuming you returning the same results from your stored procedure).
      Stored procedures can also reduce network traffic through encapsulation of batch SQL statements. Rather than sending multiple requests from the client, the stored procedure can efficiently run SQL statements in batches, only communicating to the client when necessary. Suppose you want to retrieve a series of orders for a particular customer and then update only those records whose ship dates meet some criteria. If you execute this through individual SQL statements via ASP, the network traffic would increase as the server sent results back for each request. Using a stored procedure, you could pass the arguments once for all requests and wait for the results from the server.
      Here's an example of how to migrate dynamic SQL statements from ASP code to a stored procedure. The ASP page DynamicSQL.asp (shown in Figure 1), returns all authors from the Pubs database whose last names begin with the letter M. In Figure 1, note that chr(39) is the ASCII representation of a single quote ('), while chr(32) is the ASCII equivalent of a space.
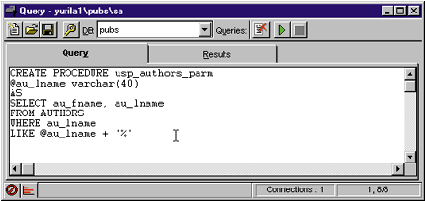
      DynamicSQL.asp can easily be ported to a stored procedure. To create the stored procedure, enter the code shown in Figure 2 into ISQL. (You can launch ISQL, shown in Figure 3, by either pressing the SQL Query Tool button in SQL Enterprise Manager, or by accessing it directly from the Program Group for SQL Server.) Once you have launched ISQL, set Pubs as the default database by selecting it from the DB combobox.

Figure 3: ISQL
Figure 3: ISQL

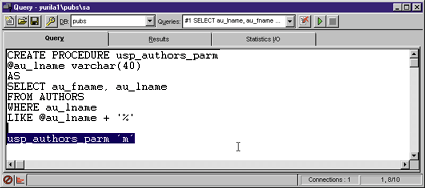
      It is always a good idea to test your stored procedure directly from ISQL before implementing it from ASP. To do this, ISQL allows you to make a direct call to it by entering the call just below the stored procedure text in the Query window (see Figure 4). You can then select the string to execute (in this case, it's "usp_authors_parm ‘m'"), and click the green arrow to run it. If you don't highlight the statement before clicking the arrow, ISQL will recreate the stored procedure. This operation would fail because the stored procedure already exists at this point.
Figure 4: Testing a Stored Procedure

      Once you're able to retrieve the correct results through ISQL, you can write the necessary ASP code to call the stored procedure. While there are various methods for calling stored procedures, for the sake of simplicity I will use the Execute method of the ADO Connection object. The ASP page CallStoredProc.asp (see Figure 5) calls the usp_authors stored procedure, passing the argument M.
      This is one way to call a stored procedure. In Tip 2 I'll show you a more elegant approach that provides more control over the stored procedure's execution while minimizing network activity.
      

Tip 2: Explicitly Create Your Parameters
      ADO provides a Parameters collection that you can take advantage of when calling stored procedures that accept parameters. During development, you can use the Refresh method to help you determine how to create the parameters correctly. Once you have determined the proper parameter information you can explicitly create them as necessary for your production code. Whenever possible, avoid calling the Refresh method of the Parameters collection in your production code because this causes the client to make unnecessary trips to the server to retrieve information.
      The Parameter object has several properties that you can retrieve through the Refresh method. These include Attributes, Direction, Name, NumericScale, Precision, Size, Type, and Value. Knowing this, you can query the Parameters collection through the Command object to find out the details of your ADO object as shown in Figure 5. This code generates a table of information about a stored procedure's parameters, shown in Figure 6.
      With this information you can easily write the code to create the Parameters to call your stored procedure. You first create each of the parameters, defining the Name, Type, Direction, Size, and Value. These arguments are optional. However, if you specify a variable- length data type in the Type argument, you must either pass a Size argument or set the Size property of the Parameter object. After creating the necessary parameters, you then bind them to the Parameters collection using the Append method, and call the Execute method of your Command object as shown in Figure 7.
      

Tip 3: Avoid Blobs
      Blobs (Binary Large Objects) are stored in SQL Server as either text or image datatypes. SQL Server does not store the Blob data on the data page along with the other fields in the row. Instead, SQL Server maintains a pointer to the Blob data. The data itself is stored in 2KB pages linked through 16-bit text pointers, meaning that there are really about 1800 bytes available for actual data storage if the column is not NULL. If the column is explicitly set to NULL, the storage size will be 0, since there is no need for the text pointers. This essentially means that storing data in Blobs will increase your storage requirements in 2KB increments.
      While storage size alone may not be a deterrent, there are also functional limitations with Blobs. For example, if you use a WHERE clause to search on a text column, you are limited to using the LIKE operator. This can be a very time consuming and will add a lot of overhead to your application. Also, when you're working with large quantities of data, it may become necessary to read the data in chunks, rather than pulling it out of a column all at once.
      Before using a Blob field, consider the alternatives. If you want to store images in the database, you may find it more appropriate to store the images outside of the database, and simply maintain URLs that point to the images within the table. If you are storing lots of text data, you may find that rather than using a Blob field, you can denormalize the table and break the data into varchar(255) fields.
      If you still require a Blob field despite the storage overhead and limitations in functionality, there are a few caveats. If you're using a forward-only cursor (the default), you should retrieve the Blob fields from left to right, and to the right of any scalar values you include in your SELECT statement. If your underlying table definition looked like this


 CREATE TABLE MyTABLE(
 Field1        Identity(0, 1),
 Field2        Text,
 Field3        Int,
 Field4        Image
 )
retrieve your records using the following SELECT statement:

 SELECT Field3, Field2, Field4 FROM MyTable
      There is another point to be aware of concerning presentation. If you will be retrieving images from your database through ASP, you will need to manipulate the HTTP header information. If you were to retrieve a GIF image from the database, you'd need to first clear out any existing HTTP header information, then set the ContentType to Image/Gif. See the article "Delivering Web Images from SQL Server," by Scott Stanfield (MIND, July 1998), for a complete discussion of how to do this effectively.
      To put additional text on the returned page, you need to create a separate page to host the image. Figure 8, RetrieveImage.asp, demonstrates how you can retrieve an image from Pubs. Notice how this page doesn't write any text with the Response object. Since I would like to provide some text with the image, I created an additional page, ShowImage.asp (see Figure 9). Another page is necessary because once you have set Response.ContentType to Image/Gif, you cannot write text to the ASP page. ShowImage.asp actually displays the image by referring to the RetrieveImage.asp in the IMAGE tag's SRC argument.
Figure 10: ShowImage Output

      This two-page trick comes in handy for operations such as providing dynamic banners while minimizing work for your server. Simply create a static HTML page, then reference the ASP page through your IMG tag. The ASP page would be responsible for choosing which banner to display. Figure 10 shows the output of ShowImage.asp.
      

Tip 4: Pick the Right Cursor for the Job
      Choosing the correct SQL cursor has a direct impact on the success of your application. ADO provides four cursor options: forward-only, static, keyset, and dynamic. Since each cursor type behaves differently, you will greatly benefit from understanding the capabilities of each.
      Forward-only cursors are used when you only need to make a single pass through the data. Since they don't have to remember positioning information, forward-only cursors provide the fastest performance with the least amount of overhead. The SQL Server implementation of the forward-only, read-only cursor is commonly referred to as a firehose cursor because it maintains an open connection to the client while the data is streamed from the server. Since it's highly optimized for performance, it is the default cursor type created when you call the Execute method of the Command and Connection objects. In fact, even if you request a different cursor when you call the Execute method, ADO will still generate a forward-only cursor.
      While a forward-only cursor may be ideal for many situations, it can't do everything. For example, the RecordCount property of a recordset is not supported if it uses a forward-only cursor. If you try to access the value, you get a -1. If you need to use the RecordCount property, then you must choose a cursor that supports it, such as a keyset or static cursor.
      Over time you will become acquainted with the capabilities that various database providers give to the different cursor options. A much more efficient way to get this information is to test your recordset to find out whether it supports the functionality that you need. Figure 11 shows a sample include file named RsSupports.asp, which tests a Recordset for specific functionality. (I always give my include files an .asp extension so that they cannot be read directly from the server.)
      With RsSupports.asp, you can then test a particular recordset using the following code:


 <!— #include file="RsSupports.asp" —>
 <%
     sCnn = "Driver={SQL Server};Server=(local);UID=sa;PWD=;Database=pubs"
     RsSupports "SELECT * FROM AUTHORS", sCnn
 %>
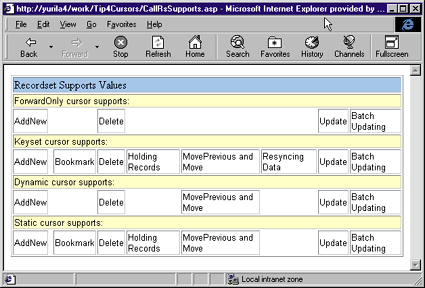
This would produce the output seen in Figure 12. Figure 13 charts recordset properties by cursor type, while Figure 14 lists the recordset methods available by cursor type.
Figure 12: Testing Recordsets

Tip 5: Pool Your Connections Wisely
      Connection pooling enables a middle-tier application to maintain and share connections. With connection pooling enabled, connections remain open for a specified duration and can be shared across users. This can dramatically improve performance since establishing a connection to the database is one of the most overhead-intensive operations you can perform. Without connection pooling, each user must establish individual connections, suffering the associated costs each time.
      To enable connection pooling under Internet Information Server (IIS) 3.0, you must perform two steps. First, launch RegEdit (see Figure 15) and navigate to the key HKEY_ LOCAL_MACHINE\System\CurrentControlSet\Services\ W3SVC\ASP\Parameters. Next, change the "StartConnectionPool" value in the right pane from 0 (Off) to 1 (On).
      IIS 4.0 automatically supports connection pooling at the driver manager level, but this can be toggled through the CPTimeout value in the registry. It is on by default for SQL Server, and the default timeout is 60 seconds (a connection will remain in the pool for 60 seconds while not in use). You can edit CPTimeout for the SQL ODBC Driver by launching RegEdit and navigating to the key HKEY_LOCAL_ MACHINE\Software\ODBC\ODBCINST.INI\SQL Server.
      The rules for connection pooling are relatively straightforward. Connection pooling only applies when you connect to the database using the same user name and password for each connection. If a connection is in use when the client makes a request, a new connection will be created. When designing your application, make sure that you are creating your connections using the same user name and password each time. If you are using Standard security in SQL, you might try creating perhaps three types of access accounts: an administrative type account, a general user account, and a privileged user account.
      You can take advantage of connection pooling by creating and destroying the Connection object on a per-page basis, rather than storing it in a Session variable. Destroying the object on every page releases the connection to the pool so that it may be reused. This resource sharing reduces the load on the server and can reduce database connection time for users after the initial connections are created.
      It is important to note that when working with a forward-only cursor, the connection will not be released until you have finished reading the data. This serves as another reminder that you should only retrieve the data that you need.
      

Tip 6: Avoid Putting ADO Objects in Sessions
      Session objects lure many developers away from a scalable Web design. Don't fall into this trap. Do not store your ADO objects in Session variables. When you do this, you introduce both scalability limitations and threading considerations. Take the Connection object, for example. If you store a connection in a Session variable, you no longer have the benefit of connection pooling. Connection pooling is profitable when connections are shared across multiple clients and resources are in use only as long as they are needed. A Connection object stored in a Session variable will only serve the user for which the Session was created, and the Connection will not be released to the pool until the end of the Session.
      Threading issues come into play when you store ADO objects in Session variables. By default, ADO objects are marked as apartment-threaded in the registry. This is fine when you create your objects with page-level scope, but threading problems will arise when you move your ADO objects to Session or Application scope. If you must cache your ADO objects in the Session or Application objects, be sure to mark the ADO objects as Both in the registry. Depending on the version of ADO your server is running, run either MakeFree.bat or MakeFree15.bat. These files are installed by default in C:\Program Files\Common Files\System\Ado. You'll have to restart your Web server for the changes to take effect. The .bat files call files that modify the registry. If you open the .reg files that are called by the .bat files using an editor such as Notepad, you can see the subkeys of the ADO CLSIDs that are affected by this change.
      Other problems from storing ADO objects in Session can stem from the duration of the Session itself. By default, a Session object has a 20-minute timeout. This means the Session resources for each user are consumed for 20 minutes of idle time before they are released. While you can reduce the default Session duration or programmatically end the Session, these methods are unreliable. Not only are they not always effective, but you may find that your ADO objects are not available when you need them.
      For example, suppose you reduced the default Session timeout to five minutes. Then a user accesses your ASP page, which stores the ADO recordset in a Session variable. After five minutes, the user decides to move to your next Web page. At this point, the recordset is no longer available, since the Session has timed out. Of course, you can programmatically check to see if your Recordset is available before you perform an operation, but you will need to do this more extensively throughout your code than if you had not relied on Sessions.
      A more scalable solution is to use ADO objects at the page level. To maximize the benefit of connection pooling, open and close your connections on a per-page basis. This ensures that you use the connection only as long as necessary. Sessions can quickly consume your server's resources, depending on the number of connected users and what you store in the Session object. As you design your ASP pages, avoid using ADO objects stored in Sessions. By removing dependencies on Sessions, you eliminate wasted resources and allow your application to be distributed across multiple computers.
      Developers from a traditional client/server background tend to store connections and recordsets in Session variables because acquisition and retention of resources was crucial for good performance there. This approach does not scale well on the Web. For example, if you create a Connection for each user and store that object in a Session variable, you will lose the benefits of connection pooling, since connections are not released back to the pool. Along the same lines, consider the memory consumption of each object in addition to the Session variable itself for each user. Now multiply this amount by the greatest number of concurrent users you'll have visiting your site and you'll begin to understand the load your Web server might encounter.
      You might consider using Application variables to store your Connection object. While this is less resource-intensive than Session variables, there are still performance issues. For best performance, use a get-in/get-out approach.
      

Tip 7: Create Useful Indexes
      Well-designed indexes can greatly enhance the performance of your application. Unfortunately, the reverse is also true. Poorly designed indexes or no indexes at all can slow your application to a crawl. It is important to take indexing seriously and create useful indexes. The key is to provide the optimizer with a good selection of indexes and let it choose the one that makes the most sense for a given operation.
      To begin with, consider whether you need a clustered index and, if so, which columns should comprise it. A clustered index results in the data being physically stored after being sorted by the key defining the index. By default, the primary key is chosen as the clustered index during table creation, unless you specify the NONCLUSTERED keyword.
      You may not want your primary key to serve as a clustered index, especially if you will be retrieving single rows by their primary key. In this case, a non-clustered unique index would better serve your purposes. Essentially, you want to choose a clustered index if you will be querying the data for values that fall within a given range (such as WHERE ship_date BETWEEN ‘5/10/97' AND ‘5/10/98') and for queries that will return data ordered in the same way as the clustering key.
      You can specify that the primary key should be non-clustered as in the following syntax:


 CREATE TABLE employee2
 (
     emp_id        integer
         CONSTRAINT p1_constraint PRIMARY KEY NONCLUSTERED,
     fname           CHAR(20) NOT NULL,
     minitial        CHAR(1) NULL,
     lname           VARCHAR(30) NOT NULL,
     hiredate        SMALLDATETIME NOT NULL
 )
You can then add a CLUSTERED index to your table based on another column that may be more effective. In this case, I chose to create a CLUSTERED index on the hiredate column because the application will frequently retrieve employees sorted by their hire dates:

 CREATE CLUSTERED INDEX idx_hiredate   
 ON employee2(hiredate)  
 WITH SORTED_DATA
      When you're determining which columns to include for indexes, consider how you will use the data. If you will be performing queries involving WHERE clauses, consider each column in the clause as a candidate for an index. Also, remember that column order is important when defining an index. As in the case of a composite key (a key composed of more than one column), you need to make the most distinguishing column the leftmost part of the index.
      Suppose you have a composite key made up of the au_fname and au_lname columns within a table. In the Pubs database, these columns in the authors table represent an author's first name and last name. For the index to be useful to a query such as "WHERE au_lname = ‘Gringlesby'" or "WHERE au_lname = ‘Gringlesby' AND WHERE au_fname = ‘Burt'", the au_lname column must be on the left of the index. However, this column order would not be useful for a query such as "WHERE au_fname = ‘John'". You would need to create an additional query on just the au_fname column.
      Consider indexing columns used for joins. This is particularly important because, while an index is created for you automatically when you create a PRIMARY KEY constraint, the index is not created automatically when in a FOREIGN KEY constraint.
      A few additional guidelines apply when designing your indexes. First, keep your indexes narrow. In other words, try to avoid multicolumn, compound indexes. Instead, create a larger number of narrow indexes. This provides the optimizer with more possibilities to choose from. Keep in mind that creating a large number of indexes will not guarantee the best performance. The query optimizer usually uses only one index per table per query—the rest are overhead. Be sure to continually evaluate the purpose and usefulness of your indexes.
      The most important thing to remember about choosing indexes is that empirical testing will be your best guide. Experimenting with indexes is cheap and the rewards are great. During development, create numerous indexes and test their performance. Keep the best and drop the rest; unused indexes create unnecessary overhead.
      On a side note, it is recommended that every table contain a primary key. That is not only good design; some ADO operations actually require that the underlying table has a primary key defined.
      

Tip 8: Optimize Your Queries
      When you structure your query, many considerations will affect your application's overall performance. Decisions ranging from how much data you will return to how you sort your data all have a tremendous impact on query execution. Apply good judgment when designing your queries and be sure to monitor and tune query performance regularly.
      Some types of queries are more resource-intensive than others. Queries that return large resultsets can become a bottleneck to your application and can create unnecessary network traffic. This becomes even more evident as your site's performance gets worse and worse as you try to scale your application to more users. Instead, attempt to filter records based on user selections and only return the data that is absolutely necessary. Also, rather than using SELECT *, be sure to only include the columns that you need within your SELECT statement.
      Certain query operators are also very resource-intensive. For example, IN, NOT IN, and OR queries can be very demanding on the server. The != (not equal) comparison operator is another operator to avoid if at all possible. Certain column functions such as SUM can also take their toll on the server. If you must use these operators, pay close attention to how it is affecting your application's performance.
      A good way to monitor and tune your queries is through ISQL. Using ISQL, you can set options that will report performance information regarding your query. For example, you can enter the following query in the ISQL window (again, be sure that pubs is selected as the default database):


 SELECT au_lname, au_fname
 FROM authors
 WHERE au_lname like 'b%'
      You can then bring up Query Options by pressing the button with the picture of a wrench on the ISQL toolbar (see Figure 16). Once you have brought up the Query Options window, choose Show Query Plan and Show Stats I/O as shown in Figure 17. Once you set these options, run the query. The output will show the results of your SQL statement, along with performance information (see Figure 18).
Figure 16: Accessing Query Options

Figure 17: Query Options
      The benefit of Show Query Plan is that you can see which indexes are in use. What you want to watch out for is a table scan, in which the query optimizer found no indexes of value and was forced to scan the entire table. Notice that in Figure 18, the optimizer chose to use the aunmind index and was able to efficiently execute the query.
      Show Stats I/O allows you to examine the I/O consumed by the query. Note the count of logical page I/Os. The optimizer's goal is to minimize I/O count. Make a record of the logical I/O count and experiment with different queries and indexes to improve performance. Place more emphasis on Show Stats I/O when analyzing your query performance. It may take more time to become familiar with the output, but it may well be the most definitive tool for gauging your query's performance.

Tip 9: Isolate Your Errors
      During development, you will typically run into a number of errors while coding your ASP pages. Owing to the complexity of a data-driven Internet application, there can be a number of places to fail. In many cases, just knowing where the problem occurs can help you resolve the problem. Unfortunately, error messages returned by ADO within your ASP page sometimes leave too much to the imagination. You can often isolate the cause of the problem by applying the following framework.
      Test your SQL outside of an ASP page. It is common for someone comfortable with scripting to begin coding an ASP page from scratch. When the code is not running properly, you should do your best to eliminate the SQL statement as a cause for the problem. The last thing you should do is attempt to fix something that will never work. Try running your SQL statement directly from the ISQL window to confirm that the syntax is correct.
      Take advantage of Visual Basic® to test your ADO code. This not only helps to remove authentication and desktop issues that you may encounter when running under IIS, but Visual Basic also provides a rich debugging environment. By eliminating as many unknowns as you can from the picture (in this case authentication and desktop issues), it may be easier to spot the problem. Once you have stable code, porting to ASP script is relatively painless from Visual Basic. For examples on how to do this, check out Dave Cline's article, "Designing ASP Files within Visual Basic," in the April 1998 issue of MIND.
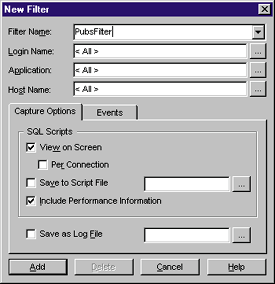
      Monitoring SQL Server activity can be very revealing. To do this, you can use SQL Trace. SQL Trace can be found in the SQL Server program group. Once you launch it you will be asked to pick a filter, as shown in Figure 19. Give the filter some name that makes sense to you. I typically choose the name of the database that I will be monitoring. Within this dialog, make sure that you have selected the View on Screen option.

Figure 19: SQL Trace

      Once you have named your filter, click Add to apply it. This will cause SQL activity to be logged to the screen for further analysis. Figure 20 shows some sample output.
      Notice that the full SELECT statement is captured in the output in Figure 20. This can be useful feedback when you are sending SQL statements from an ASP page because you can confirm how SQL is executing the statements. Tracing is expensive in terms of server resources, so avoid it during heavy traffic, and limit it to your development server whenever possible.
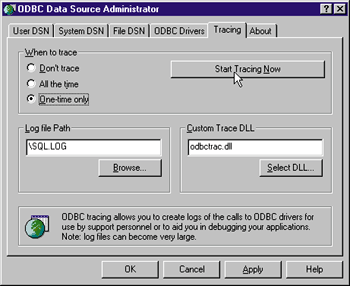
      Another extremely useful tool for diagnosing ADO errors that occur under ASP is ODBC Trace. You can use ODBC Trace to create a dump of all traffic through any of your ODBC drivers. The tool is configurable through the ODBC Manager option in the Control Panel. Typically, due to its voluminous output, you will want to configure this to run one time only. Once you have set this option, press the Start Trace button as shown in Figure 21.
Figure 21: ODBC Trace

      The beauty of ODBC Trace is that you can look at how the ODBC driver handles your SQL call. Many of the problems you encounter will leave clues here. These problems are beyond the scope of this article, but the ODBC SDK provides a great reference for helping you read through the trace log.
      There is always the Errors collection, of course, which can be accessed directly from your ASP script. The ADO Connection object provides this object, which you can drill into and reveal a more informative error message. When the datasource generates and returns errors, this is where you'll find them. Here's an ASP script that uses the Errors collection to check for any errors generated when opening the connection to the database:

 <% Set cnnPubs = Server.CreateObject("ADODB.Connection")
     cnnPubs.Open "pubs", "sa"
     If cnnPubs.Errors.Count > 0 Then
         'Errors have occurred so we can iterate the collection
         'for more detailed information
         For Each Error In cnnPubs.Errors
             Response.Write Error.Number & ": " & Error.Description
         Next
 %>
      The Errors collection has two properties: Count and Item. Count will return the number of Error objects in the collection. Item will return a specific Error object from the collection, which you can then inspect for its properties. The Error object's properties are listed in Figure 22.
      In addition to the provider errors that are described in the Error object and Errors collection, ADO itself may return errors to the exception-handling mechanism of your runtime environment. Figure 23 shows both decimal and hexadecimal error code values.
      

Tip 10: Use TCP/IP as Your Network Library
      I've saved the best tip for last. Choose TCP/IP for your network library on your client machine. TCP/IP provides the fastest connectivity of any network library option. To configure SQL Server to use TCP/IP, or confirm that it already supports TCP/IP, you will need to run your SQL Server installation program. You will see an option for Network Support during setup where you can choose TCP/IP.
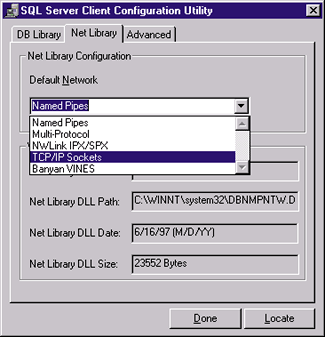
      To configure your client machine (your Web server in this case) to use TCP/IP as your network library, use the SQL Server Client Configuration Utility, which you can install from the SQL Server installation software if you don't already have it. Once it's installed, you will see it listed within the SQL Server Program Group. If you have ADO 1.5 or later installed on the Web server machine, you can access the SQL Server Client Configuration Utility during your DSN creation (you'll see a button labeled Client Configuration). Note that when you're creating DSNs to be used by ASP, you should stick to System DSNs—they provide best performance.
      Once you have accessed the SQL Server Client Configuration Utility, you will need to use the Net Library tab to change your network library support. To do so, choose TCP/IP Sockets from the Default Network options as shown in Figure 24. Press Done once you have made your selection.

Figure 24: Network Library Support

      Using TCP/IP as your network library limits you to standard security within SQL Server. This can work out well for a number of reasons. Using integrated security can severely limit the effectiveness of connection pooling in your Web application. For integrated security to work as expected, you need to enforce authentication from the Web server. Authenticating each user allows SQL Server to map the Windows NT® accounts to their corresponding SQL logins, but creates a problem: since each user has a unique login, you've avoided the mechanisms that give you the performance benefits of connection pooling. Remember, for a connection to be reused, a request for the resource must include a user name and password identical to the existing connection.
      Many developers choose integrated security, attempting to leverage existing Windows NT accounts, but don't realize that they are sacrificing performance. For one thing, integrated security requires a trusted connection, which means you cannot choose TCP/IP as your network library. The biggest hit is the problem with connection pooling. While it is possible to use connection pooling in conjunction with integrated security by mapping the Anonymous account to a valid SQL account and only allowing anonymous access to your Web site, this is usually not how it's implemented. When sites choose integrated security, they typically also choose challenge/response (currently only supported by Internet Explorer) or basic authentication from the Web server to enforce individual connections to SQL Server.
      If you choose integrated security and SQL Server is installed on a different server than your Web server, you cannot enable challenge/response from the Web server. In this case, your only authentication options on the Web server are anonymous and basic authentication. If you choose to allow anonymous, you must either create a local account on the SQL Server host machine that has an identical user name and password as the Web server's anonymous account, or you must specify a domain account as the anonymous account on the Web server. This domain account must have appropriate permissions on both machines, including the right to log on locally.

Conclusion
      Accessing SQL Server from ADO using ASP can pose quite a few challenges. While there are numerous resources available on these topics, I have hopefully given you enough information to provide a framework for successful development.

From the November 1998 issue of Microsoft Interactive Developer.