This article may contain URLs that were valid when originally published, but now link to sites or pages that no longer exist. To maintain the flow of the article, we've left these URLs in the text, but disabled the links.


MIND


This article assumes you're familiar with Active Server Pages and SQL

Ad Hoc Web Reporting with ADO 2.0
Johnny Papa and Charles Caison
     
Ever been frustrated with Web sites that just don't give you data in the format you want? With ADO 2.0 and Active Server Pages, you can make these annoyances a thing of the past.
As Web developers, we are often faced with the challenge of moving existing reports to the Web for our clients. In fact, the Web is the most logical place to showcase reports because Web browsers themselves are ultra-thin clients. If you compare traditional client-server architecture to the Web architecture, you can see some very real advantages to using the Web. For example, a standard client-server application requires that each client PC has a copy of the presentation tier software installed on it. This means that for every user of the system, you must install a copy of the client software on their PC so they can actively use the system. However, a Web application only requires a Web browser to be installed on users' PCs. With Web applications, we no longer need to support client installations of our products. We simply update the Web server and the client's browser receives the update automatically the next time they contact the Web server.
      None of this is news to you, however. The demand for more accessible and highly flexible reports appears to be never ending. Often, the demand for new reports stems from the sales department's need for remote access to reports while they are on the road. Other times the demand comes from upper management, who has decreed that all existing reports must be accessible from all nationwide branches in a standard format. Wherever the call originates for the reporting development, we have to determine how to accommodate the needs of our clients. This is where the Web and ADO make our lives much simpler.

ADO 2.0 Steps In
      There are two main problems to face when architecting a portable reporting system: how to deliver reports on demand to any location, and how to allow the user to customize the reports dynamically. Obviously, the Web solves the problem of portability; however, allowing for dynamic reporting has been quite a hassle in the past. But that was before ADO 2.0. Creating Internet-friendly reports through ASP and ADO 2.0 provides a solution for ad-hoc reporting with the most flexibility over the widest geographical scope. Now we can create reports that are stored in a central location (a Web server) that are accessible throughout the world wherever an Internet connection is available. Add the robust new features of ADO 2.0 and voilą! We have powerful, fast, dynamic, and highly accessible reports. Maintenance for new and modified reports has never been easier (and we all know that reports are always changing). What makes this even faster is that we only query the database once. That's right, we create the ADO recordset once, and store it in an ASP Session variable.
      OK, OK. We've talked enough about what we can do. Let's see the results. Then we'll see the details of how we accomplish this feat.

One Page at a Time
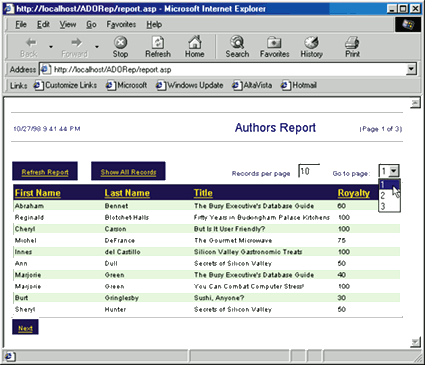
       Figure 1 shows a sample of a highly extensible Web report that uses the paging and sorting features of ADO 2.0. Notice that the report only shows 10 records on each page. We can navigate to other pages by using the Previous and Next links (if available) or by jumping directly to a specific page using the combobox in the upper-right corner of the page.

Figure 1: A Sample Web Report
Figure: A Sample Web Report

      If you are not familiar with paging, now is a good time to learn. Paging is the ability to show a user-defined number of records on the screen, then allow the user to move forward and backward through the report to different pages of records. For example, if we click on the Next link on the report in Figure 1, the report will display the second page of data.
      The display of 10 records on a page is a user-configurable setting. We can set the number of rows to be displayed on each page of the report using the Records per page text box. By changing this value and clicking the Refresh Report link in the upper-left corner of the report, the report will be redisplayed showing the number of records per page that we entered. These reports can even remember the page number we were on. For example, let's assume we are on the third page of a 25-record report that displays 10 records per page. We then change the page size from 10 to 7 records per page and refresh the report. ADO reconfigures the page size to display 7 records at a time (with a total of 4 pages).
      So what about the times when we are on page 10, for example, then we change the page size so that there are only 3 pages? In this case, we have the report go to the last available page. Otherwise, if we tell ADO to go to an invalid page number, it will raise an error. Alternatively, we could have coded this to go to the first page every time the page size changes. In any case, this decision is up to the developer, which ultimately means it is up to the client who commissions the project.
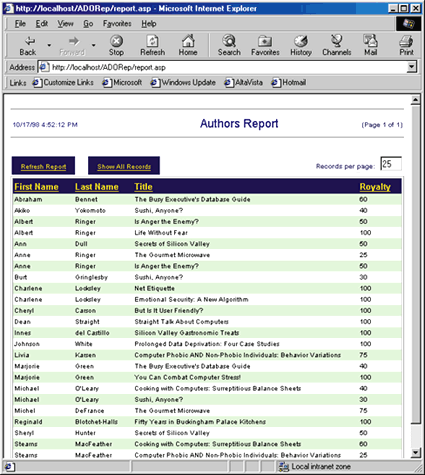
Figure 2: Displaying All Records

      Of course, paging is great for situations when we do not want to see all of the records at once. But what if we really want to see all of the records on a single page so we can scroll through it? With this report, we simply click the Show All Records link, as shown in Figure 2.

A Report of a Different Sort
      In addition to the paging features that are provided by ADO and this reporting tool, we can also sort the report in ascending or descending order. We've tweaked the sorting capabilities of ADO 2.0 to allow the user to sort the report in ascending order when the user clicks the column heading hyperlink. To sort the report in descending order, click the same column heading again and the report's sort order will reverse itself.
      Incidentally, this report stays on the same page even when the sort changes. For example, let's assume we are on the third of 10 pages and the data is sorted alphabetically by last name. If we sort on the last name again, making it sort in descending order, the report redisplays the third page. However, this time the data on the third page is totally different. This isn't a red flag, but something to keep in mind.
      Sorting is a really common request by users, even from those receiving the same report. Jake wants the sales report sorted by product, Colleen wants it sorted by order date, and Kadi wants it sorted by sales region. What a mess! In situations like this, ADO 2.0 really proves its worth. Now that we've seen what we can do, let's take a look at how it works.

Under the Hood
      The first thing we do is set up the ASP code by including the ADO constants we'll need and declaring all variables we will use in the ASP (see Figure 3). Since we used Option Explicit, we have to declare all of the variables we will use on this page. We did not have to use Option Explicit, but it makes debugging misused variables that much easier. We could have simply included the entire adovbs.inc file so we wouldn't have to list each constant we needed. But, since we are only interested in using a handful of ADO constants, it seems a bit easier to simply list them. For greater scalability we could have included the entire file of ADO 2.0 constants because if we add more ADO functionality later, we would probably have to add additional constants. But in our case, we'll simply list the two constants we need to totally encapsulate this code within a single page.
      Once we have declared our constants and variables, we can move on to the serious code. First, we need to determine whether we have already created the recordset by checking if the Recordset object is stored within the Session variable called Report. If it is there, we retrieve it to a local variable to use in our ASP. If it isn't there, we create it. The code to create the recordset is quite ordinary, as shown in Figure 4. However, this code is special because we are creating a client-side cursor so we can take advantage of disconnecting the recordset from the database once we have retrieved the data.
      Why do we want to disconnect? Sometimes the best answer to a question is to look at its alternative. In this case, the alternative is to store the recordset in the session and keep it connected to the database. Keeping this connection alive is a drain on the resources of the database server. Multiply that by as many users as would use your reports concurrently and you've got an enormous resource strain on the database server. Besides, we have all we need within the ADO recordset once we get the data from the database, so there's no need to stay connected. To disconnect, we simply set the ActiveConnection property of the recordset to Nothing. If we ever need to reconnect, we could set the ActiveConnection property of the recordset to a valid Connection object.
      There are some real advantages to using a client-side cursor besides disconnected recordsets. For example, we'll take advantage of the ADO 2.0 sorting feature that implements a temporary index on the ADO recordset to sort the data. The code in Figure 5 sorts the ADO recordset if the user clicked on a column heading (if not, we skip the sorting section altogether). We determine whether the user clicked the column heading by checking if the hidden ReSort text box has a value of yes. (You'll see later how this value gets filled in, as well as the other two hidden text boxes used for sorting.)
      Once we have determined that the user wants to sort the recordset, we retrieve the column name and the sort direction from the hidden text boxes SortBy and SortDir, respectively. We have to compare these values with the sort and direction we used the last time we sorted the recordset. Notice that the column names are wrapped within square brackets. We do this to avoid issues with multi-word column names such as First Name. Since the column names are wrapped in brackets, we need to strip the brackets temporarily to get the actual column name. This section of the code decides whether we should sort the column in ascending or descending order. If we simply wanted the user to sort in ascending order, we could replace this entire section with one line of code similar to the following:


 objRS.Sort = Request("SortBy")
      Now that we have sorted the ADO recordset, we need to determine if the page size has changed or if the user moved to a different page. First, we check to see if the page size changed. If it did, we set the page size accordingly. If the user decided to go to another page, we navigate to that page directly. All of this is moot if the user requests that all records be displayed on a single page, in which case there is no need for paging, so we simply display all records. We used some JScript® to set the page size, as you'll see in Figure 6.
      The MoveToPage function in Figure 7 is called by the onchange event of the Go to page combobox. When a user goes to a page, this function sets the page number and submits the page to refresh the report. The ShowAllRecs function fires when the user clicks on the hyperlink to display all records on a single page. This function sets the page size to the number of records in the ADO recordset, then submits the page to refresh the report. Finally, the ReSort function sets the column to sort by and submits the page to refresh the report. All of this script occurs on the client side and is written in JavaScript to support both Microsoft® Internet Explorer and Netscape Navigator.
      Once we have coded this functionality into the page, the rest of the script is relatively routine. First, we create the report headers, as shown in Figure 8. Then we create the hyperlinks to show all records, refresh the report, and allow the user to go directly to a page (see Figure 9). We can make a hyperlink submit a page indirectly by having the hyperlink's href specify some JavaScript using the following syntax:

 href="javascript:PutFunctionCallHere():"
Pointing the href to a client-side JavaScript function, we can call our functions as we outlined in Figure 7. (This method is common among Web developers who want to find a way around having submit buttons all over a screen—although they could serve our purposes too.)
      At this point we need to start displaying the column headings. This is pretty easy with ADO since the fields and their attributes are exposed through the Fields collection. We can loop through this collection and display each field in the ADO recordset using the Name property, as shown here:

 <!-- Display the report, itself. -->
 <%If Not (objRS.BOF and objRS.EOF) Then%>
     <table border="1" cellpadding="0" width="100%">
     <tr>
     <td>
     <table border=0 cellpadding="2" cellspacing="0" width=100%>
         <!-- Display the column headings. -->
         <tr>
         <%For intCol = 0 To objRS.Fields.Count - 1%>
             <td nowrap bgcolor="#000060" valign="top">
                 <font face="helvetica,verdana,arial" size=2 color="#99cccc">
                 <b><a href="javascript:ReSort('[<%=objRS(intCol).Name%>]')" 
                 onmouseover="window.status='Sort by <%=objRS(intCol).Name%>'"
                 onmouseout="window.status='';"
                 title="Sort by <%=objRS(intCol).Name%>">
                 <%=objRS(intCol).Name%></a></b></font>
             </td>
         <%Next%>
         </tr>
But we also need to allow the user to sort by columns, so we make the column heading a hyperlink. The hyperlink uses some client-side JavaScript to call the ReSort function, passing the name of the column heading. This will be used by the ReSort function to determine which column to sort by.
      Once we have the column headings and the code behind their links, we need to tackle the display of the data rows, as shown in Figure 10. This is a simple process of looping through each row using the MoveNext method of the ADO recordset. Within each record, we must loop again, this time through the Fields collection to display each column's value.
      Now, in Figure 11, we begin the report footer by determining whether we require the Previous or Next hyperlinks. These hyperlinks call the MoveToPage client-side JavaScript function with the next or previous page number, as appropriate. But first we need to decide if these links make sense or not. For example, why have a Previous link if we are on the first page? A quick check of the intCurrentPage variable makes this determination for us, while a comparison between the same variable and the ADO recordset's PageCount property reveals whether we need the Next link.
      Making sure we touch all of the bases, we display a message stating there were no records retrieved by the report's SQL:

 <%Else%>
     <center>
     <!-- Display a message stating there were no records found. -->
     <table border=0 cellpadding=2>
         <tr>
             <td align="center" bgcolor="#000060">
                 <font face="helvetica,verdana,arial" size=2 color="#99cccc">
                 No matching records could be found.
                 </font>
             </td>
         </tr>
     </table>
     </center>
 <%End If%>
We mentioned earlier that we would store values in hidden text boxes that would be evaluated by server-side ASP. These hidden HTML text boxes are set by the client-side JavaScript functions from Figure 7.

<!-- column to sort by -->
<input type="hidden" name="SortBy" value="<%Response.Write(strSort)%>">

<!-- should the columns be resorted -->
<input type="hidden" name="ReSort">

<!-- should all of the records be displayed on one page -->
<input type="hidden" name="AllRecs">

</form>
</body>
</html>
For example, if a user clicks on the hyperlink to sort the records by a particular column, the JavaScript sets the SortBy text box to the sort column and the ReSort text box to yes.
      Finally, we save the disconnected recordset in the Session variable Report so we can use it again.

<%
set session("Report") = objRS
Set objRS = Nothing
%>
This is why it is important to use a disconnected recordset; otherwise, we would have to keep a constant connection open with the database. Imagine if you had a hundred users reading your Web reports! That would mean many open (and little-used) connections wasting your database server's resources.

Ad Hoc Reporting
      This reporting technique is a great solution to the reporting needs of many clients, but what makes it ad hoc? We can pass any SQL SELECT statement to the report and it will automatically adjust itself to the new columns, sorting fields and other report features. But what if we want to use another database? We can use a different ADO connection string. In fact, we can do one better. Because we are using OLE DB through ADO, we can retrieve data from a multitude of resource managers, as long as someone has written an OLE DB provider for the resource. Luckily for us, with ADO 2.0 there are several new OLE DB providers available from Microsoft, including SQL Server™, Oracle, Jet database, Index Server, and ADSI. Before ADO 2.0, we had to live with the OLE DB provider for ODBC, which meant we had to go through OLE DB to get to ODBC to get to our database! OLE DB providers are being written all the time. Now we can get to mainframe databases, text files, and other data formats all through the same ADO interface.
      To take advantage of these ad hoc reporting techniques, we will probably want to store the connection string in an Application variable. This way we lower the resources needed as the connection string will probably be the same for everybody. It also makes it easier for us to change the connection string in one place, instead of several places. However, if we need to have different connection strings for different reports, a Session variable will do the trick in keeping the report generic and reusable. We can take the same approach in passing in the SQL for the reports by creating a Session variable for the SQL SELECT statement. These are the only two features of the report that are not necessarily generic. As long as we utilize a means of passing these values into the ASP, we are successful at preserving the reusability of this report.

One Step Further
      We can take this reporting technique even further by using some of the other features of ADO 2.0. For example, we could allow users to reduce the report's data records by letting them specify some additional criteria (like Royalty < 100%). We could even take advantage of another new feature of ADO 2.0: the Find method. This method lets us navigate to a specific record within the recordset. Find takes advantage of another new feature in ADO 2.0: indexing. ADO recordsets can now have temporary client-side indexes created upon them. This is why we can now sort and find records within our recordsets. A sorted recordset does not change the order of the data, it simply uses a client-side index within the ADO Recordset object to reference the rows in the appropriate sorted order. With so many new features in ADO 2.0 and the symbiotic relationship between ADO and RDS, we can finally take advantage of the Web to create our own rich reporting tools.

From the December 1998 issue of Microsoft Interactive Developer.