Visual J++ 6.0 / Visual Studio / IDE Extensibility
By Bill Chiles
Extensibility is a set of features that allow you to customize the user interface of the development environment and change its behavior. The spectrum of customization ranges from convenient UI tweaks that Visual J++ 6.0 (VJ6) developers can use every day (such as keyboard rebinding), to easily creating project and project item templates, to remotely controlling the environment and its contents with Automation. Some features include Tools Options, named window and keyboard configurations, adding new items to the Add Item and Add Project dialog boxes, creating new templates for the Template Wizard, and writing your own add-ins and wizards. There's much VJ6 developers can do to tailor the environment to their particular needs.
One of the most powerful features we have is the ability to automate the development environment with add-ins and wizards. These allow us to seamlessly extend the environment with complex features that look and behave as though they shipped with VJ6. For example, if you're part of a development team, you can implement a wizard for new projects or classes that captures a domain of business logic that your team works with. You can introduce new tool windows that track the environment's selection and display information for selected items. The add-in object model includes the Visual J++ Code Model (available for download; see end of article for details) that we use internally at Microsoft to build features such as IntelliSense (command completion, parameter tips, etc.) in the editor, the Document Outline window, and parts of the WFC forms designer. This is a very powerful two-way code model that stays synchronized with the source editors.
Customizing IDE Windows
There are several ways VJ6 developers can customize how the development environment manages windows. We at Microsoft have heard repeatedly that better use of screen real estate and more flexible window management is important for developers, so we've greatly improved docking behavior, and added new features such as tab-linking, named window configurations, and full-screen mode.
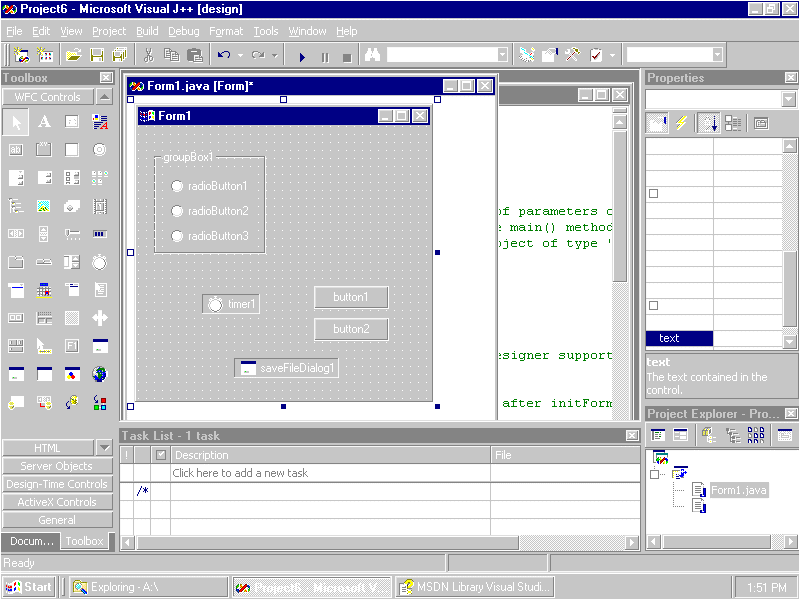
Docking and linking tool windows. Developers can stick two windows together to form a new, combined window that, when dragged and resized, simultaneously changes the joined windows (see Figure 1). You can dock windows one above the other, or one beside the other. The constituent windows can be separated by dragging the contained title bar out of the combined window, or by double-clicking the contained title bar. You can also dock windows to the sides, top, and bottom of the IDE when the IDE is in Multiple Document Interface (MDI) mode (more about this later).

Figure 1: The VJ6 IDE, shown here in the default MDI mode, can be customized to the nth degree. Note that the Properties Window and Project Explorer have been joined, one-atop-the-other, into one dockable window. Also displayed is the handy-dandy Task List.
You can also join two windows by making each a page in a new, tabbed window (see Figure 2). To do this, simply drag the title bar of one window over the other. This saves screen real estate over docking windows. As with docking, you can separate tab-linked windows by dragging a tab out of the combined window, or by double-clicking a tab.
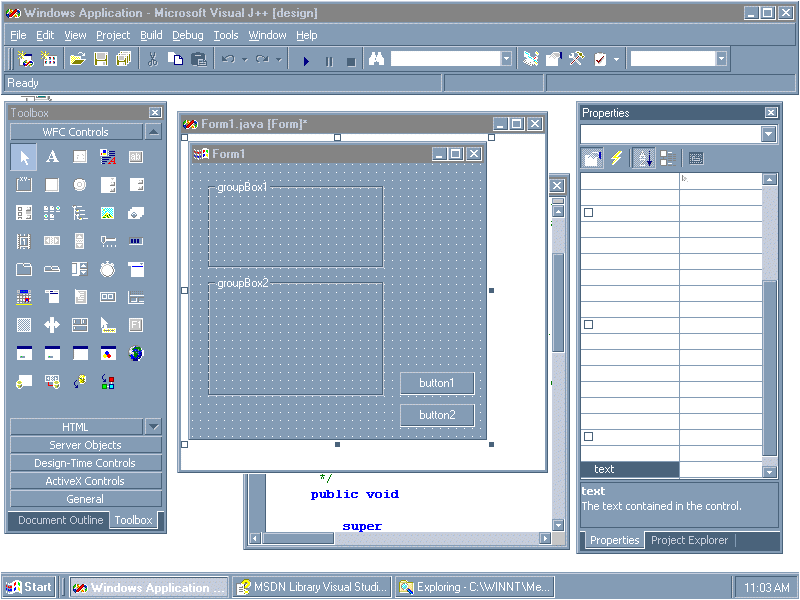
Figure 2: To maximize screen real estate, the Properties Window and Project Explorer have been joined into one tabbed window. Note also, that VJ6 is shown here in its SDI mode.
Defining named window configurations. After docking and linking windows and finding a configuration that works well for certain kinds of work, you can name the current configuration and save it. You can switch to any named window configuration at any time.
Using Full Screen Mode. The Full Screen Mode command closes all tool windows in the IDE and gives all the space available to the editor or document windows (see Figure 3). This is very useful if you're editing for an extended period of time, or doing an online code review. The command toggles this mode, so invoking it again will restore the window configuration you were previously using before entering the mode.
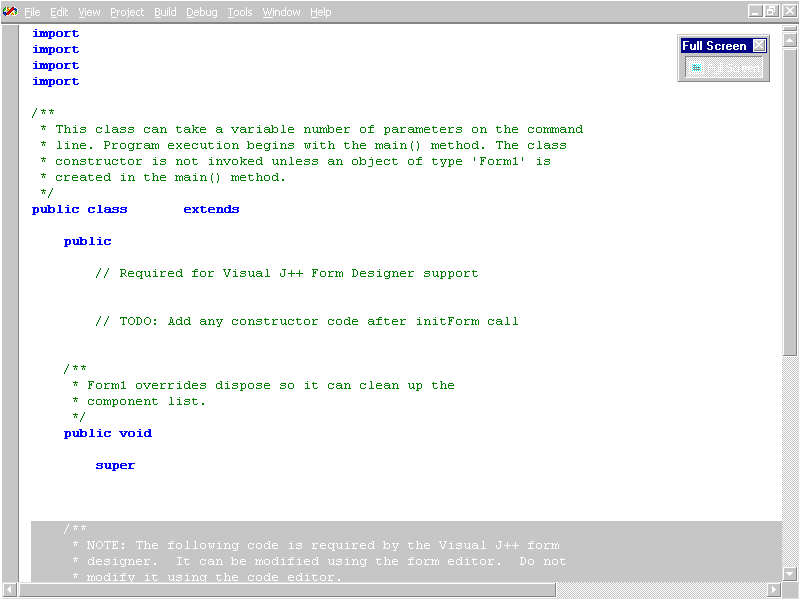
Figure 3: Full Screen mode closes all tool windows in the IDE and gives all the space available to the selected window.
Recycling document windows. When opening new files in the editor, you can indicate whether the current editor window should be reclaimed to show the new file, or whether the development environment should always create a new editor window for each new file. If the current editor window shows a modified file, then the environment creates a new editor window.
Customizing command bars. Because VJ6 uses standard Office command bars, you can customize the command bars in exactly the same way you can Office products.
Changing between MDI and SDI modes. Under Tools | Options, you can select a property that indicates whether the next invocation of the IDE should be in MDI mode or Single Document Interface (SDI) mode (see Figure 4).
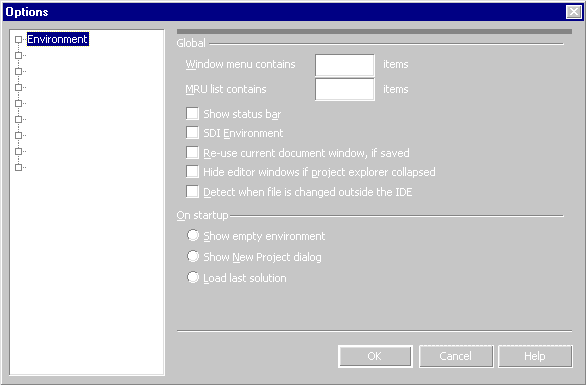
Figure 4: The Environment page of the Options dialog box.
Changing the IDE and editor fonts. Under Tools | Options, you can choose a particular font family, character set, and size for the entire development environment. These options take effect the next time you invoke the IDE.
You can choose the font family, character set, and size for the text editor. Additionally, for various kinds of text (comments, programming language keywords, etc.), you can select a specific color and whether the text should be bold. These changes take effect immediately.
Changing the IDE language. Under Tools | Options, if you have a machine that supports multiple languages, you can select the language the IDE should use. This change takes effect the next time you invoke the IDE.
Customizing the Keyboard Bindings
This section discusses some ways VJ6 developers can customize keyboard bindings.
Changing the binding for a single command. Using the Tools | Options property page for Environment/Keyboard, you can change the key that a command is bound to (see Figure 5). Bindings can be a single key chord or a sequence of two key chords (such as Ck Ck to set a bookmark in the editor).
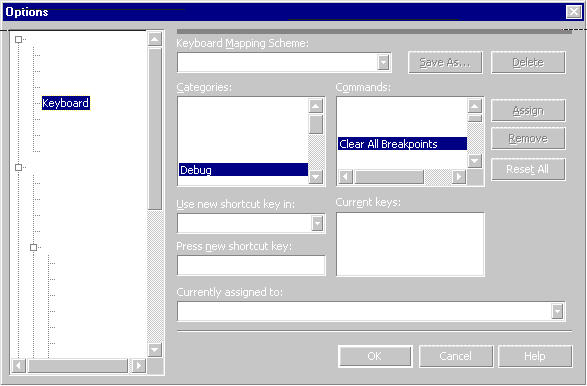
Figure 5: The Environment/Keyboard page of the Options dialog box.
You can also use this property page to determine what command a key is bound to. Typing a key in the input area, if it's bound, causes the development environment to display the command name and a description of the command.
Key bindings are organized according to key binding contexts. There is a context for the whole environment and other contexts for various views in the text editor. This gives you the flexibility to have a key do something special when an editor window has focus, and do something else in the rest of the environment.
Using keyboard mapping schemes. Key bindings are organized according to key binding schemes. There is a default scheme for Development Environment 6.0, and there are schemes shipped for a couple of versions of VC++ and VB 5.0. You can customize several bindings and save your own scheme out to a file that then becomes a choice in the mapping scheme drop-down control.
Customizing Command-line Invocations
When invoking the IDE from the command line, you can use various switches to control the environment, such as including invocations of the environment as part of a build script. Here is the command-line syntax:
devenv
{ SolutionName [/debug | /release]
  [/deploy | /m | /clean | /rebuild] }
or
{ [/debug | /release]
  [/deploy | /m | /clean | /rebuild] SolutionName }
or
{ ProjectName [/debug | /release]
  [/m | /clean | /rebuild] }
or
{ [/debug | /release]
  [/m | /clean | /rebuild] ProjectName }
or
{ [/run | /runexit | /out FileName] [/lcid LocaleID]
  [/fn FontName] [/fs FontSize] [/sdi | / mdi] }
or
{ /? }
The command-line arguments are described in Figure 6.
| Argument | Description |
| ProjectName or SolutionName | Designates the project (for example, .vjp, or .vip) or the solution file (for example, .sln). |
| /debug | Tells Visual Studio to build the ProjectName or SolutionName in debug mode. |
| /release | Tells Visual Studio to build the ProjectName or SolutionName in the form that you want to distribute it. |
| /deploy | Deploys the solution using the active deployment map. |
| /make or /m | Tells Visual Studio to build ProjectName or SolutionName using the current build settings. |
| /run or /r | Tells Visual Studio to build and run ProjectName or SolutionName using the current build settings. The development environment is displayed and active when the project or solution is finished running. |
| /runexit | Tells your product to run ProjectName or SolutionName. The development environment is minimized when the project or solution is run. If, for any reason, the file is changed in the process of running, all changes are ignored and no dialog box appears on exit to design mode. This argument uses the current build settings. |
| /clean | Removes the built project files without rebuilding the project or solution. For example, you could use this command if you wanted to remove all the build files from your current project. |
| /rebuild | Removes the built project files and then rebuilds the project or solutions. |
| /out | Allows you to specify a file to receive errors. Must be used with /m, /clean, /deploy, or /rebuild. The errors are placed in this file, along with other status information. If you do not use this option, command-line build errors will be displayed in a message box. |
| FileName | Designates the file to receive errors when you build an executable using the /m, /runexit, /deploy, or /rebuild option. |
| /lcid or /l | Sets the environment's default language. |
| LocaleID | Designates the LCID you want to use. |
| /fn | Changes the system font for the environment. |
| FontName | Designates the font you want to use. |
| /fs | Changes the size of the system font for the environment. |
| FontSize | Designates the size of the font you want to use. |
| /sdi | Changes the Visual Studio environment to SDI mode. When in SDI mode, every window you have open appears on the desktop. Visual Studio remains in SDI mode until you change it. You can change to MDI mode by using the /mdi argument or by clearing the SDI Environment option on the general Environment page in the Options dialog box. |
| /mdi | Opens your product in MDI mode. When in MDI mode, you have one window on your desktop that contains the other windows you have open. Your product remains in MDI mode until you change it. You can change to SDI mode by using the /sdi argument or by selecting the SDI Environment option on the general Environment page in the Options dialog box. MDI mode is the default. |
| /? | Lists the available command-line arguments. |
Figure 6: Command-line arguments.
Customizing the Task List
Now let's discuss some ways VJ6 developers can customize the behavior of the Task List.
Adding, removing, and modifying comment tokens. Under Tools | Options, the Task List property page lets you define new comment tokens, delete existing tokens, or modify their priority (see Figure 7). There is one token you cannot change. It's fixed so there is a localizable default token that add-ins and other contributed functionality can query the development environment to get and use in generated code, with the guarantee that the comment will show up in the Task List. This reserved token, in English, is "TODO:."
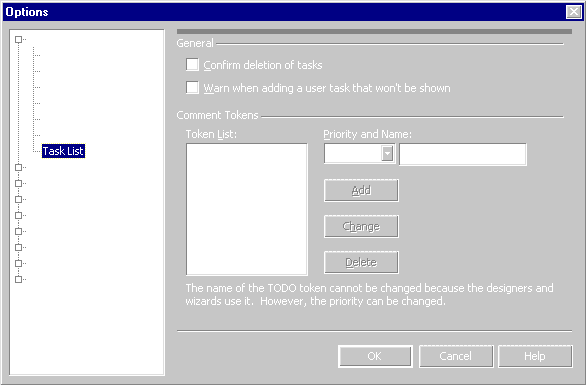
Figure 7: The Environment/Task List page of the Options dialog box.
Customizing the VJ++ editor's tasks. The VJ++ editor provides a few options that allow you to control what task items it puts in the Task List:
Toggle whether it makes comment token task items.
Toggle whether it makes task items for errors as you type.
If checking for errors, toggle whether it looks for syntax errors statement by statement, or only in class and method headers.
Toggle whether the editor shows compiler errors as blue squiggles.
Customizing the Toolbox
The following section discusses some ways VJ6 developers can customize the Toolbox.
Adding, removing, and moving tabs. If you right-click on the Toolbox, you can use commands to create new tabs to help you organize elements in the Toolbox. When you create a new tab, you can supply a name for it. Moving tabs around to change their order is as simple as clicking on the tab and dragging it to a new location. You can right-click on a tab and use the Rename command to rename a tab, or the Delete command to blow one away.
Saving code fragments. The Toolbox supports drag-and-drop to and from the editor. This is a very useful way to save common expressions or idioms in your programming language for retrieval when you need them. You can also use this feature as a multi-element clipboard of sorts.
Customizing the Add Item and Add Project Dialog Boxes
You can customize what is shown (and how it is shown) in the Add Item and Add Project dialog boxes (see Figures 8 and 9). You can place files in the project item directories for the products, and they immediately become items that can be added (for example, code snippets). You can do the same thing with placing directories with project files and several item files for new projects.
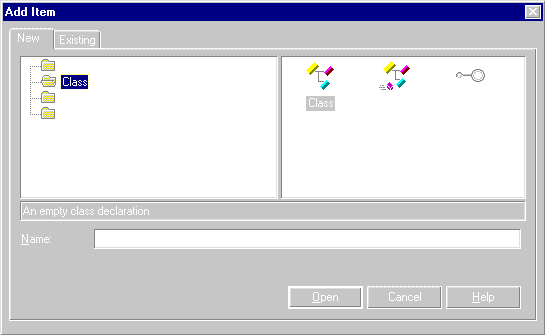
Figure 8: The Add Item dialog box.
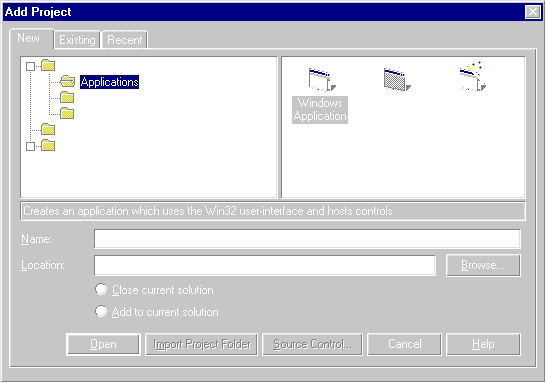
Figure 9: The Add Project dialog box.
The development environment looks for VSDIR (*.vsdir) files in the directories that contain new items and projects. VSDIR files provide a sort order for items, descriptions, display names, ability to localize names and descriptions, references to icons, etc. Users can add to, remove from, or rearrange the sort order of contents in these files. There can be multiple VSDIR files at each level in the directories that contain new projects and items. The environment reads all of them at a given level and builds an overall order for displaying items. Items not listed in VSDIR files appear after all items listed in a VSDIR file.
The development environment provides a Template Wizard that can be used to prompt users for information and merge that information with template sources to produce new project items. Users can add a new template to the Add Item dialog box by creating a new VSZ (*.vsz) file that refers to the Template Wizard and the sources for the template.
Using VSDIR files. A VSDIR file is a text file that informs the Add Item and Add Project dialog boxes about VSZ files and all other templates. The file contains line-oriented records, one record per file or folder template. The fields within a given record are separated by pipes ( | ). A directory can contain multiple VSDIR files. Generally, one VSDIR file contains information for multiple VSZ files, folders, or templates. Here's a simple example:
Form|{AECC23E0-8AA3-11d0-B606-00A0C922E851}|#36056|10
Class|{AECC23E0-8AA3-11d0-B606-00A0C922E851}|#36054|20
Web Page|{AECC23E0-8AA3-11d0-B606-00A0C922E851}|#36057|30
Other|{AECC23E0-8AA3-11d0-B606-00A0C922E851}|#36213|40
The following fields can be specified for a given record:
RelPathName — Name of the template VSZ file, e.g. MyWizard.vsz.
{clsidPackage} — The GUID of the package whose satellite DLL contains localized strings, i.e. Localized Name, Description, and SuggestedBaseName. This field is optional, and will normally be blank for VSDIR files that correspond with third-party wizards.
LocalizedName — This is the localizable name of the template or wizard. It can be a string or a resource identifier of the form #ResID. This is the name that appears in the Add Item dialog box.
SortPriority — This is an integer representing the relative priority of this file/template/wizard. For instance, if this item is 1, this will appear next to other 1's and ahead of all 2's or lower-priority items.
Description — This is the localizable description of the Template/Wizard. It can be a string or a resource identifier of the form #ResID. This is the description that appears in the Add Item dialog box when the item is selected.
DLLPath or {clsidPackage} — Used to load an icon for the template/wizard/file. The icon is loaded as a resource out of a DLL/EXE file using the value of the IconResourceId field. This DLL/EXE file can be identified using either a full path, or a GUID of a package. The implementation DLL of the package is used to load the icon (not the satellite DLL).
IconResourceId — This is the resource Identifier within the DLL or package implementation DLL that determines the icon to display.
Flags — Includes a group of bitwise flags used to disable/enable the Name and Location fields in the Add Item dialog box. The value of the Flags field should be the decimal equivalent of the combination of bit flags required (e.g. 3 is equivalent to VSDIRITEM_DisableNameField | VSDIRITEM_DisableLocationField). The possible flags that can be combined are:
VSDIRITEM_DisableNameField     = 0x00000001
VSDIRITEM_DisableLocationField = 0x00000002
SuggestedBaseName — This field represents the name that will be the default for the file/wizard/template. It is either a string or a resource identifier of the form #ResID. The shell uses this value to provide a default name for the item. This base value is appended with an integer value to make the name unique if necessary, e.g. MyFile21.asp.
Note that:
Any non-required field for which there is no meaningful data should contain a 0 (zero) as a placeholder.
If no localized name is provided, the relative path name will be used.
Field 6 overrides field 2 for icon location.
If no icon is defined, the shell will substitute the default icon for a file with that extension.
If no suggested base name is provided, "Project" will be used.
Using VSZ files. The development environment launches wizards via VSZ files. These files contain information private to the shell for identification purposes, and information custom to the wizard. The files also contain a reference to the wizard to be invoked. The custom information allows a single wizard to be invoked with different data from different VSZ files, so a single wizard can be used to perform apparently different functions.
The following is a sample VSZ file:
VSWizard 6.0
Wizard=VIDWizard.CBlankSiteWizard OR GUID
Param=foo
Param=bar
VSZ files show up in the Add Item and Add Project dialog boxes as new items and projects that can be added to the solution. (See the section on VSDIR files to see how to control displaying the VSZ files.)
Using the Template Wizard. The Template Wizard dynamically determines the panes it displays to users based on prompts contained in template source files. For each response the user gives, the wizard replaces the prompts in the template sources and then copies the resulting files to the project. The templates can be one or more files in a flat or hierarchical structure.
Template prompts are of the form <#% Stuff to ask the user %#>. If this pattern appears more than once, the user is only prompted once, and the response is used everywhere the pattern occurs. There are built-in patterns, for example, <#%GUID1%#>, which causes the wizard to silently generate a GUID and substitute it for the pattern. Any files containing no patterns, or only built-in patterns that can be silently supplied, are copied to the project without interacting with the user.
The wizard also provides a table of all the files comprising the template. The user can rename the files. If any of the files refer to a renamed file with a URL pattern, those references are fixed up to refer to the new name. Any URLs that are relative are fixed up as well.
After creating your template source files, you need to put them in a directory and create a VSZ file for the template. The VSZ file must be placed into a subdirectory of \Program Files\Microsoft Visual Studio\VJ98\VJProjectItems. The VSZ file must contain the following:
VSWIZARD 6.0
Wizard=VIWizard.CTemplatePageWizard
Param=c:\My\Template\Sources\MyTemplate1
Param=DaClass.java
The last line is optional, but when supplied, it indicates the file in MyTemplate1 that should be opened in the IDE after it is added as a project item.
Add-ins and Wizards
An add-in is an ActiveX server that communicates with the development environment through its OLE automation object model. An add-in implements the IDTExtensibility2 interface. When the IDE creates the add-in server, the IDE passes the root of the object model to the OnConnection member function. Add-ins can contribute new commands to the environment and handle events, i.e. notifications of changes in the environment. Add-ins can present a UI to the user, or work quietly in the background.
A wizard is an add-in the IDE creates as the result of selecting an item in the Add Item or Add Project dialog box. A wizard performs a sequence of interactions with the user, generates project items and projects, then goes away. A wizard implements the IDTWizard interface, which has one method: Execute.
If you author a wizard, you must create a VSZ file in the appropriate directory for the Add Item or Add Project dialog box. When the user chooses the wizard (i.e. selects the item or project relating to the VSZ file you added), the development environment creates the wizard server and passes the root of the object model to the Execute method. The development environment passes different contextual data depending on whether the wizard was invoked via the Add Item or the Add Project dialog box. Figure 10 shows a sample of Visual Basic code that displays the information passed to it.
Implements IDTWizard

Const ItemWizardKind = _
  "{0F90E1D1-4999-11D1-B6D1-00A0C90F2744}"
Const ProjectWizardKind = _
  "{0F90E1D0-4999-11D1-B6D1-00A0C90F2744}"

Private Sub IDTWizard_Execute(ByVal Application As Object,
  ByVal hwndOwner As Long, ContextParams() As Variant, _
  CustomParams() As Variant, RetVal As DTE.vs_exec_Result)

  Dim msg As String

  If ContextParams(0) = ItemWizardKind Then
    msg = "Item Wizard" + vbLf
    msg = msg + "Add an item to Project " + _
          ContextParams(1) + vbLf

    Dim ProjItems As ProjectItems
    Set ProjItems = ContextParams(2)
    If TypeOf ProjItems.Parent Is Project Then
      msg = msg + "Adding item to top-level " + _
            "ProjectItems collection" + vbLf
    Else
      msg = msg + "Adding item to project subdir " _
            + ProjItems.Parent.FileNames(1) + vbLf
    End If
    msg = msg + "The destination directory is " + _
          ContextParams(3) + vbLf
    msg = msg + "The new item will have the name " + _
          ContextParams(4) + vbLf
  Else
    msg = "Project Wizard" + vbLf
    msg = msg + "The project file name relative to " + _
          "the solution directory is " + _
          ContextParams(1) + vbLf
    msg = msg + "The destination directory for the " + _
          "new project is " + ContextParams(2) + vbLf
    msg = msg + "The installation dir for devenv.exe is " _
          + ContextParams(3) + vbLf
    If ContextParams(4) Then
      msg = msg + "Create a new solution for the new " + _
            "project" + vbLf
    Else
      msg = msg + "Add the new project to the current " + _
            "solution" + vbLf
    End If
    msg = msg + "The custom param is '" + _
          CustomParams(0) + "'" + vbLf
  End If

  MsgBox msg, , "Development Environment Wizard"

End Sub
Figure 10: Using this Visual Basic code, you can see the values passed to a wizard when it is invoked.
Add-ins must be registered just as any other ActiveX server. Then the development environment's Add-In Manager can find the add-ins, display their name, and display a description of the add-in. If you use Visual Basic 6.0, there's an add-in designer that prompts you for this information and performs all the required add-in registration. If you author the add-in in Java, you can add a public method, named OnCOMRegister (see Listing One, beginning on page XX), that does the part of the registration that announces the add-in to the Add-In Manager. If you use neither of those options, a typical .reg file for an add-in might look like the following:
REGEDIT4

[HKEY_CURRENT_USER\Software\Microsoft\
  VisualStudio\6.0\Addins\ProjectName.ClassName]
"Description"="What I like about you."
"FriendlyName"="Addin Appel"
"LoadBehavior"=dword:00000000
Getting more information on the add-in object model. To investigate the add-in object model, use the object browser and look at the following type libraries:
Visual Studio 6.0 Extensibility (DTE add-in object model)
Microsoft Add-In Designer (IDTExtensibility)
Microsoft Office 8.0 Object Library (command bars)
VJExt (VJ6 project and code models)
A listing of all the objects, and their members, for the environment and project structure is available for download (see end of article for details). A listing of all the objects, and their members, for the Visual J++ Code Model is also available for download (again, see end of article for details). This is the code model used internally by VJ6 to implement all the IntelliSense features, the Document Outline window, and parts of the WFC forms designer.
What you can do with add-ins and wizards. This section outlines some of the ways you can automate the development environment with the add-in object model:
Manipulate environment-wide properties such as those found in Tools | Options.
Navigate the solution and project structure, add and remove projects and project items, open project items in one of several views (designer or source for example), modify project items, etc.
Add and remove commands, and get events when commands fire.
Access all the windows in the environment, close them, access the text buffer for source editors, dock windows, hide them from view, set focus, and create new tool windows that are dockable and behave like built-in tool windows.
Sink events for solutions opening and closing, start and end of builds, adding and removing projects and project items, and the selection changing.
Access the Visual J++ Code Model from any VJ6 project's .java item to navigate and manipulate the code in that file. You can also access the code model from the root of the add-in object model to access by name a particular package, class, or file.
With a particular .java file, the code model object returns objects for the package that the code is compiled into, a collection of imports at the top of the file, and a collection of classes in the file.
You can add and remove imports.
With a class object, you can access a collection of interfaces implemented by the class, a collection of members, a collection of superclasses, a collection of subclasses, and the modifiers for the class. You can modify any of these.
With members, you can distinguish fields from methods, get type information for fields and signature information for methods, get back to the class object, get the initializer expression for a field, access the modifiers, access the statements in methods, and add and remove members. You can modify these properties.
With statements, you can query their type (for example, IF, FOR, SYNCHRONIZE, etc.) and add and remove statements from blocks of code.
For source elements (classes and members), you can access their JavaDoc comments as an object. This object lets you get the comment as a synopsis, a short description, or the entire text. You can index the object by name for various tags. Some standard tags that are likely to occur repeatedly in a single comment are available also in special collections. For example, you can index @param tags by the name of the parameter to get the text of the tag.
How to get started. Two very good ways to get started with your first add-in is to review the sample add-in described in this article, and to use the Add-In Wizard available for download from http:\\www.microsoft.com\visualj. Both of these are available for Technology Preview 2.
The Add-In Wizard downloads as a single DLL that installs itself when you invoke regsvr32 on the DLL. The next time you start VJ6, there will be a VJ6 add-in project that you can select in the Visual Studio folder of the New Project dialog box. Creating one of these projects launches the wizard (see Figure 11).
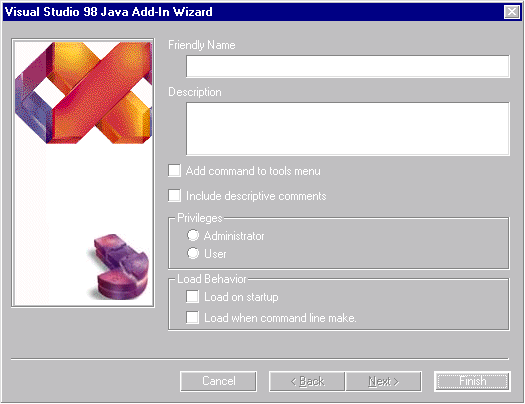
Figure 11: The Add-In Wizard.
The wizard creates a basic add-in that you can run immediately after you finish using the wizard. The wizard lets you supply a display name for the add-in (which appears in the Add-in Manager dialog box) and a description for the add-in. You can optionally choose to have the wizard generate the code to add a command to the Tools menu for invoking the add-in once it is loaded into VJ6. When the wizard is done, you will have a new project with a single item that is similar to the VJSolutionInspector.java file, as shown in Listing One. (It's also available for download; see end of article for details.)
If you don't install VJ6 in the default location, you will need to modify the project settings for the add-in project to correct the pathname for the alternate launch program (devenv.exe). If you launch devenv.exe as the alternate launch program for your add-in project, then the second instance runs in debug mode so you can step through your add-in code in the first IDE instance, and watch the effects of the add-in in the second IDE instance.
Solution Inspector Demo
The following sample (available for download; see end of article for details), creates an add-in that lets you inspect the VJ6 projects in the solution from the project item and class levels to the class members level (as shown in Listings One and Two; Listing Two begins on page XX). When members are selected, the add-in shows their signatures and any JavaDoc comments they might have.
There are two files:
VJSolutionInspector — Add-in class that implements _IDTExtensibility2
SolutionInspectorUI — Form class that implements the graphical user interface
The form class implements four list boxes:
Projects — for the current open projects
Project Items — for the selected project
Classes — for the selected item
Members — for the selected class
Additionally, the following controls are included to complete the form:
Description text box — Displays any comments for the class members.
Refresh button — Searches for any new additions to the project and updates the list boxes.
Done button — Closes the add-in (hides it).
VJSolutionInspector class. This class implements the interface by which the environment connects to the add-in instance, _IDTExtensibility2. This class implements a CommandBarControlEventHandler member class for handling the menu command that invokes the add-in.
The VJSolutionInspector class implements OnConnection by adding a command to the Tools menu for invoking the add-in and instantiating the form class. The OnConnection code contains COM interoperability routines to:
make a command bar control;
find the Tools command bar;
add the control; and
wire up the event to the method of the inner class so this method runs when the user invokes the command.
The OnDisconnection method removes the command from the Tools menu.
A reference to the root of the add-in object model that is used by both VJSolutionInspector and the form class, SolutionInspectorUI, is saved in a public field. A reference to the instance of the SolutionInspectorUI form is saved to allow the Tools menu command handler to manipulate the form.
The COM interoperability code in the VJSolutionInspector class:
casts types;
creates a connection point cookie;
uses the interface name to declare variables that reference objects; and
uses the class name to create objects (using the new statement).
The SolutionInspectorUI form class. Most of the code in the SolutionInspectorUI file is standard user interface code, event handlers for each control, and an initialization method. The initAddin method, after some calls on the GUI objects to clear the display, iterates over all the VJ6 projects in the solution to fill the first list box.
COM interoperability:
Calls the DTE objects method, GetObject, to late bind to IDs. Java doesn't implicitly support late binding the way Visual Basic does.
Explicitly casts to the name of the interface, _VJProjects. VJ6 requires the expression on the right of the assignment to compile-time check with the type of the declared variable on the left. GetObject is declared to return an Object because it cannot know what it might be returning.
Explicitly gets the number of items and creates a for loop. Java doesn't have a For Each construct for iterating standard automation collections as does VB.
Passes a Variant object into the Item method (provided by the COM interoperability library) to access the projects collection. Some functions and some Java types implicitly coerce to the appropriate variant type. However, sometimes you need to explicitly create a Variant object and pack your data into it before passing the data as an argument to a function.
Explicitly calls the properties accessor method, getName, to access properties such as Name.
Event handlers. These are the event handlers:
lstProjects_click
lstItems_click
lstClasses_click
The following code appears in lstItems_click, after the populate lstClasses comment:
IJavaClasses classes =
  ((IJavaCompileUnit)curItem.getCode()).getClasses();
To call getClasses, there must be explicit type information to verify that this call is valid. Everything between the assignment operator (=) and the period before getClasses is grouped in parentheses, thus allowing us to create a scope for the cast operation, (IJavaCompileUnit). Otherwise, you need an extra line of code, and you must create a temporary local variable to hold the intermediate result of the expression.
The interesting code in lstClasses_click is:
getPrototype(JavaPrototypeFlag.JPF_FULLTYPENAMES +
             JavaPrototypeFlag.JPF_PARAMNAMES +
             JavaPrototypeFlag.JPF_TYPE)
The three constants are defined in the type library. In VJ6, the COM wrappers place these constants inside a Java interface definition. The interface name is the same as the enumerator type's name that declares these constants.
The ListerUI_closing event code shows how to capture the window close command for the add-in window and turn it into a hide operation, making the add-in behave like a tool window.
The rest of the code in the file is GUI builder-generated code.
Show Me the Code
VJSolutionInspector — Basic add-in. The code in this file (again, see Listing One), except for about four lines, is the basic code to start writing an add-in that puts a command in the Tools menu.
SolutionInspectorUI — WFC form. This is the same file as the sample code on the Tech-Ed 98 conference CD, but many lines of WFC form-initialization code have been removed (again, see Listing Two). Only the code pertinent to the sample remains.
Conclusion
Visual J++ 6.0 extensibility allows you to increase your productivity and enhance your experience as a developer using the product. You can conveniently customize the user interface, including keyboard bindings, command bars, docked and tab-linked window configurations that you can name and return to at any time, editor indentation style and comment tokens for the Task List, and Toolbox tabs and contents.
You can also easily extend the Add Item and Add Project dialog boxes to access project and item templates, and invoke wizards. You can seamlessly integrate new features with add-ins and wizards that look and behave as if they were shipped with VJ6. There are a variety of ways to customize the development environment to your special needs and work practices.
The files referenced in this article are available for download from the Informant Web site at http://www.informant.com/ji/jinewupl.htm. File name: JI9809BC.ZIP.
Bill Chiles is a program manager on Microsoft's new environment team. In the Visual J++ product, he works on the editor and the add-in object model. Bill has worked on development environments and programming languages, particularly highly customizable tools and editors, since the early 1980s.
Begin Listing One — VJSolutionInspector.java
/// This file implements the COM class that implements the
/// interface by which the development environment connects
/// to add-ins.
import com.ms.com.*;
import com.ms.vstudio6.dte.*;
import com.ms.vstudio6.msaddndr.*;
import com.ms.office97.*;
import com.ms.lang.*;

/**
 * This class defines the Addin object by implementing the
 * interface by which the development environment connects
 * to add-ins.
 *
 * @com.register ( clsid=710B1AE4-9E3A-11D1-883A-
   B07C0CC10000, typelib=710B1AE3-9E3A-11D1-883A-
   B07C0CC10000, progid="VJSolutionInspector.Connect" )
 */
public class VJSolutionInspector
  implements _IDTExtensibility2 {

  // This holds the root of the add-in model. The
  // OnConnection method gets passed the DTE object, and we
  // save a reference in this field. The GUI form class,
  // VJSolutionInspectorUI, references the DTE object also.
  protected static _DTE dteObject;

  // These fields help in wiring up the add-in as a command
  // in the development environment's menus.
  private ConnectionPointCookie connPtCookie;
  private CommandBarControl cmdBarControl;
  private CommandBarControlEventHandler cmdCtlEvtHandler =
    new CommandBarControlEventHandler();

  // This is the form we create in OnConnection, which we
  // need to reference in our command handler whenever the
  // command for the add-in is invoked.
  private SolutionInspectorUI addinUI;

  /** @dll.import("USER32", auto) */
  native public static int MessageBox(int hWnd,
    String lpText, String lpCaption, int uType);

  /**
   * Define a class with a click event handler for our
   * command bar control. If you were to have multiple
   * commands for a single add-in, you would define a
   * member class for each one and duplicate the code in
   * OnConnection for wiring up the command & its handler.
   */
  private class CommandBarControlEventHandler
    implements _dispCommandBarControlEvents {

    public void Click(Object button, boolean[] handled,
      boolean[] cancelDefault) {

      handled[0] = false;
      cancelDefault[0] = false;
      // MessageBox(0, "Handled", "Click", 0);
      addinUI.initAddin();
      addinUI.setVisible(true);
    }
  }  // class CommandBarControlEventHandler

  /**
   * This is the method the development environment invokes
   * after creating the add-in object. The development environment
   * passes in the root of the add-in model, which we bind to
   * dteObject for general reference.
   *
   * Due to the scope of this sample, we ignore the other
   * arguments.
   */
  public void OnConnection (Object VSInst, int ConnectMode,
    Object AddInInst, SafeArray custom) {

    dteObject = (_DTE)VSInst;

    // Bind some variant objects so that we can pass values
    // to COM wrappers.
    Variant varCmdCtlType =
      new Variant(MsoControlType.msoControlButton);
    // ID for command bar control. One is a fine value,
    // doesn't matter.
    Variant varCmdCtlID = new Variant(1);
    // Need dummy value for optional parameters.
    Variant varOptDummy = new Variant(1);
    // Note that the dummy value is a dummy value.
    varOptDummy.putError(0);

    // Set up our command in the Tools menu.
    CommandBar cmdBar = dteObject.getCommandBars().getItem(
      new Variant("Tools"));
    cmdBarControl = cmdBar.getControls().Add(varCmdCtlType,
      varCmdCtlID, varOptDummy, varOptDummy, varOptDummy);
    // Set the command display name for the control.
    cmdBarControl.setCaption("Solution Inspector");
    cmdBarControl.setOnAction("Solution Inspector");

    // Wire the command bar control event source to
    // our handler.
    Variant varCmdBarControl = new Variant(cmdBarControl);
    Events evts = dteObject.getEvents();
    CommandBarEvents cmdBarEvents =
      evts.getCommandBarEvents(cmdBarControl);
    try {
      connPtCookie = new ConnectionPointCookie(
        cmdBarEvents, (_dispCommandBarControlEvents)
        cmdCtlEvtHandler, Class.forName(
      "com/ms/vstudio6/dte/_dispCommandBarControlEvents"));
    }
    catch(ClassNotFoundException cnfe) {
      MessageBox(0, "ClassNotFoundException", "argh", 0);
    }
    catch(Exception e) {
      MessageBox(0, "Exception", "argh", 0);
    }

    // Create UI and party on ...
    // MessageBox(0, "The End.", "foo", 0);
    addinUI = new SolutionInspectorUI();
    addinUI.setVisible(true);
  } // OnConnection

  public void OnStartupComplete(SafeArray custom) {
  }

  public void OnAddInsUpdate(SafeArray custom) {
  }

  public void OnDisconnection(int RemoveMode,
    SafeArray custom) {

    // Need dummy value for optional parameters.
    Variant varOptDummy = new Variant(1);
    // Note that the dummy value is a dummy value.
    varOptDummy.putError(0);
    connPtCookie.disconnect();
    cmdBarControl.Delete(varOptDummy);
  }

  public void OnBeginShutdown(SafeArray custom) {
  }

  // public static void onCOMRegister(boolean unRegister) {
  //  MessageBox(0, "The Reg.", "foo", 0);
  // }
  public static void onCOMRegister (boolean reg) {
    if (reg == true) {  // Register
      try {
        RegKey regKey = new RegKey(RegKey.getRootKey(
          RegKey.USER_ROOT),
          "Software\\Microsoft\\VisualStudio\\6.0\\"+
          "Addins\\VJSolutionInspector.Connect",
          RegKey.KEYOPEN_CREATE);
        regKey.setValue("Description",
          "This is an addin sample that browses the " +
          "solution down to Java file source elements.");
        regKey.setValue("FriendlyName",
          "Solution Inspector Sample Addin (VJ)");
        regKey.setValue("LoadBehavior", 0);
        regKey.close();
      }
      catch (RegKeyException rke) {
      }
    }
    else {  // Unregister
      try {
        RegKey regKey = new RegKey(RegKey.USER_ROOT,
          "Software\\Microsoft\\VisualStudio\\6.0\\Addins",
          RegKey.KEYOPEN_WRITE);
        regKey.deleteSubKey("VJSolutionInspector.Connect");
        regKey.close();
      }
      catch (RegKeyException rke) {
      }
    }
  }
} // class VJSolutionInspector
End Listing One
Begin Listing Two — SolutionInspectorUI.java
/// This file contains the class definition for my GUI
/// form.
import com.ms.com.*;
import com.ms.vstudio6.dte.*;
import com.ms.vstudio6.vjext.*;
import com.ms.wfc.app.*;
import com.ms.wfc.core.*;
import com.ms.wfc.ui.*;

/**
 * This class implements the form for our add-in UI.
 * VJSolutionInspector.OnConnection instantiates this
 * class.
 */
public class SolutionInspectorUI extends Form
{
  // Define some fields to simplify coordination between
  // controls.
  _VJProject curProject;
  _VJProjectItem curItem;
  IJavaClass curClass;

  /**
   * In the constructor, we just initialize the GUI form
   * (code added by GUI builder) and the add-in state
   * (including the first list box).
   */
  public SolutionInspectorUI () {
    // Required for Visual J++ Form Designer support.
    initForm();
    initAddin();
  }

  /**
   * Clear controls and fill list box of VJ projects.
   *
   * Whenever the Addin command is invoked by the developer,
   * the command handler invokes this function. Same for
   * the Refresh button. We should be more clever about
   * preserving as much state as possible between
   * invocations and refreshes, but adding all the code to
   * make the sample "release" quality would obscure the
   * code that is shows the Addin model.
   */
  protected void initAddin () {
    // Ensure a clean slate.
    lstProjects.removeAll();
    lstItems.removeAll();
    lstClasses.removeAll();
    lstMembers.removeAll();
    txtDescription.setText("");
    // Fill in projects list control.
    // TODO: Handle case when no solution is open, or there
    // are no VJ projects.
    _VJProjects vjProjs = (_VJProjects)VJSolutionInspector.
      dteObject.GetObject("VJProjects");
    int numProjs = vjProjs.getCount();
    int i;
    Variant var = new Variant(1);  // Fill in bogus value.
    for (i = 1 ; i <= numProjs; i ++) {
      var.putInt(i);
      _Project proj = vjProjs.Item(var);
      lstProjects.addItem(proj.getName());
    }
  }  // initAddin

  /**
   * The main entry point for the application. Because this
   * form is for an add-in, we do not run this code as a
   * stand-alone app. This main method never executes.
   *
   * @param args Array of parameters passed to the
   * application via the command line.
   */
  public static void main (String args[]) {
    Application.run(new SolutionInspectorUI());
  }

  /**
   * Fill in lstItems and reset lstClasses and lstMembers.
   *
   * TODO: Need to handle DTE.Events.VJProjectsEvents to
   * update lstProjects.
   */
  private void lstProjects_click (Object sender, Event e) {

    _VJProjects vjProjs = (_VJProjects)VJSolutionInspector.
      dteObject.GetObject("VJProjects");

    // Extensibility collections are 1-based.
    Variant var = new Variant(
      lstProjects.getSelectedIndex() + 1);
    curProject = (_VJProject)vjProjs.Item(var);
    _ProjectItems elts = curProject.getProjectItems();

    // Load up the items list box.
    lstItems.removeAll();
    curItem = null;
    int numItems = elts.getCount();
    int i;
    for (i = 1; i <= numItems; i ++) {
      var.putInt(i);
     _ProjectItem item = elts.Item(var);
      lstItems.addItem(item.getName());
    }

    // Clear other controls.
    lstClasses.removeAll();
    curClass = null;
    lstMembers.removeAll();
    txtDescription.setText("");
  } // lstProjects_click.

  /**
   * If a .java file is selected, then populate the
   * lstClasses box.
   */
  private void lstItems_click (Object sender, Event e) {

    _VJProjectItems vjItems = (_VJProjectItems)curProject.
                                getProjectItems();

    // Addin model collections are 1-based.
    Variant var = new Variant(
                    lstItems.getSelectedIndex() + 1);
    _VJProjectItem vjItem =
      (_VJProjectItem)vjItems.Item(var);

    // TODO: ensure item is .java file, and if not,
    // reselect previous item to avoid having to clear
    // lstClasses and lstMembers. For now, assume item is
    // .java file.
    curItem = vjItem;

    // Clean up other UI elements.
    curClass = null;
    lstClasses.removeAll();
    lstMembers.removeAll();
    txtDescription.setText("");

    // Populate lstClasses.
    IJavaClasses classes =
      ((IJavaCompileUnit)curItem.getCode()).getClasses();
    int i;
    int numClasses = classes.getCount();

    // VJ++ Code Model collections are zero-based.
    for (i = 0; i < numClasses; i ++) {
      var.putInt(i);
      IJavaClass clss = classes.Item(var);
      lstClasses.addItem(clss.getName());
    }
  } //lstItems_click

  /**
   * Populate lstMembers list box and add simple
   * description of class to description box.
   */
  private void lstClasses_click (Object sender, Event e) {
    IJavaCompileUnit cu =
      (IJavaCompileUnit)curItem.getCode();
    Variant var =
      new Variant(lstClasses.getSelectedIndex());
    curClass = ((IJavaClasses)cu.getClasses()).Item(var);
    txtDescription.setText(curClass.getPrototype(6));
    lstMembers.removeAll();
    IJavaMembers members =
      curClass.getMembers("", false, null, 0);
    int i;
    int numMembers = members.getCount();

    // VJ++ Code Model collections are zero-based.
    for (i = 0; i < numMembers; i ++) {
      var.putInt(i);
      IJavaMember member = members.Item(var);
      lstMembers.addItem(member.getPrototype(

        JavaPrototypeFlag.JPF_FULLTYPENAMES +
        JavaPrototypeFlag.JPF_PARAMNAMES +
        JavaPrototypeFlag.JPF_TYPE));
    }
  }  // lstClasses_click

  /**
   * Put description of member in description box. Includes
   * Javadoc description (but not entire Javadoc comment)
   * if one is present.
   */
  private void lstMembers_click (Object sender, Event e) {

    Variant var =
      new Variant(lstMembers.getSelectedIndex());
    IJavaMember member = ((IJavaMembers)curClass.
      getMembers("", false, null, 0)).Item(var);
    String description = "";
    if (member.getIsField()) {
      description = member.getName() + " is a field.";
    }
    else if (member.getIsMethod()) {
      description = member.getName() + " is a method.";
    }
    description = description + '\r' + '\n' +
      ((IJavaDocComment)member.getDocComment()).
      getSummary();
    txtDescription.setText(description);
  }  // lstMembers_click

  private void btnDone_click (Object sender, Event e) {
    this.hide();
  }

  private void btnRefresh_click (Object sender, Event e) {
    initAddin();
  }

  /**
   * We hook the close control on the add-in's window, hide
   * the form only, and cancel the command. This makes the
   * add-in like a tool window.
   */
  private void SolutionInspectorUI_closing(Object sender,
    CancelEvent e) {

    e.cancel = true;
    this.hide();
  }

  /**
  * NOTE: The following code is required by the Visual J++
  * form designer. It can be modified using the form
  * editor. Do not modify it using the code editor.
  */
  Container components = new Container();
  Label label1 = new Label();
  ListBox lstProjects = new ListBox();
  Label label2 = new Label();
  ListBox lstClasses = new ListBox();
  Label label3 = new Label();
  ListBox lstItems = new ListBox();
  Label label4 = new Label();
  ListBox lstMembers = new ListBox();
  Label label5 = new Label();
  Edit txtDescription = new Edit();
  Button btnRefresh = new Button();
  Button btnDone = new Button();

  private void initForm() {

    this.setText("Solution Inspector");
    this.setAutoScaleBaseSize(13);
    this.setClientSize(new Point(413, 479));
    this.addOnClosing(new CancelEventHandler(
      this.SolutionInspectorUI_closing));

    label1.setFont(new Font("MS Sans Serif", 18.0f,
      FontSize.POINTS, FontWeight.BOLD,
      false, false, false));
    label1.setLocation(new Point(10, 10));
    label1.setSize(new Point(230, 30));
    label1.setTabIndex(0);
    label1.setText("Solution Inspector");

    lstProjects.setLocation(new Point(10, 90));
    lstProjects.setSize(new Point(180, 134));
    lstProjects.setTabIndex(1);
    lstProjects.setText("");
    lstProjects.setItemHeight(13);
    lstProjects.setUseTabStops(true);
    lstProjects.addOnClick(new EventHandler(
      this.lstProjects_click));

    label2.setLocation(new Point(10, 70));
    label2.setSize(new Point(100, 20));
    label2.setTabIndex(2);
    label2.setText("Projects");

    lstClasses.setLocation(new Point(210, 90));
    lstClasses.setSize(new Point(190, 134));
    lstClasses.setTabIndex(3);
    lstClasses.setText("");
    lstClasses.setItemHeight(13);
    lstClasses.setUseTabStops(true);
    lstClasses.addOnClick(new EventHandler(
      this.lstClasses_click));

    label3.setLocation(new Point(210, 70));
    label3.setSize(new Point(70, 20));
    label3.setTabIndex(4);
    label3.setText("Classes");

    lstItems.setLocation(new Point(10, 270));
    lstItems.setSize(new Point(180, 121));
    lstItems.setTabIndex(5);
    lstItems.setText("");
    lstItems.setItemHeight(13);
    lstItems.setUseTabStops(true);
    lstItems.addOnClick(new EventHandler(
      this.lstItems_click));

    label4.setLocation(new Point(10, 250));
    label4.setSize(new Point(90, 20));
    label4.setTabIndex(6);
    label4.setText("Project items");

    lstMembers.setLocation(new Point(210, 270));
    lstMembers.setSize(new Point(190, 121));
    lstMembers.setTabIndex(7);
    lstMembers.setText("");
    lstMembers.setItemHeight(13);
    lstMembers.setUseTabStops(true);
    lstMembers.addOnClick(new EventHandler(
      this.lstMembers_click));

    label5.setLocation(new Point(210, 250));
    label5.setSize(new Point(80, 20));
    label5.setTabIndex(8);
    label5.setText("Members");

    txtDescription.setLocation(new Point(10, 410));
    txtDescription.setSize(new Point(310, 60));
    txtDescription.setTabIndex(9);
    txtDescription.setText("");
    txtDescription.setAutoSize(false);
    txtDescription.setMultiline(true);
    txtDescription.setReadOnly(true);

    btnRefresh.setLocation(new Point(330, 410));
    btnRefresh.setSize(new Point(70, 20));
    btnRefresh.setTabIndex(10);
    btnRefresh.setText("Refresh");
    btnRefresh.addOnClick(new EventHandler(
      this.btnRefresh_click));

    btnDone.setLocation(new Point(330, 450));
    btnDone.setSize(new Point(70, 20));
    btnDone.setTabIndex(11);
    btnDone.setText("Done");
    btnDone.addOnClick(new EventHandler(
      this.btnDone_click));

    this.setNewControls(new Control[] {
      btnDone, btnRefresh, txtDescription, label5,
      lstMembers, label4, lstItems, label3, lstClasses,
      label2, lstProjects, label1});
  }
  // NOTE: End of form designer support code

  public static class ClassInfo extends Form.ClassInfo {
    // TODO: Add your property and event infos here.
  }
}
End Listing Two
Download source code for this article here.