![]()
 beyond@microsoft.com |
| Ken Spencer |

|
Database Development Tools
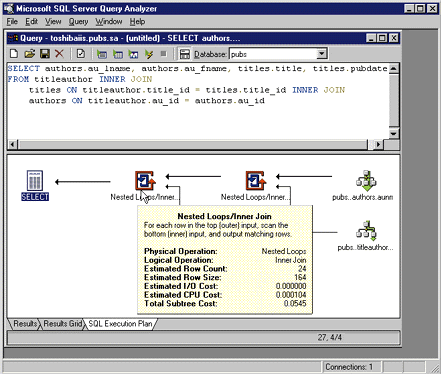
With this new version of SQL Server, the venerable tool known as ISQL/w has become Query Analyzer and can be used to create, execute, and test SQL logic. You will see why Microsoft renamed this tool when you inspect the SQL Execution Plan tab in the Query window. The SQL Execution Plan shows the steps the query goes through and provides information on how much overhead each step generates. The information for each step can be displayed by holding the mouse over the step. The information will be displayed in a dialog box, as shown in Figure 1.
A handy trick for analyzing your queries is to create a query in Visual InterDev, copy the SQL into Query Analyzer, and click the Display SQL Execution Plan icon. Then you can test the query, change it as necessary, and copy it back to Query Designer in Visual InterDev.
There are also underlying changes to the T-SQL language that simplify the process of creating applications. One new feature is called deferred name resolution. This allows you to create stored procedures, triggers, and batches of SQL statements that reference temporary tables. In previous versions of SQL Server this was a real problem because you could not create one of these objects or SQL code without first creating the table. Now you can create and maintain objects and SQL without having the table in place first. The deferred name resolution takes place automatically in T-SQL. For instance, when you create a stored procedure, it is syntax-checked when you save (compile) it, then stored in the database. Database object names (such as tables) are resolved when the stored procedure is executed.
Changes to various data types have been made, addressing more realistic expectations of how data is being used. The data type changes include:
Using SQL Server with Visual InterDev
There are a couple of different ways you can build applications with Visual InterDev 6.0 and SQL Server 7.0. First, you can use the new Data Environment in Visual InterDev 6.0 to connect to the database and link design-time controls to a data command. Second, you can use straight ADO and create a data-driven application just like you would in Visual InterDev 1.0. In fact, the design-time controls for Visual InterDev 1.0 are included with Visual InterDev 6.0. They don’t appear in the default toolbox, but you can, of course, fix this with a few mouse clicks.
Let’s take a look at the Data Environment and how it can be used with SQL Server 7.0. The first thing you need to do to connect a page to a database with the Data Environment is add a data connection. You can do this by right-clicking Global.asa, the project name, or the Data Environment folder (if it exists). This will open the Select Data Source dialog, which is identical to the one from Visual InterDev 1.0. You can choose to create a new data source or select an existing one.
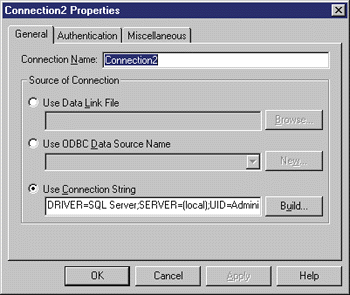
The process of creating a new data connection is the same as it was for SQL Server 6.5. Once you answer the questions and select the data source, you will see the dialog shown in Figure 2.
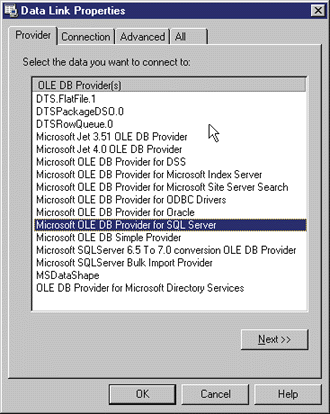
Click the Build button to change the characteristics of the connection. For instance, if you want to change the database provider, you can click Build, then click the Provider tab on the Data Link Properties dialog shown in Figure 3. This lets you explicitly choose which provider is used to connect to SQL Server. Since SQL Server 7.0 uses a native OLE DB provider, it will generally provide the fastest performance.
The next step in using the Data Environment is to add a data command object, which is essentially an ADO data command that lives at the project level under a data connection. You create a data command by right-clicking a data connection and choosing Add Data Command. In the Properties dialog, you then enter the SQL or method to retrieve the data and change the name of the command. Now you have a data command object. To build the query, you can click the SQL Builder button to start Query Designer.
The dialog’s Advanced tab allows you to set cursor parameters, lock type, cache parameters, and other command parameters. These options are generic to all databases, but the database you are using must support the options you select.
Now that you have a command object, lets see how you can use it within an application. Adding Data Environment commands to an ASP page is simple. You can drag a data command and drop it onto the page, then drag the fields from the command and drop them under the data command on the page. These two steps will automatically add a recordset to the page, then add all the fields for the recordset. Figure 4 shows the page after these two actions are completed.
I created the data commands on this page by dragging the Titles data command from the Project Explorer and dropping it on the page. This resulted in the Recordset1 object you see on the page. I then dragged the Title, Type, and Pub_
id fields from Titles in the Project Explorer and dropped them under Recordset1. This resulted in the textboxes in Figure 4. At this point, the page is functional and will display data if viewed in the browser.
This is the high-level approach to building a database application. You can still use ADO directly and script the page just as you would in Visual InterDev 1.0. Although you do get more control over the actions ADO takes by scripting it directly, more effort is required on your part to get it working and to maintain it.
The Data Environment helps with build-ing maintainable applications. When you create a data command object, it can be reused in many different pages. If you need to change a property such as the cursor setting, you need only change it once on the data command object. All the pages that make use of the object will reflect the change because they don’t have hardcoded SQL and parameters in the page. This makes for a much more efficient application.
Visual Basic 6.0 also uses the Data Environment. This makes it easy to build Internet or intranet applications that use the Data Environment and combine Visual Inter-Dev 6.0-based applications and Visual Basic 6.0-based components. The inclusion of the Data Environment in both development tools means you don’t have to relearn interfaces when develop-ing cross-language applications.
You can also create stored procedures with Visual InterDev 6.0, then use them in ASP applications. To create a stored procedure, right-click the Stored Procedures folder
in Data View, then change the stored procedure skeleton as you want. Next, save the resulting code and Visual InterDev will create the stored procedure for you. You should now see the stored procedure name in Data View under the Stored Procedures folder.
Now you can create a data command object just as I showed you earlier. Instead of using SQL, select Stored Procedure in the Database Object list and select the stored procedure you want to use in the Object Name list. Now your data command object is linked to the stored procedure instead of the SQL. If you have any pages based on that command object, they will now automatically use the stored procedure. You don’t need to change anything else as long as the stored procedure returns the same fields as the SQL.
The Data Environment and the design-time controls used in this discussion are based on the Visual InterDev 6.0 scripting object model. This is a new object model that resides on the server and is implemented by either a JScript® runtime library or COM objects on the server. Microsoft intends to provide both versions of the server runtime and will let you choose which one to use for an application.
When you add a design-time control or a data command object to a Web page, Visual InterDev 6.0 will remind you that you must enable the scripting object model on the page to use the control. You can answer Yes to this prompt and Visual InterDev 6.0 will add it for you. You can also add it yourself by right-clicking the page, choosing Properties, and checking the "Enable scripting object model" checkbox. This will insert the script code to install the object model.
Using English Queries
One thing that intrigued me about SQL Server 7.0 was the new Microsoft English Query tool. Microsoft English Query lets you create an application that allows users to enter simple questions rather than complex SQL. For example, users can enter question like "How many books did Ken Spencer write?" and retrieve meaningful results. This query is fed to the English Query runtime component, which takes the statement and translates it into SQL. But making this work requires some fiddling at the database level and with English Query.
English Query works off of a database schema. This means your database must be built with a logical structure. The English Query design tool will read the schema directly from the database. Before you can use English Query, you must create a domain that maps various entities and relationships to the underlying database structure. If you have ever worked with an entity relationship diagram, you will be familiar with the approach you must use with the English Query tool. If not, English Query includes an excellent tutorial that will walk you through the process of creating the application. There is a sample ASP application in the Samples\ASP2 directory that demonstrates how to use Microsoft English Query applications with ASP.
You must use care when building an English Query-based application. Your biggest challenge will be determining what types of questions users will ask, then mapping these to the underlying database structure.
For a sample query, I used the Pubs database that ships with
SQL Server. To create my English Query-based application, I started the English Query design tool from Start | Programs | Microsoft English Query. Next, I started a new application by selecting File | New. In the New Application dialog, I clicked the "Structure loaded from database" option before clicking OK. This displayed the Select Data-source dialog, from which I selected the Pubs datasource that I
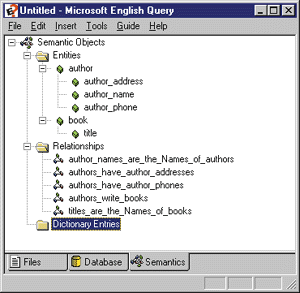
had already created. This action loaded the structure of the database as shown in Figure 5. From this point, you can build the English Query structure, test the application, and generate the English Query part of the application.
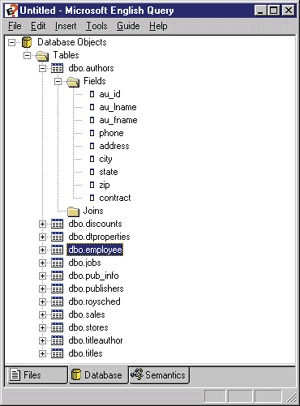
Notice the author and book entities in Figure 6. Both of these are major entities that map directly to an entire table: author maps to the Authors table, and book maps to the Titles table. You create a
mapping by selecting Insert | Entity, which displays the Entity property page. Figure 7 shows the completed property page for book. You can see from the Words/phrases box in the dialog that users can refer to books by book, publication, tome, work, and manuscript. You can use these entities to answer general questions such as "List all the books" or "List all the authors."
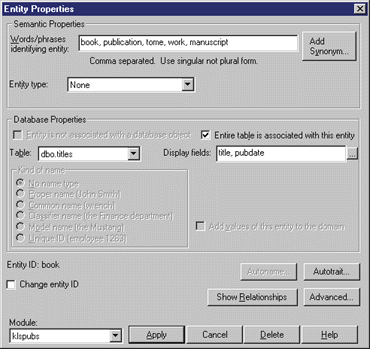
Figure 8 shows the properties for the title entity (shown under the book entity in Figure 6). The title entity is a minor entity and is mapped to a field in the Titles table. Notice that I also selected Proper name as the Kind of name. The Kind of name options control the formatting of the data as it is returned by queries and as it is used in queries.
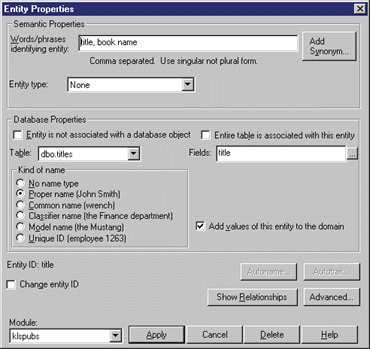
You can also see from Figure 8 that I specified relationships
between the entities. The relationships describe how to answer various questions. Microsoft English Query can combine relationships to answer questions at runtime.
You create a relationship in a manner similar to creating an
entity by selecting Insert | Relationship. This will display the relation-ship properties. First, add the two entities: book and title. Then click the Phrasings tab and click the Add button. Next, double-click Name/ID Phrasing to display the Name/ID Phrasing dialog.
At this point, I have defined the
relationship between books and titles. Defining phrases tells English Query how to answer the questions.
Now you can test the query. Select Test Application from the Tools menu. Enter a sample question such as "List the books." The generated SQL and the results of the query will be shown when you submit the query.
The last step in creating the application is to build it. This step is also performed in English Query. Select Build Application from the Tools menu. This will generate
the .eqd file that is used by the run-time engine.
Management Tasks
SQL Server 7.0 provides tools for creating databases, tables, triggers, and other related database items and for developing SQL logic. For users of previous versions of SQL Server, these tools will look somewhat different. If you’re using Visual InterDev, you’ll feel right at home, as SQL Server now includes the Visual Database Tools that were introduced with Visual InterDev 1.0. These tools are now integrated into the SQL Server management tools, making it easier to create new databases and database objects (such as tables, stored procedures, and triggers), and to make changes to database objects.
For instance, when you create a new table in SQL Server Enterprise Manager, you are actually using the Visual Database Tools Table Designer. The Table Designer allows you to change table definitions after the table is loaded with data. You will also notice that that Query Designer is used to open tables in Enterprise Manager. The Query Designer toolbar is contained at the top of the window and can be used to display the other design panes.
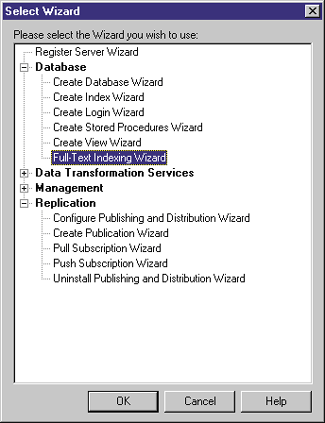 |
| Figure 9: Wizard Selection |
|
You can add tables to Query Designer by clicking the Add Table icon on the toolbar. After clicking this button, you will be presented with a list of tables. After you add a view by clicking the View tab to display the views in the database, you can select a view and add it to the query. You can change query types, execute queries, and do most of the other actions normally available in Query Designer. SQL Server 7.0 also includes a set of wizards that simplify many different tasks (see Figure 9). You can display the list of wizards in Enterprise Manager from the Tools menu. The various wizards will walk you through many tasks that were time-consuming and tedious in previous versions of SQL Server. Figure 10 shows the new Current Activity dialog, which can be displayed from the Tools menu. As you might expect from its name, this window shows the current activity on SQL Server. The highlighted line is for a developer testing an application against SQL Server 7.0. The Kill Process button allows you to terminate a user process, while the Send Message button lets you send a message to the user or system that is running the process. These buttons work for all three tabs in the dialog, providing a fast way to see what is happening on a server and to take action if necessary. The Detail Activity tab displays detailed information on the current acti-vity, including Login ID, Process ID, Status, Database, Command (you will see the actual SQL Server command name or the SQL command that is executing), and Host (either the server or workstation name). |
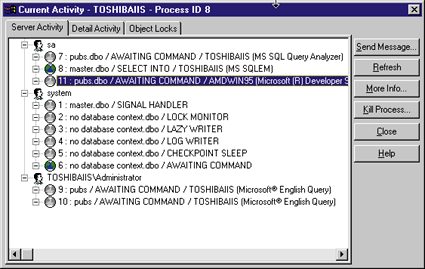 |
| Figure 10: Current Activity Dialog |
Another Visual Data Tool feature included in SQL Server 7.0 is the Database Diagram view. You can access this feature by right-clicking the Database Diagram folder for a database, then selecting New Database Diagram from the context menu. This will start the Create Diagram wizard to walk you through the process of creating the diagram. Create Diagram first presents you with a list of tables to add to the diagram. When you select a table, the related tables will also be added. For instance, I selected the Titles table and the Titleauthor table was added for me automatically . You can control the level of related tables that are added by incrementing or decrementing the number in the "How many levels of related tables" field at the bottom of the page. The default is 1. The last two steps of the wizard allow you to choose how the tables are arranged and to review your choices before the diagram is created. Using the Database Diagrams view with Enterprise Manager is helpful. You can create the diagrams in either Enterprise Manager or Visual InterDev and use them from either tool. This allows you to easily share information among developers and database administrators. You can also use the other Database Diagram features to create new tables, change relationships between existing tables, and working with tables in Enterprise Manager, a real time-saver.
Conclusion
|
From the October 1998 issue of Microsoft Interactive Developer.