![]()
|
This article may contain URLs that were valid when originally published, but now link to sites or pages that no longer exist. To maintain the flow of the article, we've left these URLs in the text, but disabled the links.
|
 beyond@microsoft.com |
| Ken Spencer |

|
Using PageObject with Design-Time Controls
It will often be necessary to initialize a design-time control in some way when a user first visits a page. Let's create a simple page that uses a Listbox design-time control to allow a user to select a record from a recordset.
To start the sample, add a data connection to any ODBC database. (I used the Pubs database shipped with SQL Server™ for all samples in this column.) Next, create a new ASP file, then drag a Recordset design-time control from the Toolbox onto the page in the body section, just after the <BODY> tag. Answer Yes when you're asked if you want to enable the scripting object model.
Next, open the properties for the Recordset design-time control. Name the recordset, then click the "SQL statement" radio button. Enter a SQL statement to extract all the records from a table. I used the following statement for this sample:
select * from authors
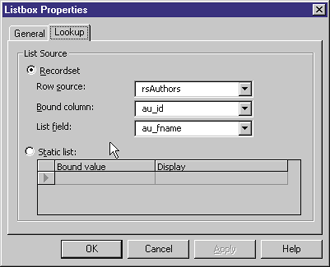 |
| Figure: Sample Listbox Properties |
Now let's add some code for the onchange event. First,
display the Script Outline by clicking the tab under the Toolbox or by pressing Ctrl+Alt+S. You can also display the Script Outline from the View menu or with the shortcut
icon on the standard toolbar. Expand the Server Objects & Events folder, then expand Listbox1. Double-click the onchange event to insert an event shell in the page, then
add this line of code:
The completed page is shown in the source editor in Figure 2. Now, let's view the page in the browser (as shown in Figure 3). This page looks normal, right? But when you try to select the first entry in the list when the page opens, nothing happens. Selecting any other entry in the list, then selecting the first entry again makes both work. What's going on? |
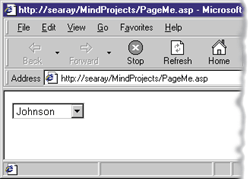 |
| Figure 3: PageMe |
|
When the page first displays, the first entry in the recordset is shown in the list. When the user selects this entry, there is no change in the value of the list, so the onchange event does not fire. Selecting any other list entry works because it is not the same as the current contents.
So how do you fix this? One way is to add a blank entry as the first item in the list. You can do this by using this code: Now what? The PageObject control has a set of useful server events and properties. These server events are available when PageObject is using the server design-time control scripting platform. When you add the PageObject design-time control to a page, the thisPage Object shows up in the Script Outline. One of the events provided by PageObject is onenter, which fires each time a page is executed. It fires whether a user explicitly navigates to the page or the page executes as a result of a user event such as a user selecting an item from a list. Onenter is a handy place to put code that you want to execute each time a page is executed. In this example, I'll use it to perform some action on the listbox each time the page executes. PageObject also provides the firstEntered property. This property returns true when a user navigates to a page for the first time, then false when the page is executed for that user again. Coupling this property with the onenter event allows you to place code in a page that executes either on the first access or subsequent accesses by a user. Let's add this code to the page and see what happens. First, drag the PageObject design-time control from the Toolbox and drop it on the page just after the listbox. Next, display the Script Outline again. Expand the Server Objects & Events, then expand thisPage. Double-click the onenter event and the event code will be added to your page. Next, move the line you entered before inside this event code and add an if statement around it. The resulting code should look like this: There is one other server event you can use with PageObject: the onexit event executes when the page completes processing. This allows you to group statements that should execute when the page processing is complete. If you have told Visual InterDev to implement the scripting platform as Client (under Microsoft Internet Explorer 4.0), the onbeforeserver event fires before any code is sent to the server. I will discuss client design-time control implementations in more detail in a future column.
Using PageObject Properties and Methods
|
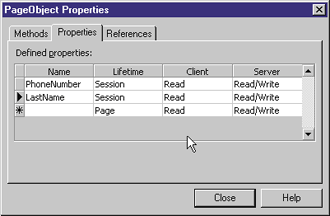 |
| Figure 4: PageObject Properties |
|
Now, what can you do with
the properties? When you create
a property for the PageObject,
two methods are created for the PageObject and the property. Getxxx retrieves the value of propertyxxx and setxxx sets the value of propertyxxx. Whenever you need to access a property, you must use these
methods to set data to or retrieve
data from the property. To illustrate this, let's look at how to use these
two methods.
|
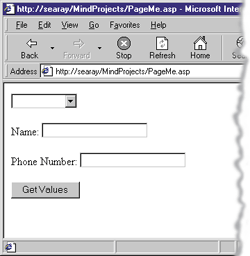 |
| Figure 5: Using the Get and Set Methods |
|
I added two design-time control textboxes and a design-time control button to the sample page. The results are shown in the browser in Figure 5. To add these functions to your page, add a two-row, two-column HTML table to hold the textboxes. Then drop a Textbox design-time control into the second column in each row. Next, drag a Button design-time control onto the page after the end of the table. I named the button cmdGetValue.
Open the page in source view. Modify the Listbox1_onchange code used earlier to look like this: Notice the syntax used for both lines. The setxxx and getxxx members are methods, not properties. You must pass the value to the setxxx method as a parameter; don't assign it like a variable. For instance, if you use this syntax Next, open the Script Outline, expand Server Objects & Events, then expand the design-time control button. Double-click the button's onclick event to add the event to your page. Now, add this code to the onclick event: How does this relate to exposing properties across pages? Using this example, let's access these properties from another page. First, create a new ASP file. Copy the table containing the textboxes and the design-time control button from the previous example and paste them into the new page. Then add a PageObject control to the page. At this point, the new page should look exactly like the first page, except for the listbox. Open the properties for the PageObject design-time control, then click the References tab. Click the ellipsis and find the PageMe.asp file from the last example. Select this page and click OK. The property page should now look like the one in Figure 6. That's all you need to do to create the reference to the other page. |
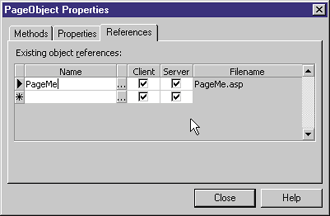 |
| Figure 6: PageMe Properties |
Next, open the Script Outline for the new page, expand Server Objects & Events, then expand the entry for the design-time control button. Double-click the button's onclick event to add the event to your page. Add this code to the onclick event:
Conclusion
|