February 1998
![]()

Download CFeb98.exe (24KB)
|
Paul DiLascia is the author of Windows ++: Writing Reusable Code in C++ (Addison-Wesley, 1992) and a freelance consultant and
writer-at-large. He can be reached at askpd@pobox.com
or http://pobox.com/~askpd.
|
Q I want to use the CS_OWNDC window class style to force each of my windows to have its own device context (DC). In the old version of my code, I used to get the name of the MFC view class:
David S. Calkins
Drexel University, USA A _afxWndFrameOrView is an MFC-private symbol that MFC uses as the class name for views (the frame has a different name, but that's another story). Since _afxWndFrameOrView is defined as an extern, you can look at it if you code an extern declaration as above—but only if you link with the static MFC library. If you link with the MFC shared DLL, _afxWndFrameOrView is undefined because it isn't exported. So how do you get the class name? And, in general, how do you create a window class that's exactly like one of the MFC default classes, but with one or two modifications? |
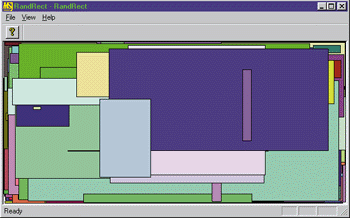 |
| Figure 1 RandRect Window |
|
|
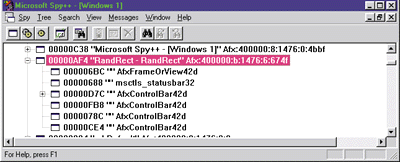 |
| Figure 3 Before |
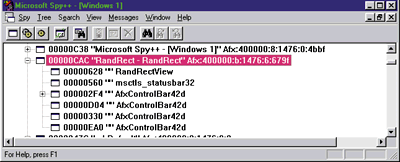 |
| Figure 4 After |
|
So, how does RandRect do this? It all happens in CMyView::PreCreateWindow (see Figure 5). The basic strategy is as follows: first call the base class CView::PreCreateWindow to let MFC register whatever window class it wants to register, then look at cs.lpszClass to find out what the name is. Why do this in PreCreateWindow instead of in your app's InitInstance function? Because MFC doesn't register its standard view class until your app actually needs it—that is, until your app actually creates a view. So CMyView::PreCreateWindow calls CView::PreCreateWindow to let MFC register the view class and set up the CREATESTRUCT with lpszClass pointing to the name of the view class, which in this case happens to be AfxFrameOrView42d. Once you have the class name, you can pass it to GetClassInfoEx to get the window class information in a WNDCLASSEX structure. (Pretty soon every function in Windows® will end with Ex, and then we'll have GetMumbleExEx.) Once you have the WNDCLASS—pardon me, I mean WNDCLASSEX—info, you can modify whatever fields you want. For example, you can OR the style with CS_OWNDC and register a new class using the modified WNDCLASSEX information. Don't forget to give your class a different name! And, of course, you must also set the new name in the PreCreateWindow function's CREATESTRUCT parameter. You only need to register the window class once, but you must set cs.lpszClass every time MFC calls your PreCreateWindow function. That's all there is to it. This technique works with views or frames or any other kind of window MFC creates, and it doesn't depend on knowing any undocumented (and unreliable) variables like _afxWndFrameOrView. Use it any time you want to change the default styles in an MFC pre-registered window class, or any other window class attribute such as the background brush or cursor. Keep in mind that when you change the class style, you do so for all instances of windows of that class within your app. Figure 6 shows the window class styles MFC uses for its built-in window classes. As for CS_OWNDC, you've raised an excellent point that deserves further elaboration. Windows provides three kinds of DCs for video displays: class, common, and private. Class DCs are a backwards-compatibility thing that's gone the way of the dodo, provided in Win32® for backward compatibility only; don't use it. That leaves private and common DCs. Common DCs are the run-of-the-mill DCs you get if you don't do anything special. Whenever you call GetDC or BeginPaint, Windows grabs a DC from a special cache and initializes it with default objects (black pen, background color brush, system font, and so on) and attributes such as mapping mode = MM_TEXT. Your app then selects its own pen, brush, font, and attributes before drawing on the DC. When you're done using the DC, you must deselect all your objects. How many times have you seen code like this? |
|
| Then, when you're done using the DC, you must call ReleaseDC or EndPaint. Typically, the whole sequence happens every time you process a WM_PAINT message. In MFC, the BeginPaint/EndPaint sequence is hidden inside the view's OnPaint handler: |
|
|
The CPaintDC constructor calls BeginPaint; its destructor calls EndPaint. Likewise, the constructor for CClientDC calls GetDC, and the destructor calls ReleaseDC. So even though you may never code BeginPaint/EndPaint or GetDC/ReleaseDC in an MFC app, these functions get called every time you handle a paint message or use a CClientDC. What does this have to do with common versus private DCs? In the normal case (a common DC), Windows must grab the DC from its cache and initialize it with drawing objects and attributes every time your app requests the DC by calling GetDC or BeginPaint. This takes CPU cycles. On top of that, your app may then call a gajillion functions to create and select the pens, brushes, and fonts, select them into the DC, set up the mapping mode, and so on—all of which takes even more CPU cycles on every paint message. As an alternative, you can tell Windows to use a private DC, which you do by specifying the CS_OWNDC class style. With a private DC, Windows doesn't initialize the DC every time you call GetDC or BeginPaint (though you must still call these functions, as well as ReleaseDC or EndPaint). Instead, Windows allocates a private DC for every instance of your window class and keeps it around for the lifetime of the window. Since the DC remembers its state, you don't have to set it up from scratch every time you get a paint message. If you select a red brush, it will remain selected until you either select a different brush or destroy the window. The performance benefits are obvious. A private DC can boost speed considerably for graphics-intensive apps like CAD and desktop publishing. Such apps typically have a current pen, brush, font, mapping mode, foreground/background color, and so on. If you use a common DC, you have to select these objects with every paint message; with a private DC, you need to select them only once to start, and then again whenever the user chooses a new pen or color. If private DCs are so good, why not use them all the time? In the old 16-bit days, DCs were a scarce resource. You had to be careful about using a private DC because if too many apps did, Windows could run out of DCs. That's because in Windows 3.1, all USER and GDI objects come from 64KB LocalAlloc-style heaps with 16-bit offsets into the heap. But Windows 3.1 is a thing of the past. What about Win32? The answer depends on what Win32 platform you're talking about—Windows 95 or Windows NT®. Here's what the official Platform SDK documentation says about private DCs in Windows NT: "If you were programming for 16-bit Windows, you were told to avoid the use of your own DCs because the system could only support a few. This is not true on Windows NT. Use the creation style CS_OWNDC as much as you can when you call the RegisterClass function. This avoids repeated calling of the relatively expensive GetDC and ReleaseDC functions every time you have to draw. It also preserves the selected objects in your own DC in between calls, eliminating the need to select them again after each call to GetDC." Since Windows NT is a true 32-bit operating system with a flat memory model and gobs of memory, you can use CS_OWNDC to your heart's content. But what about Windows 95? There, the situation is a little more tricky. Windows 95 is a strange beast—a 16/32-bit hybrid operating system that's a big improvement over Windows 3.1, but still unfortunately rooted in 16-bit land. The Windows 95 USER and GDI modules that manage user interface and graphics objects each maintain two heaps: a Windows 3.1 old-style 64KB local heap, and a new-for-Windows 95 2MB 32-bit heap. In order to provide more system resources, Windows 95 allocates frequently needed system objects like windows and fonts from the 32-bit heaps, so it can run many more windows than Windows 3.1. But in the interest of maximizing backward compatibility, the Windows 95 designers chose to leave as much code as possible unchanged from Windows 3.1. So Windows 95 still allocates other objects—like DCs—from the old 64KB local heap. A full discussion of this topic is beyond the scope of this column; if you want to learn more, I suggest you read Chapter 4 of Matt Pietrek's excellent book, Windows 95 System Programming Secrets (IDG Books, 1995). The main point as far as private DCs are concerned is: in Windows 95, DCs are allocated from GDI's local heap, so you shouldn't use CS_OWNDC indiscriminately in Windows 95 the way you can in Windows NT. That said, Windows 95 is still much better than Windows 3.1 because many other GDI objects such as pens, brushes, and fonts are offloaded from the local heap to the 32-bit one, leaving more room for things like DCs. The natural question is: when should you use CS_OWNDC in Windows 95? I can't give you a hard-and-fast rule; it's a matter of judgment. My advice is if your OnDraw function makes a lot of calls to set up its DC, try compiling your app with CS_OWNDC. If performance is noticeably faster with CS_OWNDC, then go ahead and use it; if you don't notice much difference, as is certainly the case with a program like RandRect, then stick with the vanilla-style common DC. If you decide to use a private DC in Windows 95, it's a good idea to stress test your app in situations with many other applications running at the same time. You might even consider making CS_OWNDC a user-customizable option with a friendly name like "Boost graphics performance," and a help tip explaining that checking this option will make the program faster but will consume more resources. If your app targets both Windows 95 and Windows NT, you can detect which platform you're on and automatically use CS_OWNDC on Windows NT. To find out what platform you're running on, call GetVersionEx. |
|
|
Once you have globals like bWinNT and bWin95, you can use them wherever you want to perform Windows NT and Windows 95-specific operations.
Q I want to use the standard animated controls like those in the Windows Explorer when copying or moving a file with drag and drop. These are the animations that show a file floating from one folder to another. Is there some place I can find this information, or do I have to make my own animations? Didier Fillettaz
Geneva, Switzerland A The short answer to your question is: if you have Visual Studio™ 97, the files are on the Visual Basic® CD (Disc 1), in the directory \VB5.0\VB\ GRAPHICS\AVIS. This directory contains several useful AVI (Audio/Video Interleave) files; the standard ones used in Windows Explorer are shown in Figure 7.
I began by looking for the AVI files. An AVI file is essentially a sequence of bitmaps interleaved with sound to create a movie. AVI is the Windows equivalent of QuickTime files used on the Macintosh. Animation controls work by playing an AVI file. These controls only play silent films; if you give an animation control an AVI file that contains audio, the control ignores the audio portion. In any case, the first thing to do to find the copy/move animations is to find the AVI files, which I knew had to be stored as resources in some system EXE or DLL. In theory, they might live in the Windows directory or perhaps Windows\Media, with nice names like filecopy.avi or filemove.avi—but I knew that would be too easy. My favorite tool for finding resources inside EXEs and DLLs is Microsoft Developer Studio™. Developer Studio allows you to open any EXE or DLL and see the resources inside. (If you're using Visual C++® 5.0, make sure you select Open as Resources in the File Open Dialog.) You can't modify the resources or extract them to files, but you can at least see which executables contain which resources, and you can copy or paste them to your app. Figure 8 shows explorer.exe open in Developer Studio, which is the first place I looked. You can see several resources—bitmaps, dialogs, icons, and so on—but no AVI files. |
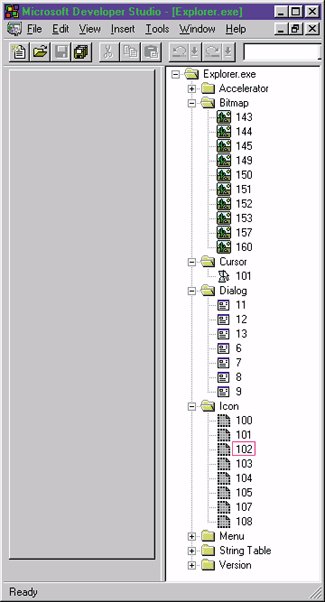 |
| Figure 8 Explorer.exe in Developer Studio |
|
A little further poking and I found some AVI files in shell32.dll (see Figure 9). Notice the "AVI" resource type. It makes sense that the animations would be in shell32.dll since that module provides shell support for Windows 95. I still wasn't certain these were the correct AVI files for file copy, move, and so on, but I had a pretty good hunch. So the next step was to actually play the AVI files. I considered various ways of doing it; one way would be to use FindResource/LoadResource to load the AVI resources directly from shell32.dll and save them to disk, or even play them directly in an animation control. But animation controls can only play a file given a file name or resource ID in the currently running module. There's no way to play an AVI resource in another module because the animation control assumes the HINSTANCE is the instance handle of the currently running app. |
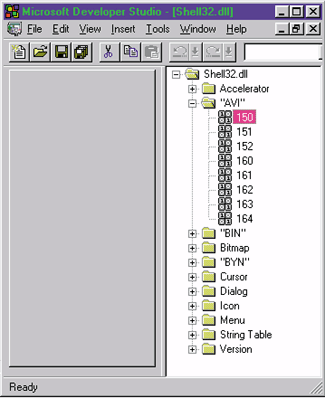 |
| Figure 9 AVI files in Shell32.dll |
|
So instead, I wrote a program to extract the AVI files from shell32.dll. Writing such a program is easier than it seems at first because the format of an AVI file is particularly distinctive. AVI files use the RIFF (Resource Interchange File Format) format, which is comprised of a nested hierarchy of tagged blocks or "chunks" (see Figure 10). Each chunk begins with an eight-byte header comprising a four-byte ASCII type ID followed by a four-byte DWORD size that tells the length of the chunk data. The data itself follows the header and is chunk-specific. Different kinds of chunks contain different information, but all chunks have the same eight-byte header: ASCII chunk ID followed by data size. This makes it easy for an application to parse the chunks without knowing what they contain. |
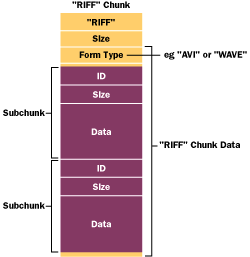 |
| Figure 10 RIFF Hierarchy |
|
The first chunk in a RIFF file is always the RIFF chunk, which begins with the type ID RIFF. Every AVI and WAVE file begins with the characters RIFF. Then comes the size of the data which, since the RIFF chunk is the top-level chunk, is the length of the entire file minus eight bytes for the chunk header. For a RIFF chunk, the first data item is another four-byte ASCII ID called the form type that identifies the kind of RIFF file. For AVI files it's "AVI "; for WAVE files it's "WAVE". The rest of the data is a list of subchunks of various types specific to whatever kind of RIFF file is used. For example, there are LIST chunks that contain lists of other chunks, and vidc chunks for a piece of video, and audc chunks for audio data. Once you know the RIFF format, it's easy to write a program that looks for RIFF files embedded in another file. Just scan the file for the pattern "RIFF". When you find it, look at the next four bytes as the size of a data block, and the next four bytes after that as the type of file, AVI or WAVE. In other words, scan the file for the sequence "RIFFbbbbAVI" or "RIFFbbbbWAVE", where b is any byte. If you find this sequence, chances are you've found an AVI or WAVE file, though of course it could be something else, such as this very article, which contains the text RIFFbbbbWAVE, or part of an executable program that has some static data: |
|
| However, the chances of that are small—and so what if you extract a file that's not really an AVI file? All I'm trying to do here is build a primitive spelunking tool. FindRiff (Figure 11) is the result. All you have to do is invoke it from a DOS box with the names of the files you want to search. For example: |
|
| or |
|
| In the latter case, FindRiff will display the following output: |
|
|
FindRiff extracts each AVI file and writes it to the current directory using the FILExxxx.AVI names. If you examine these files, you'll find they are in fact the same eight AVI files listed in Figure 7. Amazing! FindRiff uses the appropriate filename extension .AVI or .WAV depending on the type of file it finds, so you can use FindRiff to find sound as well as video. You can easily modify FindRiff to search for other kinds of RIFF files as well, but for Windows apps, AVI and WAV are the most common. If you want to find every AVI and WAV file in all the windows system EXEs and DLLs, you can even type: |
|
|
Just make sure you type this command from a temp directory to avoid cluttering Windows\System. I didn't bother to put in any checks for overwriting files; FindRiff simply overwrites old FILExxxx.AVI or .WAV files. If you decide to go spelunking for sound and video, be warned: just because you can extract a clip from a DLL or EXE doesn't mean you're free to use it! You're welcome to use the Microsoft files in Figure 7 in your own apps, but you really should get permission before using proprietary animations, especially if it's something clever or arty. When in doubt, get permission before you use! Have a question about programming in C or C++? Send it to askpd@pobox.com |
From the February 1998 issue of Microsoft Systems Journal.