This article may contain URLs that were valid when originally published, but now link to sites or pages that no longer exist. To maintain the flow of the article, we've left these URLs in the text, but disabled the links.

The Windows 98 Shell
often take a walk through the bytes of some system DLLs to search for a needle in a haystack: undocumented but potentially useful functions. My primary goal is not gathering material for a new edition of Undocumented Windows, but rather pure amusement. Sometimes, however, I get lucky, like when I uncovered the semidocumented SHFormatDrive function for formatting drives. By the way, it's the same code used by Windows® Explorer, and you can find more information about it on MSDN™ in Knowledge Base article Q173688.
Another interesting—and more recent—discovery are the new scriptable shell objects that Microsoft Internet Explorer 4.0 and Windows 98 bring to your desktop. In a nutshell, you have a few new objects for easily accessing all the features of the Windows shell. Such functionality, available through COM interfaces, is documented in the latest versions of the Internet Client SDK (now part of Site Builder) and MSDN.
In this column, I'll show you how to take advantage of scriptable shell objects and how to go beyond the available documentation. I'll focus on the Shell and Folder objects. My sample code is mostly written in Visual Basic®, with a smattering of C++. It demonstrates a COM-based component (also known as an ActiveX® control) that realizes a customized directory list with two noteworthy features: it utilizes a tree view control instead of traditional list views, and it lets you filter the various items added, giving your users access only to certain zones of the disk. Judging from the amount of email I receive, these features seem to be a hot topic.
Scriptable Shell Objects
The copy of shdocvw.dll that shipped with the final release of Internet Explorer 4.0 contains several new and long-awaited automation servers. While working on an Internet Explorer 4.0-related project, I stumbled upon this development. I didn't know much about browser helper objects, so I suspected that snooping around the internals of the library might help. (For more information on this topic, see Scott Roberts's article, "Controlling Internet Explorer 4.0 with Browser Helper Objects," MIND, May 1998.) Armed with the Visual Basic 5.0 Object Browser (see Figure 1), I started digging out the details of shdocvw.dll. The presence of Shell, Folder, and FolderItem objects, stimulated my curiosity. Needless to say, my original aim was immediately superseded by another: how does shdocvw.dll work and how can I use these interfaces? At the time, I was unable to find any documentation, so the only way to learn more was to compose some test code. I tried the following syntax directly from a Visual Basic form:
 Dim o As New Shell
 o.FileRun
 Set o = Nothing
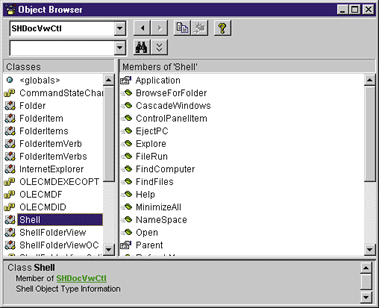
| Figure 1: Visual Basic 5.0 Object Browser |
The result of implementing this code is shown in Figure 2. As expected, the system's Run dialog box appears in its usual position just above the taskbar with its expected settings. Selecting Run from the Start menu doesn't provide any new surprises either. Even the behavior of the FindFiles and FindComputer methods are predictable. In other words, the Shell object represents the Windows shell: by using the Shell object you can access and programmatically reproduce all the features and the functions of the system shell.
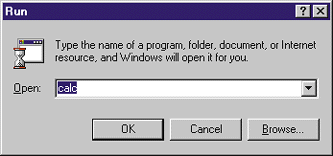
| Figure 2: Run Dialog |
Scriptable Shells and C++
In Visual Basic, a scant three lines of code solved the problem of calling a system dialog. How can you get the same result with C++? Things are a bit more complicated, but
far from impossible. The latest Internet Client SDK (available at the Site Builder Web site) comes with an updated header file called exdisp.h. This file should already be present in your Win32® compiler's include directory. This is certainly true if you installed Microsoft® Visual Studio™ 97. The correct version of exdisp.h is dated Fall 1997 or later. Exdisp.h is important because it defines all the COM interfaces needed to call the Shell object from a C++ program.
The following code represents a typical heading for a C++ application that wants to make use of exdisp.h:
 #define INC_OLE2
 #define WIN32_LEAN_AND_MEAN
 #define STRICT
 #include <windows.h>
 #include <exdisp.h>
Make sure that you don't have multiple copies of exdisp.h in different directories—you have to include a recent version. Once you add the above code and initialize the COM libraries through CoInitialize, you're ready to create instances of the Shell object. The mnemonic constant that identifies the CLSID is CLSID_Shell, while IID_IShellDispatch is the interface ID.
All the methods and the properties of the Shell object are exposed through the IShellDispatch COM interface. Here's the C++ code necessary to get the same result as the three-line Visual Basic code shown previously:
 VOID RunPrograms( VOID )
 {
     HRESULT rc;
     IShellDispatch *pShellDisp = NULL;

     CoInitialize( NULL );
     rc = CoCreateInstance( CLSID_Shell, NULL, CLSCTX_SERVER,
                       IID_IShellDispatch, (LPVOID *) &pShellDisp );
     if( FAILED(rc) )
         return;

     pShellDisp->FileRun();
     pShellDisp->Release();
     CoUninitialize();

     return;
 }
|
|
Figure 3 illustrates a demo program that works as a shell console and lets you run programs, find files, and even clear and restore the desktop windows. The entire program is written in C++ and its full source code is available at the link at the beginning of this article.
|
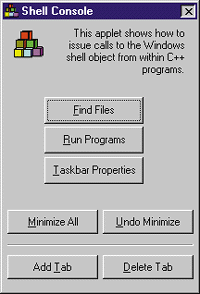
| Figure 3: Shell Console |
What the Shell Can Do for You
So far I've presented some highlights from the Windows 98 Shell object. Now I'll take a more general look at it. First, the Shell component is registered with a ProgID of Shell.Application. This means that the following code snippet works fine:
 Dim o As Object
 Set o = CreateObject( "Shell.Application" )
 o.FileRun
 Set o = Nothing
Regular MIND readers may remember that similar code appeared in my June 1998 column when I covered the Windows Scripting Host object model.
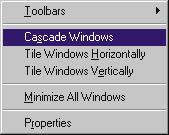 |
| Figure 4: Popup Menu |
Figure 4 shows the popup menu that appears when you right-click on the taskbar. Apart from the Toolbar items, all the remaining selections have a corresponding method in the Shell object. For now, let's concentrate on the basic dialogs. Later, I'll attack some more advanced topics, including how to customize the system taskbar.
For a quick but complete understanding of what the Shell object can do for you, take a look at Figure 5 where I've summarized the methods the components expose and their specific syntax. The Shell object has no properties besides the standard Parent and Application properties. Furthermore, it doesn't fire any events. I suggest that you create the world's simplest Visual Basic form with just a handful of push buttons, and link the few lines shown previously to the Click event. Of course, you can replace o.FileRun with any command you want to test.
Most of the Shell methods don't require parameters. There are, however, a few points to clarify for a better understanding of the whole topic. The most important involves the BrowseForFolder method.
BrowseForFolder, after all, is a simplified version of the SHBrowseForFolder API function. In my opinion, this implementation has a great drawback; it returns a Folder object rather than a string with the selected path. I'll attempt to fix this later with a Visual Basic replacement.
 |
|
Figure 6: BrowseForFolder
|
|
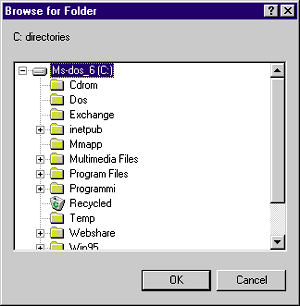
BrowseForFolder accepts up to four arguments: the parent window, a descriptive text to present the directory list, a numeric value to set some options for the dialog (refer to the standard Win32 documentation for these values) and, most importantly, the System object to be used as the root of the displayed tree of folders. In fact, BrowseForFolder provides a tree-based view of the available folders. By setting the vRoot argument you can decide which subtree to view. Figure 6 shows what happens if you call the method through the following code:
|
 Dim o As New Shell
 o.BrowseForFolder Form1.hWnd, "C: directories", 0, "c:\"
 Set o = Nothing
|
|
The tree view starts with the C:\ directory and doesn't allow you to select any folders above it in the hierarchy. The Windows shell, however, also includes special folders such as Recycle Bin and Printers. You can browse the special folders by assigning the vRoot argument to one of the special constants listed in Figure 7. Here's a brief example:
|
o.BrowseForFolder Form1.hWnd, "My Computer:", 0, ssfDRIVES
|
|
All the ssfxxx constants are members of the ShellSpecialFolderConstants enum type. Not all of the system's special folders match a physical directory in the file system. If they do not, they are called virtual folders. For example, My Computer (to which ssfDrives corresponds) is not a real location on your hard disk; ssfFavorites points to a subfolder of the Windows directory. You can ask for the physical path via the SHGetSpecialFolderPath API function
or one of the properties of the FolderItem object, which I'll discuss later. The constants listed in Figure 7 are the ones defined by the scriptable shell objects, but they are not all really available. If you
dig into the documentation for the SHGetSpecialFolderLocation API function, you will run into at least three other interesting constants. By adding the following definitions
|
 Const ssfHISTORY = &H22
 Const ssfCOOKIES = &H21
 Const ssfINTERNET = &H1
|
|
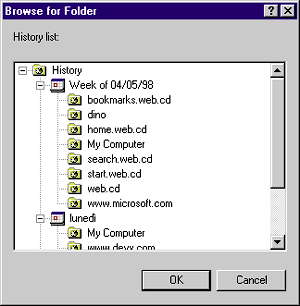
to any Visual Basic program, you can get the same result displayed in Figure 8, where I used the new constant ssfHISTORY. As the names suggest, ssfCOOKIES returns the folder where cookies are stored, while ssfINTERNET returns all the references you find expanding the Internet Explorer node in your Windows Explorer window.
|
 |
|
Figure 8: History Folder
|
|
The Namespace
The BrowseForFolder dialog shows the contents of a virtual or actual folder. This same content is programmatically accessible via a new object called Folder which is returned by both the BrowseForFolder and the NameSpace methods. The latter method in particular accepts a variant argument that could be a path string or one of the already mentioned ssfxxx constants. An object is returned that internally wraps and makes available the actual content of the folder, whatever it may be. Such data is obtained by asking the folder to enumerate its items. A custom folder, namely a namespace extension, will work just like a standard folder. Namespace extensions were covered in the February 1998 installment of Cutting Edge.
The Folder Object
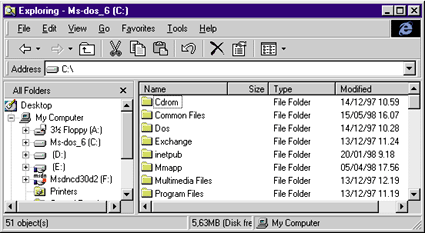
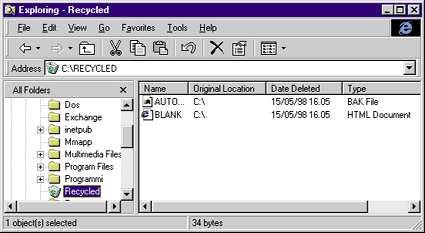
The Folder object is the software representation of the shell folders. It exposes methods for creating a child folder, and copying and moving items from other folders. The programming interface is heavily influenced by the Explorer view of the folders. In fact, there's a method called GetDetailsOf that returns the same column-based information available to the Explorer list view. Column 0 is the name, column 1 is the size, followed by the type and last modified date columns (see Figure 9). Of course, the role and the position of the columns may vary according to the features of the specified folder. For example, if you hold a reference to the Recycle Bin folder, then the second column provides the original location of the file (see Figure 10).
|
 |
|
Figure 9: Getting Details of Folders
|
|
 |
|
Figure 10: Recycle Bin Folder
|
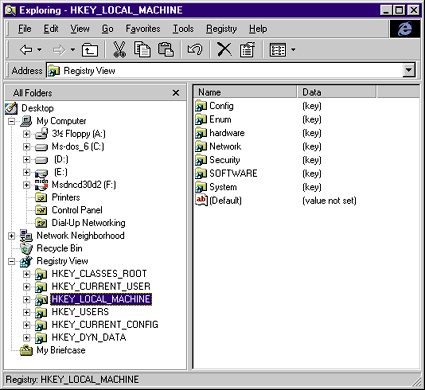
A Folder object also returns the collection of the items it contains. In most cases such items are files, but it depends upon the nature of the folder itself. A sample in the Internet Client SDK provides a cool namespace extension capable of bringing the entire Windows registry in the Explorer tree view, just like any other special system folder (see Figure 11). You click on the Registry View icon and all the main registry keys are available for further expansion. In this figure you don't see a list of files; rather, you see records excerpted from a single system file.
Once you've instantiated a folder, you can access all of its items via the Items member. Items is a collection, made up of Item and Count members, that you can walk through using the usual Visual Basic syntax. Any item within a folder evaluates to a FolderItem object. These objects expose properties such as Path, Size, ModifyDate and Type, plus a handful of interesting methods to verify whether the given item is a link, a standard file, a directory, or a virtual folder. This interface is fully documented in the Internet Client SDK.
|
 |
|
Figure 11: Registry View
|
|
Let's shift the focus to a method called InvokeVerb. This method has the ability to execute a given verb associated with the item's context menu. In other words, InvokeVerb lets you execute a command on the item. The commands available on a given folder item are all listed in the context menu. Notice that a folder item might be a folder itself. No matter what type the folder item is, InvokeVerb always supports the entire collection of menu choices. The syntax is as follows:
|
where vVerb is a Variant argument that denotes the name of the verb to execute. Once you hold a FolderItem object you can programmatically invoke any of its context menu commands. But there is more. If you have a FolderItem, then getting all the string commands for the context menu is as easy as accessing the Verbs collection. This gives you a great opportunity for adding custom context menus to files, at least inside your own applications. In fact, to get the same result throughout Explorer, you need shell extensions that are not so easy to write in pure Visual Basic. An unsupported example, however, is available from the tools\unsupprt\ictxmenu directory of the Visual Basic 5.0 CD.
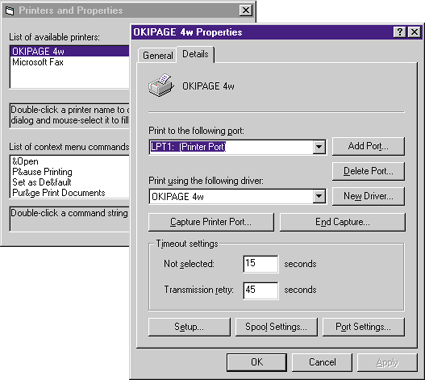
Now let's see how to handle verbs in practice. Figure 12 shows some Visual Basic-based code that loads all the available printers and programmatically invokes the various context menu items. This code is excerpted from the demo program available on the MIND Web site. Figure 13 illustrates how to get the Properties dialog. Double-clicking on a printer name executes the following lines of code:
|
 Dim fi As FolderItem
 Set fi = g_Printers.Items.Item(
    List1.ListIndex + 1)
 fi.InvokeVerb "P&roperties"
|
 |
|
Figure 13
|
|
InvokeVerb only accepts and correctly processes strings that are members of the Verbs collection. As you've probably noted, the verb includes an ampersand. It is required—if you omit it, the dialog will never appear. More precisely, InvokeVerb wants the same exact string displayed by the context menu, possible ampersands included. Other than directly invoking a verb, you can even ask a verb to execute itself. This is implemented by the following code snippet:
|
 Dim fi As FolderItem
 Dim fiv As FolderItemVerb
 Set fi = g_Printers.Items.Item(
     List1.ListIndex + 1)
 Set fiv = fi.Verbs.Item(List2.ListIndex)
 fiv.DoIt
|
First, I get a FolderItem for the selected printer, and create a FolderItemVerb (another scriptable shell object) from the associated Verbs collections. Executing the verb is even simpler: just call the DoIt method. Everything I've shown you for printers applies to any folder and any kind of item.
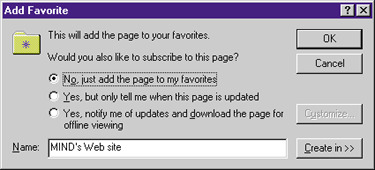
There's much more than this in the Windows 98 shell. For example, there are a few helper objects that let you seamlessly handle subscriptions and the collection of the currently open windows. ShellUIHelper drives the dialogs and wizards that the system provides for users to set up subscriptions and favorites folders. The following code
|
 Dim suih As New ShellUIHelper
 Dim sMIND As String
 sMIND = "http://www.microsoft.com/mind"
 suih.AddFavorite sMIND, "MIND's Web site"
|
|
runs the dialog shown in Figure 14. ShellWindows is an object that collects all the open windows on the desktop.
|
 |
|
Figure 14: Add Favorite Dialog
|
Browsing For Folders
As mentioned, the BrowseForFolder method is used to return a Folder object, but sometimes you just want a string representation of the folder. It's a bit tricky, but by no means impossible, to get the full path name from a folder.
|
 Dim f As Folder
 Dim fi As FolderItem
 Set f = shell.BrowseForFolder(...)
 Set fi = f.Items.Item
 MsgBox fi.Path
|
A more direct approach is the BrowseForFolderEx function, which skips over the memory requirement of such objects (see Figure 15). This function has the same prototype as the shell's method but it returns a string.
BrowseForFolderEx, which takes a different approach than BrowseForFolder, is based on the SHBrowseForFolder API. I've given it the same prototype as the BrowseForFolder's method. The API function returns a pointer to the identifiers list (PIDL) that the shell uses to uniquely identify a path from the desktop to the selected folder. The PIDL must be converted to a readable path and this is just what SHGetPathFromIDList does. Since a PIDL is primarily a pointer, it's reasonable to translate it as a Long type. Furthermore, a possible source of errors is the argument that's passed to SHGetPathFromIDList. It is not sufficient to pass an empty String variable; it must be properly initialized and refer to a large enough buffer to hold the returned value.
|
 Dim sFolderName As String
 sFolderName = String(MAX_PATH, 0)
 SHGetPathFromIDList lpIdList, sFolderName
|
An Embeddable COM
Component
The scriptable shell objects provide you with powerful tools for browsing and automating the shell components. Something has been left out—an embeddable COM-based component. If you carefully observe the internals of the BrowseForFolder dialog (with tools like the Visual C++® utility Spy++), you'll notice that it is composed of a standard tree view control that is loaded during initialization and has the well-known Explorer-
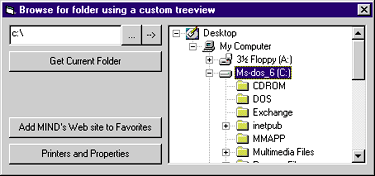
like hierarchical look. So a COM component
written in Visual Basic capable of providing
a tree view of the system's folders is in
order (see Figure 16).
|
 |
|
Figure 16: Using a Custom Tree View
|
The CustomDirList control exposes a single read-write property called Folder, a couple of events, and no methods. The Folder attribute lets
you read and set the current folder. Each time you programmatically change the current folder, the control refreshes to reflect the changes and ensures the selected item is always visible. The component is a Visual
Basic-based ActiveX control project that
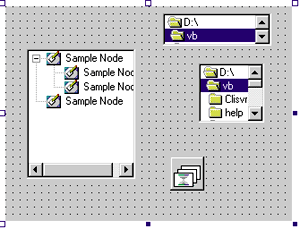
consists of four child controls, as shown in Figure 17. They are a tree view, an image list, and two DirListboxes.
DirListboxes give you a good compromise when it comes to balancing performance and programming ease. They are simple to use and quicker than the Folder object. When I coded this COM component, my first approach was instancing a temporary Folder object each time I needed to scan the contents of a given directory.
|
 Dim f As Folder
 Set f = g_Shell.NameSpace( dirName )
|
Try to run this code on the Windows directory and you'll soon observe the performance slowing down dramatically. This occurs because the Folder object loads every item it finds in a directory or file. In contrast, the DirListbox control only considers subfolders and it works much faster.
|
 |
|
Figure 17: Custom DirList Control
|
An even better solution is resorting to the API functions FindFirstFile and FindNextFile. I also made use of a second DirListbox to count the children of the visited directory (the first DirListbox) and to decide whether the new tree view node must be expandable. Figure 18 shows a portion of the source code for this control. There are three points to focus on: filling the tree view, getting the right icon, and automating the refresh after a new selection.
The tree view keeps getting filled as long as the user expands the various nodes. The first nodes are always the Desktop and My Computer. By design, the controls do not display any other virtual folder. If a directory includes subdirectories (this is why I used the second DirListbox) then a single item is initially added causing the plus sign to appear on the node. When the user attempts to expand a node, this dummy item is removed and replaced by the actual subfolders.
Each drive has its own icon and in some cases this icon changes dynamically. Consider the CD drive whose icon might be contained in the currently inserted disk. There's a specific API to return valid HICON data. This routine is SHGetFileInfo.
|
 Dim sfi As SHFILEINFO
 SHGetFileInfo f.Items.Item(i).path, _
      0, sfi, Len(sfi), _
      SHGFI_ICON Or SHGFI_SMALLICON
|
The hIcon member of the SHFILEINFO structure will contain the handle HICON to the icon. How do you put this HICON into a Visual Basic tree view control? The icons used for tree view nodes must be contained in an image list control. The SDK interface for image lists allows you to add icons through the ImageList_AddIcon function, but this is not true for the image lists provided by Visual Basic. In fact, the comctl32.ocx (to which the ImageList belongs) wraps all the Windows 95 common controls, but provides a layer of code that shields the actual HWND window. This means that you can call the ImageList_AddIcon passing the control's hWnd property and actually add an HICON member. Unfortunately, this new image will never be detected by the control itself because you didn't add it through the OCX's Add method. This method requires you to pass a Picture object instead of an HICON.
Thus, you need to convert HICON data to a Visual Basic picture. This can be done in several ways. The most tricky but efficient way is one that I discussed in Windows Developer's Journal (December 1997). A Visual Basic Picture type is based on the IPictureDisp COM interface. The OLE SDK exposes a direct function to create such types: OleCreatePictureIndirect. This routine accepts a structure where you've stored the HICON handle and returns a Picture object. Here's a code snippet that's used inside the CustomDirList control:
|
 Dim pic As IPictureDisp
 Dim picDesc As ICONTYPE
 Dim iid As GUID
 OleInitialize ByVal 0&
 OleCreatePictureIndirect picDesc, iid, True, pic
 OleUninitialize
|
Both the GUID type and the ICONTYPE are described
in the source code.
In particular, the GUID type is the actual representation of what identifies a CLSID or an interface ID in the COM world.
With this ActiveX control you can embed an Explorer-like view of the disks in your own applications, making them more attractive. Another feature to create would filter the displayed item. In other words, the CustomDirList would raise a proper event each time it added a new directory to the list. By hooking it, you could prevent users from accessing certain areas of the disk while running your application. Figure 16 demonstrates hiding the Windows directory. The associated code is as follows:
|
 Sub CustomDirList1_AddDirectory( _
     ByVal dirName As String, _
     canContinue As Boolean )

   Dim sWinDir As String
   Dim n As Long
   sWinDir = String(260, 0)
   n = GetWindowsDirectory(sWinDir, 260)
   sWinDir = Left$(sWinDir, n)
   If LCase(dirName) = LCase(sWinDir) Then
       canContinue = False
   End If
 End Sub
|
Modifying the Taskbar's Contents
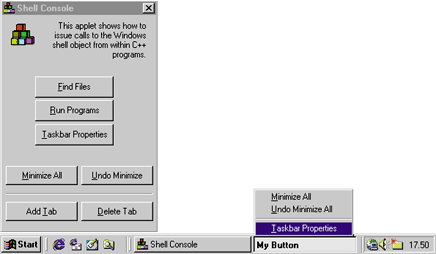
Figure 19 illustrates a C++ program that issues calls to the scriptable shell objects at a lower level of abstraction. If you look carefully, you'll notice that the figure shows more than that. The Shell Console window includes the two buttons
Add Tab and Delete Tab. Clicking on AddTab causes a custom button to appear on the taskbar as if it were the caption of a new application started. This is what the ITaskbarList interface lets you do. In a nutshell, it gives you the means to modify the contents of a Windows 98 taskbar's component: the task list. In the March 1998 Cutting Edge column, I discussed what's new with the Active Desktop™ and explained the new architecture of the taskbar. The task list is just a tab control that adds a tab for each unowned window in the system. Through ITaskbarList you can control what appears on this task list.
But there's a problem. The Internet Client SDK documents the members of this interface, but there's no trace of a header file to include in user applications. The latest shlobj.h file only defines the CLSID and the interface ID, but nowhere can you find the formal definition of the ITaskbarList interface upon which your own implementation is based. Never mind, though. I've written a compatible IDL file and compiled it with the MIDL compiler to create a ready-to-use header file.
|
 |
|
Figure 19: Modifying Taskbar's Contents
|
|
The taskbar.idl and taskbar.h files are included in this month's source code. The taskbar buttons aren't real buttons, but they always have a window behind them. Thus, by sending the proper instructions to this window, you can simulate the functionality of the Start button (see Figure 19). The buttons you click on the taskbar (and those you can add to) aren't windows, but the pages of a tab control with the TCS_BUTTONS style. However, they render a window whose handle you need to pass when adding or deleting a tab. To add a tab, use the following code:
|
 #include "taskbar.h"
 VOID OnAddTab( HWND hWnd )
 {
   HRESULT sc;
   ITaskbarList *pDisp = NULL;
   CoCreateInstance( CLSID_TaskbarList, NULL,
     CLSCTX_SERVER, IID_ITaskbarList,
     (LPVOID *) &pDisp );

   pDisp->AddTab( hWnd );
   pDisp->Release();
   return;
 }
|
|
I recommend rendering window with WS_CAPTION.
Conclusion
This month I summarized the new features of the Windows 98 shell. However, these features are already available under Windows 95 and Windows NT® 4.0, provided that you install Internet Explorer 4.0 and, more importantly, the Active Desktop shell update.

|
From the August 1998 issue of Microsoft Interactive Developer.
![]()


