March 1998
![]()
Pop Open a Privileged Set of APIs with Windows NT Kernel Mode Drivers
Download driver.exe (57KB)
|
James Finnegan is a developer at Communica, Inc., a Massachusetts-based company specializing in system software design. He can be reached via his web page at http://www.windows.to or via email at jimf@nema.com.
|
|
Have you ever been
intimidated by Windows NT¨ and its seemingly secure environment? Have you ever needed to do the "impossible" in your Win32¨ application, employing the far-reaching powers of a VxD under Windows¨ 95, only to assume that similar capabilities don't exist under Windows NT? If so, you need to understand the power provided by Windows NT drivers.
Why am I writing about this nearly five years after the release of Windows NT? It's recently become apparent to me that Windows NT and Windows NT drivers, although tried and true, are still woefully misunderstood. It's time to demystify the role of drivers under Windows NT. I'll implement some practical examples that will show that Windows NT drivers are not just "drivers for devices"; rather, they are the means of doing things that were previously considered impossible under Windows NT. But what if you never intend to develop a Windows NT driver? Why should you care about this? Understanding these drivers not only provides valuable insight into the workings of Windows NT, it also exposes you to a handy set of privileged APIs that you can take advantage of without writing a stitch of driver code. If you read the Editor's Note from the February 1998 issue of MSJ, you were treated to an account of one of the inevitable hardware bugs that manage to manifest themselves: Joe Flanigen (your fearless Technical Editor) discussed the Intel Pentium F00F erratum that you've probably heard about. Of course, Microsoft would not stand by idly and permit your computing experience to be diminished by the likes of some hardware errata (look for the Windows NT fix at ftp://ftp.microsoft.com/ bussys/winnt/winnt-public/fixes/usa/NT40/hotfixes-postSP3/pent-fix/). Implementation of the fix, of course, requires modification of some privileged-mode data structures. These structures are generally under the tight control of the operating system, and are off limits to the prying eyes of lowly user mode applications. Therefore, it is no surprise that the fix comes in the form of a modified component of the Windows NT kernel. Prior to the release of the Microsoft fix, I had developed and distributed my own fix to the Pentium erratum for both Windows 95 and Windows NT. The fix, a single Win32-based executable, did what seemed impossible. When run, it modified the appropriate OS components, eradicating the bug under two very different operating systems without requiring the static modification of the kernel. This was met with comments ranging from "you must have a source license to Windows NT" to "what you've done is impossible!" Of course, it wasn't impossible. It just required an understanding of how to exploit the facilities available to you in Windows NT kernel mode. I was surprised that hardly any comments were made regarding such a fix for Windows 95 even though that was more difficult to implement! This was probably because Windows 95 and VxDs are a known quantity for many developers. Reaching in and doing things by brute force surprises few people today. It's time to bring that mindset forward to Windows NT by thinking about device drivers and DDKs differently.
A Brief Historical Perspective
|
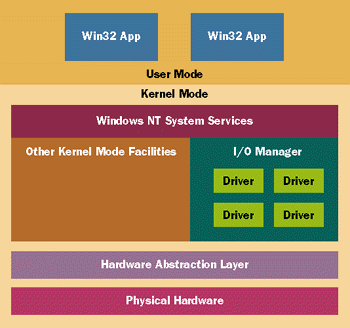 |
| Figure 1 Windows NT and the I/O Manager |
|
|
|
|
The driver must be installed in the system before you can load it. Typically, a driver is statically installed in the system's registry. The path for drivers is \HKEY_LOCAL_ MACHINE\System\CurrentControlSet\Services. Services? Yes, drivers and services are treated as one and the same from user mode. This permits you to control the driver via the Service API. (For more detailed information on the Service API, see Jeffrey Richter's article, "Design a Windows NT Service to Exploit Special Operating System Features," MSJ, October 1997.) Later on, you'll see how to utilize the Service API to dynamically load drivers at runtime.
If you peruse the Windows NT DDK documentation (the best documentation is the sample code included in the DDK, which includes the source to a number of shipped Windows NT drivers), you'll discover that Windows NT drivers seem to come in a number of flavors. The simplest type is a monolithic driver. This type generally has no dependencies on other drivers loaded in the system. They supply an interface to user mode applications and talk directly to hardware without any intervention or support from anyone else. This is the type of driver I'll be implementing here. A layered driver is one that handles user mode requests, processing and passing each request from the highest-level driver to the lowest-level driver. This is controlled by the Windows NT I/O Manager. Although the layering scheme has some limitations, it is a scheme that many of the system-supplied Windows NT drivers take advantage of. A filter driver is like a layered driver in that it sits on top of another driver, but it receives requests destined for the lower-level driver first, providing the ability to intercept, alter, or filter these requests. This is done without the knowledge or volition of the lower-level driver. As you could imagine, this has some powerful and interesting uses. For example, the Encrypting File System (EFS) driver that comes with Windows NT 5.0 encrypts data being written to or read from the NTFS driver. This is accomplished by the EFS driver's ability to intercept I/O requests and alter the data before the NTFS driver sees it. Finally, you can vaguely distinguish drivers as physical or logical in nature. Generally, a physical driver is the driver talking directly to some hardware. A logical driver generally talks to other drivers, which eventually end up communicating with the bare metal. In theory, logical drivers should be portable to other Windows NT platforms. In fact, the implementation of the Windows NT DDK APIs goes to great lengths to provide a level of portability between Windows NT implementations, even for physical drivers. But let's be honest here; a driver is a very low-level component that is usually dealing with highly computer-specific resources. Even though a generic, platform-independent interface is commendable, it simply isn't realistic in all circumstances. I know that I'll be skewered by the Windows NT kernel-mode purists for saying this.
Driver Visibility in User Mode
|
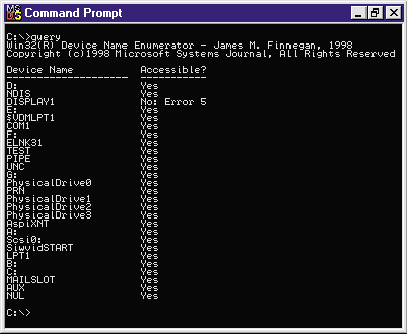 |
| Figure 3 Query.exe run by an administrator |
|
|
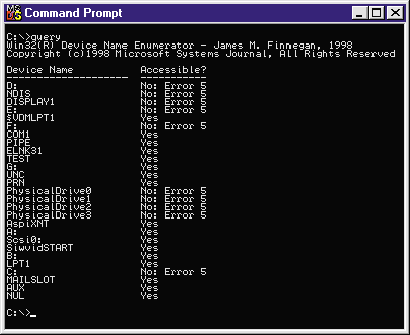 |
| Figure 4 Query.exe run by a guest |
|
|
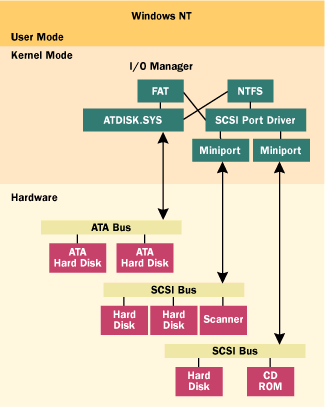 |
| Figure 6 Accessing a Physical Drive |
|
This seemingly flat, generic interface to disparate hardware devices is provided by the coordination of ATDISK.SYS (a monolithic driver that controls all MFM/RLL/ESDI/IDE hard disk drives in a system), the SCSI port driver and its associated interface card specific miniport drivers, and the HAL (the Windows NT hardware abstraction layer). When Windows NT boots, ATDISK.SYS and SCSIPORT.SYS enumerate all devices under their control, modifying a configuration structure that indicates how many disks each driver controls. Generic symbolic names (in the form of PhysicalDrivex) are then created, representing each of the disks. It is the responsibility of ATDISK.SYS and the SCSI miniport drivers to supply a minimum level of functionality (like read and write) so other drivers, like the file system drivers (FAT and NTFS), can successfully talk to these drives.
This design and the fact that the drives are accessible (at least to accounts with administrative privileges) gives you the ability to exploit this functionality within your own applications—without writing any driver code.
Accessing Drivers from User Mode
The need for access to the MBR should be obvious if you're writing utility applications. For example, a virus-scanning program may want to check the MBR for boot record viruses, or a disk utility application may need to verify the integrity of the MBR and the disk partition information it contains. As you'll see, doing this in a manner that is compatible across all types of disk drives in Windows NT is made easy by this well-defined interface. First, the driver that represents the first physical drive needs to be opened. This is done by referencing its name by the generic symbolic link that's been created: |
|
| After the file handle to the driver is obtained, you just need to call ReadFile, reading 512 bytes from the first offset, since the file handle's position defaults to offset zero: |
|
|
The buffer is now filled with the contents of sector zero of the first disk—the MBR. The contents are displayed in Figure 8.
|
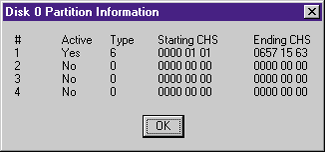 |
| Figure 8 Output of Testapp.exe |
|
If the thought of reading the MBR off of the disk under Windows NT gives you the creeps, be aware that access to PhysicalDrivex devices (as shown earlier in the Query.exe application), as well as other file-system type drivers, is restricted to users with administrator privileges. Therefore, you need not be concerned with uncovering any blatant security holes by exploiting this fairly basic interface. But what if you really want non-administrator users to access the MBR? What if you've written a virus-scanning utility or a disk integrity program and you need users to access these privileged devices? Well, you'll need to write a Windows NT device driver!
Anatomy of a Windows NT Driver
|
|
|
Most drivers allocate any data that is global to the device driver within a driver-defined device extension. Memory for the device extension is allocated in the call to IoCreateDevice (based on the size specified in the second parameter).
Also, the device type (the fourth parameter) plays a key role in the accessibility of the driver from non-administrator accounts. As seen in the output from Query.exe earlier, some drivers cannot be accessed from regular user accounts. By default, certain device types are restricted. These are listed in Figure 9. Figure 10 lists all of the remaining device types that are unrestricted to users (including guest accounts). Keep in mind that Windows NT drivers still need to be installed initially in the system's registry by an administrator (the steps are shown later). Once the device object has been created, it's time to create a name visible to user mode Win32 applications. This is easily done with a call to IoCreateSymbolicLink: |
|
| You can create one or more symbolic names by doing this. In addition, you can create additional user mode aliases by adding keys to the following registry path: |
|
|
If you look at the values in this key, you'll see familiar MS-DOS device names listed (like NUL, PRN, and AUX); their associated data values are strings that match their device names or symbolic links. For example, NUL points to \Device\Null. Adding your own aliases is as trivial as adding your own string values here.
The final thing to do is assign the DRIVER_OBJECT's structure members with pointers to your function handlers. Most of the initialization required is for the last structure member in DRIVER_OBJECT, which is defined as follows: |
|
| This is an array of function pointers that are used by the I/O Manager to dispatch various messages to your driver. It is at the end of the structure to permit the addition of control messages in future versions of Windows NT and other Microsoft® operating systems supporting this driver architecture (such as WDM in Windows 98). The current list of major messages defined in Windows NT 4.0 is shown in Figure 11. |
|
|
The I/O manager uses these pointers to dispatch messages from user mode apps, as well as internal control messages to your application. For example, when a Win32-based app opens your driver with a call to CreateFile, the
I/O manager will call the function pointed to by the DriverObject->MajorFunction[IRP_MJ_CREATE] structure
member. Within that function you'd do whatever initialization would be required by your driver. Likewise, when the Win32-based app closes the handle to your driver, DriverObject->MajorFunction[IRP_MJ_CLOSE] is called. The function pointed to by DriverObject->DriverUnload is called when your driver is stopped (by shutting down the system, the user typing NET STOP DriverName from a command prompt, or stopping the driver in the Devices applet in the Control Panel).
IRPs
|
|
|
As a side note, you'll notice in your travels through Windows NT kernel land that function definitions typically contain keywords like IN and OUT. They indicate whether a parameter is for input, output, or both. Currently, IN and OUT are not defined, so their inclusion is benign. But they certainly improve the readability of your source code.
The first parameter is the device object you created for your driver within your DriverEntry call. The I/O Manager will always pass this pointer to your control functions, so you don't have to tote around a pointer to it globally within your driver. The second parameter is a pointer to an IRP structure. This structure completely contains the information required to bust apart and process the request. Following the flow from the perspective of reading or writing, a call to the following code from a Win32 user mode app eventually calls into the I/O Manager, which creates an IRP with an IRP stack: |
|
|
The IRP stack contains the parameters destined for your driver. For monolithic drivers (like those presented here), there will only be stack entries for the current driver. For layered or filter drivers, there will be a stack "frame" for each driver in the chain of drivers.
A pointer to the stack location for your driver can be obtained by calling the following in your driver: |
|
|
IoGetCurrentIrpStackLocation is a macro that obtains the current stack pointer in the IRP (which is managed by the I/O Manager). IO_STACK_LOCATION is a structure that contains a union of structures that each represent parameters passed from specific IOCTLs. The most frequent one you will encounter in your own Windows NT drivers would be for read, write, and device I/O control.
For the read example above, the parameters would be passed like so: |
|
| irpSp->Parameters.Read.ByteOffset represents the file position passed from user mode (set by a call to SetFilePointer). irpSp->Parameters.Read.Length is the direct result of the length parameter in the ReadFile call. The user mode buffer itself is pointed to by: |
|
|
This buffer is mapped and ready for use by your driver. There is no additional mapping or any other setup that needs to occur before you can use the buffer. The I/O Manager prepares the transfer to and from user mode on your behalf. Note, however, that this pointer represents both the input and output buffers passed from user mode. Although not necessarily important with read or write (which is either all input or all output), this does become critical with calls from DeviceIoControl, where this buffer is shared, sized to be the larger of the input or output buffer. Get everything you need out of the input buffer before writing anything to the output buffer, since you'll clobber anything that's in there!
At this point, you have all the information you need to process your device-specific request. Once you've completed processing, it's time to instruct the I/O Manager to return control to the calling user mode application. First, you should set the IRP's status member to indicate success of failure of the operation: |
|
| Next, you need to set the IRP's Information member to represent the number of bytes to copy back to the user mode application: |
|
| Finally, you instruct the I/O Manager that you are finished with the IRP: |
|
|
The I/O Manager uses the notification via IoCompleteRequest to either complete the request or continue processing the IRP with other layered drivers.
Fun With DeviceIoControl
|
|
|
The CTL_CODE macro mangles together the passed-in elements. Each of these elements is critical to the I/O Manager and its treatment of IRPs and their contents. This differs from the Windows 95 treatment of IOCTLs, which does not depend on the IOCTL's value for processing. (See the sidebar, "The Windows 95 Connection" for more information.)
CTL_CODE crams together the parameters into a DWORD value. The resulting format is shown in Figure 13. The first parameter is the device type that was specified when your driver's device object was created. The second parameter is a SHORT that is a custom control code for your driver. Values 0x0000 through 0x07ff are reserved by Microsoft, and are typically predefined for use by drivers included in Windows NT. Values 0x0800 and higher are for your own use. |
 |
| Figure 13 IOCTL Format |
|
The third parameter is the data transfer type performed by this IOCTL. This parameter is the source for much confusion, since the DDK documentation is not terribly clear. Lacking a definitive description, see Knowledge Base article Q115758. A typical data transfer type is METHOD_
BUFFERED. The DDK documentation says to use METHOD_BUFFERED "if the driver transfers small amounts of data for the request." This is because the data transferred to and from user mode is actually copied into and out of kernel mode by the I/O Manager. Even though no restrictions are placed on the size of data transferred using METHOD_BUFFERED, actually copying large amounts of data could be unacceptably time-consuming. Note that the input and output buffers are shared when using METHOD_
BUFFERED, and the buffer is pointed to by Irp->AssociatedIrp.SystemBuffer (as shown earlier).
Loading a Device Driver
Access to Restricted Resources
|
| 15h | Get the low byte of base memory | 16h | Get the high byte of base memory | 17h | Get the low byte of extended memory | 18h | Get the high byte of extended memory |
| The results are returned in kilobytes (in a SHORT value), and need to be obtained a byte at a time. For example, to get the amount of extended memory from the CMOS in MS-DOS or Windows 95, you'd do the following: |
|
|
Using _inp and _outp in a Win32 application is completely valid. Running a Win32 application under Windows NT that uses this code will cause a fault because Windows NT restricts I/O permissions from user mode applications.
The code shown above can be moved almost wholesale into a Windows NT driver, where direct access to I/O ports is permitted. In MSJDrvr.c (see Figure 12), the function MSJReadMemoryStatsFromCMOS implements this for the IOCTL_MSJDRVR_READ_CMOS control code. The base and extended memory values obtained from the CMOS are returned to the caller in a structure. The values are retrieved by the following code: |
|
|
As you can see, it's similar to the previous code snippet. The calls to _inp and _outp have been replaced by WRITE_PORT_UCHAR and READ_PORT_UCHAR, which are supplied by the Windows NT kernel as abstracted wrappers around
I/O functionality. In theory, these functions are portable to other platforms. In practice, I could have easily placed my own inline assembler or C wrappers around the Intel IN and OUT instructions, but the results would be the same. Even though this code may not be applicable on non-Intel PC platforms, the functionality to read and write to I/O ports is provided. If there's no need to circumvent the infrastructure given to you to do the job, then don't do it!
Even though this code works fine, the Windows NT driver architecture has a premise of one driver per device. This is really no different than the infrastructure for VxDs. For example, VPICD in Windows 95 restricts an IRQ to a single service routine. Even though interrupt chaining could be supported, Microsoft has chosen the strategy that when one device driver claims a resource, no others can wrest control away from it. This brings some sense of order to things, but unduly restricts layering schemes that could be implemented if, for example, ISRs could be chained. Similar restrictions are placed on hardware interrupt routines under Windows NT. The I/O Manager restricts more than one driver from attaching to an IRQ via IoConnectInterrupt if the target device is not level-sensitive. If the system's host bus is level-sensitive (where more than one hardware device can be attached to an IRQ line), the I/O Manager permits chaining under the assumption that each device has its own individual driver. If you want to be able to see IRQ requests from a device under the control of some other driver, you're generally out of luck unless the controlling device driver builds some type of interface or chaining mechanism itself (such as the parallel port driver in Windows NT). Windows NT tries to enforce a similar restriction on I/O ports through the use of the function IoReportResourceUsage. In theory, if your driver utilizes an I/O port or a range of ports, you should claim control of this resource through IoReportResourceUsage. As demonstrated, though, no such restriction is enforced by the Windows NT kernel. It is easy to envision how you could wreak havoc on an unwitting device driver that thinks it left a target device in an implicit state. In short, be careful and make sure you know what you're doing. Even though my earlier example of I/O port reading to obtain CMOS data works fine, there is a more appropriate method for obtaining this information under Windows NT. The CMOS resource is owned by HAL, and its contents can be obtained easily with a call to HalGetBusData, passing a bus type of Cmos as its first parameter. This is shown in MSJReadMemoryStatsFromCMOS in MSJDrvr.c: |
|
| When this function returns, the buffer contains the CMOS data that was obtained by HAL. Plucking out the aforementioned base and extended memory values is easily done by accessing the appropriate offsets into the buffer: |
|
|
Adding Access to PhysicalDrive0
|
|
|
It's interesting to note that this function works equally well with symbolic names in the user mode namespace as it does with the kernel mode-only names referenced in the call to IoCreateDevice. This greatly simplifies your life since you can reference the generic symbolic link rather than the specific SCSI or ATA device driver by name.
Also note that the pointer to the returned device object comes with no restrictions. If you have carnal knowledge of a particular device object—for example, if you know the structure of its device extension—you can access it via this pointer. Referencing a device extension in this manner is not recommended unless you absolutely know what you're doing. Now that you have a valid pointer to the target device driver's DEVICE_OBJECT, an IRP needs to be built and dispatched to it. Building IRPs is performed by calling the I/O Manager's IoBuildSynchronousFsdRequest, IoBuildAsynchronousFsdRequest, or IoBuildDeviceIoControlRequest functions. The first two functions are restricted to calling the IRP_MJ_READ, IRP_MJ_WRITE, IRP_MJ_ FLUSH_BUFFERS, or IRP_MJ_SHUTDOWN IOCTLs. The latter function can call any IOCTL supported by the driver. For simplicity, I'll use IoBuildSynchronousFsdRequest. |
|
|
The parameters passed to IoBuildSynchronousFsdRequest are similar to user mode's ReadFile counterpart. A kernel mode event object is created with a call to KeInitializeEvent and associated with the IRP. This event handle is used to block while the IRP is pending.
Now that the IRP is created, it can be dispatched to the I/O Manager via a call to IoCallDriver, destined for the target driver: |
|
|
Upon successful completion, the buffer referenced when the IRP was created will be filled with the results of the call. These results can be passed back to the caller, just as if the caller made the call to the device driver directly. It's fairly easy to see how your driver can act as a proxy to do things that are restricted or invisible to user mode apps.
I have not touched on asynchronous processing of IRPs here (via IoBuildAsynchronousFsdRequest). Asynchronous processing permits you to assign a completion routine that is called within your kernel mode driver when an IRP completes. This permits you to return control to the user mode process, giving you the flexibility of signaling the user mode event handle when the operation is finished. This is the foundation of asynchronous I/O, and it makes use of the OVERLAPPED structure in your user mode I/O apparent.
Dynamically Loading a Windows NT Driver
|
|
| Although typically added by the installation procedure of an application, you can easily add the appropriate registry entry via the SCM APIs. You first need to open a handle to the SCM: |
|
|
This succeeds only if it's called from an account with administrator privileges, which provides the security necessary so normal users cannot add and execute privileged code without the proper authority.
Once the SCM has been opened, you add the driver by making a call to CreateService, passing the driver name and the fully qualified path name of the driver's file: |
|
| Now all you need to do is start the driver through the StartService call, passing the handle obtained from the previous call to CreateService: |
|
|
At this point, you can call CreateFile, passing in the name of your newly loaded driver. Easy, huh?
Stopping and unloading your driver is just as simple. If you previously disposed of the service handle for your driver, a call to OpenService will give you the handle required to manipulate the driver via the SCM: |
|
| First, you need to stop the driver. This is done by calling ControlService, passing a SERVICE_CONTROL_STOP message: |
|
| To complete your cleanup, you need to delete the registry entry made for you by the earlier call to CreateService. This is done by calling DeleteService: |
|
|
As you can see, dynamically manipulating a driver is fairly straightforward. Capitalizing on your knowledge of how services and the SCM work gives you the flexibility to minimize clutter and ease the installation burden of your Windows NT drivers.
Hiding Your Driver
|
|
| Now, within the initialization of your application, load the resource and write it out to a temporary file. |
|
|
At this point, you'd dynamically load your driver. Once it is loaded, you can safely delete the temporary file. It may be dopey and brute-force, but it does work. Keep in mind, of course, that you are restricted to doing this with users who have the appropriate privileges to dynamically load drivers (namely, those with administrator rights).
Final Pitfalls
|
|
|
Your competitors may hate it, but I ensure that you'll sleep better at night knowing that you're not inadvertently giving away some deep, dark driver secret.
The last dilemma to mention is some restrictions placed on video devices. As noted before with the output from Query.exe, the DISPLAY symbolic link is off-limits to everyone, including users with administrator rights. The premise behind this is that the Windows NT kernel should be the only one that has control of the video display. The problem gets worse when you dip into kernel mode. Let's say you try to execute the following code in your driver: |
|
|
Windows NT will bug check (you'll get a blue screen). Yes, you read that right, Windows NT will crash if you simply try to touch the video driver's device object! If you're trying to get hardware information on the video card installed, you're out of luck! The only other option is to dip into the registry to get whatever information the video driver may have placed there upon initialization.
This is really just the tip of the iceberg when it comes to video support problems in kernel mode. Since so many video cards insist on using onboard BIOS for their only means of communication, special hacks have to be employed to support driver creation under Windows NT. In particular, a video miniport driver is highly dependent on the VideoPortInt10 API call, which is a trap door to the video card's BIOS. (VideoPortInt10 takes a structure of Intel x86 registers as a parameter—so much for portability!)
Conclusion
From the March 1998 issue of Microsoft Systems Journal.
|