On Language
By Brian Johnson
Using Exceptions to Create Polite Visual J++ 6.0 Programs
One of the things you've probably noticed about any Microsoft program you run is that when the program runs into a problem, it seldom dies without giving you some indication of what happened. A program that just up and leaves without so much as a "See ya!" is even more disconcerting than an annoying error message. The key to writing polite code is to put in place a method of handling unforeseen errors. In Java, these are called exceptions.
One of the many advantages to using Java is that the language has built-in support for handling exceptions. Part of the art of Java programming is handling exceptions gracefully. Part of the problem is that exceptions can seem cumbersome, and it's not always easy to decide if you really need to create your own exception handlers. In this article, I'll tell you how to use exception handling in your own code. Much of what you need is already built into the Java language and Visual J++.
Exceptions in Java
An exception is simply a condition that interrupts the normal flow of control in your program. A program throws an exception, which must be caught by another part of your program. The Java language has quite a bit of exception handling built in, so you will get an error indication of some sort before your program dies, whether you prepare for exceptions or not. However, if you want your program to present a polite error message, retry an operation, clean up temporary files, and so on, you must write an exception handler.
The base class for all exceptions is java.lang.Throwable. Derived from this class are java.lang.Error and java.lang.Exception. An error is an exception that is difficult to handle, such as stack overflow. Usually, you can ignore these errors and let Java's default exception handler take care of them.
Other exceptions come in two flavors: checked and unchecked. The compiler makes sure that every checked exception has a handler (hence the name; the compiler "checks" for these exceptions). The unchecked exceptions include the errors and exceptions that inherit from java.lang.RuntimeException. The run-time exceptions include security exceptions, null-pointer exceptions, and so on. Similar to errors, it's difficult to write effective handlers for run-time exceptions, which is why the compiler does not check for them.
Checked exceptions are the exceptions that require most of your attention and care. These exceptions are deliberately raised, and you must deliberately handle them. Input/output exceptions are good examples of checked exceptions. If your Java program opens a file, it must also handle the situation where the file cannot be opened. The java.io.IOException class and its derived classes are checked exception classes, so the compiler checks to make sure you handle the exceptions that can arise, such as FileNotFoundException.
You can define your own exception classes as well. An exception class can encapsulate data and methods related to the error in question, so you can use an exception object to communicate useful information from where the exception is thrown to where it is caught.
Catching Exceptions
Exceptions are handled through try...catch...finally blocks. You can place any code you want into one of these blocks. Java executes the code in the try block in the normal fashion. If the try block finishes without problems, the finally block executes. If an exception occurs in the try block, it's first handled by the logic contained in the catch block for the exception that occurs. Regardless of what happens in the catch block, the code under the finally block is executed. The syntax for an exception block looks like the code shown in Figure 1.
try
{
  // Do something.
}
catch (Throwable exc)
{
  // Do something if an exception is thrown.
}
finally
{
  // Do something regardless if exception is thrown.
}
Figure 1: Syntax for a try...catch...finally exception block.
You can use a catch block, a finally block, or both, but you must have at least one for each try. You can use as many catch blocks as you need before the finally block. The generic (Throwable exc) code will catch any exception and allow you to take action instead of relying on Java's default exception handlers.
To narrow your exception handling a little bit, you can specify any particular exception you want to handle. For example, you can create a separate catch block that runs only when the specified exception is thrown (see Figure 2).
try
{
  // Code that throws an ArithmeticExecption;
  // Code that throws an IllegalArgumentException;
}
catch (ArithmeticException exc)
{
  // Do something math related.
}
catch (IllegalArgumentException exc)
{
  // Do something related to argument passing.
}
Figure 2: You can create a separate catch block that runs only when the specified exception is thrown.
After the catch block finishes, Java executes the code in the finally block — if there is one — then execution continues normally with the statement that follows the try...catch...finally structure. You can do anything you want in the catch or finally blocks. Usually, a catch block reports the error to the user in a friendly way, then tries to recover from the problem. A finally block usually cleans up resources, deleting temporary files, for example.
If the catch block doesn't handle an exception, the finally block executes, then execution stops abruptly in the containing method, and Java searches the calling method for an appropriate catch block. The search continues up the call stack until a catch block handles the exception, or until no methods remain in the call stack, in which case the thread terminates.
Throwing Exceptions
You can also raise an exception in a catch or finally block. For example, a catch block can re-throw an exception it catches by throwing the same exception object:
try
{
  // Code that throws an exception.
}
catch (Exception exc)
{
  // Record the exception in a log file, then re-throw
  // the exception to be handled elsewhere.
  LogException(exc.toString());
  throw exc;
}
The easiest way to see how all this works is to create an exception situation and watch the program execute. You can then note the difference when using a try...catch block to handle the exception, versus leaving the exception unhandled.
An Example
The first example program I've created is a WFC Windows application (see Listing One ). I added two buttons to Form1 and set up a couple of scenarios to demonstrate handled versus unhandled exceptions.
Begin Listing One — First Example
import com.ms.wfc.app.*;
import com.ms.wfc.core.*;
import com.ms.wfc.ui.*;
import com.ms.wfc.html.*;

/**
 * This class can take a variable number of parameters on
 * the command line. Program execution begins with the
 * main() method. The class constructor is not invoked
 * unless an object of type 'Form1' is created in the
 * main() method.
 */
public class Form1 extends Form
{
  public Form1()
  {
    // Required for Visual J++ Form Designer support.
    initForm();

    // TODO: Add any constructor code after initForm call.
  }

  /**
   * Form1 overrides dispose so it can clean up the
   * component list.
   */
  public void dispose()
  {
    super.dispose();
    components.dispose();
  }

  private void btnDivByZero_click(Object source, Event e)
  {
    // Exception handling allows the method to
    // recover from the error.
    int x=1, y=0, z=0;
    try
    {
      z = x / y;
    }
    catch (ArithmeticException evt)
    {
      statusBar1.setText(evt.toString());
    }
    MessageBox.show(Integer.toString(z), "Result");
  }

  private void btnDivByZeroUnhandled_click(
    Object source, Event e)
  {
    // Divide by zero error causes method to terminate
    // before the message box is displayed.
    int x=1, y=0, z=0;
    z = x / y;
    MessageBox.show(Integer.toString(z), "Result");
  }

// GUI Code cut for brevity.

}
End Listing One
The following is the code in the btnDivByZeroUnhandled_click event. This code throws an unhandled ArithmeticException. The method fails, but Java's built-in exception handlers let you know what has happened:
private void btnDivByZeroUnhandled_click(
  Object source, Event e)
{
  // Divide by zero error causes method to terminate
  // before the message box is displayed.
  int x=1, y=0, z=0;
  z = x / y;
  MessageBox.show(Integer.toString(z), "Result");
}
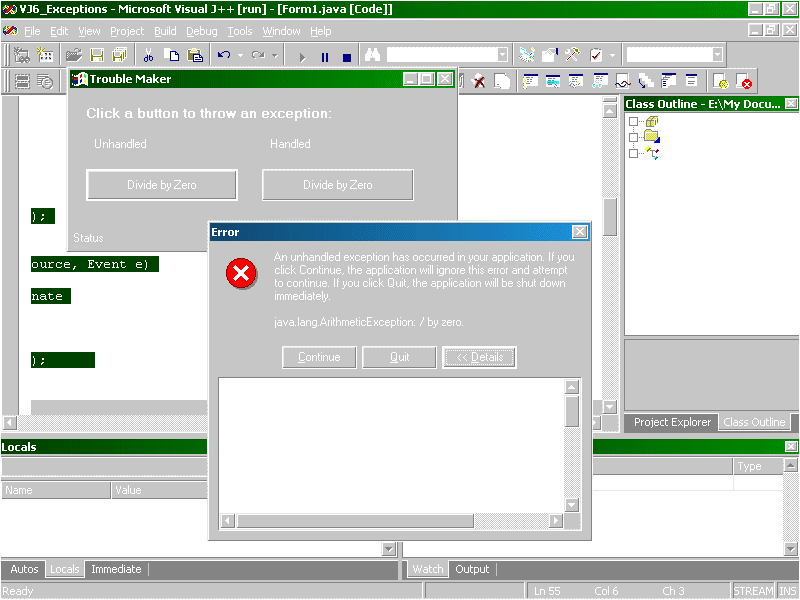
You can see what happens when this button is clicked (see Figure 3). Because this is a WFC program, you get a nice exception dialog box that lets you know that the program choked on the code. When you run this example, the remaining code in the event isn't executed.

Figure 3: An unhandled divide-by-zero exception.
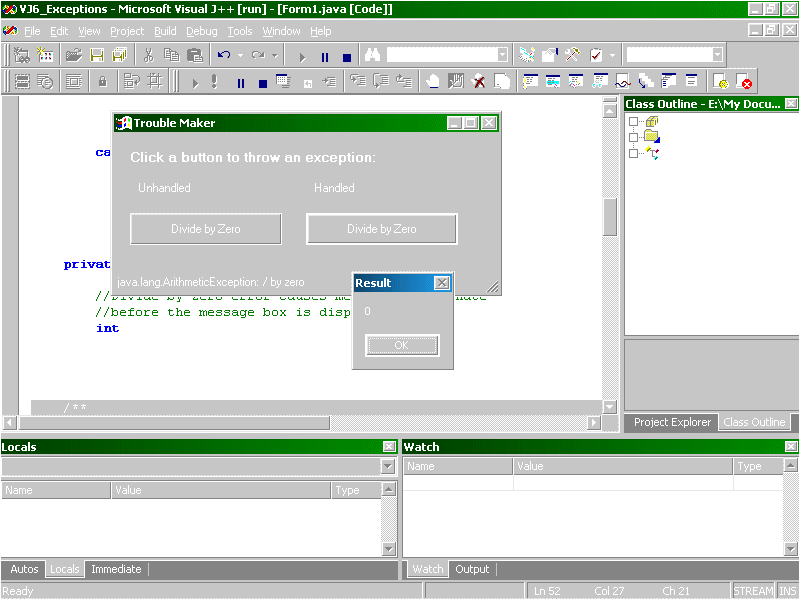
Contrast this code with a similar event that uses a try...catch block to handle an arithmetic exception (see Figure 4). You can see the screen shot I took after clicking the Handled button in Figure 5. I sent the error message to the status bar on the form. The cool thing is that the code following the exception still gets run. For the record, I can't give all the credit for the success of this code to the exception handler. The compiler will complain if you try to run this without initializing the variable Z, saving us from another potential problem.
private void btnDivByZero_click(Object source, Event e)
{
  // Exception handling allows the method to
  // recover from the error.
  int x=1, y=0, z=0;

  try
  {
    z = x / y;
  }
  catch (ArithmeticException evt)
  {
    statusBar1.setText(evt.toString());
  }

  MessageBox.show(Integer.toString(z), "Result");
}
Figure 4: This code uses a try...catch block to handle an arithmetic exception.

Figure 5: Handling the divide-by-zero exception.
Writing Your Own Exception Classes
You can easily create your own exception classes by extending java.lang.Exception, then throwing a new exception object in a try...catch block. In this example, I'll just write the exception class as an inner class for a WFC program (see Listing Two). Then, I'll have a statement in the program throw an exception to the new exception class.
Begin Listing Two — Second Example
import com.ms.wfc.app.*;
import com.ms.wfc.core.*;
import com.ms.wfc.ui.*;
import com.ms.wfc.html.*;

/**
 * This class can take a variable number of parameters on
 * the command line. Program execution begins with the
 * main() method. The class constructor is not invoked
 * unless an object of type 'Form1' is created in the
 * main() method.
 */
public class Form1 extends Form
{
  public Form1()
  {
    // Required for Visual J++ Form Designer support.
    initForm();

    // TODO: Add any constructor code after initForm call.
  }

  /**
   * Form1 overrides dispose so it can clean up the
   * component list.
   */
  public void dispose()
  {
    super.dispose();
    components.dispose();
  }

  private void button1_click(Object source, Event e)
  {
    int x = 100;

    try
    {
      if (x > 50) throw (new Problem());
    }
    catch (Problem p)
    {
      MessageBox.show("Caught a problem exception!",
                      "Problem");
    }
  }

  class Problem extends Exception
  {
  }
// GUI Code cut for brevity.

}
End Listing Two
The code for the exception class looks like this:
class Problem extends Exception
{
}
To throw that exception, the try...catch block looks like this:
try
{
  if (x > 50) throw (new Problem());
}
catch (Problem p)
{
  MessageBox.show("Caught a problem exception!",
                  "Problem");
}
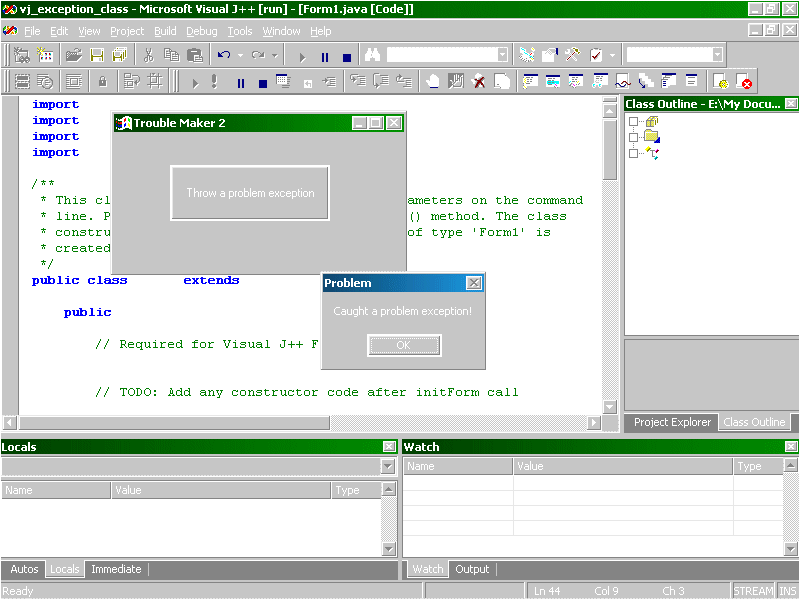
You can see what happens when this code is run in Figure 6. Remember that because your exception class is an object, you can encapsulate any data or methods that you want within it. I'll leave it to you to decide what you might want to do with your own exception classes.

Figure 6: Handling a custom exception.
Handling Checked Exceptions
If you don't catch a checked exception in the same method where it is thrown, you must list that exception class in the method's throws clause. The Java compiler guarantees that a method explicitly deals with all checked exceptions, either by catching them or by notifying the caller that the method might throw the exception.
When you call a method that has a throws clause, your method must likewise catch all listed exceptions, or notify its callers by listing the uncaught exception classes in its throws clause. This is where the difference between checked and unchecked exceptions is so important. If you had to list every exception that a method might throw, every throws clause would include RuntimeException and Error because these exceptions can happen anywhere. Listing them in a method's throws clause doesn't contribute any useful information, so the Java compiler doesn't check for them. All other exceptions are checked exceptions, and the compiler ensures that a method deals deliberately with all checked exceptions.
The throws clause tells you what might happen, so you can be prepared. For example, a method that might throw the Problem exception can be written as follows:
public void problem_method(int x) throws Problem
{
  if (x > 50)
    throw new Problem();
}
Where the method is called, you must catch the Problem exception, or list it in the method's throws clause, as shown in Figure 7.
public void catches_problem(int x)
{
  try
  {
    problem_method(x);
  }
  catch (Problem problem)
  {
    MessageBox.show("Caught a problem exception!",
                    "Problem");
  }
}

public void propagates_problem(int x) throws Problem
{
  problem_method(x);
}
Figure 7: Catch the Problem exception, or list it in the method's throws clause.
The VJ6 Exception Bonus
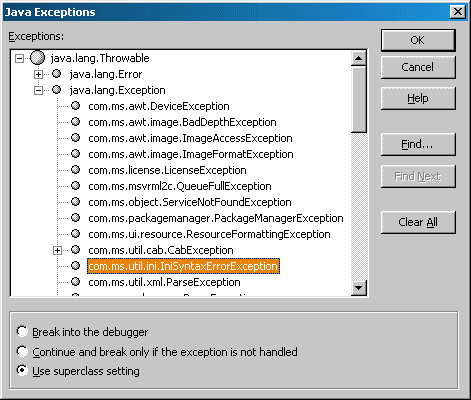
I've tried to distill exceptions down to the very simplest example. I've talked about just a couple of the Java run-time exceptions you can catch in your code. To really get a good look at what Visual J++ 6.0 has to offer by way of exceptions, open the Java Exceptions dialog box from the Visual J++ 6.0 Debug menu or press CSE. You can see a shot of this dialog box in Figure 8.

Figure 8: The Java Exceptions dialog box.
The Java Exceptions dialog box lets you examine the exception hierarchy down from java.lang.Throwable. I said earlier that Microsoft takes error handling seriously. This is evident when you start to drill down and you see all the exceptions associated with such packages as com.ms.awt.*, com.ms.util.*, and so on.
Besides letting you view this exception hierarchy, the Java Exceptions dialog box lets you choose what the debugger does when any given exception is thrown. You simply choose the exception you wish to customize and select the way the exception is treated when thrown. By default, these exceptions use the superclass setting, so you can handle the larger group by setting the behavior for the superclass. When you hit an exception, you can use continue, and break only if the exception is not handled, or you can break into the debugger.
Conclusion
With the excellent exception handling built into Java, you can usually be sure your programs will behave when they run into problems. The debugging features of Visual J++ 6.0 go a long way toward ensuring that you create bug-free code without catching every possible exception. In this article, I tried to provide you with enough information about exception handling so you can start to take whatever level of control you wish over exceptions that might occur in your own programs.
Brian Johnson is a freelance writer in Orlando, FL. His most recent book is Microsoft Image Composer for Dummies [IDG Books Worldwide, 1998]. You can reach him at brianjay@gate.net or visit his home page at http://www.gate.net/~brianjay.
Download source code here.