This article may contain URLs that were valid when originally published, but now link to sites or pages that no longer exist. To maintain the flow of the article, we've left these URLs in the text, but disabled the links.


MIND


How It's Done

minddone@microsoft.com        Download the code (140KB)

Michael Hyman

Greetings Will Robinson

B
ack when I was a bachelor, I was never quite sure what to do in many social situations. I can remember awkward forays into dance clubs, where I was ignored except for the occasional woman who would ask if I had any drugs to sell. Now that I get my hair cut more frequently, that problem has all but vanished. I've also learned about the benefits of sending cards for all occasions. Mother's Day? Valentine's Day? Programmer's Day? It doesn't matter. They each need a special greeting. Of course, finding a stamp is a different issue. Fortunately, the Internet has solved that. It is simple to send animated greeting cards, with no stamps required. And the Web abounds with them.
      This month I'll show some Dynamic HTML techniques you can use to create animated greeting cards. I'll also satisfy the requests of several readers by showing how to modify the page so that it will work with Netscape Navigator. Believe it or not, there are still a bunch of folks out there using Netscape products. And since Netscape was kind enough to rename their object model to Dynamic HTML (sending the world into confusion about what Dynamic HTML is, and whether anything written in Dynamic HTML will work on both Microsoft® Internet Explorer 4.0 and Navigator 4.0), I'll break through some of the confusion.
      First, let me state that what Microsoft Internet Explorer 4.0 calls Dynamic HTML and what Netscape Navigator 4.0 calls Dynamic HTML are completely different. Currently, Internet Explorer 4.0 provides a far broader and more powerful object model than Navigator 4.0. Now, let's take a look at how the two browsers work, and then see how to write for both of them. Let me warn you that this discussion is by no means exhaustive. There certainly are more things you can do to target both browsers, and more nuances and twists than I will explore here. In fact, I have purposefully chosen a sample page that only uses features readily available in both browsers.

What's Up, Doc?
      Rather than describe the differences between the two browsers, I'll go through the far shorter list of similarities. In addition to the standard HTML 3.0 level capabilities, both browsers will let you:

  • Use 2D positioning for DIVs and SPANs
  • Change the visibility of DIVs and SPANs
  • Trap mouse events for DIVs and SPANs
  • Trap mouse events for image maps
  • Get collections of DIVs and SPANs
  • Change the background color of text dynamically

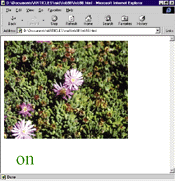
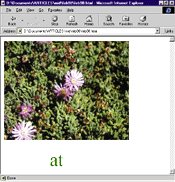
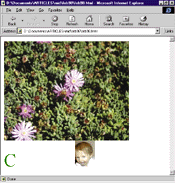
      Fortunately, these capabilities are more than I need for creating an animated greeting card. The card will be simple, with just a picture at the top and a message below. The letters in the message will cycle, kind of like a marquee; unlike a marquee, the individual letters will stay in place. Figure 1 shows several pictures of the page over time. The images and letters are easily changed, of course.

Figure 1: Personal Web Wizard Output Figure 1: Personal Web Wizard Output Figure 1: Personal Web Wizard Output
      Figure 1: An Animated Greeting Card
      Now I'll create a set of objects, all with the same ID. I'll create a collection for those objects; then I'll create script code to walk through and manipulate the collection. To begin, let's take a look at the HTML parts of the page:


 <IMG SRC=card.jpg><BR>
 <SPAN id=banner>C</SPAN><SPAN id=banner>o</SPAN><SPAN id=banner>n</SPAN>
 <SPAN id=banner>g</SPAN><SPAN id=banner>r</SPAN><SPAN id=banner>a</SPAN>
 <SPAN id=banner>t</SPAN><SPAN id=banner>s</SPAN><IMG id=banner SRC=face.jpg>
Here you have the image that will appear at the top of the screen. Following it are a series of SPANs, each having the same ID. And finally there is an image, again with the same ID as the SPANs. Note that each SPAN contains a single letter. By creating a collection for all of the elements named banner, you will be able to hide and show each letter (that is, each SPAN or image) individually.
      Because all of the SPANs have the same ID, you can use a style sheet to set their style globally:

 <STYLE>
 #banner {font-size:44pt; color:green; visibility:hidden}
 </STYLE> 
Of course, if you want to use different fonts and colors for each letter, you can override the global style with an inline style sheet.
      Now I'm going to create a collection to cycle through the various elements named banner. These elements could be SPANs containing a single character, as in the HTML fragment you just examined. But they could just as easily contain words, groups of pictures, or anything else that you want.
      Next, I need to write the code. Each time a timer ticks, I'll show one letter and hide another. Thus, the letters (or rather, the SPANs) will cycle across the page. I'll add a variable, numShow, that controls how many letters are visible at any point in time. You can experiment with changing this value to get a look that you like. The larger the value, the more letters will stay on the page at one time.
      To begin, create a collection of all of the elements with a particular name, in this case elements named banner:

 collBanner = document.all.item("banner");
Then make numShow SPANs visible, after making sure that numShow is a valid number:

 if (numShow > collBanner.length)
     numShow = collBanner.length - 1;
 for (i = 0; i < numShow; i++)
     collBanner[i].style.visibility = "visible";
Now, I'll kick off the animation:

 window.setTimeout("animate()",1000);
Making the page animate simply involves deciding which element to hide and which to show. I'll use a variable to track the current element. Each time the function animate is called, I'll hide the current element:

 collBanner[curItem].style.visibility = "hidden";
      To compute which element to show next, I'll add the value of numShow to the current element. If that goes beyond the end of the number of elements, I'll wrap around to the beginning using the mod operator:

 nextItem = (curItem + numShow) % collBanner.length;
 collBanner[nextItem].style.visibility = "visible";
Finally, I'll advance the current item counter, then call the animation again after a slight delay:

 curItem = ++curItem % collBanner.length;
 window.setTimeout("animate()",200);
Figure 2 shows the complete code. Test It!
      

Navigamus Ignoramus
      At this point, let me share some philosophy with you. I'm not a big believer in write-once read-many Web pages. That is, I don't think it is realistic to write a page that heavily leverages Dynamic HTML and will work fine under all browsers. Nor do I think it makes much sense to write a dynamic page for the subset of functionality shared by Navigator and Internet Explorer. Or to write it for Navigator, and use innerHTML to replace large sections of the page so that it works with Internet Explorer (which you can do if you know a couple of tricks to change scripts dynamically).
      If I'm doing something sophisticated, my philosophy is to author separate pages for each browser, then use an ASP file or a CGI script to detect the user's browser and redirect to the appropriate page. (Stinks, huh? Well, I remember custom coding Mac and Windows®-based code a while back, but then I don't have a Mac any more.) You can do this in a client-side script as well, but it is much cleaner to do so on the server. The number one reason is that it doesn't mess up the back list. The number two reason is that you get more techie points. So rather than making a vain attempt to manipulate the page to work in both Netscape Navigator and Internet Explorer, I'll show how to convert the page to work with Navigator.
      Navigator doesn't let you create a collection of all elements with a particular name, but it will let you find a collection of all layers. A layer is created either by using the nonstandard LAYER tag, or by creating a DIV or SPAN that is absolutely or relatively positioned. So the first thing to do is relatively position all of your SPANs. That won't change how they appear on the screen, but will let them show up in the Layers collection. I'll do this simply by changing the style sheet:


 <STYLE>
 #banner {position:relative;font-size:44pt; color:green; visibility:hidden}
 </STYLE>
      I'll also have to wrap the image inside a SPAN, since the image itself can't be part of the collection—only DIVs, SPANs, or LAYERs are allowed in Navigator 4.0. (Also note that unlike Internet Explorer 4.0, Navigator doesn't let you position elements such as images using CSS notation either. Bogus!)
      Here's the HTML that wraps the image inside of a SPAN:

 <SPAN id=banner><IMG SRC=face.jpg></SPAN>
Now comes the interesting part. Instead of getting a collection of all elements with ID set to banner, you'll get the set of all layers:

 collBanner = document.layers;
This brings up one slight problem: if you want to limit the collection to only include some layer elements, you'll need to write a loop that checks the ID of each element and only adds those with a specific ID into an array. Although this isn't hard, it isn't as convenient as using the Internet Explorer equivalent document.all.item.
      As with the Internet Explorer 4.0 version, I'll walk through the collection and turn on the first numShow elements. Here, though, there is a difference. With Internet Explorer, you access the position, visibility, color, and other element attributes through the style object. In other words, if you want to make an element named foo visible you would write:

 foo.style.visibility = "visible";
If you want to move an element foo's left position to 100 you would code:

 foo.style.left = 100;
      Netscape Navigator, by contrast, manipulates the properties from the object itself. So to make an element visible, you could write:

 document.foo.visibility = "show"
And to move the element, add this line:

 document.foo.left = 100;
You'll note a few other differences from the example. First, instead of setting visibility to "hidden" or "visible," you set it to "show" or "hide." Second, you need to address the element via the document object.
      Now, all you need to do is change the way you hide and show elements in the animate function. For example, the code to hide an element becomes:

 collBanner[curItem].visibility = "hide";
Figure 3 shows the complete listing of the animated greeting card page for Netscape Navigator. Test It!


From the April 1998 issue of Microsoft Interactive Developer.