January 1998
![]()
The New HTML Help System Extends Online Help From the Desktop to the Web
Download HTMLhelp.exe (52KB)
|
Ted Faison has written extensively on Windows, Java, Delphi, and C++. He is president of Faison Computing Inc., a firm that develops software components and applications for Windows. Ted can be reached at ted.faison@computer.org.
|
|
The new HTML Help
system represents an evolutionary step in online documentation systems. Until the advent of Web browsers, Microsoft relied on essentially two methods for displaying documentation. The most common used the WinHelp engine, which was adequate for simple systems. the Other system used a Microsoft program called InfoView, and was developed to satisfy users who needed to locate help documentation on the numerous Microsoft® Developer Network CDs.
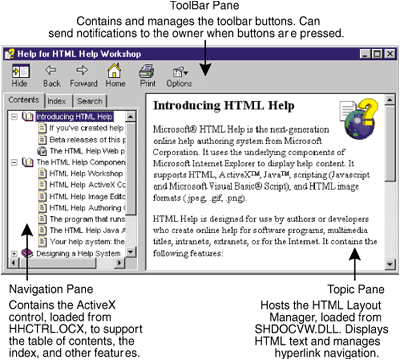
All of the basic features in WinHelp 4.0 were ported to the new system and the user interface has been completely redesigned. Apart from the switch to HTML, a number of new features were added. When you open a typical HTML Help window, you immediately see something that looks like a mix between the Windows® Explorer and Microsoft Internet Explorer. A typical help window is shown in Figure 1. By default, the window opens in the upper-right corner of the screen. The height of the window is set to display all the text available, if possible. If there is too much text, a vertical scrollbar is added automatically. |
 |
| Figure 1 A Typical HTML Help Window |
|
The HTML Help system lets users locate information either through a table of contents (TOC) or through an index. HTML Help windows are usually tri-pane, meaning they contain three standard panes. There are ways to control the Overall appearance of your help window, so it doesn't necessarily have to contain all three panes, but the tri-pane arrangement is the default. The top pane is for the ToolBar, the bottom-left pane is for the TOC, and the bottom-right is where the help topics are displayed.
HTML Help Workshop
|
 |
| Figure 2 An HTML Help Workshop Session |
|
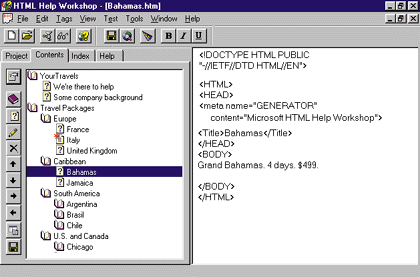
HHW has a number of wizards to simplify common tasks like embedding the HHCTRL ActiveX control in HTML documents. Most of the Se wizards become available after
at least one HTML file is associated with a project. Once this is done, the wizards are available from the HHW toolbar or the Tags menu. The Compile command compiles an entire HTML Help project into a single file. Compiled files are useful for several reasons. First, they are small, so they are well-suited for Web deployment. Second, certain features such as full-text searching are available only with compiled files.
Once you create your help files with HHW, there are two ways for users to view the M. The simplest is with a standard Web browser. Because all the files are written in HTML, any browser that supports ActiveX can be used. And if you really want to support browsers that aren't ActiveX-aware, you can instead embed the navigation controls as Java applets, a process I'll describe later. The most typical way users get to your HTML Help system is through a Help menu in your application. Menu commands can be used to programmatically create a help window using an HtmlHelp API function.
Creating a Help System
|
|
|
The frames also designate which HTML file is loaded by default. The left pane loads a file that uses an embedded HHCTRL ActiveX control to support navigation features. Having created a new TOC, you can use HHW to add entries and customize it. Indexes are created and managed in a similar manner. At any time you can click the Display In Browser button to preview how your HTML pages will look.
You can structure the entries shown in the TOC to support different classes of users with Information Types (IT). HHW also comes with a built-in tool, called the HTML Help Image Editor, to capture and view screen images. It supports common image formats like BMP, GIF, and JPEG. The Image Editor lets you manage the images used in your help system, but keep in mind that it wasn't designed to be a full-blown graphics production system.
Compiled Files
|
|
|
The second parameter is the name of the compiled file that contains the topics. The third parameter is the alias number of the topic.
Navigating HTML Help Content
|
|
|
Version information is designed primarily to aid developers during debugging, not for users to see.
To demonstrate the features on the HTML Help system, I created a small documentation system for a fictitious travel agency called Your Travels. I'll be using code fragments from this example throughout the article. To display an index in an HTML file, you need an index sitemap file, which has an .hhk extension. You embed the HHCTRL ActiveX control on the page and pass it the name of the sitemap. You can create .hhk files manually with a tool like Notepad or with HHW. Building an index is not automatic. You have to add entries to it, declaring keywords and the topics they are linked to. You add entries by clicking the "Insert a keyword" button on the index pane in HHW. For each index entry, the wizard adds a record to the sitemap, like this: |
|
|
The ITs in the dialog box are not supported for indexes under HTML Help 1.0. ITs are a way to categorize the contents of your Help system, allowing users to obtain customized information based on the selected ITs.
Once you have a sitemap with indexed entries, creating an index is a matter of using the HHW Wizard to insert the HHCTRL ActiveX control into the document. Clicking keywords in the index displays the linked topic in the right pane. |
|
|
You can put objects on a page so users can click on the M to see links to other topics. the Se objects are normally used as references to related topics, or "see also" features. If all you want is a link to another topic, just use a simple hyperlink.
The HHW Wizard lets you create lists of related topics as buttons, popup menus, or dialog boxes. Buttons act just like ordinary hyperlinked text: you click the M and the browser goes to the linked page. Popup menus are useful for short lists. The popup window will automatically get scrollbars if the list doesn't fit in the window, so it can handle any number of items. Dialog boxes are useful when the number of topics to display is long. Links to related topics are encoded as URLs. You can mix local and remote URLs, significantly blurring the boundaries of your help system. The wizard lets you insert the HHCTRL ActiveX control into an HTML document with parameters to support related topics. Your HTML document will have a button embedded on it. If you requested a popup menu, the code will look like this: |
|
|
Shortcuts
A shortcut is a button users can click on to launch a secondary program. Say you want to open a form that collects information from the user. A shortcut button could launch a standalone program to get the user data and send it to your Web server. Shortcuts appear as buttons, with optional text or a bitmap for the caption. To add a shortcut to an HTML page, you need to embed the HHCTRL ActiveX control on the page and pass it three parameters, like this: |
|
|
Keep in mind that programs launched by a shortcut can't return a status code to their caller like modal dialog boxes do. The programs execute independently of your help window and don't close automatically when your help window closes.
Splash Images
|
 |
| Figure 4 A Splash Window |
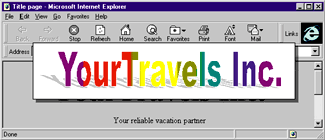
| I captured an image off the screen using HTML Help Image Editor, then saved it as SPLASH.GIF in the directory with the rest of my documentation files. When I ran the HHW Wizard, I embedded the HHCTRL ActiveX control on my title page, selected the Splash option with my GIF file, and requested a three-second duration. That's it. Loading the title page with a browser causes the splash window to appear (see Figure 4). Here's the code the wizard generated to create the three-second splash window: |
|
|
The splash duration is measured in milliseconds. You can use GIF or BMP images.
Tables of Contents
|
|
|
The preferred way to show a TOC is in the left pane of a multipane window. Clicking entries in the TOC changes the topic shown in the right pane. You can change this arrangement by indicating the name of the topic pane in the sitemap file. You could even make the TOC appear by itself, or in a pane at the top of the window. Using the Table of Contents Properties dialog box in HHW, you can customize the way the TOC appears, including its font, treeview styles, and bitmaps. The HHCTRL ActiveX control that displays the TOC uses an image list to display bitmaps for each entry in the TOC. The built-in image list looks like Figure 5. Each bitmap is 16 X 16 pixels. |
|
|
| Figure 5 HHCTRL Built-in Image List |
|
To select a bitmap for a TOC entry using HHW, click the Edit Selection button in the Contents pane. In the Advanced tab there is a spinner edit control for selecting the image index. The spinner uses a 1-based image index. You can customize the TOC by creating your own image list as a BMP file using a tool like Microsoft Developer Studio™. The image list must consist of a series of bitmaps. To select your image list, click the Contents Properties button on the Contents pane in HHW and enter your image list file name.
Information Types
You use ITs with TOC entries. Using HHW, select an entry in the TOC, then click the Edit Selection button. The Information Types tab lets you associate the entry with one or more ITs. When the user opens the help window, the TOC displays entries for all the ITs. To select a subset, the user right-clicks the TOC and selects the Customize command. This launches a wizard. The HtmlHelp API is also designed so you can select ITs programmatically, but the feature wasn't quite ready in time for the release of version 1.0. You aren't required to use ITs in your HTML Help projects. If a topic doesn't reference one, it will always be displayed, regardless of the IT selected.
The Java Applet
|
|
|
Make sure you type HHCtrl.class with the exact upper and lower case, otherwise you'll get a "class not found" error when the Java Runtime Environment tries to load it. The HTML Help documentation says to include a codebase directive in the APPLET statement, but I wasn't able to get it to work. Using a codebase directive seems to interfere with the applet's ability to find and load the sitemap files. You need to copy all the Java support files contained in the HHW java subdirectory to the directory that contains your HTML documents. Make sure that your .hhc and .hhk sitemap files, plus all your other help files, are in the same directory.
Creating HTML Help Windows Programmatically
|
|
| There are two versions of the declaration: HtmlHelpA for ANSI strings and HtmlHelpW for Unicode (wide) strings. Other than the character set they are identical, so I'll describe the ANSI version. A #define statement in HTMLHELP.H selects one function or the Other: |
|
|
Before using HtmlHelp in your program, you need to include HTMLHELP.H, which contains the definitions for the commands and parameters you can use. As with any function exported from a DLL, you can load it implicitly or explicitly. To load implicitly, you link your application with the import library HHCTRL.LIB and just use HtmlHelp in your code as a regular function. When your application loads, the Windows loader will automatically load HHCTRL.OCX, so you'll call the API function like this: |
|
| To load explicitly, you use GetProcAddress and access the API through the returned function pointer. You can load either by name or ordinal. To load by name, use the string HtmlHelpA or HtmlHelpW. To load the ANSI function, you would write something like this: |
|
| To load by ordinal, you should use the symbolic names ATOM_HTMLHELP_API_ANSI or ATOM_HTMLHELP_ API_UNICODE, like this: |
|
|
When calling HtmlHelp, the first parameter is the handle of the calling window. Some help windows you create can send messages, and the calling window will receive the M. For example, if you create a help system that has a toolbar, the help window can send WM_NOTIFY messages to the calling window when the user clicks a button. The calling window also owns and controls the visibility of the help window. This is an important new feature because WinHelp windows were owned by the Desktop and their visibility was not controlled by the calling app. With HTML Help windows, the Owner is generally your application. When you switch to another app, the Help window is hidden. If you hide or minimize your app, the Help window is also hidden or minimized. If you close your app, the Help window is closed. The HtmlHelp API is a versatile function and accepts all kinds of commands and parameters to create and manipulate help windows. Figure 7 describes the commands. I'll get to the parameters shortly. Normally, the first call you make to the HtmlHelp API is to create a help window. There are several ways to create windows, based on what you want to display. The simplest is to use the HH_DISPLAY_TOPIC command, which will create a window with formatted HTML text in it. If the text contains links, the user can click on the M to navigate to linked documents, just as with a regular Web browser. |
|
This code displays the contents of the file TravelPackages.htm from the local file system in a default window. The window will have the styles WS_THICKFRAME | WS_OVERLAPPED | WS_VISIBLE, which is just a resizable window with a blank caption bar, as shown in Figure 8. For the HTML file name in the second parameter, you can also use Web URLs—in fact, the default is an HTTP URL. The file name www.microsoft.com/default.htm would default to http://www.microsoft.com/default.htm and display the Microsoft home page. You can subsequently use the HH_SET_WIN_TYPE command to customize the location, size, title, color, and font of the help window.
Here's how you would use HH_DISPLAY_TEXT_POPUP to display a char array: |
|
|
The HH_POPUP structure allows you to set the foreground and background colors of the window. Using -1 selects the default colors. The pt field specifies the coordinates of the top-left corner of the window. (The HTML Help documentation incorrectly states that pt refers to the top-center point of the window.) You can also set margins around the text by using the rcMargins field. To display text from a resource file, set the HH_POPUP fields hinst and idString. The hinst field is the instance handle used to load string resources. idString is the resource ID of the string. Here's how you would set up the HH_POPUP structure to display text from a resource: |
|
|
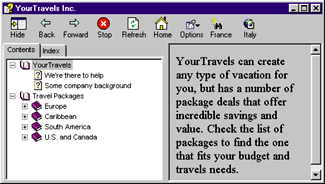
Text popups stay on the screen until you press a key or click the mouse. The MFC function AfxGetInstanceHandle returns the instance handle for the currently executing module. If your app is not written using MFC, you can get the instance handle by calling the GetModuleHandle API function with a NULL argument. You can also use the instance handle of a DLL if your resources are stored there. The most elaborate type of help window is the tri-pane variety described earlier. Showing a tri-pane window requires two steps: creating it and displaying something in it. Creating the window is a matter of setting up an HH_WINTYPE structure and passing it to HtmlHelp with an HH_SET_WIN_TYPE command. The structure is complex, allowing you to specify almost every possible option for the tri-pane window, including the number and appearance of toolbar buttons, the size of the three panes, the window style, the ITs supported by the HHCTRL ActiveX navigation control, and so on. The HTMLHELP.H include file has comments for each field. Because the structure is complex and the comments rather concise, I decided to provide additional information about each field, as shown in Figure 9. To see how everything fits together, you really need to see some code. Figure 10 creates a fairly complete tri-pane help window, with tabs in the navigation pane and all the toolbar buttons available. The button glyphs are fixed—take 'em or leave 'em. The code produces the window shown in Figure 11. |
 |
| Figure 11 Tri-pane Help Window |
|
The last two buttons on the right are custom buttons, referred to as Jump1 and Jump2, that you can tie to your own URLs. Notice that the first call to HtmlHelp creates the window and the second one displays it. The first call creates a window with the type name of MyWindow, which is used in the second call, preceded by the > character.
Commands and Parameters
|
 |
| Figure 14 HH_WINTYPE Structure |
|
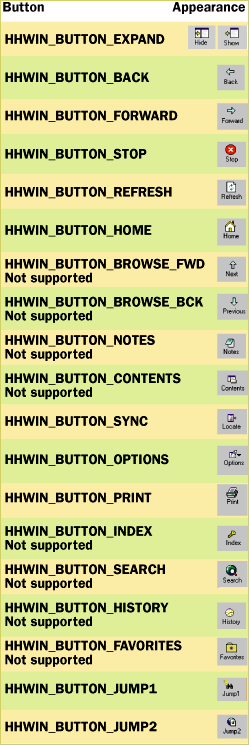
Although HHCTRL.OCX contains bitmaps for all the bitmaps shown in Figure 14, not all of the M
are supported in the code, as indicated. If you don't specify any tool-bar buttons in the HH_WINTYPE structure, a default toolbar will be created with the Expand, Back, Options, and Print buttons. There are a number of situations in which you might want to receive notification events from the help window: you might want to do something special when the user goes to a certain topic or when a certain toolbar button is pressed. The help window has the Option of sending you notifications to tell you what the user does. Although full notification support was planned, only HHN_NAVCOMPLETE, described below, was finished in time for the release. Because an update to HTML Help will appear soon, I'll describe all the event notifications. To receive notifications, you must set the idNotify field in HH_WINTYPE. Once set, you'll receive all kinds of notifications, but you can ignore those you're not interested in. Handling notifications is a matter of processing WM_ NOTIFY messages. The wParam parameter carries the value of the idNotify field you set in the HH_WINTYPE structure. It corresponds to the ID of the control sending the notify message (in this case the help window), so you can distinguish different senders from each other. The lParam is a pointer to an HHN_NOTIFY structure, which looks like this: |
|
|
hdr contains a standard NMHDR structure, used in all Windows notification messages. pszUrl contains a string pointer used with HHN_NAVCOMPLETE notifications to indicate the URL the user switched to. The NMHDR structure looks like this: |
|
|
hwndFrom is the handle of the Help window, idFrom is the notification ID you set with the idNotify field of the HH_WINTYPE structure. This same ID is also in the wParam parameter of the WM_NOTIFY message. The code field contains either the value HHN_NAVCOMPLETE or HHN_TRACK. An HHN_NAVCOMPLETE notification message is sent after a new topic has been loaded. An HHN_ TRACK notification is sent immediately when the user clicks a button. Figure 15 shows the code for handling notifications. If you try this code with the current HtmlHelp API, you won't receive HHN_TRACK events. When the event is eventually supported, the idAction field of the HHNTRACK structure will contain the ID of the button that was pressed.
Search Support
Training Cards
|
|
|
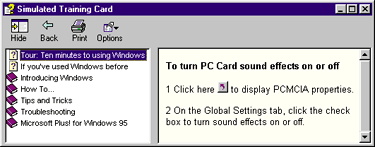
The SHORTCUT image is a built-in bitmap. The file HHCTRL.DLL contains resources used by the HHCTRL ActiveX control, and one of the M is the SHORTCUT bitmap. Incidentally, the DLL also contains the image list used with TOC entries and the toolbar button images shown in Figure 5. The HHW Wizard allows you to specify a message to send to the program the button launches. If you specify WM_ TCARD, then your program will get WM_TCARD messages in a manner similar to WinHelp. The main difference is that this approach sends WM_TCARDs to your standalone program, while WinHelp training cards send WM_TCARDs to the Owner window. I created a simple topic page that looks a lot like a WinHelp training card, with a shortcut button showing the SHORTCUT bitmap (see Figure 16). |
 |
| Figure 16 HTML Help Shortcut Button |
|
I created the TOC using HHW. The topic was created using plain old Word 97 and saved as an HTML file. Then I embedded the HHCTRL ActiveX control to support the
shortcut button. For the window background color I used the value 0xFFFFEF, which corresponds to the default Windows 95 training card color. The HTML code for the topic pane in Figure 16 is shown in Figure 17.
Converting an Existing WinHelp Project
Conclusion
From the January 1998 issue of Microsoft Systems Journal. |