by Michael C. Amundsen
If you've ever had to write an application involving at least one process that took lots of time, you know how important it is to create some type of progress indicator to let users know the program hasn't locked up. In this article, we'll show you how to use Visual Basic 4.0-32 or Visual Basic 5.0 to build a progress-indicator component that you can use in all your future projects.
Along the way, we'll also show you how to use the new Visual Basic 5.0 keyword WithEvents to create an event sink from a DLL instead of an ActiveX control. Using WithEvents allows you to create an asynchronous callback from your component back to the application that's using the component.
To design and implement a reusable component with Visual Basic, you must first determine the final product. Will it be an ActiveX control, a DLL, or an EXE? Although your initial reaction might be to use an ActiveX control, this isn't always the best choice—for several reasons. First, you can only build ActiveX controls using Visual Basic 5.0. If you're using VB4, you must choose between a DLL or an EXE component. Second, if you're using Visual Basic 4.0-16, you can't build a DLL component—only an EXE. Table A shows a quick guide to component-building options with Visual Basic 4.0 and 5.0.
Table A: Component options with Visual Basic 4.0 and 5.0
| Component | VB4-16 | VB4-32 | VB5 |
| OCX | No | No | Yes |
| DLL | No | Yes | Yes |
| EXE | Yes | Yes | Yes |
Another consideration is that DLLs are often easier to work with than ActiveX controls. For example, what if you wanted to use this progress indicator but didn't have a default form in your application? Finally, VB4 won't allow you to display a modeless dialog box within an OLE DLL. Since our progress-bar component requires the display of such a dialog, you should select the EXE option when building this component in VB4; if you're using VB5, choose the ActiveX DLL option.
Planning the projectOnce you've determined the component type, you need to design the interface between the object and your applications. The object interface describes the properties and methods the component will "publish" to other applications. If you're using VB5, you can also create event messages that your component can send back to the application.
Since we want to use this progress indicator in lots of different situations (copying files, calculating totals, loading records into memory, etc.), we'll build a very generic tool. Also, since our goal is to focus on the process of building and using the component, we'll keep the design simple.
We'll use three values to control updating the progress bar. We'll assume that the progress bar starts at zero (MinValue) and ends at 100 (MaxValue). However, users will be able to set each value at any value they choose. As the process progresses, the Value property will be updated. It's this Value property that will be represented on the dialog box's progress bar.
There are only three methods defined for the component. The Show method will be invoked at the start of the process. Each time users want to update the progress value, they can use the Update method. Finally, when the work is finished, the Drop method will remove the dialog from the screen.
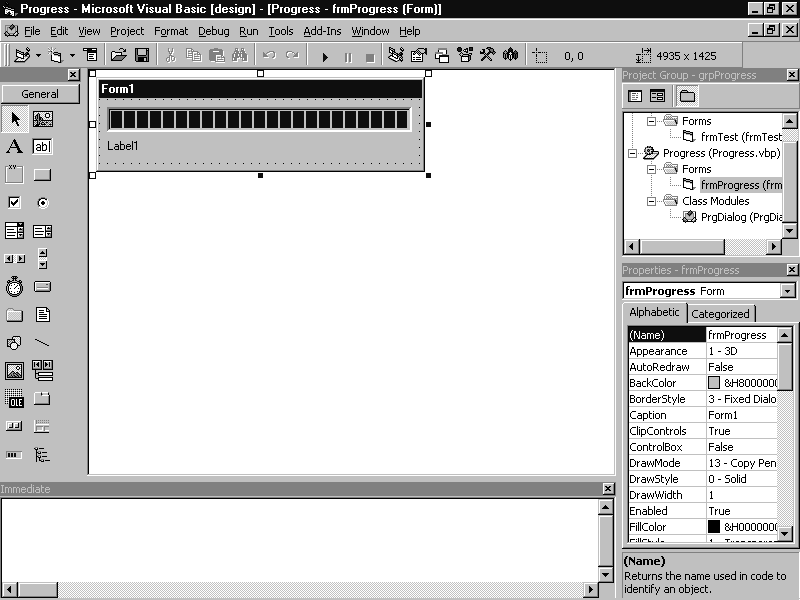
We're making one big assumption in our component—that there'll be a dialog onscreen. That means we must build a form. Figure A shows what this form looks like in the VB IDE.

Figure A: Our progress dialog form will look like this.
Building the dialog formNow that the design is done, it's time to build the component. If you're using Visual Basic 5.0, start Visual Basic and select ActiveX DLL as the project type. If you're using Visual Basic 4.0, just start Visual Basic with the default project.
We'll begin by setting up the dialog form. If you're using Visual Basic 5.0, you'll first need to add a blank form. To do this, choose Add Form from the Project menu. In the dialog box that appears, choose Form from the New page and click OK.
Next, you'll need to make the ProgressBar control available for your project. In VB5, you'll select Components… from the Project menu, click the check box beside Microsoft Windows Common Controls 5.0 OCX and click OK. To access the Components dialog box in VB4, select Controls… from the Tools menu. The ProgressBar component should now appear in the Toolbox.
Add a ProgressBar and a Label component to the form, as shown in Figure A. Next, set the form and component properties as Table B indicates. Don't worry yet about the Caption properties of the form and label; we'll change those at runtime.
Table B: Dialog-form elements
| Object | Property | Setting |
| Form | Name BorderStyle ControlBox StartUpPosition |
FrmProgress 3 - Fixed Dialog False 2 - Center Screen (VB 5VB5 Only) |
| ProgressBar | Name | PrgProgress |
| Label | Name | LblProgress |
If you're using Visual Basic 4.0-32, you'll need to add an extra bit of code to the form. Listing A shows the code to add to the Form_Load event. This code will center the form on the screen. In VB5, forms have the new StartupPosition property, so you needn't use this code.
Listing A: Code to center form in VB4
Private Sub Form_Load()

    ' for VB4 only

    With Me
        .Left = (Screen.Width - .Width) / 2
        .Top = (Screen.Height = -.Height) / 2
    End With

End Sub
After you've laid out the dialog form, save it as frmProgress.frm and the project as Progress. In VB5, you'll also be prompted to save the class module; name it prgDialog.cls.
Creating the object interfaceNext, we'll write the code for the object interface that will use the form. In this step, we'll create the properties and methods that define the object interface.
If you're using Visual Basic 4.0-32, add a class module to the project by choosing Class Module from the Insert menu. (VB5 creates the module automatically.) Next, set the Name property of the class object to prgDialog and save it as prgDialog.cls. You'll use this class object name when you call the component from other programs.
Finally, we must make sure that the class module is visible to other programs outside the DLL/EXE component. To do this in VB5, set the Instancing property to 2 - Creatable MultiUse. In VB4, set the Instancing property to Multiuse and the Public property to True.
Now we need to create local storage variables for each property in Table A. Section 1 of Listing B shows the code to add to the General Declarations section of the class module.
Listing B: Progress-component code
Option Explicit

Private intMinValue As Integer
Private intMaxValue As Integer
Private intValue As Integer
Private strCaption As String
Private strTitle As String

--------------------------------

Private Sub Class_Initialize()

    ' Set initial values.

    strCaption = "Working..."
    strTitle = "One Moment..."
    intMinValue = 0
    intMaxValue = 100
    intValue = 0

End Sub

--------------------------------

Public Property Get DialogTitle() As String
    DialogTitle = strTitle
End Property

Public Property Let DialogTitle(ByVal vNewValue As String)
    strTitle = vNewValue
End Property

Public Property Get DialogCaption() As String
    DialogCaption = strCaption
End Property

Public Property Let DialogCaption(ByVal vNewValue As String)
    strCaption = vNewValue
End Property

Public Property Get MinValue() As Integer
    MinValue = intMinValue
End Property

Public Property Let MinValue(ByVal vNewValue As Integer)
    intMinValue = vNewValue
End Property

Public Property Get MaxValue() As Integer
    MaxValue = intMaxValue
End Property

Public Property Let MaxValue(ByVal vNewValue As Integer)
    intMaxValue = vNewValue
End Property

Public Property Get Value() As Integer
    Value = intValue
End Property

Public Property Let Value(ByVal vNewValue As Integer)
    ' read-only
End Property

--------------------------------

Public Sub Show()

    UpdateDialog
    frmProgress.Show

End Sub

Public Sub Update(intTemp As Integer)

    intValue = intTemp
    UpdateDialog

End Sub

Public Sub Drop()

    Unload frmProgress

End Sub

--------------------------------

Private Sub UpdateDialog()

    ' Update the form.

    With frmProgress
        .lblProgress = strCaption
        .Caption = strTitle

        With .prgProgress
            .Min = intMinValue
            .Max = intMaxValue
            .Value = intValue
        End With

    End With

    DoEvents ' yield for screen refresh

End Sub
After creating the local storage variables, add the code in section 2 of Listing B to the Class_Initialize event. This code will execute each time a user creates an instance of the object.
Now you're ready to create the property routines for the object. Using Table C as a reference, add the five properties to the object.
Table C: Component properties and methods
| Item | Name | Type | Default |
| Property | DialogTitle DialogCaption intMinValue intMaxValue intValue |
String String Integer Integer Integer |
"One Moment" "Working…" 0 100 0 |
| Method | Show Update Drop |
Adding these properties creates a pair of routines for each property. (Property Get and Property Let). The Get routine allows users to "get" the local storage value associated with the property. The Let routine "lets" users place a value into the associated local storage location. These routines simplify the basic coding of the properties. Section 3 of Listing B shows the coding needed for all five Property Let and Property Get statements. Note that you must change each property's type as indicated in Table C.
As you can see, the only code needed for each property is a line that handles the association between the local storage and the published property name. Note that the Property Let statement for the Value property has only a comment line. This property will be read-only for users, so there's no code to allow users to place data in the local storage associated with that property.
The final step in completing the object interface is to code the object methods. Table C describes three methods (Show, Update, and Drop). Add these methods as public subs and insert the code from section 4 of Listing B.
We also need a method to handle some of the "undercover" work of the object. Add the UpdateDialog method to the project as a private sub, using the code from section 5.
The job of the UpdateDialog method is to move the local storage values onto the form and the progress-bar control. Notice the use of the DoEvents keyword, which forces the operating system to pause a moment to allow the screen to refresh.
As you can see, the three methods are quite simple. Note the use of the parameter for the Update method. That's all the code you need for a basic progress bar.
If you're using Visual Basic 4.0-32, you can skip to "Compiling the Component," below. In VB5, however, you can add an event to your component object.
Adding the complete eventOne of the new features of Visual Basic 5.0 is the ability to add event messages to your programs. Most people know that you can add events to ActiveX controls, but you can also add events to DLL components. In this example, you'll add a message that fires each time the progress bar reaches completion.
There are two steps to creating event messages: declaration and invocation. First, you must add code to the General Declarations sections of the object. To do so, add the following lines of code:
' vb5 only
Public Event Completed()
Now you need to add code that "fires off" the event message. Do this by changing the Update procedure as follows. (Add the code shown in color.)
Public Sub Update(intTemp As Integer)

    intValue = intTemp
    UpdateDialog

    ' vb5 only
    If intValue >= intMaxValue Then
        RaiseEvent Completed
        Unload frmProgress
    End If

End Sub
The new code first checks to see if the maximum progress value has been reached. If so, it sends the Completed message and unloads the form.
Compiling the componentNow that the coding is done, you're ready to compile the component for use in other programs. If you're using Visual Basic 4.0-32, first insert a BAS module by selecting Module from the Insert menu. Then, insert a single, empty procedure called Main. This step is necessary in order for the operating system to register the component for use on the workstation. The Visual Basic 5.0 ActiveX DLL template takes care of this process automatically.
Choose Options… from the Tools menu and click the Project tab. Type Progress in the Project Name field, and choose Sub Main from the Startup Form dropdown list. Click OK.
Now you're ready to compile the object. In Visual Basic 4.0-32, select Make EXE File… from the File menu. In VB5, choose Make Progress.dll… from the File menu; accept the default name (Progress). Once the component has compiled, we'll create a simple test project to see how it works.
Testing the progress indicator
Now that the component is completed, you're ready to test it out. Save all your files, then start a new standard Visual Basic project. Add a single button to the default form. Set the button's Name to cmdTest and its Caption to Test. Now, add the code in Listing C to the cmdTest_Click event.
Listing C: cmdTest_Click() code
Private Sub cmdTest_Click()

    Dim objProgress As Object
    Dim x As Integer
    Dim y As Integer

    Set objProgress = CreateObject("Progress.PrgDialog")

    objProgress.Show

    For x = 1 To 100
        objProgress.Update x
        For y = 1 To 10000
            ' na
        Next
    Next

    objProgress.Drop

    Set objProgress = Nothing

End Sub
This is all the code you need to test the new object. Note the use of CreateObject() to make the link between this application and the component. This method of linking occurs at runtime and is called late binding of the object. There's another version called early binding that you can use at design time, as we'll see shortly.
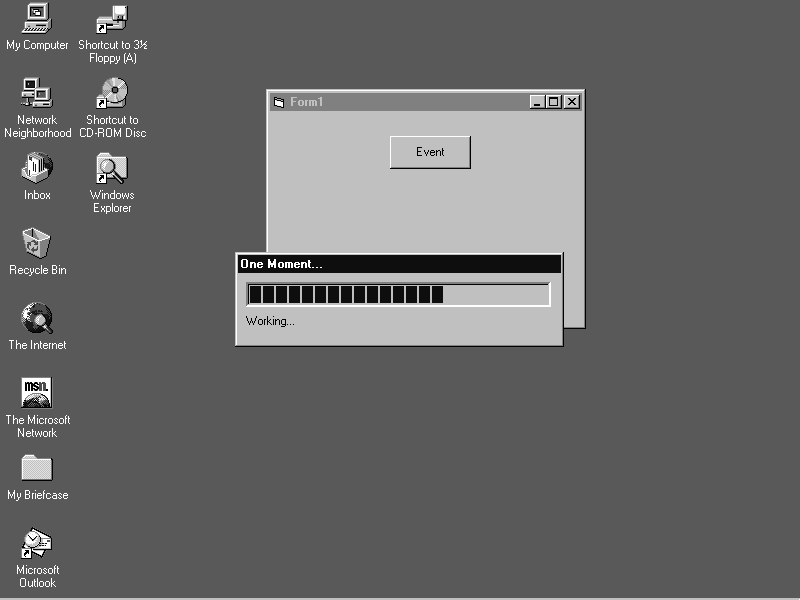
To try the project out, run it and press the Test button. You should see a progress bar like the one in Figure B.

Figure B: Our test project brings up this progress dialog box.
(If you have trouble running your test project, be sure you've spelled the project name and class name correctly in the CreateObject() method. Also, check that you've compiled the DLL/EXE component before running the test code. Compiling the component automatically updates the Windows Registry with information about your component—without this information, VB won't be able to locate and use the Progress component.)
Now add a second button called cmdEvent with a caption of Event. We'll use this button to test the early-binding method of component use. (If you're using VB5, you'll get to test the event message, too.)
First, create a reference to the component in your project, thus binding your project to the component. To do this in VB5, select References… from the Project menu. Now, locate and select the Progress component from the list, and click OK. In VB4, you access the References dialog box by selecting References… from the Tools menu.
When you have a reference to the component in your project, you can declare the local variable using the object name instead of the generic As Object designation. Finally, in order to receive event messages, Visual Basic 5.0 requires an expanded declaration statement for the object that references the DLL. Listing D shows the proper declaration for Visual Basic 4.0-32 and 5.0. Add the appropriate line to the General Declarations section of your test project's code.
Listing D: Early binding code
Option Explicit

' vb5 only
Dim WithEvents prgBar As PrgDialog
' vb4 version
'Dim prgBar As PrgDialog
'
Now you're ready to add code to the cmdEvent_Click event. The code in Listing E looks quite similar to the code in Listing C.
Listing E: cmdEvent_Click code
Private Sub cmdEvent_Click()

    Dim x As Integer
    Dim y As Integer

    Set prgBar = New PrgDialog

    prgBar.DialogCaption = "Counting..."
    prgBar.DialogTitle = "Event Version"

    prgBar.Show

    For x = 1 To 100
        prgBar.Update x
        For y = 1 To 10000
            ' na
        Next
    Next

    prgBar.Drop

    Set prgBar = Nothing

End Sub
If you're using VB5, you can now add code to the prgBar_Completed event. This code is shown in Listing F.
Listing F: prgBar_Completed() code
Private Sub prgBar_Completed()

    ' handling an event message from DLL in vb5

    Beep
    MsgBox "Task Completed!"

End Sub
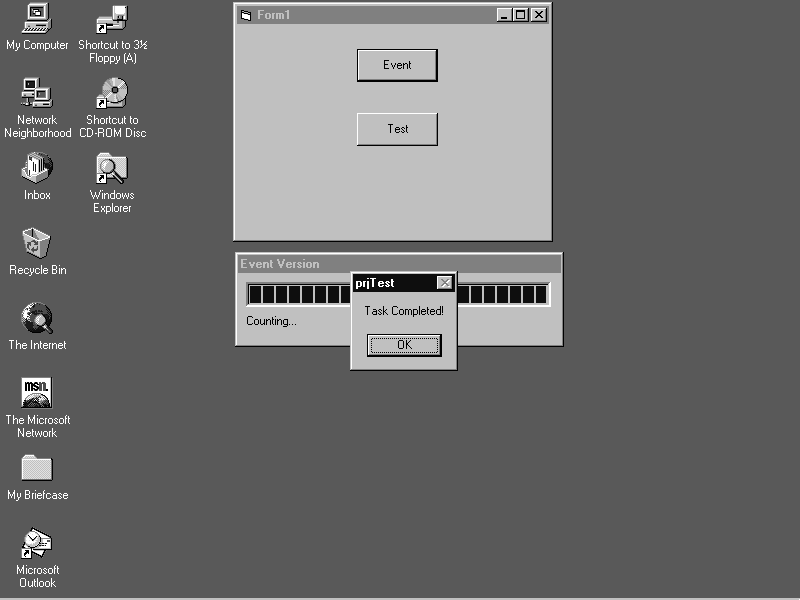
That's all there is to it. Now, when you run the project under Visual Basic 5.0 and press the Event button, you'll see the same progress bar plus a dialog box that pops up at the end of the loop, as shown in Figure C.

Figure C: The event message pops up to indicate that the process is complete.
ConclusionA progress bar serves as an important indicator that an application hasn't frozen up during a lengthy process, such as copying data. In this article, we've shown you how to create a component to display a progress indicator in your 32-bit VB applications.
Copyright © 1998, ZD
Inc. All rights reserved. ZD Journals and the ZD Journals logo are trademarks of ZD
Inc. Reproduction in whole or in part in any form or medium without
express written permission of ZD Inc. is prohibited. All other product
names and logos are trademarks or registered trademarks of their
respective owners.