![]()
This article assumes you're familiar with Java and Jscript
|
This article may contain URLs that were valid when originally published, but now link to sites or pages that no longer exist. To maintain the flow of the article, we've left these URLs in the text, but disabled the links.
|
|
Give Your Web Pages a Little Oomph with Microsoft Liquid Motion
Brian Johnson |
| With Microsoft Liquid Motion, even a novice can create swell-looking animations for Web sites (and personal amusement) in no time. |
|
Microsoft® Liquid Motion™ is not an easy product to describe. It's an animation tool for the creation of Web content, but it's more than that. It's a tool that lets you create interactive content quickly and easily. It lets you script that content, giving you complete control over what's happening on your page. And unlike many popular Web animation tools, it doesn't have a high learning curve or require quite a bit of artistic talent, so you won't need to hire specialists to produce suitable content. Liquid Motion is dead simple to use and the results can be stunning. The secret to Liquid Motion is a Java engine that allows your animation to run on multiple platforms in any browser that supports Java and JavaScript. This engine allows you to combine text, images, and sound into an animation and give you precise control over the behavior of these objects. Once an animation is created, the project can be published to a directory, an FTP server, or a FrontPage® 98-based Web. Additional features can be added that are specific to Microsoft Internet Explorer 4.0 or higher. You can download a time-limited demo of Liquid Motion from the Microsoft Web site (http://www.microsoft.com/liquidmotion) and then order the program online during the trial period or after your time runs out. Once you have the program, you can rerun setup and download additional clip art from the Internet. The added artwork is really fab.
Building an Animation
|
 |
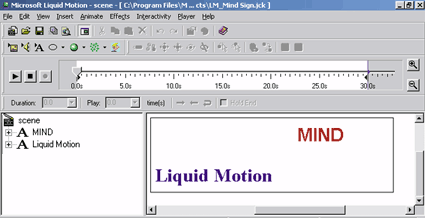
| Figure 1: Adding Text Objects to a Scene |
|
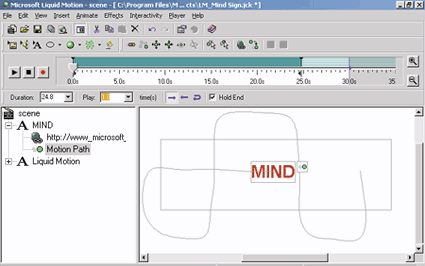
If you're used to working in Macromedia Director or Flash, you might be a little baffled by the Liquid Motion user interface. The program uses a single timeline that controls the various objects in your animation. To make things more understandable, you can enable Structure View from either the toolbar or the View menu. Structure View gives you an outline from which you can select objects in your scene. Once an object is selected, you can change its properties, add an animation effect, or add a trigger event. The duration and visibility of an object in a scene is indicated by the bar in the timeline when the object is selected. In Figure 2, the text object MIND starts off in the center of the scene. I've got the Liquid Motion text object starting outside the scene window so it can't be seen at this point. The line that you see drawn around the MIND object is a motion path that I created by clicking the record button and then dragging the MIND object around the scene. After creating the path, the action can be viewed by clicking the Play button. The speed at which the animation plays back depends on the duration value. You can set this value either by entering the number of seconds in the Duration dropdown listbox, or by stretching the green indicator in the timeline when the motion path is selected beneath the object. The motion path can be edited by selecting the path in the outline and dragging the path line around in the animation workspace. |
 |
| Figure 2: Motion Path for the MIND Object |
|
To get to the advanced capabilities of the motion path, double-click the motion path in the Structure View. This will bring up the properties dialog for the motion path. The settings on the TimeEffects tab let you exercise quite a bit of control over how the moving object behaves, allowing for acceleration, deceleration, and even slow motion. Creating a motion path for each of the objects in the scene and then clicking the play button presents two independently moving objects. When the objects move outside the confines of the scene window they disappear. Drawing the path outside the scene window lets you make the actor enter from a different location. All this animation is great, but the feature that makes using Liquid Motion more compelling than a standard animated GIF image is interactivity. Since each of the objects in any given scene is live, you can adjust the behavior of the object based on user interactions such as mouse clicks. The easiest way to do this while making sure that you're accessing the object that you really want to use is to select the object from the outline in Structure View. The Interactivity menu item lets you select from a URL link, a trigger, a script trigger, or two animation options, avoid and follow. Adding a URL link to an object is simple. Just select the object, then select Interactivity | URL Link from the Liquid Motion menu. You'll be presented with a properties dialog box that lets you specify the location of the jump and even the frame where you want to display the object. This option is important as it lets you use Liquid Motion to create some super buttons for your pages. If you'd rather not create a unique motion path for each of your objects, you can try out Liquid Motion's built-in animation effects. You'll find them under the Animate menu selection. You can add multiple animation effects to a single object, once again controlling how and when that effect occurs by selecting the effect in the outline and adjusting the Duration and Play loop in the Liquid Motion toolbar and timeline. |
 |
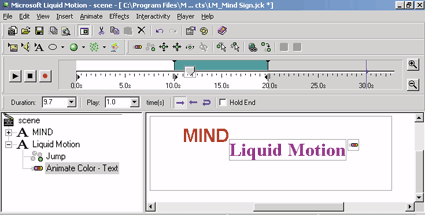
| Figure 3: Adding Animation Effects |
|
You can see in Figure 3 that I've added two animation effects to the Liquid Motion text actor. The Jump effect moves the actor around the scene randomly. The Animate Color effect changes the color of the actor. Notice that when Animate Color is selected the green bar in the timeline starts at 10 seconds and ends at 20. I made this adjustment by moving the bar with my mouse. Now, when the animation runs, the color change in the actor doesn't start to occur until 10 seconds into the animation.
A Little More Interactivity
|
 |
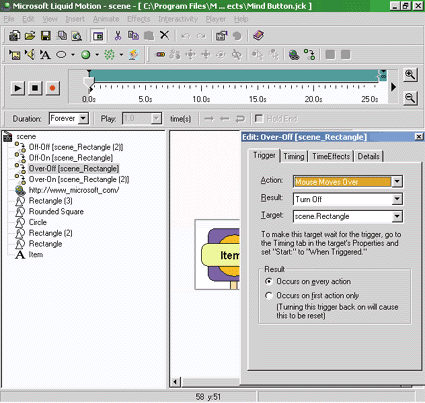
| Figure 4: Adding Trigger Effects |
|
Moving the mouse over the scene window should cause the Rectangle object to disappear and the Rectangle (2) object to appear. If everything is lined up properly, it will look like the rectangle has simply changed color. When you move the mouse out of the scene, the original rectangle should return. To test the new animation in Internet Explorer, choose File | Preview in Browser from the Liquid Motion menu. The first time you preview an
This step is the easiest one yet. To build a toolbar using the button animation, just open a new Liquid Motion animation and use Insert | LM Animation File to add your button to the animation. Repeat this for the number of buttons you wish to add. You'll notice that these button objects are each held together as an inner scene in the new animation file. You'll want to change the caption and URL for each of the buttons in your scene. To access the objects with-in any inner scene, just expand the outline and select the object that you want to edit or examine. You can edit any of the buttons in any way you wish. You might want to change the color of the circle or square to make each of the buttons dif-fer-ent—or add or remove shapes. What you do is up to you. The final step is to remove Rectangle (3)—the bar in the background—from the last button object. This will give you a completed bar. You can see the bar previewed in Figure 5. Remember to check that the duration value for the bar is Forever. If you leave it set for 30 seconds, the bar will disappear after a while. This could be a bit shocking to your viewers, so make sure to watch the preview page for a minute or two before you publish. The code generated for the MIND button is excerpted in Figure 6.
Exporting to FrontPage 98
Conclusion
See the sidebar "Third Party Add-Ins" |
From the November 1998 issue of Microsoft Interactive Developer.