How many times have you wished you could change the contents of a table cell on the fly? You could use frames to achieve the results you want, but updating content in a frame still requires a trip to the server to grab the new page, not to mention that working with frames can be a hassle.
Thanks to the innerText property, you can now change the contents of a table cell on the fly—without a trip to the server. That's because the TD and TH tags are two of the many elements that support the innerText property. The most common use of this functionality would probably be to change the cell contents in response to an event, such as the user clicking the mouse button or moving the mouse over a certain area. Therefore, we'll explore those possibilities in the following example.
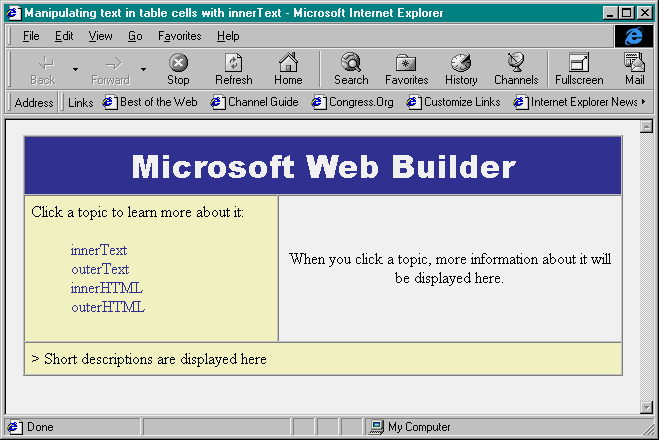
Building the tableLet's create a simple HTML page that will provide information about some DHTML properties. On this page, we'll use a table that consists of four cells. Two of the cells will be static —the first will display a heading, and the other will display a list of selectable properties. The other two cells will be dynamic—one will display detailed information about the properties when the user clicks them, and the second will display a brief remark about the properties as the user passes the mouse over them. When you load the completed page in IE4, it will appear as it does in Figure A.

To begin, open a new HTML file in your favorite editor. Then create the empty table using the following code:
<HTML>
<HEAD>
</HEAD>
<BODY BGCOLOR="WHITE">
<TABLE BORDER=1 WIDTH=600 ALIGN=CENTER CELLPADDING=6 CELLSPACING=0>
  <TR>
    <TD COLSPAN=2 ALIGN=CENTER BGCOLOR="333399">
    <FONT FACE="Arial Black" SIZE=6 COLOR="FFFFFF">

Microsoft Web Builder

    </FONT>
    </TD>
  </TR>
  <TR>
    <TD BGCOLOR="FFFFCC" WIDTH=250 VALIGN=top>
    Click a topic to learn more about it:
      <ul><FONT COLOR="333399">
<!--Selections--> </ul>
</TD>
<TD BGCOLOR="FFFFFF" WIDTH=350 ID="myText" ALIGN=CENTER VALIGN=CENTER>
When you click a topic, more information about it will be displayed here.
</TD>
</TR>
<TR>
<TD COLSPAN=2 ID="myDesc" BGCOLOR="FFFFCC">
> Short descriptions are displayed here
</TD>
</TR>
</TABLE>
</BODY>
</HTML>This code provides us with the basic table layout. Now, let's replace the selections comment with the actual selections. We're going to use the SPAN tag to define our selections, and we'll give each one a unique ID. In addition to the ID, we'll include mouse event handlers as well as formatting for the cursor. Here's the code for the four options we'll use in our example:
<SPAN ID="opt1" style="cursor:hand;" onclick="showText()"
                 onmouseover="showDesc()" onmouseout="showDesc()">innerText</SPAN><BR>

<SPAN ID="opt2" style="cursor:hand;" onclick="showText()"
                 onmouseover="showDesc()" onmouseout="showDesc()">outerText</SPAN><BR>

<SPAN ID="opt3" style="cursor:hand;" onclick="showText()"
                 onmouseover="showDesc()" onmouseout="showDesc()">innerHTML</SPAN><BR>

<SPAN ID="opt4" style="cursor:hand;" onclick="showText()"
                 onmouseover="showDesc()" onmouseout="showDesc()">outerHTML</SPAN><BR>
As you can see, we call JScript functions in response to three mouse events for each selection—onclick, mouseover, and mouseout. The onclick event calls the showText() function, while the onmouseover and onmouseout events both call the showDesc() function. Let's create those functions now.
Clickable functionalityFirst, let's look at the showText() function, which fires when the user clicks a selection. We want showText() to replace the contents of the table cell myText with text that describes the item that the user clicked. To accomplish this, copy the following code to the HEAD section of your document:
<SCRIPT LANGUAGE="Jscript">
function showText()
{
myObj = document.all.myText

switch (window.event.srcElement.id){

   case "opt1":
      myObj.innerText = "The innerText property sets or retrieves
                  the text between the start and end tags of the current element.
                 This read-write property can be any valid string.";
      break;

   case "opt2":
      myObj.innerText = "The outerText property sets or retrieves
                 the text of the current element. This read-write property
                  can be any valid string.";
      break;

   case "opt3":
      myObj.innerText = "The innerHTML property sets or retrieves
                 the HTML between the start and end tags of the current element.
                 This read-write property takes a string containing a valid combination
                 of text and HTML tags, except for <html>, <head>, and <title> tags.";
      break;

   case "opt4":
      myObj.innerText = "The outerHTML property sets or retrieves
                 the current element and its content in HTML. This read-write
                  property can be any valid string containing a combination of text and
                  HTML tags, except for <html>, <head>, and <title> tags.";
      break;
}
}
</SCRIPT>
As you can see, we used a switch statement to determine which element (opt1, opt2, etc.) generated the onclick event. Once we've determined which element triggered the event, we set the innerText property of the myText cell to the text for that selection. By the way, we created a variable called myObj to hold the document object reference for the myText cell. It wasn't necessary to handle it that way, but it cuts down on some typing and simplifies things if we want to reuse the code.
Mouseover functionalityThe last function we'll create is the showDesc() function. That's the function that fires when the mouse passes over (or out of) one of the selection spans. As the mouse passes over a selection, showDesc() replaces innerText of the bottom cell with a brief description of the selection. When the mouse moves out of a selection, showDesc() removes the description. Let's look at how we did it. Place the following code in your document after the showText() function but within the SCRIPT tags:
function showDesc()
{
myObj = document.all.myDesc
if (window.event.type == "mouseover"){
switch (window.event.srcElement.id){
case "opt1":
myObj.innerText = "> Description of innerText property";
break;
case "opt2":
myObj.innerText = "> Description of outerText property";
break;
case "opt3":
myObj.innerText = "> Description of innerHTML property";
break;
case "opt4":
myObj.innerText = "> Description of outerHTML property";
break;
}
}
else{
myObj.innerText = "> "
}
}You probably recognize the technique. We handled the mouseover similarly to the way we handled the click event in the showText() function. However, there are a couple of differences. One obvious difference is that we set myObj to the myDesc table element. The other difference is that we handle both the onmouseover and onmouseout events in the same function. To do so, we enclose our switch statement within an if…else statement that checks for the type of event with the window.event.type property. If the event is a mouseover, we replace innerText with the short description text; otherwise, we replace it with the placeholder (>).
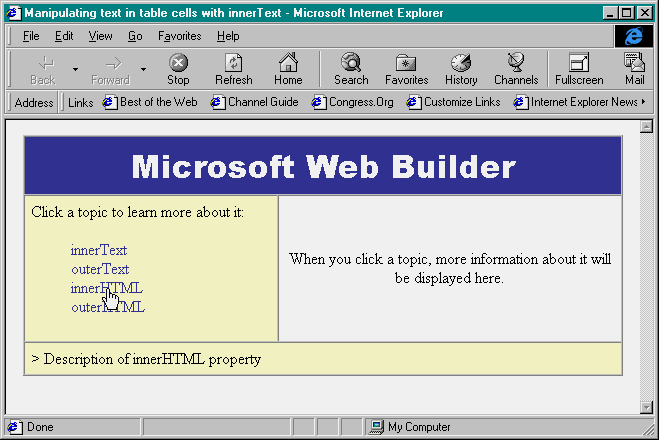
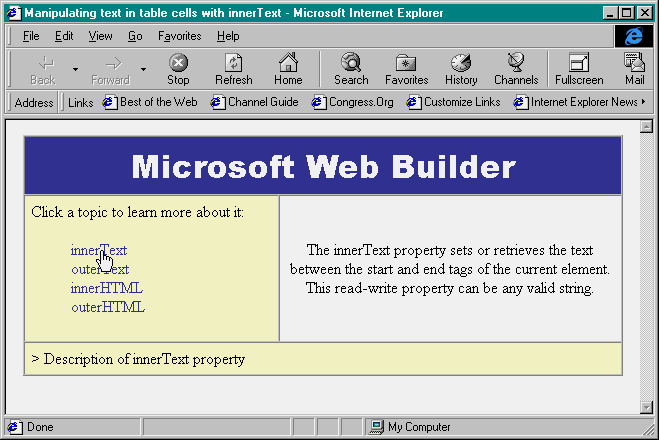
Take it for a test driveWe've completed all the steps to create the page, now let'sgive it a spin. Save your work, then open the file in IE4. At first, nothing much will be going on, as you can see in Figure A. However, as you move your mouse over the property choices in the left cell, you'll see their short descriptions appear below, as in Figure B. Finally, as you click a property, the right cell will display the text associated with your selection, as shown in Figure C.


Dynamic HTML offers the Web developer many new ways of manipulating content without making multiple trips to the server. In this article, we showed you how to use the innerText property as one means of manipulating content. To fine-tune your technique, read the sidebar "Innies, Outies: What's the Difference?" for information on similar Dynamic HTML properties.
Copyright © 1998, ZD
Inc. All rights reserved. ZD Journals and the ZD Journals logo are trademarks of ZD
Inc. Reproduction in whole or in part in any form or medium without
express written permission of ZD Inc. is prohibited. All other product
names and logos are trademarks or registered trademarks of their
respective owners.