by Shamir Dasgupta
Upon its introduction, JavaScript quickly became the de facto standard in client-side scripting for the World Wide Web. Although scripting isn't new to the Web, JavaScript remains popular for its cross-browser capability and variety of built in functions. We particularly like to use JavaScript to validate and add interactivity to our HTML forms. In this article, we discuss some of the JavaScript functionalities that you can incorporate into your HTML documents.
Adding status messages to your formForms are the most common way to capture information about visitors to your Web site. Using a form, you can gather information and use it later to produce a statistical report about your visitors.
Typical form fields are plain HTML and don't provide interactivity. For example, if you wanted to add status messages based on the user's action, you can't do so with plain HTML. But you can achieve that functionality by using JavaScript, as we're about to show you.
What's your status?To display a status message based on a user's action, we'll take advantage of a JavaScript event handler. Event handlers are the methods that get called when a user interface event occurs. For example, clicking a button generates an onClick event for that button. Similarly the onFocus event is called when a form element receives user interface focus.
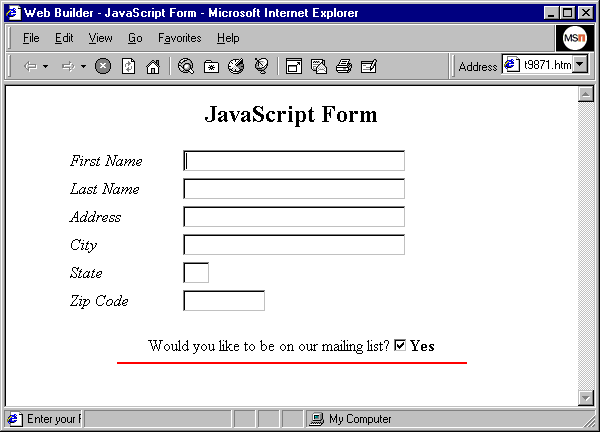
In this example we'll use the JavaScript onFocus event handler to display a status message as well as to write a function creating a message box. The status messages will be displayed in your browser's status bar. When we're finished, our HTML document will look like Figure A. Let's get started by creating the form.

Figure A: Our sample form provides a status message based on the user's interaction.
Form follows functionUsing your HTML editor, first create a form. Our sample form has seven elements to gather user information. The first six are simple text input fields and the seventh is a check box to which we'll attach a message box.
To create the text elements, use the <FORM> tag as we have here:
<center><b>JavaScript Form</b><p><form name="MyForm"><table border="0" width="450"><tr><td><i>First Name</i></td><td><input type="text" name="FirstName" size="30"></td></tr>
We've decided to create the form inside a table for formatting purposes; you can use your own if necessary. Repeat the process to create the remainder of the elements. For the complete code, refer to Listing A.
Once you have the text input fields completed, you can create the final element–the check box—using the following lines of code:
Would you like to be on our mailing list?<input type="checkbox" name="List" checked ><b>Yes</b>
Now that you've finished the form, it's time to add the status messages to each of the first six elements.
Send a messageTo add the status messages to the form elements, we'll simply add an onFocus event handler to each of them. To do so, modify the text input field from the previous section as we've done here:
<input type="text" name="FirstName"size="30" onfocus="window.status='Enter your First name here.';">
As you can see, adding the event handler is fairly simple. Using this technique, add event handlers to the other five text input elements, changing the message as appropriate for each field.
Now, you're ready to write the message box for the check box element. To start, we'll create a JavaScript function called notify() and place it in the <HEAD> section of the document.
Use the following lines of code to create the function:
<script language="JavaScript"><!---hide itfunction notify(){alert ("We use this mailing list for internal use.We will not sell this information to anyone.");}//--></script>
As you can see, the function itself is straightforward, designed to simply display a message box and the message in it. Now all we'll have to do is attach this function to our seventh and final form element. To do so—you guessed it—we'll use an event handler called onClick.
Use the following lines of code to modify the check box input element:
Would you like to be on our mailing list?<input type="checkbox" name="List" checkedonclick="notify();"><b>Yes</b>
That's all the code you need to write for this example. Save your document and open it in your browser. The result should look like Figure A. To test your creation, move your cursor to one of the form elements and watch the status bar for a message.
Now, move your mouse pointer over the check box and click to uncheck the box. You'll see a message box appear, as shown in Figure B.

Figure B: Our message box gives the user a special message.
ConclusionForms are an essential part of many HTML documents. You can enhance the user's experience at your Web site by adding interactivity to your form with the help of JavaScript. In this article, we showed you how to add status bar messages to provide information about each of your form's fields. We also created a special message box linked to our form's check box. To learn about another helpful form of JavaScript interactivity, read "Validating Your Forms With JavaScript" in this issue.
Listing A: Source code for the sample form
<HTML>
<HEAD>
<META NAME="GENERATOR" Content="Microsoft Developer Studio">
<META HTTP-EQUIV="Content-Type" content="text/html; charset=iso-8859-1">
<TITLE>Web Builder - JavaScript Form</TITLE>
<script language="JavaScript">
<!---hide it
function notify(){
alert ("We use this mailing list for internal use.
  We will not sell this information to anyone.");
}
//-->
</script>
</HEAD>
<BODY bgcolor="#FFFFFF">
<center>
<b>JavaScript Form</b>
<p>
<form name="MyForm">
<table border="0" width="450">
<tr>
<td><i>First Name</i></td>
<td><input type="text" name="FirstName" size="30" onfocus="window.status='Enter your First name here.';"></td>
</tr>
<tr>
<td><i>Last Name</i></td>
<td><input type="text" name="LastName" size="30" onfocus="window.status='Enter your Last name here.';"></td>
</tr>
<tr>
<td><i>Address</i></td>
<td><input type="text" name="Address" size="30" onfocus="window.status='Enter your street address here.';"></td>
</tr>
<tr>
<td><i>City</i></td>
<td><input type="text" name="City" size="30" onfocus="window.status='Enter your city name here.';"></td>
</tr>
<tr>
<td><i>State</i></td>
<td><input type="text" name="State" size="2" onfocus="window.status='Enter your state name here.';"></td>
</tr>
<tr>
<td><i>Zip Code</i></td>
<td><input type="text" name="Zip" size="10" onfocus="window.status='Enter your Zip Code here.';"></td>
</tr>
</table>
<p>
Would you like to be on our mailing list?<input type="checkbox" name="List" checked onclick="notify();"><b>Yes</b>
<hr width="350" COLOR="RED" noshade>
</form>
</center>
</BODY>
</HTML>