![]()
This article assumes you're familiar with Java, Visual InterDev, COM and ADO
Download the code (323KB)
|
This article may contain URLs that were valid when originally published, but now link to sites or pages that no longer exist. To maintain the flow of the article, we've left these URLs in the text, but disabled the links.
|
|
Using MTS Components on Your Web Server with Java
Christian J. Thilmany |
| Using Microsoft Transaction Server, Active Server Pages, and Java, you can create a Web server application that will scale from a ten-person intranet to thousands of users over the Internet. |
|
Transaction support is a long-overdue addition to Microsoft® Windows® and BackOffice®. Before the advent of Internet and Web development, writing a client-server application meant targeting a certain number of users. Scaling an application for a typical network environment of 1 to 50 users meant leveraging the abilities of a particular database. Most business logic was kept at the database implementation tier in the form of SQL triggers and stored procedures. The focus of other development efforts was on creating robust front-ends and an intelligent set of user services code. Database implementers controlled the server code, while Windows-based development remained at the workstation level, creating intelligent front-ends. This "smart client" approach can work well for controlled network environments whose mission is to create an intelligent client-server system centered on a corporate datastore. Unfortunately, fattening the business logic at the database tier also stretches the capabilities of the SQL language. Although programming in SQL can produce scalable applications, SQL was never meant to be a true general-purpose programming language.
Fortunately for developers, this client-rich architecture allowed the programmer to concentrate on business logic and application functionality, and not the intricacies of scalable code. Unfortunately for these same developers, the arrival of the Internet and distributed application architectures brought new scaling issues and a new development model. Development is now focused on the server, where business logic has ended up. This is a shift from the traditional database coding setup that client-server programmers are familiar with. With distributed technology, applications on the Internet are now becoming component-driven. This can mean distributing the logic between servers and thinning the clients in the emerging n-tier architectures you are now seeing. In the n-tier world, the development of parts of an enterprise application can now be divided among those with the appropriate skills and functional knowledge. Programmers familiar with GUI development work on the client, while those with data access development skills can focus on the business components. Of course, database implementers and administrators still remain at the data tier. This environment also simplifies code distribution, since most of the business logic has been moved from the client to the server. With clients becoming thinner and installations becoming smaller, administrators can focus more on server configuration and less on deployment. Microsoft's new Zero Administration Initiative follows this premise. Along with server-based development comes the challenge presented by the increase in user access. Business services running on the server can now be accessed from thousands of clients. The programmer must now be concerned with concurrency, user context, connections, synchronization, pooling, security, and transactional behavior. For instance, building transactional behavior into a server application can be a tremendous challenge. Atomic behavior among these transactions is a must, and it's up to the developer to ensure this. Using banking transactions as an example, if a customer transfers money from one account to another, the two transactions must both either fail or succeed. If not, that customer may walk away with more or less funds in their accounts than intended. Transactional integrity is an important business issue and must be addressed at the development level. As the number of users increase, these issues become more and more onerous, sidetracking the developer from the real task at hand, which is delivering application features.
What is Microsoft Transaction Server?
|
 |
| Figure 2: ObjectContexts |
|
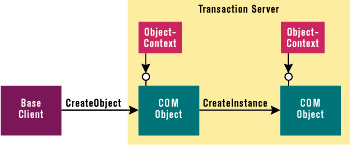
If an application client is anything other than an Active Server Page (ASP), and if multiple components make up the transaction, the first instantiated component must in turn instantiate other components, using the newly created ObjectContext to perform its own CreateInstance on the second component (see Figure 2). In essence, the first component becomes a client of the second. Clients developed in languages such as Visual Basic, Java, or Visual C++® must perform object instantiation in this manner in order to control transactional context. During execution, the client component runs normally, and on successful completion calls SetComplete. This completes the work on the transaction and tells MTS to recycle any resources it may be holding, thus finishing the atomic operation. If errors occur at any time in the transaction, SetAbort is called and all changes are immediately rolled back. The beauty of the model is that any component may have already called its save routines to a data store such as SQL Server. If SetAbort is called at any time, data will not persist, leaving the atomic operation intact. This model frees the developer from having to perform any manual two-phase operations or cache data. MTS and the Microsoft Distributed Transaction Coordinator (DTC) manage this automatically. If the application client happens to be an ASP, as in my example, then the second component does not have to be instantiated from the first. Instead, transaction control is kept at the ASP level since the ASP acts as a transaction client to components created within that page. This feature is built into Internet Information Server (IIS) 4.0 using ASP 2.0. Using ASPs greatly simplifies the code required in an MTS component by eliminating any ObjectContext.CreateInstance calls. This simplifies a component developer's task of making business components truly stateless and reusable.
Building MTS Components Using Java
|
 |
| Figure 3: Seminar Reservation Web App |
|
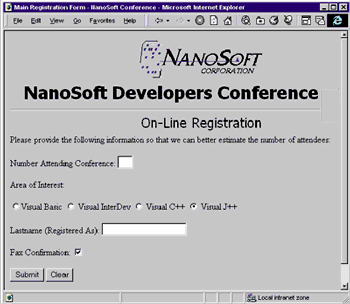
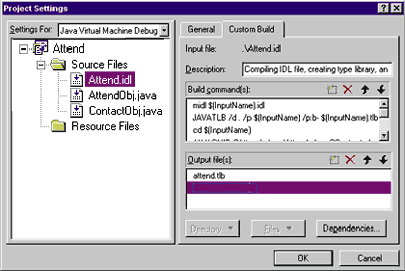
For developers creating large-scale applications, transactions have many advantages. When MTS 1.0 first shipped, it was the only product to provide such transaction support for Java. Developing transactions without it would have been a major endeavor. Let's explore how to create an MTS component using Java and then drive it from a fully functional ASP, thus completing my transactional Web app. Step 1 As part of the Attend project, I first provided definitions for my classes and the interfaces that I would later implement by creating an Interface Description Language (IDL) file. This IDL file will be used to create my type library and is the necessary first step toward building my components. In Attend.idl, I created two components, or coclasses. The first class, CContact, I will use to add contact information to my database. The second class, CAttend, will be used to register the attendees to the conference (see Figure 4). Each component can be used individually or grouped into a transaction. In the CContact class I created a method called Add, which will be called from the client to add a contact to the database (in this case SQL Server 6.5). In the CAttend class I also created a function called Post, which will register an attendee to the conference so I can later get an accurate headcount. When building an IDL file for a Java-based COM component, you should only use COM-compatible data types that can be mapped to Java types. I also recommend using OLE automation-compatible types and making the interfaces dual. A dual interface allows a component to be called from both early-binding (vtable) and late-binding (automation) clients. Using a dual interface will also allow VBScript clients like mine to use Java-based COM components. It is important to note that all out parameters must use Variant types if they are to be called from VBScript, as in my example. For a complete table of the mapping between COM types and Java types, see the Microsoft Visual J++ documentation topic "Type Mappings between Java and COM." Step 2 Make sure that each class, interface, and library in the newly created IDL file has a globally unique identifier (GUID). Choose Create GUID from the Tools menu in Microsoft Developer Studio or run guidgen.exe directly from the command line. Once the IDL file is complete, the next step is to create the type library. Since multiple custom attributes will be used in the IDL, I needed version 3.01.59 or later of the MIDL compiler, which ships with all versions of MTS. I chose to place the MIDL compiler in the project settings of my Visual J++ project, as part of my custom build settings. In Visual J++, select Project | Settings, highlight the IDL file in the left pane, and select the Custom Build tab to add the following: |
|
|
This lets you avoid going to the command line to run the MIDL compiler. In fact, all of the many command-line tools can be run in this fashion (see Figure 5). It is assumed that these tools are all in the current path. At the end of each step, I chose to build the Attend project. This compiled my IDL into a corresponding type library, attend.tlb. |
 |
| Figure 5: Project Settings |
|
Step 3 The next step is to create the first actual Java code for the project. These classes will act as wrappers for the classes that I will implement later. The Javatlb.exe tool, part of Visual J++, creates one .class file for each coclass and interface in the type library I created. The names of the files generated from Javatlb will correspond to the names of the coclasses and interfaces. When Javatlb is run, each generated .class file will be placed in the appropriate package subdirectory. Using Javatlb, I created the CAttend.class, IAttend.class, CContact.class, and IContact.class files. Later, I created two additional Java files to implement the components: Attend.AttendObj and Attend.ContactObj. At runtime, the Java VM will use these wrapper classes to map incoming calls from COM clients to method calls in Attend.AttendObj and Attend.ContactObj. To generate my Java wrappers I used the /p option to specify Attend as the Java package for my new classes, and /d to tell Javatlb in which directory to place the wrapper classes. I added the following just after the MIDL command: |
|
|
As an optional step, calling Javatlb with the /U:T switch will create a declarations file called summary.txt. This will contain all of the required Java signatures contained in the type library. Summary.txt can be handy when later implementing the COM classes in Java. Step 4 The last step before implementing and compiling your Java code is to run an MTS-specific tool called Javaguid.exe on the newly created wrapper classes. This tool is used to ensure that the proper GUID class (com.ms.com._ Guid) is passed to all MTS-specific APIs. Those APIs requiring a GUID type will be changed appropriately. The wrapper classes created in Step 3 must be in the current directory when you run Javaguid. Again, I added this tool to the custom build in Project | Settings right after the Javatlb line like this: |
|
|
Step 5 Finally, I implemented my Java classes. In my case, I created AttendObj.java and ContactObj.java to implement the CAttend and CContact classes. Each class name must exactly match what's been specified in the JAVACLASS custom IDL attribute. I then implemented all of the methods with-in those interfaces as defined in Attend.idl. In my case, I needed to implement the Post (IAttend) and Add (IContact) methods of my components. Later, I will call each of these functions from my ASP base client (see AttendObj.java, available online). Step 6 For both the Add and Post methods, any database transport interface may be selected (I chose ADO). I recommend that the chosen transport be ODBC-based in order to utilize one of MTS's key features, the ODBC resource dispenser, for optimized database connectivity. The services use ODBC running on the server, so the cross-platform architecture will remain intact. Also, to take advantage of the MTS transactional environment, the database must be XA-compliant and must support MTS. Currently, SQL Server 6.5 is one of those databases (Sybase and Informix are soon to follow). This is not to say that I couldn't have developed my MTS components without an XA-compliant database, but I wouldn't have had access to MTS's transactional services. Step 7 After I implemented all of the business logic, I built my project. The build compiled attend.idl, ran all of the custom build command-line tools, and compiled the Java source with jvc.exe. Step 8 Before I deployed my new components into MTS, I had to build an in-process DLL from the generated class files. Only DLLs can be used within MTS. For my example, both components are contained in one DLL called vjattend.dll. To accomplish this, I used yet another tool called the Java Executable Generator (EXEGEN). The version that ships with MTS supports a new /d switch for creating DLLs. As before, I added this to my Project | Settings, this time to my Post-Build Step tab: |
|
|
The /d switch tells EXEGEN to build a DLL, and /out specifies the file name of the component DLL. The /r switch recurses into the project subdirectory, where all of my class files will be found. As an option, I chose to copy the final binary to a deployment
directory, called packages, as shown in Figure 6. |
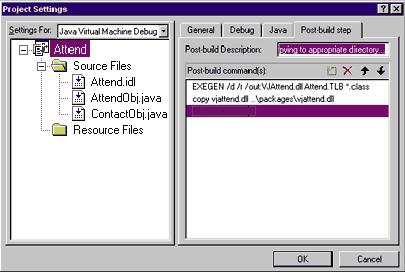 |
| Figure 6: Post-build Commands |
|
Deploying Your Components into MTS
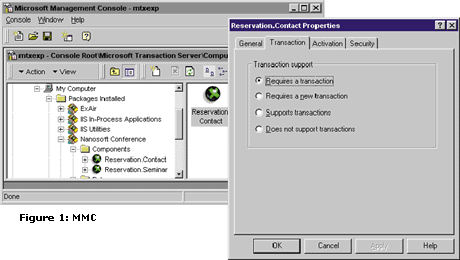
It's time to deploy the components into MTS. Using the MTS Explorer or MMC, create an empty package to house the components. I called mine Conference. To create a package, open the MTS Explorer and highlight the hierarchy Packages Installed. Right-click this hierarchy, and select New. Choose Create an empty package and give it a name. Next, I added my components. I defined the component's programmatic IDs (ProgIds) as Reservation.Contact and Reservation.Seminar. I will use these ProgIds to create my components from VBScript. Once deployed, the ProgIds are displayed in the MTS Explorer. I expanded the hierarchy under the new package and highlighted components, right-clicked, and selected New. I chose to install the new component vjattend.dll. MTS loaded the file and listed all of the components in a corresponding dialog. I then selected finish and vjattend was deployed! I used all of the default MTS property settings for this example. These settings include "Requires a Transaction," which flags MTS to create an accessible object context, and "Enable authorization checking," which enforces DCOM security on the component. All transactional settings initially came from my IDL custom attributes like TRANSACTION_REQUIRED (see Figure 4). At this point I could instantiate my components from an ASP. At runtime, the ASPs I build will use the Java VM as the COM server for each implemented Java class. The COM server is associated with the Java VM through the component's registry settings.
Building a Web Client with Active Server Pages
Debugging Your MTS Components
|
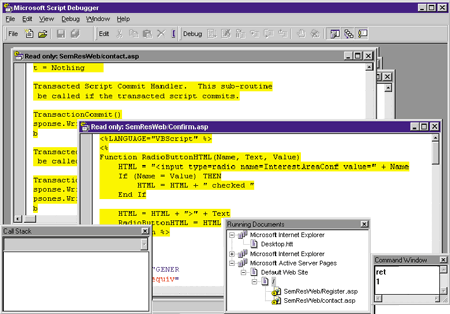 |
| figure 12: Microsoft Script Debugger |
At runtime, MTS provides many views such as the Statistics Window to help the developer see what's going on. But MTS is more than a transaction monitor or object broker. Not only does it make the world of distributed components more manageable, MTS provides insurance to the developer. What once ran only on a single workstation can now scale across the Web.
|
From the February 1998 issue of Microsoft Interactive Developer.