EXCELence
By David Ringstrom
Printing is one of the more common tasks of Microsoft Excel users. If you're working in a single-sheet workbook, it's simple to click the Print toolbar button to generate output. Yet, how many of your workbooks have only one sheet? In this article, you'll see how to create an importable UserForm that simplifies printing multi-sheet workbooks.
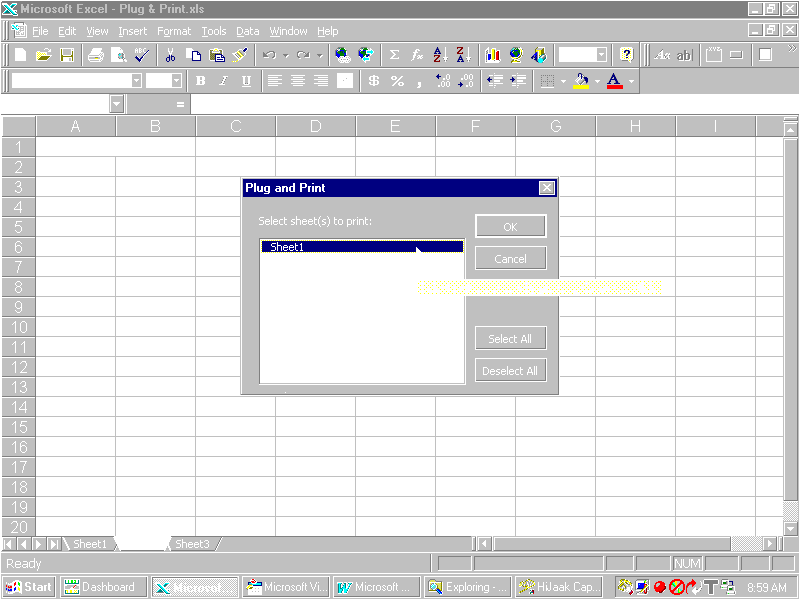
Let's begin by creating the dialog box shown in FIGURE 1. To do so, open a blank workbook, then press A! to launch the Visual Basic Editor (VBE). In the Project Explorer window, right-click on the file name of your workbook, then choose Insert | UserForm.
Use the Properties window in the VBE to change the name of the UserForm to frmPlugPrint, then set the caption to Plug and Print. Next, specify 165 and 240 for the Height and Width properties, respectively. Now, add four CommandButtons to the form, and change the names and captions of the buttons as follows:
| Name | Caption |
| cmdOK | OK |
| cmdCancel | Cancel |
| cmdSelectAll | Select All |
| cmdDeselectAll | Deselect All |
The Height and Width properties for each button should be set to 6 and 18, respectively.
At this point, you're ready to add a ListBox control to the UserForm, positioned as shown in FIGURE 1. Assign the name lstSheet to the control, then set the Height and Width properties to 110 and 155, respectively. When you add a ListBox to a UserForm, its MultiSelect property defaults to MultiSelectSingle, which means the user can only select a single item from the ListBox. In this case, we want to select multiple worksheet names, so change this property to MultiSelectMulti. Finally, you can provide a helpful cue by setting the ControlTipText property to:
Select multiple sheets by pressing Ctrl as you click.
Now that you're finished with the ListBox, add a Label control to the UserForm (above the ListBox) with the following caption:
Select sheet(s) to print:FIGURE 1 shows the completed Plug and Print dialog box within the example Excel program (this UserForm is available for download; see end of article for details.)

FIGURE 1: The completed Plug and Print dialog box.
Now let's create the underlying macros for the UserForm. Begin by double-clicking on the UserForm, then create the routine shown in FIGURE 2.
Private Sub UserForm_Initialize()

  Dim sht As Object

  ' Populate the ListBox with names of all visible sheets.
  For Each sht In ActiveWorkbook.Sheets
    If sht.Visible = True Then
      Me.lstSheets.AddItem sht.Name
    End If
  Next

  ' Select the first sheet name in the ListBox.
  lstSheets.Selected(0) = True

End Sub
FIGURE 2: This routine populates the ListBox with the names of all visible worksheets.
When the UserForm is displayed, the routine loops through all the sheets in the active workbook, then adds the name of each visible sheet to the ListBox. As shown by our use of the Name property, whatever appears on each workbook tab will be included in the ListBox. If you want to include every sheet in the workbook, regardless of the status of its Visible property, you can omit the If statement and simply use the AddItem method to populate the ListBox.
When you're ready, create the routines shown in FIGURES 3 through 5. When you've finished adding these routines, scroll to the top of the module sheet, then add the statement:
Dim i As IntegerSub cmdOK_Click()
Unload Me
Application.ScreenUpdating = False
' When the user clicks OK, loop through the names in
' the ListBox.
For i = 1 To lstSheets.ListCount
' If sheet name is selected, print sheet.
If lstSheets.Selected(i) = True Then
ActiveSheet.PrintOut
End If
Next
End SubFIGURE 3: This routine assigns functionality to the OK button.
Sub cmdCancel_Click()

  ' Unload the user form.
  Unload Me

End Sub
FIGURE 4: The Cancel button dismisses the dialog box.
Private Sub cmdSelectAll_Click()

  For i = 0 To lstSheets.ListCount - 1
    lstSheets.Selected(i) = True
  Next

End Sub

Private Sub DeselectAll_Click()

  For i = 0 To lstSheets.ListCount - 1
    lstSheets.Selected(i) = False
  Next

End Sub
FIGURE 5: The Select All and Deselect All buttons enable the user to toggle the selected status of all items in the ListBox.
With the UserForm in place, we now need to create a short routine that will allow us to display it. In the Project Explorer window, right-click on the file name of your workbook, then choose Insert | Module. Add the following routine to the blank module that appears:
Sub PlugAndPrint()

  frmPrintSheets.Show

End Sub
then use the Properties window to rename the module from Module1 to modPlugPrint.
Because we're trying to streamline printing in Excel, it's a good idea to assign a shortcut key to the PlugAndPrint routine we just created. This will provide single keystroke access to the dialog box that we created. To do so, press A! to return to Excel, then choose Tools | Macro | Macros. Select the PlugAndPrint routine, then click the Options button. Specify a lowercase "p" for the shortcut key, as shown in FIGURE 6, then click OK and Cancel to close the dialog boxes.
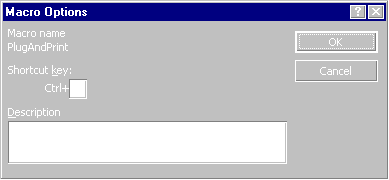
FIGURE 6: Assigning a shortcut key provides single keystroke access to the PlugAndPrint subroutine.
Putting It to the Test
In a moment, we'll add even more functionality to the UserForm. Before we proceed, however, let's test the UserForm in its current state. To do so, make sure there are at least three sheets in the current workbook. Type a descriptive sentence in cell A1 of each sheet, as shown in FIGURE 7. Once you've done so, press CP to display the Plug and Print dialog box. The dialog box shown in FIGURE 1 should appear.
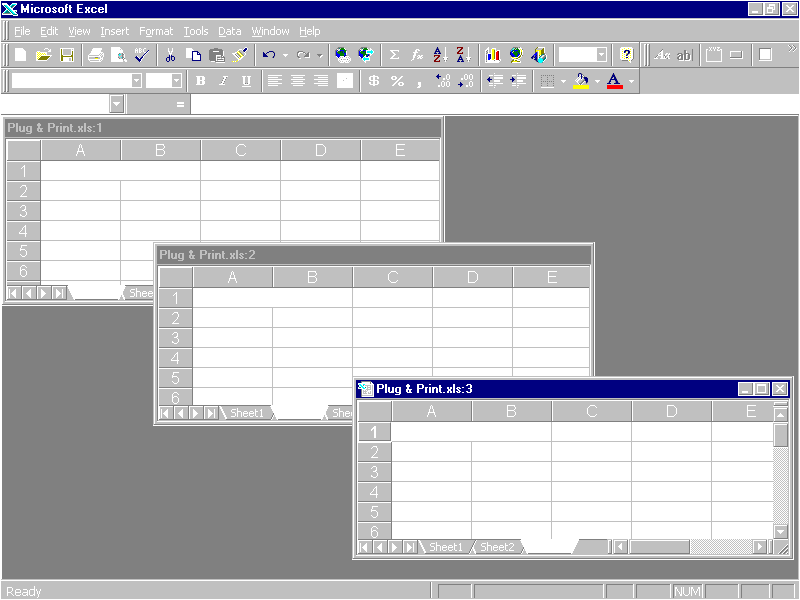
FIGURE 7: Place a descriptive sentence in cell A1 of each sheet.
As you can see, all the sheet names in the workbook appear automatically. You can click the Select All button to select all worksheets, or Deselect All to clear existing selections. Also, notice how the control tip appears while the mouse is located over the ListBox. Once you click OK, the selected sheets will print automatically.
Before we continue, let's perform another test. Hide Sheet2 in the workbook, then press CP again. As shown in FIGURE 8, only the first and third worksheets appear. In most cases, you won't want to print hidden sheets within your workbook. As you'll recall, we specified that the UserForm should only display the names of visible sheets, so you won't have to deselect hidden sheets when you print. However, you can easily modify the routine to include all sheets, as we discussed earlier in this article.
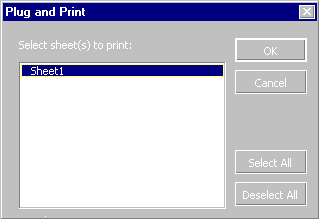
FIGURE 8: Hidden sheets are automatically omitted from the ListBox.
Plugging and Printing
At this point, you have a basic UserForm that you can use with any Excel workbook to simplify printing multiple sheets. There are other enhancements that we can add, but first let's understand how you'll transfer the UserForm to your other workbooks.
Press A! to return to the VBE, then right-click on frmPlugPrint in the Project Explorer window. Choose Export File from the shortcut menu to display the dialog box shown in FIGURE 9. Click the Save button to save a copy of the UserForm with the default name. Repeat this process to export the modPlugPrint module.
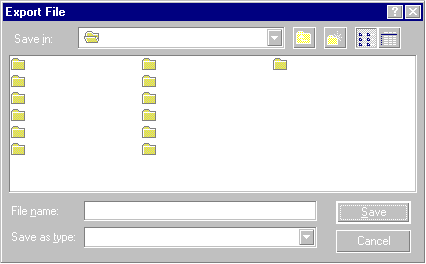
FIGURE 9: You can save UserForms and modules as separate files.
Next, let's import the UserForm into another workbook. To do so, open one of your existing multi-sheet workbooks, then right-click on that file name in the Project Explorer window of the VBE. Choose Import File from the shortcut menu, select the frmPlugPrint.frm file from the Import File dialog box, then click Open. Once you've done so, repeat the process to import the modPlugPrint module into your workbook.
Now press A!, then activate your workbook. If you press CP, the Plug and Print dialog box should appear. You now have a powerful new tool in your VBA arsenal, because you can quickly add an easy-to-use printing routine to any of your Excel workbooks, often with little or no modification.
Making Enhancements
In some cases, the technique we've used thus far may be too generic for a complex workbook. In such cases, you'll want to add more capability. For instance, you might have a workbook that has one "consolidated" page and several "detail" pages. The consolidated page contains a single print range that recaps certain information, while the detail pages have two print ranges. You want the user to be able to select whether to print the consolidated or detail pages, and also be able to specify which of the two ranges on the detail pages, if any, to print.
To implement these changes, return to the VBE and select a workbook that contains the frmPlugPrint UserForm. Change the Height property for the UserForm to 205, then add a Frame control and two CheckBox controls, as shown in Figure 10. Change the Name and Caption properties for these controls as follows:
| Name | Caption |
| Frame1 | Sections to Print |
| chkSummary | Summary |
| chkDetail | Detail |
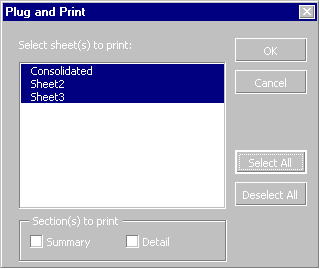
Figure 10: These controls add additional functionality to the UserForm.
Note that we chose not to change the Frame control's Name property, because our VBA routine won't refer to that object.
The next step is to modify the macro associated with the OK button. To do so, double-click on that control, then modify the underlying code to look like FIGURE 11.
Sub cmdOK_Click()

  Dim s As Object

  Unload Me
  Application.ScreenUpdating = False


  ' When the user clicks OK, loop through the names in
  ' the ListBox.
  For i = 0 To lstSheets.ListCount - 1
    ' If a sheet name is selected.
    If lstSheets.Selected(i) = True Then
      ' See which which boxes are selected and print
      ' the range.
      Set s = Sheets(lstSheets.List(i))
      s.Activate

      Select Case s.Name
        Case Is = "Consolidated"
          ActiveSheet.PrintOut
        Case Else
          If chkSummary Then
            With s.PageSetup
              .PrintArea = "A1:I38"
              .PrintTitleRows = ""
              .PrintTitleColumns = ""
              .FitToPagesWide = 1
              .FitToPagesTall = 1
            End With

            ActiveSheet.PrintOut
          End If

          If chkMonthlyDetail Then
            With s.PageSetup
              .PrintTitleRows = "$1:$2"
              .PrintTitleColumns = ""
              .PrintArea = "A38:K100"
              .FitToPagesWide = 1
              .FitToPagesTall = False
              ActiveSheet.PrintOut
            End With
          End If
      End Select
    End If
  Next i

End Sub
FIGURE 11: Modify the routine in FIGURE 3 to work with the CheckBox controls.
You'll notice that the main change is the addition of the Select statement to the routine. If, as the routine loops through each sheet in the workbook, it finds a sheet named Consolidated, it simply prints that sheet. Otherwise, the routine first checks to see if the Summary CheckBox is selected. If so, it sets the print area for the "summary" range, as well as certain other page setup options, then prints that section of the worksheet. A similar procedure occurs when the Detail CheckBox is selected.
To test this routine, create a workbook that has one sheet named Consolidated, then as many other sheets as you desire. Type identifying text within the given print ranges, then if necessary, import the frmPlugPrint.bas and modPlugPrint.bas files.
As you can see by the structure of the macro, you can easily tailor it to allow easy printing of even the most complex workbooks. Use specific references to worksheet names cautiously, though, because if someone renames a worksheet, portions of the cmdOK_Click routine may produce undesired results. For instance, if you refer to a sheet named Consolidated, yet someone changes the name to OurResults, then that first page in the workbook will still print, but perhaps not in the fashion that you want.
Adding More Functionality
Oftentimes, you may print several — or even dozens — of drafts of a particular spreadsheet. In such cases, it's useful to include the date and time of the draft in the page header or footer (so that you don't mistakenly refer to an earlier hard copy of your work). Yet, your boss might not like having such a header or footer on the finished product. Let's see how to add Draft and Presentation buttons that make it a breeze to toggle page headers and footers on and off.
Continuing with the UserForm you added the Frame control to, extend the size of the UserForm further to a height of 245. Copy the existing Frame control, or add another, then add two OptionButton controls named optDraft and optPresentation, with captions of Draft and Presentation, respectively. Also, change the Caption property of the new Frame to Report Format, as shown in FIGURE 12.
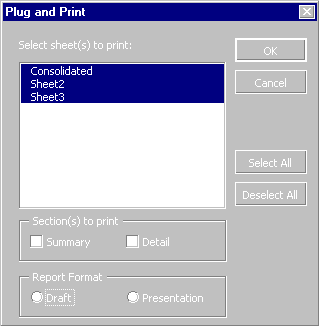
FIGURE 12: These option buttons let you toggle between header and footer settings.
Add the following code to the cmdOK_Click routine, shown in FIGURE 11, before the Select statement:
With ActiveSheet.PageSetup
  If optDraft Then
    .RightHeader = "&D - &T"
  Else
    .RightHeader = ""
  End If
End With
This minor modification lets you toggle your page header on or off, on-the-fly, when you print. This also helps eliminate the frustration that you'd ultimately otherwise encounter when you realized that in your haste to print the "presentation" format, you forgot to turn the header off!
If you include these CheckBox and OptionButton controls in your printing routine, you'll want to make one small change to the frmPlugPrint_Initialize macro to include the following statements:
chkSummary = True
chkMonthlyDetail = True
optDraft = True
These ensure that the Summary and Detail CheckBox control, as well as the Draft OptionButton, are automatically selected when the Plug and Print dialog box is displayed. Keep in mind that you can also modify the statement:
lstSheets.Selected(0) = Trueto automatically select a different sheet. This statement, for instance:
lstSheets.Selected(1) = Truewould preselect the second sheet on the list. Or, include several such statements to preselect multiple sheets when the Plug and Print dialog box is displayed.
Finally, we already discussed that the generic printing routine will suffice for many of your spreadsheets. However, in some cases you'll need the additional CheckBox and OptionButton controls. Fortunately, you can have the best of both worlds in one UserForm.
When you need only the basic UserForm, change the Height property back to 165. The CheckBox and OptionButton controls will remain as part of the UserForm, but won't display. If you do this, be sure to set the CheckBox and OptionButton controls to the desired setting. The user won't be able to change them, but your VBA routine will still process any code that refers to the hidden controls.
A Crowning Touch
An excellent adjunct to the Draft and Presentation buttons would be to allow the user to automatically print to a specific printer. For instance, you might print draft versions of your work on a black-and-white printer, but use expensive paper in a color printer for the presentation copies. Rather than requiring the user to remember to change printers, you can add automatic printer selection. To do so, modify the cmdOKClick routine, as shown in FIGURE 13.
Sub cmdOK_Click()

  Dim s As Object
  Dim strPrinter As String

  Unload Me
  Application.ScreenUpdating = False

  strPrinter = Application.ActivePrinter

  ' The following should be set to the names of printers
  ' that exist in the user's printers panel.
  If optDraft Then
    Application.ActivePrinter = "Draft Printer"
  Else
    Application.ActivePrinter = "Presentation Printer"
  End If

  ' When the user clicks OK, loop through the names in
  ' the ListBox.
  For i = 0 To lstSheets.ListCount - 1
    ' If a sheet name is selected...
    If lstSheets.Selected(i) = True Then
      ' See which which boxes are selected and print
      ' the range.
      Set s = Sheets(lstSheets.List(i))
      s.Activate

      With ActiveSheet.PageSetup
        If optDraft Then
          .RightHeader = "&D - &T"
        Else
          .RightHeader = ""
        End If
      End With

      Select Case s.Name
        Case Is = "Consolidated"
          ActiveSheet.PrintOut
        Case Else
          If chkSummary Then
            MsgBox "Yes!"
            With s.PageSetup
              .PrintArea = "A1:I38"
              .FitToPagesWide = 1
              .FitToPagesTall = 1
            End With

            ActiveSheet.PrintOut
          End If

          If chkMonthlyDetail Then
            With s.PageSetup
              .PrintTitleRows = "$1:$2"
              .PrintTitleColumns = ""
              .PrintArea = "A38:K100"
              .FitToPagesWide = 1
              .FitToPagesTall = False
            End With

            With ActiveSheet
              .PrintOut
              .PageSetup.PrintTitleRows = ""
              .PageSetup.PrintTitleColumns = ""
            End With
          End If
      End Select
    End If
  Next

  Application.ActivePrinter = strPrinter

End Sub
FIGURE 13: This routine allows you to automatically switch between specified printers for Draft and Presentation modes.
In this case, we declared a variable named strPrinter to store the name of the current printer. We then added an If statement that changed to either a printer called Draft Printer or Presentation Printer, based on the user's selection of the Draft or Presentation buttons. These printer names correspond to the printers listed when you select the Printers icon in Windows Control Panel. The final statement of the routine resets the printer to whatever was previously specified before running this routine.
This technique is helpful, even if you only print to one printer. For instance, you sometimes may wish to print to different trays within the same printer, or specify "manual" feed so that you can put letterhead or other special paper in the printer. To do so, simply add a second copy of your printer to the Printers list in the Windows Control Panel. Change the names to something useful, such as LaserPrinter — Normal and LaserPrinter — ManualFeed. You can then specify the options you want, such as which paper tray to use in Windows Control Panel, then select the desired printer by name via your VBA code.
ConclusionMost spreadsheet work eventually involves printed output. In this article, we demonstrated how to build a scalable printing routine that can be imported into just about any Excel workbook. Furthermore, the UserForm and routines can be easily tailored to handle even the most complex printing situations. We even showed how you can have certain controls in place, but only displayed when needed.
The author would like to thank Stan Scott of Montvale, NJ for suggesting the Windows Control Panel method of setting printer options that can be called via VBA routines.
Download source code for this article here.
David Ringstrom, CPA, is president of Accounting Advisors, Inc.(http://accountingadvisors.com), an Atlanta-based accounting and spreadsheet consulting firm serving clients nationwide. His previously published work includes articles on Microsoft Excel, Lotus 1-2-3, Quattro Pro, and FileMaker Pro. For information concerning Accounting Advisors, Inc.'s consulting services, call (404) 252-3813, or send e-mail to dringstrom@accountingadvisors.com.
Save a Tree
Writing and debugging printing routines sometimes involves repeated testing. Rather than needlessly killing trees, consider setting your printer to work off line. To do so, click Start | Settings | Printers, then right-click on your current printer. Choose Work Offline from the shortcut menu that appears. Your printing routine will still function as normal, but Windows will now hold all the print jobs in a queue. When you're done working with the routine, you can purge the pending print jobs, then clear the Work Offline setting.
— David Ringstrom