This article may contain URLs that were valid when originally published, but now link to sites or pages that no longer exist. To maintain the flow of the article, we've left these URLs in the text, but disabled the links.


June 1998

Microsoft Systems Journal Homepage

Exploring DirectX 5.0, Part II: DirectSound Gives Your Apps Advanced 3D Sound

Download Jun98DirectSoundcode.exe (1,217KB)

Jason Clark supports software core development for Microsoft. He believes that logic is pure science. He can be reached at jclark@microsoft.com

Sound rounds out the gaming experience by providing feedback to the ears. Even in the days of endless beeps and whizzing noises, a game just wasn't the same without sound. The value of sound is a given; the question today is one of sophistication. Will your application generate yesterday's beeps and whizzing noises, or will it offer "three-dimensional" sound that is seamlessly integrated into your game's alternate reality? DirectX® 5.0 lets you add sophisticated sound effects to your Windows®-based applications without too much pain.
      In my last article ("May the Force Feedback Be with You: Grappling with DirectX and Direct Input," MSJ, February 1998), I introduced DirectX 5.0 with a discussion of DirectInput®, including the new force feedback features. This time I will delve into the features offered by the DirectSound® component of DirectX 5.0. If you are unfamiliar with DirectX, take a moment to scan the February issue of MSJ and you will be ready to roll.

Introducing DirectSound!
      It has become commonplace in computer games to hear voices, gunshots, sirens, engines, footsteps, and screams that sound as real as a movie soundtrack. Some of the Se sounds are sampled; others are synthe Sized.
      Of course, you can use DirectSound to play a sampled sound. You can control the volume and frequency and pan the sound from one speaker to the next. For drivers with hardware support for DirectSound features, there is no perceptible delay between the time when your application plays the sound and the time your ears hear it. This is perfect for gaming. But DirectSound offers more than just the Se simple features.
      Starting with version 5.0, DirectSound lets you move sounds through virtual 3D space with features such as Doppler effects and sound cones. And it automatically translates the virtual 3D sound environment for stereo or surround-sound output. The new three-dimensional features in DirectSound offer a rich layer of new possibilities.

Getting Started with DirectSound
      The DirectX 5.0 SDK is currently distributed as part of the Platform SDK. Once you have installed the Platform SDK, you will have the necessary files on your system. The header files you will need are in the \MSSDK\INCLUDE directory; add this path to the INCLUDE path for your project. The \MSSDK\LIB directory holds the LIB files: DXGUID.LIB, DSOUND.LIB, and WINMM.LIB. The files DXGUID.LIB and DSOUND.LIB contain the GUIDs and DirectSound functions. WINMM.LIB contains Win32® multimedia APIs—not strictly necessary for use with DirectSound, but can be very handy. Once you've taken care of the Se preliminaries, you are ready to dive in.
      The DirectSound COM objects currently include eight interfaces, but most applications will only use four: IDirectSound, IDirectSoundBuffer, IDirectSound3DBuffer, and IDirectSound3DListener. the Se are the interfaces that I will discuss in this article. The remaining four interfaces encapsulate sound capture, capture/playback notification, and extended sound card features. For further information on the Se interfaces, you can refer to the Platform SDK documentation.
      The IDirectSound interface exposes functions that affect all of DirectSound's functionality for one sound card on the system. You can use this interface to find the capabilities of the sound card, and as a starting place to retrieve IDirectSoundBuffer interfaces.
      The IDirectSoundBuffer interface lets you manage a single sound buffer. A buffer object is used to represent each individual sound played by your application. The IDirectSoundBuffer and IDirectSound3DBuffer interfaces manipulate the Se objects.
      DirectSound defines a special buffer known as the primary sound buffer. This is the buffer that is heard by the user of the application. Typically this buffer is used as a mixer for all other sound buffers, called secondary sound buffers. Both the primary and secondary sound buffers are manipulated using the IDirectSoundBuffer interface. The primary buffer can also be manipulated by the IDirectSound3DListener interface.
      Now that you have a general overview of how the Se four interfaces interrelate, let's get into some more detail. My first step will be to show how you can create a DirectSound object.

Creating a DirectSound Object
      Normally you will want to create a DirectSound object during your application's initialization. This can be done in several different ways. It is very common for an application to need only one DirectSound object for the default sound card on the system. This common case is also the simplest one. You can create a DirectSound object for the default sound card on a system by calling DirectSoundCreate with a NULL value for the GUID in the first parameter. The DirectSoundCreate function is declared in the DSOUND.H header file along with all of DirectSound's function, interface, and macro definitions. The function itself is located in the DSOUND.LIB file. DirectInputCreate is defined as follows:


 HRESULT WINAPI DirectSoundCreate(
     LPGUID lpGuid,
     LPDIRECTSOUND * ppDS, 
     IUnknown FAR * pUnkOuter );
The first parameter represents the GUID of the sound card for which you want to create a DirectSound object. As mentioned before, passing a NULL value here requests the default sound card for the system. I will discuss how to find other GUIDs shortly.
      The second parameter is the address of a pointer to an IDirectSoundInterface. This parameter is potentially confusing if you are new to COM. Remember that all COM objects are manipulated using interfaces. Your goal in calling DirectSoundCreate is to retrieve a pointer to an interface that you can use to manipulate the Object. Your application should define a variable (possibly global) of type LPDIRECTSOUND and pass its address as the second parameter to DirectSoundCreate.
      The last parameter is known as pUnkOuter and has to do with aggregation. DirectSound does not currently support aggregation so you must pass a NULL for this parameter. The return value is an HRESULT, which can be checked against the possible error values for this function. You can also apply one of the COM SUCCESS or FAILED macros to check the success of the call.
      As you can see, it is reasonably simple to retrieve a pointer to an IDirectSound interface for the system's default sound card. Although uncommon, it is possible for a system to have more than one sound card installed. If this is the case, you may want to create a DirectSoundObject for a card other than the system default. This requires that you pass a GUID for the card as the first parameter to DirectSoundCreate. You can obtain this GUID by enumerating available sound cards on the system through the DirectSoundEnumerate function. DirectSoundEnumerate is defined as follows:

 HRESULT WINAPI DirectSoundEnumerate( 
    LPDSENUMCALLBACK lpDSEnumCallback, 
    LPVOID lpContext );
      If you are familiar with other enumeration APIs in Windows, such as EnumWindows, then you will feel right at home with DirectSoundEnumerate. You simply pass a pointer to an application-defined callback function and an application-defined 32-bit value. The callback function will be given a GUID for each sound card on the system. Applications that enumerate sound devices commonly call DirectSoundCreate from within the callback function.
      Last, I should mention that it is possible to create an instance of a DirectSound object using the standard COM function CoCreateInstance. Unlike DirectSoundCreate, this will return an IDirectSound interface to an object that has not been initialized and is not affiliated with any sound card on the system. Before the Object can be used you must call the Initialize member function of the interface and pass the GUID of a sound card or NULL for the default sound card. If you are familiar with COM or you are using other COM objects in your application, then you may be more comfortable with this approach to creating a DirectSound object. The choice is entirely up to you. You now have an IDirectSound interface at your disposal, so what next?

Using the IDirectSound Interface
      The DirectSound object is actually fairly simple and has only a few main functions. One major function of the IDirectSound interface is the ability to create and duplicate DirectSoundBuffer objects. Remember that the Se objects correlate to actual sound data and are where a lot of DirectSound's functionality lies. I will cover this in more detail shortly.
      The remaining functions of the IDirectSound interface deal with sound card capabilities and global settings. The most important of the Se is the cooperative level, by which an application specifies the degree of control it needs over the device. As I mentioned in my previous article, each major component of DirectX makes use of cooperative levels.
      You must set the cooperative level of the DirectSound object before it can be used to play sounds. You do this by passing one of four cooperative levels, along with the HWND for your application's main window, to the SetCooperativeLevel member function. This lets DirectSound adjust your app's control over the device in response to whether its window is in the foreground.
      DirectSound defines four cooperative levels: DSSCL_ NORMAL, DSSCL_PRIORITY, DSSCL_EXCLUSIVE, and DSSCL_WRITEPRIMARY. DSSCL_NORMAL provides the most seamless integration with other applications and system components that make sound, but it is the most restrictive for your application. It does not let you set the format of your primary sound buffer, which means that your application is limited to 22KHz, stereo, 8-bit output.
      The DSSCL_PRIORITY cooperative level gives your application priority access to device hardware and also lets it set the format of its primary buffer. It does not limit your application to 22KHz output.
      The DSSCL_EXCLUSIVE cooperative level is similar to DSSCL_PRIORITY, but with an additional element of control: DirectSound will not play sounds from other applications when yours is in the foreground.
      The fourth cooperative level is DSSCL_WRITEPRIMARY, which lets your application write directly to the primary sound buffer, but does not let it create secondary buffers. This cooperative level is not useful for most applications. Normally, DirectSound uses secondary buffers to mix sounds for you. If you are interested in creating custom mixing routines, using DSSCL_WRITEPRIMARY is the cooperative level of choice.
      Which cooperative level should you use? This depends on the nature of your application. If you want your user to be immersed in your game, then you should use DSSCL_ EXCLUSIVE. If you want users to be able to hear sounds from other applications, such as email notifiers or schedule reminders, then DSSCL_PRIORITY or DSSCL_NORMAL are better choices. Remember however that DSSCL_ NORMAL limits your output to 8-bit sound. If you want to take advantage of the higher fidelity 16-bit sound, you should use DSSCL_PRIORITY or better.
      Two other functions of the IDirectSound interface warrant discussion before I move on to the creation of sound buffers. The first is the SetSpeakerConfig member function, which lets you specify whether the user is using headphones, stereo speakers, mono speakers, or surround sound. The default setting is for stereo speakers. It also lets you estimate the distance between the speakers so DirectSound can adjust its output for the specific system configuration.
      Another important member function of IDirectSound is GetCaps, which lets your application query the capabilities of the sound card. Although DirectSound will emulate features not provided by the driver or hardware, this takes CPU cycles and can cut into performance. If your application calls GetCaps, it can adjust itself to use features that will not cause a great deal of CPU overhead.
      With most of the initialization work out of the way, let's take a look at DirectSoundBuffer.

Buffers and Waves
      Buffers are one of the most important components in DirectSound. Most of the DirectSound functionality is implemented in interfaces to the DirectSoundBuffer objects. So what exactly are the Se buffers?
      In DirectSound, a buffer is an object that encapsulates digital sound wave data. DirectSound creates and manages a primary sound buffer for you automatically. To retrieve a pointer to an IDirectSoundBuffer interface for this buffer, you call CreateSoundBuffer with DSBCAPS_PRIMARYBUFFER in the dwFlags member of the DSBUFFERDESC structure. The primary sound buffer contains the sound data that is played through the sound system's speakers.
      Applications use secondary buffers to store blocks of sound data. When a secondary buffer is played, DirectSound mixes the data from the secondary buffer with the data in the primary buffer and the user hears the composite sound. I will cover sound buffers in more detail in a moment. First, I need to cover some basics on sampled sounds or wave data.
      Sampled digital sounds come in several flavors. For example, sampled data can be 8-bit or 16-bit. This means that each sample takes up either a byte or a word. The more data from the Original sound that is retained in the sample, the higher the quality of the sample.
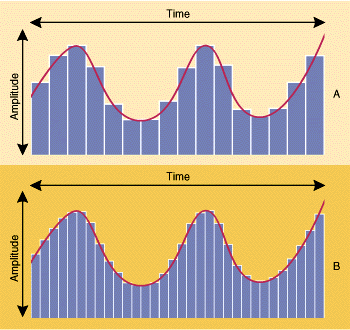
      Another important characteristic is the sample rate or frequency. In Figure 1, the red line in both graphs represents the analog or "real-world" sound wave, while the blue blocks indicate individual digital samples of data. The wider blocks in graph A represent a lower sampling rate (fewer samples per second) than the narrower blocks in graph B. As you can see, a sample with a higher sampling rate more closely approximates the analog wave. This is why higher-resolution samples sound better. Common sample rates include 8.0KHz, 11.025KHz, 22.05KHz, and 44.1KHz. Audio CDs use a 44.1KHz, 16-bit sample. Sounds can also be mono or stereo.

Figure 1  Digitally Sampled Sound Data


      The higher the sound quality, the more memory required for playback. Take, for example, a two-second, mono, 16-bit sound wave sampled at 22.05KHz. Since it is 16-bit, each sample of this sound takes two bytes of memory. The playback rate is 22050 samples per second (22.05KHz), and there is two seconds to play. You can calculate the amount of memory this sound would take by simply multiplying the Se values: 2 bytes X 22050 Hz X 2 seconds = 88200 bytes. So this sampled sound would take roughly 86KB. If this sound were stereo, it would take exactly twice as much memory.
      the Se memory characteristics apply directly to sound buffers. For all cooperative levels except DSSCL_NORMAL (which requires the 8-bit, stereo, 22.05KHzformat) you can set the format for the primary sound buffer by calling the SetFormat method of the IDirectSoundBuffer. This sets the format for all sounds played by that sound card. You can have secondary buffers that contain sounds of a different format, but DirectSound will convert the sound to the proper sample rate and resolution before mixing it with the primary sound buffer. Of course, this takes CPU cycles. For best efficiency, make sure that your secondary buffers are the same format as your primary sound buffer.
      After initialization, you normally will be able to ignore the primary buffer—as long as you keep its format in mind. DirectSound takes care of the details when mixing your secondary buffers into the primary buffer. Secondary buffers, on the Other hand, require some work on your part.
      You can create two different types of secondary buffers: static and streaming. A static buffer contains a complete sound; all of the sampled sound data resides in memory at once. Streaming buffers are only large enough to hold a portion of the sampled sound data, so your application must periodically write data to the buffer. Streaming buffers are convenient for very large sounds or sound data that is modified dynamically as it is playing.
      Regardless of the buffer type you use, a buffer should be viewed as a single sound that has a frequency rate and resolution and can be played or stopped autonomously. You will most likely create one sound buffer for each sampled sound in your application.
      To create a secondary buffer, call the CreateSoundBuffer method found in the IDirectSound interface. This creates a DirectSoundBuffer object and returns a pointer to its IDirectSoundBuffer interface.


 HRESULT CreateSoundBuffer( 
     LPCDSBUFFERDESC lpcDSBufferDesc, 
     LPLPDIRECTSOUNDBUFFER lplpDirectSoundBuffer, 
     IUnknown FAR * pUnkOuter );
At this point you should be familiar with the return value HRESULT, and as with the rest of DirectSound, pUnkOuter should be NULL. The second parameter, lpcDSBufferDesc, is the address of a DSBUFFERDESC structure that describes the buffer you want to create. The third parameter is the address of an LPDIRECTSOUNDBUFFER variable, which will receive a pointer to the new buffer's IDirectSoundBuffer interface.
      The DSBUFFERDESC structure is fairly simple. The first member, dwSize, should be initialized to the size of the structure in bytes. The second member, dwFlags, is the most complicated; I'll come back to it in a moment. The dwBufferBytes member is the length in bytes of your sound data. The dwReserved member is currently unused, but must be initialized to zero. The last member of DSBUFFERDESC is a pointer to a WAVEFORMATEX structure, which contains format information for the sampled sound such as frequency and resolution. I will talk more about this structure when I discuss how to get sampled data out of a .WAV file.
      The dwFlags member of DSBUFFERDESC tells DirectSound how you intend to use this sound buffer. If you want an interface for the primary buffer, include the DSBCAPS_ PRIMARYBUFFER flag in the dwFlags member; otherwise, a secondary buffer is created. Static buffers are created if the DSBCAPS_STATIC flag is OR'd into the dwFlags value. Other flags determine whether the buffer is stored in the sound card's memory or in your system's memory, and whether your application can play its buffer when it doesn't have focus.
      Finally, there are flags that tell DirectSound which control features you want for the buffer. the Se include DSBCAPS_CTRL3D, which indicates that the buffer can participate in 3D sound, and DSBCAPS_CTRLPAN, which indicates that the buffer's output can be panned from one speaker to the next. It is important to include only the CTRL flags that are necessary for a particular buffer so that DirectSound can optimize performance for that buffer. But don't neglect to call a CTRL flag if you need it. A call, for example, to the SetPan member function of the IDirectSoundBuffer interface will fail if the DSBCAPS_CTRLPAN flag is not included when the buffer is created.
      If a call to CreateSoundBuffer is failing mysteriously, check two things before you begin pulling your hair out. First, be sure that the dwReserved member of DSBUFFERDESC is set to zero. Second, check all of your flags to make sure that you are not using two that are mutually exclusive; this is a common reason for a failed call to CreateSoundBuffer.
      Now that you have a DirectSound buffer object, your next step is to copy sampled sound data into the buffer. This requires some understanding of .WAV files, as well as the Lock and Unlock members of the IDirectSound interface.
      The Lock function returns pointers to buffer memory in your process's address space into which you copy sound data. Note that the Lock member function returns more than one pointer to a buffer. This is because sound buffers are circular so that streaming buffers can be played while your application writes data to a different part of the buffer. Lock returns two pointers to memory, along with the lengths of each portion of the buffer. The second pointer represents the wrapped-around portion of the buffer. If this second pointer returns as NULL, then the first pointer points to the entire buffer. When you call Unlock, the buffer is out of your hands and managed by the sound buffer object. It is important to Lock, write sound data to, and Unlock buffer memory as quickly as possible to allow DirectSound to maintain efficient control of its buffers.
      Now that you know how to write the sound data to your buffer, let's discuss where to get sound data. True, you can easily write random or equation-generated data into a buffer and play the sound. But for the most part, you will want to play recorded, real-world sounds. So it's time to talk about .WAV files and Win32 multimedia functions.

Multimedia and the .WAV file
      I'll begin with a discussion of .WAV files. If you are designing a program with fixed sounds that you control, then you have the freedom to use only sounds in the same format as your primary sound buffer. Remember that DirectSound is much more efficient if it doesn't have to convert a buffer's sound before mixing it with the primary buffer. Another format consideration is compression. The .WAV file format supports compression, but DirectSound 5.0 does not. This means that you need a way to take existing .WAV files and convert the M to your frequency and resolution of choice, and make sure that they are not compressed. Fortunately, such a tool comes with Windows 95; it's called Sound Recorder.
      The Sound Recorder applet lets you load an existing .WAV file and save it in another format. It also records and plays .WAV files. After you open a .WAV file, select the Save As option from the File menu. This will produce a file dialog box with a button at the bottom labeled Change. Click this button to select the format of the saved .WAV file. Always chose PCM format because it is never compressed.
      To play a .WAV file in an application, you need two things: the sound data to copy into a secondary sound buffer object and the format information required by the WAVEFORMATEX structure, which is passed in a call to CreateSoundBuffer. The .WAV file includes both the Se elements. Windows provides a variety of multimedia functions that, among other things, help with the parsing of .WAV files.
      The Win32 multimedia functions let you parse .WAV files or images of .WAV files in memory. Thus, the multimedia functions will work whether you read your sound data from a file or make a user-defined resource and load the .WAV data directly into memory. To use the multimedia functions, you must link the WINMM.LIB file with your project and include MMSYSTEM.H in your module files.
       There are nearly 300 multimedia functions provided for Win32 in the Platform SDK. Thankfully, you only have to concern yourself with six of the M: mmioOpen, mmioClose, mmioRead, mmioDescend, mmioAscend, and mmioFOURCC. the Se are basically high-level file I/O functions made specifically for multimedia files. I will explain how to use the Se functions to parse an uncompressed .WAV file for use with DirectSound. The multimedia functions can also help you in converting .WAV formats as well as reading compressed files. See the Platform SDK documentation for a more complete description of what is available.
      The multimedia file formats supported by Win32 are internally organized into blocks of data called chunks. Each chunk begins with a structure called MMCKINFO, which contains information about the size and type of the chunk, and an offset into the file for the data portion of the chunk. The chunks in a multimedia file are arranged hierarchically, so starting from an outer chunk you can descend to a subchunk, or ascend to an outer level. This may sound confusing, but when seen in action it will be clearer.
      To read a .WAV file, first call mmioOpen to retrieve a handle to a multimedia file. If your .WAV file is in memory rather than a file, you will need to fill in an MMIOINFO structure with a pointer to the .WAV data in memory. Once you have obtained a handle to the multimedia file, you must descend to a chunk called WAVE. To do this, you fill in the fccType member of an MMCKINFO structure with the identifier for the WAVE chunk and pass the structure to mmioDescend. This is demonstrated in the following bit of code from the sample program:


 mmckinfoParent.fccType = mmioFOURCC('W','A','V','E');
 if( mmioDescend( mmioWave, &mmckinfoParent, NULL,
                  MMIO_FINDRIFF)) 
 {
    mmioClose( mmioWave, 0 ) ;
    return NULL;
 }
Notice the call to the function mmioFOURCC. It takes the four identifying characters and combines the M into a single 32-bit value for identifying the chunk. If the call to mmioDescend succeeds, the file is a .WAV file. Notice the third parameter is a NULL value. This indicates that the WAVE chunk is not a subchunk. If you descended to a subchunk, then you would include a pointer to an MMCKINFO structure identifying the parent chunk. This is what you do next when you descend to the "fmt " subchunk.
      The "fmt " subchunk's data portion holds a WAVEFORMATEX structure, which is exactly what you need to create your secondary sound buffer. After descending to the "fmt " subchunk, you need to read this data into an instance of a WAVEFORMATEX structure:

 if (mmioRead(mmioWave, (char*) &wfPCM,
     mmckinfoSubchunk.cksize) == -1) 
 {
     mmioClose( mmioWave, 0 ) ;
     return NULL;
 }
      Now that you have your WAVEFORMATEX structure—which holds the format information for the wave—all you need is the actual wave data. There are only a few more steps in the parsing process. Remember, your multimedia file pointer is currently on an "fmt " subchunk. The next step is to call mmioAscend to move the pointer back out a level so that you can call mmioDescend to descend to the "data" subchunk. This chunk contains the actual sampled sound data for the .WAV file.
      Once you have descended to the "data" subchunk, you can read the wave data in the same way you read the "fmt " subchunk. mmioRead reads the data directly into the buffer returned by the Lock member function of the IDirectSoundBuffer interface.
      Finally, you can Unlock your IDirectSoundBuffer and pass the multimedia file handle to mmioClose. That's it. You now have a secondary buffer with data from an existing .WAV file that is ready to be played.

IDirectSoundBuffer
      You have successfully called CreateSoundBuffer to retrieve a pointer to an IDirectSoundBuffer interface, and you have copied sampled sound data into the secondary sound buffer. You can now play the sound by calling the Play method of the IDirectSoundBuffer interface, and stop the sound using the Stop method. You can change the frequency, pan from speaker to speaker, and change the volume with the SetFrequency, SetPan, and SetVolume methods, respectively. DirectSound will automatically mix the data from the secondary buffer with the data from the primary buffer to produce the sound that the user hears. the Se are just the basics. I will spend a little more time discussing the basics of secondary sound buffers and then jump into the exotic new world of 3D sound!
      Here are some things you should know about your secondary sound buffers. First, you can create more than one. You can also play and stop the M autonomously, and DirectSound will take care of the mixing. The number of buffers that can be mixed depends on several factors, including the sound card, driver support for DirectX, and CPU speed. Your application can retrieve information on specific system capabilities by calling the GetCaps member of the IDirectSound interface. It's a good idea for an application to use this information to scale its sound features to the system on which it is running.
      You can duplicate secondary sound buffers by calling the DuplicateSoundBuffer member of the IDirectSound interface. You pass the pointer to the IDirectSoundBuffer interface of the buffer that you want to copy and DuplicateSoundBuffer returns a pointer to an interface for the new buffer. The new buffer will use the same sampled sound data as the Original buffer, and thus saves the Overhead of a second copy of the data. Although it uses the same wave data, each sound buffer can be played and stopped without regard to its clone. You can also make more than one duplicate of a secondary sound buffer. For example, if you have a game with four cars, each car would need to make engine noises. Your application could use DuplicateSoundBuffer to make efficient use of the memory that holds your sampled engine sound.

You Win Some, You Lose Some
      You have created a secondary sound buffer, copied sampled sound data into the buffer, and played the sound successfully. You may think that nothing could go wrong at this point. You'd be wrong. DirectSound is a shared commodity throughout the entire system. If a user switches from your application to another one, it is possible that DirectSound will deallocate the memory for your secondary buffers! This is called losing your buffers, and it is something your application must deal with gracefully.
      Here is the whole story. If the user switches from your application to an application that is using DirectSound with the DSSCL_WRITEPRIMARY cooperative level, your application's buffers will be lost. Remember that this cooperative level does not allow the creation of secondary buffers. For example, if the system is using a PCMCIA sound card and the user removes the card, your buffers will be lost. You should assume that your application can lose its buffers unexpectedly. The Play and Lock methods of the IDirectSoundBuffer interface can fail and return a value of DSERR_BUFFERLOST. Always check for this return value.
      You can restore a lost buffer by calling the Restore member of the IDirectSoundBuffer. But once the buffer is restored, it's the responsibility of your application to Lock the buffer, copy the sampled sound data back into the buffer, and Unlock it. DirectSound will not restore your sound data for you. It is also possible that whatever caused your application to lose the buffer in the first place is still happening, in which case the Restore function will fail. You may have to continue trying until the user switches back to your application.
      Sounds that are playing when buffers are lost are stopped immediately. This can be a problem if your application is playing a sound indefinitely by using the DSBPLAY_ LOOPING looping flag with the Play method. When the user switches back to your application, your application needs to restore and replay the sounds that were playing intelligently. This is commonly done by responding to the WM_ACTIVATE window message. This gives your application a chance to call the GetStatus member function of the IDirectSoundBuffer interface to see if a buffer has been lost, and to replay buffers that should be restarted.
      There is one more point to make about lost buffers. Just because the user has switched back to your application and your application has received a WM_ACTIVATE message doesn't mean that DirectSound is quite ready to let your application restore its buffers. It may fall behind the WM_ ACTIVATE message, so you must be prepared to restore your buffers, check for success, wait, and retry. But you should not fall into the trap of looping indefinitely until successful. It may be that you can never restore your buffers, and you don't want your application to enter into an endless loop! When you are finished with an IDirectSoundBuffer interface, don't forget to call the Release method so that the Object can free up its resources.

Sound is 3D
      When I first heard that DirectX was going to support 3D sound, I assumed that Microsoft had added a few trivial features and some marketing genius had decided to label it 3D. As it turns out, DirectX 5.0 has added features to DirectSound that could have no more appropriate name than 3D sound.
      Most of us associate the term 3D with vision, but human beings perceive sound in three dimensions as well. If I am standing behind you and I speak, you can figure out where I am. There are nuances in the way the sound hits one ear before the Other that your brain translates into a very accurate direction for the source. Your brain translates the many hints and clues from your ears into a "sound picture" of 3D space.
      DirectSound 5.0 attempts to reproduce the Se hints and clues. With the right hardware, the reproduction can be very impressive. DirectSound is most effective with headphones, but it also supports two-speaker, multi-speaker (quadraphonic), and surround-sound systems. The quality of 3D sound will become even better as hardware becomes more sophisticated. Your application may sound more realistic a year from now than it does today without so much as a recompile!
      I'll begin with a general overview of what 3D sound brings to DirectSound. First, 3D sound introduces the notion of virtual 3D space where each sound source has a location in x, y, and z coordinates. Second, 3D sound has added the notion of a "listener" that also has a location in 3D space represented by x, y, and z coordinates. In addition to a location, the listener has an orientation that indicates the direction the listener is facing. You can see how the Se additions alone introduce a fair amount of sophistication.
      Coordinates in virtual space give DirectSound enough information to make sounds appear to be coming from the left or the right, from behind or in front. The direction is based on the coordinates of the sound sources relative to the listener. DirectSound can also emulate distance by making sounds quieter as they move further from the listener. But it doesn't end there.
      One of my favorite features is the Doppler effect. In addition to a location in space, a sound source can have an application-defined velocity. Given the sound's velocity, distance, and direction relative to the listener, DirectSound can adjust the sound's pitch to simulate the Doppler effect. Thus, you can create a sound buffer and fill it with a constant sound such as a train whistle, and DirectSound will raise its pitch as the source moves toward the listener, and lower it as the source moves away from the listener. This allows some impressive realistic simulations.
      As I said before, the listener has a location in virtual space and an orientation (the direction the listener is facing). Direction can also be applied to sound sources. A sound source that emanates sound in all directions is known as a point source. Sound sources that have an orientation or direction are called sound cones.
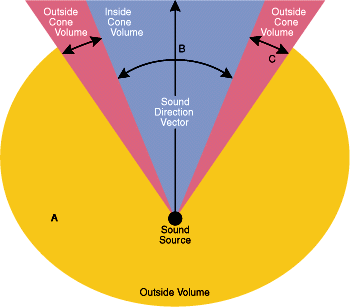
      Sound cones are called cones for a reason (see Figure 2). The sound has an orientation that describes the direction it is facing. This is represented in the diagram by a line with an arrow pointing away from the source. Two angles on either side of the line describe an inside and outside cone of sound.

Figure 2  Sound Cones


      For simplification, suppose there is no sound other than that produced by the sound cone source. A listener within the inside cone (position B in the diagram) would hear the sound at full volume, adjusted by the distance from the source. A listener within the Outside cone (position C in the diagram) would hear the sound at a volume between full volume and silence, depending on its proximity to the inside cone. A listener outside either cone (position A in the diagram) would hear nothing.
      Sound cones make it easy to implement some very complex effects. For example, if you implement a dragon's roar with a sound cone, it can be louder if the dragon is facing the listener. Sounds from a room can sweep out into an adjoining room as the door between the rooms swings open. The possibilities are endless.

Working With 3D Sound
      An application that intends to use 3D sound should make sure that it creates its buffers (including the primary buffer) using the DSBCAPS_CTRL3D flag with the dwFlags member of the DSBUFFERDESC structure. This is very important because it informs DirectSound that you intend to use 3D features with this object. If you do not include DSBCAPS_CTRL3D, queries for 3D interfaces will fail.
      You must query your sound buffer objects for new interfaces that include methods for performing 3D sound effects. Upon application initialization (often right after you create your primary sound buffer), you must query the IDirectSoundBuffer interface for your primary buffer for a pointer to an IDirectSound3DListener interface. You will also need to query your secondary sound buffers for a pointer to an IDirectSound3DBuffer interface if they are to participate in the third dimension. You can do this by calling the QueryInterface method, a standard COM interface that is available for all COM objects. The following example shows a QueryInterface call for the primary sound buffer of the IDirectSound3DListener interface:


 if ( FAILED( g_lpDSBufferPrimary->QueryInterface( 
   IID_IDirectSound3DListener, 
  (void**) &g_lpDS3dListener ) ) )
   return FALSE ;
      The first parameter to QueryInterface is the GUID for the desired interface; the second is a pointer to the interface pointer that you want filled in by QueryInterface. As you can see from the example, the GUID for the IDirectSound3D-Listener is IID_IDirectSound3DListener. A similar call to QueryInterface using the IID_IDirectSound3DBuffer GUID structure would be used to retrieve a pointer to an IDirectSound3DBuffer interface.
      The IDirectSound3DListener interface provides methods to set the location and orientation of the listener in 3D space, as well as other settings that affect all 3D sounds. The IDirectSound3DBuffer interface contains methods that manipulate the 3D characteristics of a single sound buffer, including location, Doppler effects, and cone settings. I will cover the Se interfaces in more detail shortly.
      There are a few special considerations when dealing with 3D sound. Some of the features of DirectSound are incompatible with or meaningless to 3D sound. For example, although DirectSound supports playback of stereo sound buffers, this concept has no meaning with 3D sound. The 3D features of DirectSound create stereo (or better) output from a composite of mono sound sources positioned in 3D space. If you create a secondary sound buffer that contains stereo sound data, DirectSound will be forced to convert the sound data into a mono format when using it in a three-dimensional manner. This uses CPU cycles and should be avoided.
      Another related feature of DirectSound that is incompatible with 3D sound is the ability to pan sounds from one speaker to the next. If you are creating a secondary sound buffer and you want to use this buffer with 3D sound, then you should not include the DSBCAPS_CTRLPAN flag in your call to CreateSoundBuffer. This means you should not use the DSBCAPS_ DEFAULT or the DSBCAPS_ALL flags either, since they both include the DSBCAPS_CTRLPAN flag.
      A more global consideration when using 3D sound is the actual 3D coordinate system, and how you will apply it to your application. Will it correlate directly to the coordinate system you are using in your screen output? Will it require translation or scaling? Direct Sound provides a very flexible system that lets you fit the virtual 3D space to your application's needs.

Understanding 3D Coordinates and Distance
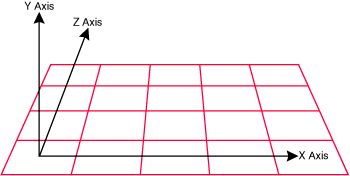
      DirectSound's virtual three-dimensional environment uses a left-handed coordinate system. This means that if the y axis increases in the up direction and the x axis increases to the right, then the z axis will increase away from you. This is illustrated in Figure 3; coordinate values increase in the direction of the arrows.

Figure 3  Left-handed Coordinate System


      Of course everything is relative, and you can adjust things programmatically as needed. For example, if you want to picture the y axis as increasing in the down direction then you need to make the z axis increase toward you.
      DirectSound's default unit of measurement is the meter. For example, if the listener is at position 0,0,0 (x,y,z) and a sound source is at position 0,0,10, then the sound's volume will be lowered as much as it would be by moving 10 meters away from a sound source in the real world. This default can be adjusted in a variety of ways.
      Your application can adjust the unit of measurement by calling the SetDistanceFactor method of the IDirectSound3DListener interface. Setting the distance factor to .01, for example, would change the unit of measurement to the centimeter. Setting it to 2 would change it to 2 meters. A value of 0.0254 would adjust the unit of measurement to an inch.
      Another adjustment you can make is to set the roll-off factor for the listener object. This lets you amplify or attenuate the muting effect on sounds as they move further from the listener, and is set using the SetRolloffFactor method.
      An important concept to understand regarding coordinates, distance, and volume adjustment is the minimum and maximum distances of a sound buffer. You may not want the volume of every sound buffer to have the same muting effect relative to its distance from the listener. For example, you are not likely to hear someone sneeze 100 meters away, but you would if they were one meter away. On the Other hand, a nuclear blast is going to seem just as loud at 100 meters as it will at one meter. The problem arises due to limitations in digitally sampled sound. The unadjusted volume of your sampled sneeze is likely to be close to the volume of your sampled explosion.
      DirectSound solves this problem by allowing you to set the distance from the listener at which the sound is at maximum and minimum volume. The 3D sound system then scales the volume linearly between the Se two distances. In the case of the explosion, you might set its minimum sound distance to a few hundred kilometers and its maximum sound distance to 100 meters. The sneeze, on the Other hand, may range from a half meter to about 50 meters. the Se settings can be set for each sound buffer using the SetMinDistance and SetMaxDistance methods of the IDirectSound3DBuffer interface.

The Listener
      3D sound is a composite effect that is changed by the settings of the sound buffers and the listener. Each time you change the position or orientation of one of the Se objects, DirectSound has to recalculate the environment. For this reason, the methods of the IDirectSound3DListener and IDirectSound3DBuffer interfaces offer two optimization techniques to avoid unnecessary recalculation by DirectSound. The first technique is batch parameter setting. The IDirectSound3DListener and IDirectSound3DBuffer interfaces both allow an application to get and set all of the parameters for the Object with a single function call.
      The second technique is deferred changes. Each method that makes a change to the 3D environment includes a parameter called dwApply, which can be set to DS3D_ DEFERRED or DS3D_IMMEDIATE. If you chose DS3D_ IMMEDIATE, then the 3D environment is immediately adjusted. Alternatively, you can make many calls using the DS3D_DEFERRED flag and then make one call to the CommitDeferredSettings member of the IDirectSound3DListener interface, which will adjust the 3D sound environment for all deferred settings. This is a more efficient approach.
      The listener is a very important part of 3D Sound. It is the listener's position and orientation relative to the sound sources that defines the three-dimensional output of DirectSound. As I mentioned before, the IDirectSound3DListener interface contains methods to change and set features of the listener. Remember that calling the QueryInterface method of the IDirectSoundBuffer object for the primary sound buffer retrieves a pointer to the IDirectSound3DListener interface.
      You set the listener's position in virtual 3D space using the SetPosition method of the IDirectSound3DListener interface. The more efficient SetAllParameters method also can be used to set the listener's position, but it requires you to decide on all the listener settings at once.
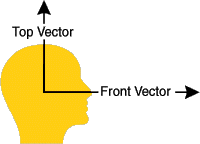
      Setting the listener's position is fairly straightforward. Setting the listener's orientation—the direction the listener is facing—is more complicated. the Orientation is defined by two vectors at right angles to each other that originate from the center of the listener's "virtual head" (see Figure 4). The top vector points up from the top of the listener's head, and the front vector points in the direction of the listener's nose. the Se vectors describe the direction that the listener is facing in 3D space. Your application sets the listener's orientation with the SetOrientation member function.

Figure 4  Listener Orientation


      That covers the basics of defining the listener. Remember to look to the IDirectSound3DListener interface for methods that will affect all 3D sound. And remember to always use the Release method of the interface when your application is finished using 3D sound.

3D Sound Buffers
      As I mentioned earlier, you can retrieve a pointer to the IDirectSound3DBuffer interface by calling the QueryInterface method of an existing sound buffer object. It is important to note that the returned interface will affect only the buffer in question. You must call QueryInterface to get an IDirectSound3DBuffer interface pointer for each secondary sound buffer that you want to use with 3D sound.
      I already discussed coordinates and distance and the effect they have on the Overall sound. So it is appropriate to start with the function that allows you to set the position of a 3D sound buffer in 3D space. The function, SetPosition, simply takes x, y, and z coordinates and a dwApply flag.
       A nuance that can effect the Output of sound relative to the listener is the "mode" of the 3D sound buffer. DirectSound supports three modes for sound buffers: DS3DMODE_ DISABLE, DS3DMODE_HEADRELATIVE, and DS3DMODE_NORMAL. They are set using the SetMode method of the IDirectSound3DBuffer interface. DS3DMODE_ DISABLE turns off 3D processing for the buffer so that the sound seems to come from the center of the listener's head. With the DS3DMODE_NORMAL setting, the position and orientation of the listener object affects the sound of the 3D sound buffer as much as the position of the buffer itself. In DS3DMODE_HEADRELATIVE mode, the listener settings have no effect on the sound of the 3D sound buffer; only the settings of the sound buffer affect the Overall sound. For example, if you are the listener and you are hailing a taxicab, then the passing car is in DS3DMODE_ NORMAL mode, while the sound of your voice is in DS3DMODE_HEADRELATIVE mode since it stays the same (relative to your ears) even if you turn your head.
      If you'd like your sound buffer to produce a Doppler effect, you can set the velocity of your 3D sound buffer using the SetVelocity member function. The velocity is simply a vector in 3D space, and does not actually adjust the Object's coordinates in virtual space. Vectors with greater magnitudes will cause a more exaggerated Doppler effect. The velocity needs to be set only once, but it's up to your application to periodically change the position of the Object for the effect to take on the proper sound.
      By default, your 3D sound buffer is set to play at an equal volume in all directions. You can, however, apply a sound cone that defines a direction of effect as well as a breadth of effect. Take another look at Figure 2. Remember that a sound cone is defined by an orientation vector that represents the direction of sound, and two angles that define an inside and outside cone surrounding the Orientation vector. The cones represent the breadth of the effect. You set the Orientation of the sound cone with the SetConeOrientation method of the IDirectSound3DBuffer interface. The cone angles are set with the SetConeAngles method, and the volume beyond the Outside cone is set with the SetConeOutsideVolume method.
      the Outside volume determines how much muting should be applied to the volume. To set a sound cone back to a point source, which is equal in volume in all directions, simply set the Outside volume to no muting by passing a zero to SetConeOutsideVolume.

A Word on Quality
      DirectX can take advantage of many different types of hardware. This can enhance the quality of your applications, but it comes with a degree of responsibility for the programmer.
      As mentioned earlier in this article, your application can query objects for the specific capabilities of the devices attached to the system. It is important for all but the simplest of applications to make good use of this information so that it can scale itself to the capabilities of the system.
      As an example, consider hardware acceleration of 3D features. If DirectSound has to use emulation to perform 3D operations, then 3D sound can be computationally expensive and should be used with care. On the Other hand, if the sound card has hardware support for 3D features, then the CPU will take a negligible hit for 3D features. Another consideration is efficiency. If you're careful, you can minimize the number of CPU cycles that DirectSound must use. Careless design can cause DirectSound to make excessive use of the CPU.
      Buffer formats are another area for caution. Remember that if secondary buffer formats don't match the format of the primary buffer, DirectSound must convert the Se buffers in real time before mixing the M. It is usually a trivial matter to ensure that buffer formats match.
      Your application will also be overworked if it makes frequent calls to change the 3D sound environment using the immediate option rather than the deferred setting option. If your application periodically updates the display, it's a good idea to only commit changes to sound once per display update, or possibly once per several display updates. Decisions like the Se can be made at runtime, depending on the system.
      Last but not least, DirectSound and DirectX functions are diligent about reporting error conditions; do not neglect to check for possible errors. Though important in all facets of software design, error checking is particularly important with DirectX because of the diversity of hardware. You can write an application that works great on one system, and doesn't work at all in another. The problem is often due to a capability difference that would have been caught with rigorous error checking.
      The sample code included with this article was designed with ease of understanding in mind. When looking over the sample code you should have no trouble seeing how the different parts of DirectSound (and DirectX) work together. It does not, however, follow all of the guidelines I just mentioned, nor is it a framework for super-efficient game design. That said, let's talk about the sample code.

The Sample Program
      The sample program for this article is a continuation of the sample from the first article in this series. The first version demonstrated DirectInput and force-feedback effects. This version builds on that to add sound effects. The first thing you should do is build the demo code and run it. You will see a stick figure in a window. By using the cursor keys or a joystick, you can move the figure around.
      You will also notice an arrow in the center of the screen. This arrow represents the listener object in 3D sound. The arrow is pointing in the direction that the listener is facing. You can rotate the listener by pressing the left mouse button. Move the listener by pressing the right mouse button on the new position. The stick figure is the sound source, and makes noise when he hits the walls. Also, if you press the second button on the joystick or the Ctrl key, the stick man will sing a little ditty. Notice how the sound changes relative to the position of the listener.
      Occasionally you will see a flying saucer that illustrates a Doppler effect in 3D sound. You will also notice a spinning loudspeaker playing rock music that demonstrates a sound cone effect.
      The purpose of this sample program is to illustrate the use of DirectSound, but there is a fair amount of non-related code in it. This code has been broken into modules based on function. For a description of the modules other than DXSound.cpp, see my previous article on DirectInput.
      The DXSound.cpp module (see Figure 5) contains all the DirectSound code and demonstrates many of the features discussed in this article. The functions in this module are listed in order of use, so you should be able to read the module from initialization code to uninitialization code.
      The tools of 3D sound let you create a virtual sound environment that rivals that of your favorite surround-sound movie. The next article in this series will cover DirectDraw®, which gives GDI graphics a major overhaul. Later in the series I will add network capabilities.

From the June 1998 issue of Microsoft Systems Journal.