![]()
This article assumes you're familiar with HTML
|
This article may contain URLs that were valid when originally published, but now link to sites or pages that no longer exist. To maintain the flow of the article, we've left these URLs in the text, but disabled the links.
|
|
Visual InterDev 6.0 Ken Spencer |
| With enhanced Web building capabilities and the ability to seamlessly debug between client and server, Visual InterDev 6.0 promises to rewrite the rules for Internet development tools. |
|
Visual InterDev™ 6.0 introduces many new possibilities to the Web application creation process. For starters, the Visual InterDev interface includes a new WYSIWYG editor that has the ability to hide the code that actually makes up a page. When working with the new WYSIWYG editor, the HTML, DHTML, and other code remains behind the scenes, so you don't need to deal with it directly. Instead, you can work with the page visually—similar to the way Visual Basic® and FrontPage® handle coding. You only need to jump into the new color-coded source code editor to tweak it or when you want to add code blocks or enter HTML manually.
Visual InterDev 6.0 also introduces other changes. The dialogs and wizards are either new or improved, toolbars have changed, and new tools have been added. There is also an entirely new Web programming model in this version. The new object-centric model makes it easy to create scripted Web applications that use components and either HTML or DHTML. In fact, Visual InterDev 6.0 takes a page from DHTML and treats almost everything like an object, right down to intrinsic HTML controls such as the textbox. Visual InterDev 6.0 also includes a powerful new debugger that can debug both server and client script in a single session. In this article, I will walk you through some of the new features. This article was prepared using an early prerelease version of Visual InterDev 6.0, so some of things that I show you may change in the beta and shipping versions of the product. If you'd like to follow along at home, a prerelease version of the product can be found on MSDN Web Snapshot CD included with this issue.
Touring the New Interface
Creating a New Project
The Layout option allows you to automatically control the layout of the automatically created navigation bars on a page. When you add either a layout or theme to a page, Visual InterDev will copy the appropriate support files into your project. Visual InterDev creates two subdirectories and populates them with the appropriate subdirectories and files: _Layouts contains the Layout files and _Themes contains the Theme files. The Site Designer is based upon the Navigation view in FrontPage 98. Site Designer allows you to create a visual representation of your site, including links between pages. When you save the design, Site Designer will create each of the files for you. Site Designer has been optimized to work with Visual InterDev and ASP files. You can not only lay out pages and create links between them, but you can also apply layouts and themes to the pages. This feature makes it easy to create a common look for a set of pages and to make visual changes to existing pages. Themes are based on standard Cascading Style Sheets (CSS), which allows you to create a style, then reuse that style on other pages or projects. If you change the style later, every item that uses the style sheet will display the updated style. Styles can be directly embedded in a page, or you can create style pages and link them to multiple pages. This is the preferred method of using styles as it promotes consistent appearance and code reuse. In the past, CSS features have been difficult to use because of the detailed coding requirements. No more. Visual InterDev includes a CSS Editor that provides point and click style editing. Figure 3 shows the CSS Editor with the Font page displayed. The style sheet outline in the left pane shows the style tags and classes in this file. When you select a tag in the outline, the attributes for that tag are displayed in the property pages on the right. You can use the CSS Editor to quickly customize styles that are part of Visual InterDev themes, then apply those styles to an entire site as part of a theme using the Site Designer.
Creating ASP and HTML Pages
|
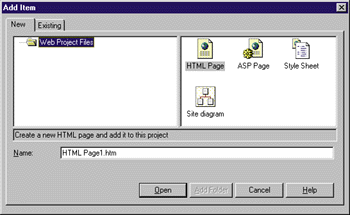
You can also create templates from your existing pages and add them to the New dialog, where you can use them to create new pages. You do this by placing the template pages in the Templates directory. There are also a number of advanced template features you can use, such as prompting the user to make selections or entries when adding a page or creating a template page that points to several files.
Building Applications
Visual InterDev includes a number of new features for building applications. Figure 5 shows the property pages for a project. There are several interesting options on the Editor Defaults page. First, you can control whether design-time controls use ASP (for server-side code) or DHTML (for client-side code execution). If you are using Microsoft Internet Explorer 4.0 as the supported browser on your intranet, then DHTML makes sense. If you are using different browsers or building Internet applications, then you should use ASP.
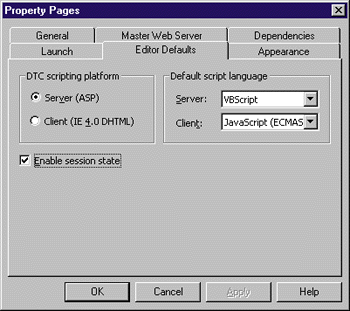
Second, you can change the default scripting language for the project for both the client and server. It's nice to be able to do this from a dialog without having to set the defaults globally for all projects. You can also turn session state management on or off from this dialog (it's off by default).
There are many other options you can set from the project properties, such as the default themes and layouts, the launch page for the application, and whether the application requires a Secure Sockets Layer (SSL) connection.
Visual InterDev also enhances your ability to work with databases. Microsoft introduced a new feature for Web applications called the Data Environment. You add the Data Environment to your project by adding a Data Connection in the same manner as with Visual InterDev 1.0: just right-click the project name, select Add Data Connection, then complete the steps presented to you. Once you have completed the connection, the Data Environment entry will show up under the Global.asa in the Project Explorer as shown in Figure 2.
To use a Data Connection, you need to add a Command object by right-clicking the Data Environment and selecting Add Data Command from the context menu. The Command object represents a database object such as a table, query, stored procedure, view, synonym, or SQL statement. It will return a recordset that can be used by the Recordset DTC. The fields in the recordset will show up under the Command object in the Project Explorer. The Command object is similar to the Data Command DTC in Visual InterDev 1.0, except that you place the Command object at the project level, not the page level.
The Pubs element directly under the Data Environment is a Data Connection that points to the familiar sample Pubs database that ships with Microsoft SQL Server™. The Connection entry just under Pubs is another Data Connection named Connection. You can set these names when you create the connection, or you can edit the properties and change the name later. In Figure 6, the Command entry, just under Connection and to the right of SQL, is a Data Command.
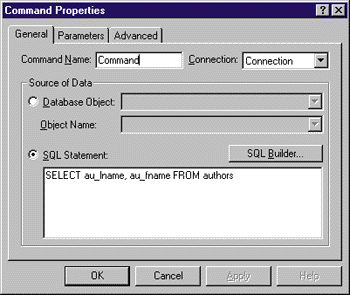
Notice that you can change the connection that the Data Command points to by using the dropdown list in the top-right corner of the page. You can also change the SQL statement manually or through Query Builder, set up the properties for parameters of the Data Command, and change the advanced properties such as the cursor type and location.
What can you do with this Data Command? This is where it gets interesting. If you use Visual InterDev 1.0 and ASP, you are probably accustomed to creating an ADO Data Command for a specific page. Now you can just create the Data Command as part of the Data Environment, then reuse it in the project. Need to make a change to the SQL? Display the properties for the Data Command, edit the SQL directly or use Query Builder, then save it. That's it. All the pages that use that command now use the updated SQL.
As you can imagine, using the Data Command to create reusable data objects should make your life much easier. First, your development time goes way down because you only need to create the code once. Second, your maintenance cycle goes down because you can make global changes to your Data Commands.
How do you use this Data Environment and Data Commands that you attach to it? First, open an ASP page in the editor. Next, drag the Data Command (Employee in this instance) and drop it onto the page. This will create a Recordset DTC in the page! You can see the DTC as Recordset_DTC1 in Figure 7.
Now, say you need to place data from the Employee table on a Web page. Highlight the columns that you need in the Employee Data Command in Project Explorer. You can see the columns displayed directly under the Employee Data Command in Figure 7. Next, drag them from the Project Explorer and drop them on the page. That binds HTML fields to the Data Command in the Data Environment.
Visual InterDev includes a number of data-bound DTC fields that can be linked directly to a Recordset DTC. You can set the default DTC fields used for each field in the Data Command. To do this you display the properties for the field, then make your changes. If you don't explicitly change the default DTC, Visual InterDev will use its own defaults depending on the type of field in the recordset. You can also drag objects from Data View and drop them onto the Data Environment to create a Command object. If you need to return a complete table or view, then this is the easiest way to create the Command object.
You can set other properties on a Recordset DTC object. For instance, you may need to create a recordset from a SQL statement or a stored procedure, but you don't need to reuse it or want it as part of the Data Environment. To do this, grab a Recordset DTC from the toolbox and drop it on the page. Next, set its properties just like you did in Visual InterDev 1.0, using Query Builder or selecting a stored procedure or view. You can use the bound DTC fields against a Recordset DTC, no matter how it was placed in the project—either from the Data Environment or manually from the toolbox. If you insert a Recordset DTC manually, then you must change the properties for each one of the bound DTC fields that you bind to it.
Debugging Applications
Visual InterDev includes support for local debugging of HTML pages, including VBScript and JScript, and remote debugging of ASP pages. Remote debugging of server-side ASP pages completes the circle, as you can now debug HTML, script, and ASP pages all at once using Visual InterDev. Remote debugging is required to test and debug powerful applications efficiently. Anyone who has developed in Visual Basic knows how powerful integrated debugging features are and how much time they can save.
Figure 8 shows Debug.htm open in the debugger. Here, I'm debugging an HTML page that includes JScript code. The red dot on the left side of the debug window indicates that a break point has been set on that line. This causes the page to stop on that line and display the debug window. The arrow just below the break point and the highlighted line indicate the current line. Advancing the code one step will execute this line and move to the next line.
The Immediate window just below the debug window allows you to interact with the application. In Figure 8, I just entered the Print Now command and pressed the Enter key. This Print command will display the results of the variable now in the Immediate window. You can see the results of the variable now displayed just below it (the current date).
You can also execute commands in the Immediate window. This is extremely useful when you are testing an application. For instance, let's say you have a variable named Age and your application takes some action when Age equals 40. Using the debugger, you can stop the code on the line where the variable Age is changed or tested. Then you could use the Immediate window and change the value interactively to 39, then 40, then 41 for testing. This allows you to localize your testing of variables, checking their values and changing them at will. You can also place the cursor over a variable and
pause it, making Visual InterDev display the current contents of the variable.
The debugger also features a Watch window (you can see this window in the bottom of Figure 8). You can place a variable in the Watch window by dragging the variable from the debug code window and dropping it in the Watch window. Once you have placed a variable in the Watch window, the debugger will update its display in real time, showing the value of that variable as it changes as long as the variable is in scope. You can also change the value of any variable in
the Watch window. Just click in the Value field and enter the new value.
The debugger code window is read-only. The ramifications of this are not major, but must be dealt with. You must carefully note any changes that you want to make to the code. For instance, in Figure 8, I might want to change this line
document.write ("The date is " + now) document.write ("The current date is " + now)
HTML Du Jour?
One of the issues with any Web application is what HTML the application produces and which browsers can use the application. The multiple incompatibilities of various browsers is a well-known problem for developers. How does Visual InterDev work in this environment?
Visual InterDev 6.0 lets you tweak the applications you generate to work with different browsers. For instance, you can create an ASP page that uses ADO and standard HTML to display data. This page can be viewed with any browser. Visual InterDev will let you change the page to use the RDS feature of Internet Explorer 4.0 with a couple of button clicks. To accomplish this, you perform these steps:
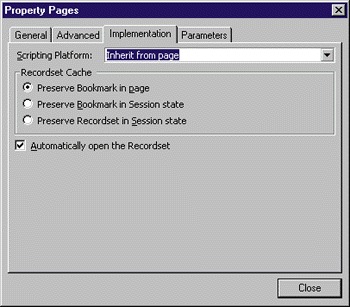
The RecordsetNavBar is another new DTC targeted at the database development area. This DTC binds to a Recordset DTC and provides you with automatic navigation features for your page. The RecordsetNavBar provides several buttons to provide standard recordset navigation (Move to First, Next, Previous, and Move to Last). You can select which buttons to display and indicate whether they show the default text characters or a preassigned image. You can make this change for any number of buttons.
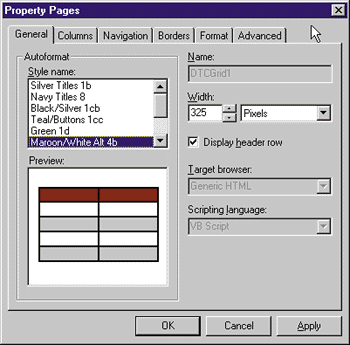
Another new DTC is the database Grid. This one's really cool. It has a designer that lets you choose the various formats and other features. The Grid control can include navigation buttons just like the RecordsetNavBar. You can select which buttons to display and change the text for each button. You can also choose from the standard designs shown in Figure 10 or explicitly change the format properties using the other pages.
Database Management
Visual InterDev 6.0 includes the new version of the Visual Database Tools. These tools have been enhanced in several areas. One of the most powerful is the ability to manage SQL Server stored procedures with Visual SourceSafe™. It works like this: you place your database under source code control. The Visual Database Tools retrieve all the stored procedures from SQL Server, then stores them in the Visual SourceSafe database. Now they are under source control. If someone comes along and modifies a stored procedure using Enterprise Manager, the next time you run the Visual Database Tools you will be alerted that someone changed a stored procedure outside of the Visual Database Tools. You will be asked if you want to accept this change or roll back the change to the version in source control. That's real control!
Other features that I particularly like are the new drag and drop tools. You can point at a SQL statement almost anywhere, right-click it, select Query Builder, and pop right in. You can invoke the Query Builder interface from just about anywhere in a database project.
Conclusion
You must check out all the nooks and crannies of Visual InterDev. Changes for the better are everywhere—menus, toolbars, functions, configuration, and so on. The projects are now stored under the Visual Studio Projects directory, which by default is under your Profiles directory. Visual InterDev projects are now tracked by user under the user's profile.
The documentation is now in the MSDN library and is accessed from the Help menu, not via a separate tab in your project. One major change to the doc engine is the print feature. You just select a major topic header, then click print, and you will be asked whether you wish to print the current page or the entire tree. I printed all of the Visual InterDev documents in about two minutes of my time and 45 minutes of the printer's time. Nice!
Visual InterDev 6.0 is a powerful new version of one of the most popular Web application development tools in the world. These new features make it a rapid application development environment from one end to the other. You can quickly create applications, standardize the look and feel of an application, debug the application, and deploy the application all from within the Visual InterDev environment. The new editors and wizards make working with code and pages much easier. If you build Web applications, you should definitely take advantage of this technology.

From the May 1998 issue of Microsoft Interactive Developer.