The Interface
By Dr P.G. Sarang
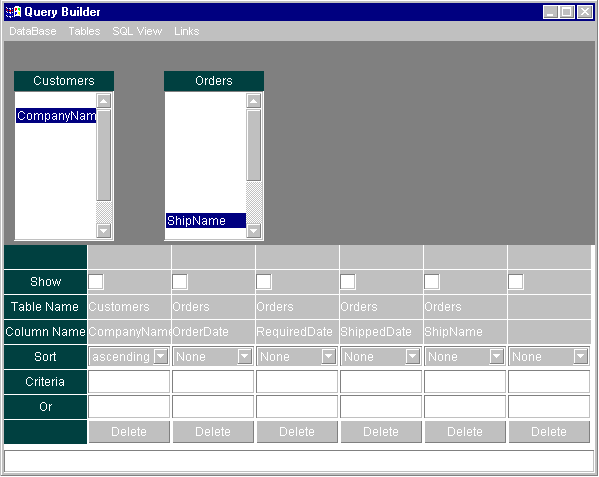
With the introduction of Sun's Java Database Connectivity (JDBC) API (in JDK 1.1), you can now develop a database application in pure Java. In this article, I'll discuss the design of a graphical query builder written in 100 percent Java. The query builder is useful for designing the SQL query visually and allows the user to view the output after executing the query (see Figure 1). This article will introduce the reader to many JDBC API calls and how to use them in practical situations.

Figure 1: The query builder in action.
Our Query Builder
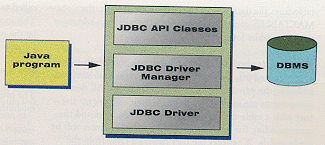
A typical JDBC configuration is shown in Figure 2. An application uses JDBC calls to open a data source. The JDBC driver manager is responsible for loading the appropriate JDBC driver to connect the application to the desired data source. After the driver is loaded, it translates the JDBC calls made by the application to the underlying database engine calls. It's also responsible for converting the data returned by the database server to the format understandable by the application.

Figure 2: A typical JDBC configuration.
Many companies are developing JDBC drivers for the popular database engines. Because such drivers may not be immediately available, the JDK contains a JDBC-ODBC bridge that can be used to develop database applications in Java. This driver is responsible for converting JDBC calls to ODBC calls. ODBC drivers are available for most database engines, so you can use this bridge to develop a database application in Java. Then when a JDBC driver becomes available, you can make minor adjustments to load it instead.
The JDBC classes and interfaces. Before discussing the design of the application, let's look at the JDBC classes and interfaces used in the program. These classes and interfaces are defined in the java.sql package.
The DriverManager class manages JDBC drivers and is used for locating the appropriate registered driver in the system while making a connection to the database. Its getConnection method accepts a string URL as a parameter and attempts to establish connection to the specified URL. If successful, it returns a Connection object.
The Connection interface defines a database session in which several database operations are carried out using SQL statements. Its getMetaData method provides information about the tables, stored procedures, etc. The getMetaData method returns DatabaseMetaData object, which provides information about the database.
We'll use the getTables method to obtain information about the tables defined in the database and the getColumns method to obtain information about the columns in a particular table. The methods of the DatabaseMetaData interface return information in form of ResultSet objects. The getMetaData method of ResultSet returns the information on the ResultSet columns in the form of ResultSetMetaData object.
We'll also use the createStatement method of Connection interface to create and execute the desired SQL statement. createStatement returns a Statement object. Then the executeQuery method of Statement executes the given SQL statement and returns a ResultSet object. (For more information about the classes and methods defined in the java.sql package, read the JDBC.)
Designing the Query Builder
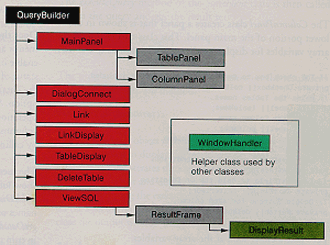
Let's now focus on the design of the query builder application. This application is a stand-alone application, which uses the JDBC-ODBC bridge. The application consists of several classes, as shown in Figure 3.

Figure 3: The classes of our application.
QueryBuilder, the main application class, creates the visual interface of the application. The application frame window displays the panel object of the MainPanel class and a status line at the bottom. The MainPanel object contains two panels:
TablePanel, which is responsible for displaying the tables used in the query; and
ColumnPanel, which is responsible for displaying the selected columns.
Our application is made up of several classes:
DialogConnect gets the data source name from the user.
TableDialog displays the names of tables to the user from the selected database. The user then selects a table from the displayed list and adds it to the query builder for querying.
DeleteTables displays the list of selected tables and allows the user to delete any of them from the query.
Link stores the information about the link between the two tables.
LinkDisplay displays the defined links to the user and allows the user to delete any of these defined links.
ViewSQL displays the SQL string generated by the query builder.
ResultFrame makes use of this generated SQL and displays the output of the SQL with the help of the helper class DisplayResult.
WindowHandler is a helper class used by other classes for handling window events.
When the application is run, the init method of the QueryBuilder class creates the main frame window of the application and sets the menu system. The object of MainPanel class and an edit box for displaying status information are created and added to the main frame window using the default BorderLayout manager. The init method then resizes the frame to full screen using the following two lines of code:
// Resize the Frame to full screen.
Dimension d = getToolkit().getScreenSize();
setBounds (0,0,d.width,d.height);
The program first obtains the screen size using the getScreenSize method, then sets the bounds for the frame using the setBounds method.
The MainPanel class holds the references to the TablePanel and ColumnPanel objects. In the init method of the MainPanel class, the two panel objects are created and added to the main panel using the GridLayout manager.
The TablePanel class declares two arrays:
private List Tables[] = new List[app.MAXTABLES];
private Label tableName[] = new Label[app.MAXTABLES];
The tableName array maintains the list of selected table names. The Tables array holds the references to the list boxes. Each list box will display the column names for the selected table from the database. In the current application, the MAXTABLES constant is set to 4, so the user can't add more than four tables for querying.
In the init method of the TablePanel class, the layout manager is turned off, and the four list boxes and four labels are added to the panel at the pre-defined locations. All these components are initially set to be invisible. Whenever the user adds a table to the query, the tableName label and the corresponding list box containing the column names will be made visible. Whenever the user deletes a table from the query, the tableName list is updated and the panel is repainted to show the revised set.
The ColumnPanel class creates a panel that is shown in the lower portion of the main panel. This class creates several array variables for displaying the selected columns to the user:
// The check box to mark if column is to be included.
private Checkbox[] colShow;
// Holds the Tables names.
private Label[] tableName;
// Holds the Column name.
private Label[] colName;
// The sort order of Selected column.
private Choice[] colOrder;
// The TextField to hold the condition.
private TextField[] criteria;
// The textfield to hold the Or Condition.
private TextField[] criteriaOr;
// Delete Buttons for each column.
private Button[] delButtons;
Let's take a closer look at the array variables:
colShow is used to hide or display the selected column in the output.
tableName displays the name of the table to which the column belongs.
colName displays the name of the selected column.
colOrder decides the sorting order (ascending, descending, or none) for each column.
criteria holds the selection criterion entered by the user. This criterion will form the WHERE clause of the SQL query (e.g. WHERE CompanyName = "IBM").
criteriaOr holds the additional criterion the user may wish to logically OR with the selected criterion (e.g. WHERE CompanyName = "IBM" OR CompanyName = "Microsoft").
delButtons holds a reference to a button object which when clicked deletes the respective column from the query.
The init method creates the GridLayout manager, creates all the above objects, and adds them to the panel. This completes the user interface of the program (again, see Figure 1). Now, let's look at how the program operates.
How Query Builder Operates
Initially, the Database menu is active while the other menus are disabled. When the user selects the Connect sub-menu option, a dialog box opens that accepts the connection string from the user. The user can enter the name of the desired ODBC data source here. The openConnection method is then called to establish the connection to the desired data source. This method first obtains the name of the data source entered by the user by calling getConnectString method; it then formats the appropriate URL:
String url = "jdbc:odbc:" + getConnectString();The program then loads the JDBC-ODBC bridge driver and establishes a connection to the desired data source:
Class.forName("sun.jdbc.odbc.JdbcOdbcDriver");
con = DriverManager.getConnection(url,"","");
The success or failure of this operation is indicated on the status line using the setStatusMessage method.
Once the connection is successfully established, the other menus are activated. The setMenuStatus method is used to enable or disable the appropriate menus depending on the status of the connection. The user can close the connection to the database at any time by clicking on the Disconnect menu option. Selecting the Disconnect menu activates the clean up-operations. Its handler removes the selected tables and columns from the user interface; it then closes the connection by calling the Close method of the Connection interface.
The user now selects the tables for querying by clicking the Show Tables menu option. This creates an instance of TableDialog class and displays a dialog box containing the names of tables available for querying. The TableDialog uses the getDatabaseMetaData method of the QueryBuilder class, which in turn calls the getMetaData method of the Connection class. The getTables method of the DatabaseMetaData class is then called to obtain the information about the tables present in the database. The table names are then displayed in a list box.
The user selects the table name from the list box and presses the Accept button to add a desired table to the query. In the actionPerformed method, we obtain the total number of tables selected so far. Once the user has selected four tables, the application prevents them from adding more tables to the query. If less than four tables have been selected, we add the name of the table to the tableName list maintained in the TablePanel class and update the display to show the table name along with its columns in the panel. The update method of the TablePanel class makes the desired list box visible and calls the fillTable method to populate the list box with the column names. The fillTable method uses getDatabaseMetaData to read the database information. The getColumns and getMetaData methods are then called to get the list of column names in the selected table and to fill the list box with these column names.
After selecting the tables for querying, the user selects the columns for the output. To select a column, the user double-clicks the desired column name in the displayed tables. The actionPerfomed method of the TablePanel class initiates different actions depending on the value of nLinkStatus variable. If nLinkStatus variable is set to zero, it's assumed the user desires to add the column name to the list of columns to be shown in the output. If the nLinkStatus variable has a non-zero value, it indicates that the user wishes to establish a link between two tables. In this case, if the nLinkStatus variable has a value of 1, it indicates the selection process for the first column in the link, and value of 2 indicates the selection of second column in the link.
To establish a link between two tables, the user must first select the Add Link menu option. This marks the beginning of the link operation. The user then double-clicks on the first column in the desired table; this changes the cursor to indicate the beginning of the link operation. Next, the user double-clicks on the second column in another table. The cursor changes back to its default shape and the link between the two tables is established. The user can verify the established links by selecting the View Links menu option. This opens a dialog box showing the list of established links. The user can then select a defined link from the displayed list and delete it from the query.
In the actionPerformed method of the TablePanel class, we first locate the list box object, which generated the event using the getSource method of the ActionEvent object:
int nTableNumber = 0;

for (; nTableNumber < app.MAXTABLES; nTableNumber++)
  if (evt.getSource() == Tables[nTableNumber])
    break;
After finding the table name, the program checks the value of the nLinkStatus variable and initiates the appropriate action depending on its value. If nLinkStatus has a value of zero, it adds the selected column information in the column panel. If the nLinkStatus variable has a value of 1, a Link object is constructed and its AddFirstLink method is called to store the information about the first column in the list. The Link class essentially has four data members that store the table name and column name for both sides of the link. If the nLinkStatus variable has a value of 2, the AddSecondLink method is called to add the second point of the link into the Link object. In both cases, the setStatusMessage method is called to give appropriate messages to the user.
The user can delete any of the selected columns from the query by clicking the Delete button under the column name. The actionPerfomed method of the ColumnPanel class determines which button is clicked using the getSource method. The removeColumn method then removes the column from the list and moves all the subsequent columns down one position. After selecting the column, the user can select the sort order by selecting the appropriate option from the list box. The user can specify the WHERE clause by entering the desired condition in the criteria and the criteriaOr edit boxes for each of the columns.
Once users are satisfied with the selection of tables, columns, links, sort orders, etc., they can view the SQL statement by selecting the View Results menu option. The menu handler calls the showSQL method to construct the SQL statement. The showSQL method iterates through all the rows and columns of the column panel to generate the SQL statement. The ViewSQL object is then constructed to display the generated SQL statement in a TextArea control. At this time, the user can modify the SQL statement before firing it on the database engine.
The user fires the SQL statement by clicking the Show Result button at the bottom of the SQL View window. This calls the setSQLString method of the ResultFrame class. The setSQLString method calls the execSQL method to execute the SQL statement. To execute the SQL statement, a Statement object is constructed on the established connection:
// Create a statement object.
stmt = Framecon.createStatement();
The executeQuery method of the Statement class is then called to run the query and get the result set:
// Execute specified query.
rs = stmt.executeQuery( Framequery );
The program then obtains the information on the result set using the getMetaData method:
rsmd = rs.getMetaData();The DisplayResult object is then constructed, and its getString method is called to display the result in a TextArea control. The getString method iterates through all the records returned in the result set to format and display each row. Note that if an exception occurs during the execution of a query, the message is shown on the system console. After viewing the results, the user can close the output window and proceed to format another query.
Conclusion
In this article, we looked at the design of a graphical query builder in Java. The program uses various Java classes and interfaces defined in the java.sql package. The query builder presented here restricts the user to four tables in the query definition. The output of the query is also restricted to six columns. Changing the appropriate constants in the source program can easily extend this limit. However, this will require the use of the ScrollPane container class, because it may not be possible to display all tables and columns at a time in the window.
The query builder presented here allows only the design of SELECT statements, but the concepts can be easily extended to incorporate other SQL statements. This application is basic and requires further enhancements and error checking to become a robust query builder. The concepts and framework provided here should be useful in such a project.
The files referenced in this article are available for download from the Informant Web site at http://www.informant.com/ji/jinewupl.htm. File name: JI9806PS.ZIP.
Dr P.G. Sarang is President and CEO of ABCOM Information Systems Pvt. Ltd. ABCOM is a consulting firm that specializes in Internet programming using Java, JavaScript, ISAPI and Windows-based application development using Visual Basic, Visual C++, Microsoft Access, and Microsoft SQL Server.