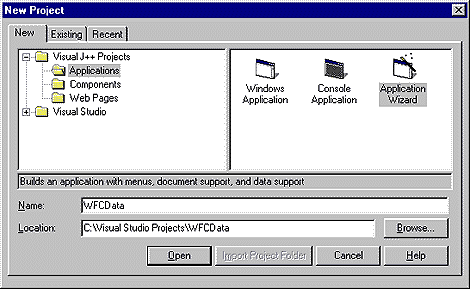
Getting started Visual J++ 6.0 makes it very easy to get started. It provides an application wizard, shown in Figure B, which will help us create our data connection.
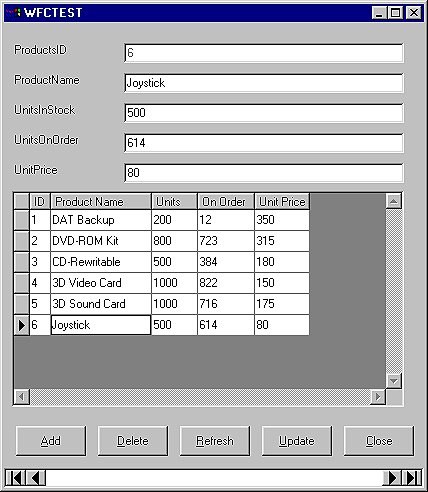
WFC controls, made available in Visual J++ 6.0, are Microsoft's answer to JavaBeans. Both use delegation-based event handling, are component based, and are easily used by RAD environments. WFC controls, however, have the advantage of being based on Microsoft's popular libraries, which provide many powerful features to the programs that use them. In this article, I'll show you how to use the more advanced WFC controls, the data components, to build a program that connects to a database and lets the user browse and edit the data. The result will be a program that displays both database records and a DataGrid, as shown in Figure A.
Figure A: Our final program displaying Database records and a DataGrid is shown
here.

Getting started
Visual J++ 6.0 makes it very easy to get started. It provides an application
wizard, shown in Figure B, which will help us create our data
connection.
Figure B: Create a project with the application wizard.
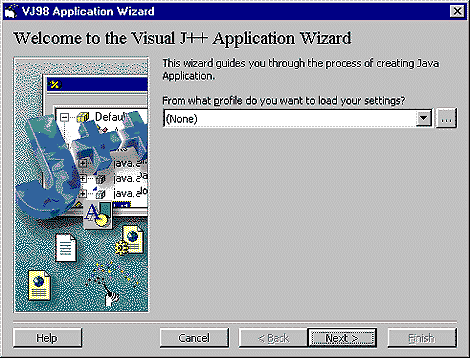
The first step of the app wizard is to ask us which profile of settings we want to use. There are no profiles included with the 6.0 Preview Release I used (Preview Release 2), so we'll leave it at None, as shown in Figure C.
Figure C: Choose None on the wizard's profile screen.
The wizard then gives us the choice of creating a form with or without data. We'll want to choose With Data for this application. Next, it gives us the choice of connecting directly to an Access database, or using ODBC. ODBC (Open Database Connectivity) is a standard language interface used to connect to a variety of data sources. Since some of you may use something other than Access, we'll use ODBC.
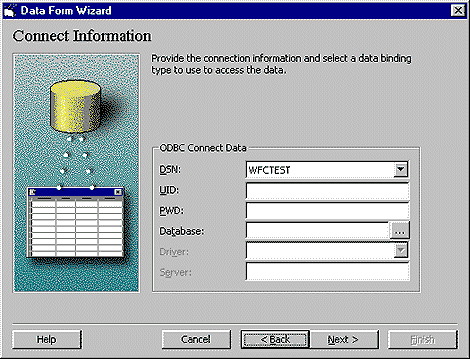
On the next page, we set up the connection. For our example, I've already set up an ODBC DSN for my Access database (you can do this with the ODBC applet in Control Panel), so I can choose it from the dropdown menu shown in Figure D. I can also connect directly with a file name. The database isn't password protected, so we don't need to add any logon information.
Figure D: Make your database connection.
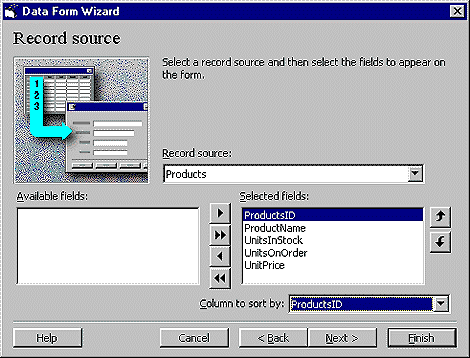
Now, we set up the form. The wizard asks us to choose a name for the class, which I'll leave as WFCTEST, and what kind of layout we want. There are several layouts to choose from, but for simplicity I'll go with Single Record, and we can take a look at the others later. The wizard also asks if we want the database connection to be fully implemented in code, or if we want to use visual controls. Since Visual J++ 6.0 is now form-based, I'll use controls. We'll be able to play with them later without having to bother with much code. Next, we choose which fields we want to include on our form, and which field should be used to sort our data. I'll include all the fields I created for my sample database, as shown in Figure E, and I'll sort them by ProductsID, the key I chose in Access.
Figure E: Select the database fields to be included.
At this point, we could let the wizard finish, but we'll keep going to see what else we can do. On the next page, we can choose what controls we want (add, delete, etc.). The default is to use all of them, so I'll leave them all in. Next, we're asked how we want the program packaged. We can create a class file, an EXE (the default), a CAB, or we can deploy the package to a Web site. I'm going to use this program locally, so I'll leave the Class option selected, with no deployment.
Finally, we can save the options we've chosen to a profile, so that we can recreate similar programs and create a report. Now, click Finish.
Once the wizard has finished, Visual J++ generates a project with everything we need to get started, including a sample form, as seen in Figure F.
Figure F: Visual J++ supplies a form for displaying our data.
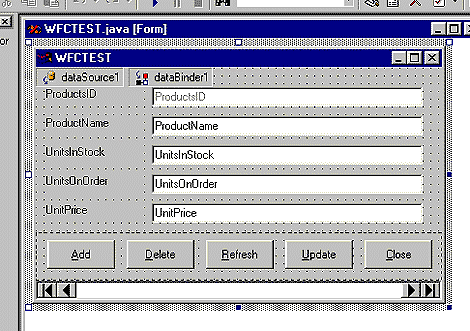
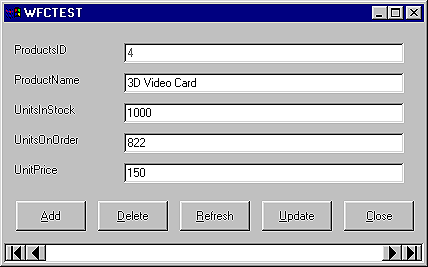
The best part is that you don't need to do anything to the program to get it to run. Just click the start button and it's off and fully functional. Figure G shows the program in action.
Figure G: This is our functioning database program.
 Breaking it down
As you can see in Listing A, the code for this program is very short;
the longest section was the code generated by the form designer. Most of the
code is event handling, but as you can see, each button requires only a few
lines to perform its function.
Listing A: WFCTEST.java
// BEGIN
import com.ms.wfc.app.*;
import com.ms.wfc.core.*;
import com.ms.wfc.ui.*;
import com.ms.wfc.data.*;
import com.ms.wfc.data.ui.*;

public class WFCTEST extends Form
{

   public void btnAdd_Click(Object sender, Event evt) {
      try {
         dataSource1.getRecordset().cancelUpdate();
         dataSource1.getRecordset().addNew();
         m_bAddNew = true;
         btnDelete.setText ("&Cancel" );
         btnAdd.setEnabled( false );
         btnRefresh.setEnabled( false );
      } catch (Exception e){
         handleADOException(e);
      }
   }

   public void btnDelete_Click(Object sender, Event evt) {
      try {
         if( m_bAddNew ) {
            dataSource1.getRecordset().cancelUpdate();
            m_bAddNew = false;
            btnDelete.setText ("&Delete" );
            btnRefresh.setEnabled( true );
            btnAdd.setEnabled( true );
         }
         else {
            dataSource1.getRecordset().delete
            (AdoEnums.Affect.CURRENT);
            if( dataSource1.getRecordset().getRecordCount()
            > 0 ) {
               dataSource1.getRecordset().moveNext();
               if( dataSource1.getRecordset().getEOF() )
                  dataSource1.getRecordset().moveLast();
            }
         }
      } catch (Exception e) {
           handleADOException(e);
           dataSource1.getRecordset().cancelBatch();
      }
   }

   public void btnRefresh_Click(Object sender, Event evt) {
      try {
         btnRefresh.setEnabled( false );
         dataSource1.getRecordset().cancelBatch();
         Object bm =  dataSource1.getRecordset().
         getBookmark();
         dataSource1.requery();
         if( bm != null )
            dataSource1.getRecordset().setBookmark( bm );
      } catch (Exception e) {
         handleADOException(e);
      }
      btnRefresh.setEnabled( true );
   }

    public void btnUpdate_Click(Object sender, Event evt) {
      try {
         this.setCursor( Cursor.WAIT );
         dataBinder1.commitChanges();
         dataSource1.getRecordset().update();
         if( m_bAddNew ) {
            dataSource1.requery();
            dataSource1.getRecordset().moveLast();
         }
      } catch (Exception e) {
         handleADOException(e);
         dataSource1.getRecordset().cancelUpdate();
      }
      this.setCursor( Cursor.DEFAULT );
      m_bAddNew = false;
      btnDelete.setText ("&Delete" );
      btnRefresh.setEnabled( true );
      btnAdd.setEnabled( true );
   }

   public void btnClose_Click(Object sender, Event evt) {
      Application.exit();
   }

   boolean m_bAddNew;
   public void dispose() {
      super.dispose();
      components.dispose();
   }

   public WFCTEST() {
      initForm();
      this.show();
      this.update();
   }

   public void formClose(Event e) {
      Application.exit();
   }

   void handleADOException(Exception e) {
      e.printStackTrace();
      MessageBox.show( e.toString(), "WFCTEST" );
   }

   private void initForm() {
      // Removed for brevity.
      // This code is automatically generated.
   }

   public static void main(String args[]) {
      Application.run( new WFCTEST() );
   }
}
// END
Now, let's take a look at the form and the components used in our sample program. There are three key components to this application: a DataSource, a DataBinder, and a DataNavigator. The DataSource control encapsulates the WFC data classes com.ms.wfc.data.Connection, com.ms.wfc.data.Command, and com.ms.wfc.data.Recordset, and handles the database connection using properties set by the developer. The DataBinder control binds fields in a RecordSet (or DataSource) to other text-based controls, such as edit boxes.
The two main properties for the DataSource control are connectionString and commandText. When you click on connectionString in the property page, you'll see a small Ellipsis (...) button. Clicking it opens a dialog that builds the string for you. The dialog lets you set up most of the connection details, like the database and database driver you'll want. When you finish, it creates a string used by the control to connect to the database. The other main property, commandText, is an SQL command used to query the database. (For an introduction to using SQL, read my article, "Accessing databases with JDBC" in the January 98 issue of Visual J++ Developer's Journal, or one of the many FAQs available on the Internet.)
The DataBinder control is a bit more complicated. First, you can set the dataSource property by choosing from all available DataSource controls via a dropdown box. Then, you set up your data bindings.
The DataBinder uses an array of DataBinding controls to bind database fields to actual components. To create DataBindings, select the bindings property of the DataBinder, and click the Ellipsis (...) button. This opens a DataBindings property page, where you can add or remove bindings as needed. When you're finished, bindings becomes a tree containing the properties for each binding. To set each binding, open its properties (by clicking on the plus (+) sign). Set the fieldName property to the name of the database field you want to bind, and set the target property to the component you want to bind it to. Do this for each of the bindings.
The third control, the DataNavigator, is the simplest. It's a visual control that allows the user to browse through the database. All you need to do is place it on the form and select a DataSource.
Getting fancy Our next example uses a control that can replace the DataBinder and the DataNavigator: the DataGrid. The DataGrid looks like the table editor in Access, and has its own data binding and navigating. You can see the sample program using a DataGrid in Figure H.
Figure H: See all the records in your database at once with a DataGrid.
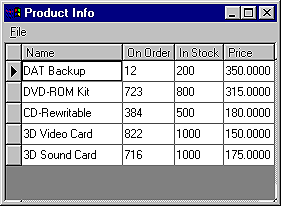
The DataGrid control is very easy to use. Let's take a look at the sample program, and how it was made.
Breaking it down...again Even though I didn't use a wizard for this program, it only took about five minutes to put together. After I created a basic Windows application with a menu, I added a DataSource control, and set up the database connection and SQL command, just as I did earlier. Then I added the DataGrid. This control's properties look just like those used by the DataBinder. First, I set the dataSource property to dataSource1. This automatically creates columns based on the database. Then I worked with the columns property, which works just like the DataBinder's bindings property, because I wanted to remove the ProductsID column. I clicked on the property, then the Ellipsis (...) button, selected the column, and clicked Remove. Then, I expanded the columns tree and edited the captions and widths the way I wanted them.
After I finished with the columns, I went back and changed a few things for simplicity. I turned off both scrolling and the features that modify the database, since these require special event handling, which we'll take care of later.
Wasn't that quick? That's all it takes to create the program shown in Figure H. Unfortunately, our current control implementation doesn't allow us to modify the database using a DataGrid, although this may be changed in the released version of 6.0. If you use a DataGrid, you'll also need to use a DataBinder and edit boxes to produce the display we showed you in Figure A at the beginning of this article. You can reproduce the display in Figure A by simply adding a DataGrid to the first example in the article. You can also use the wizard to add a DataGrid. On the page where you choose single record or grid, there's also a master/detail option, which displays both the DataGrid and the database records.
Conclusion
Visual J++ 6.0 has some powerful new features that allow you to create commercial-quality database applications. With a simple modification, the sample programs created in this article can connect to almost any other ODBC-compliant database, including Access, FoxPro, SQL Server, Oracle, either locally or over a network. You can easily create a professional interface with hardly any code at all. And considering how much Technology Preview 2 has improved over Preview 1, there should be even better data support with the released version of 6.0. Next time, I'll show you how to create your own Internet-ready database using J++ and XML.