 The Containers collection's contents

June 1999
As you develop a database, you'll often print reports directly from the Database window to test them. However, when it comes time to deploy the finished product, you'll most likely want to offer some type of alternative for users to print from other than the Database window. There are many ways to do so, and in this article, we'll show you one quick and easy solution.
A basic print option form
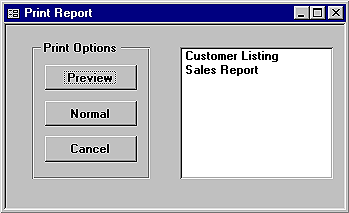
For our example, we'll build the Print Report form shown in Figure A. This form has two print options--Preview and Normal. Both print option values match the appropriate constant value for the OpenReport method of the DoCmd object. For example, when you utilize this command to preview a report, you use the acPreview constant, which has a numeric value of 2. We'll give the form's Preview option button the same value, then use the option group's current value as the OpenReport method's View argument. Finally, we'll supply a listbox of reports which you can select to preview or print. We'll generate this dynamic list of reports by taking advantage of DAO and the database's Containers collection.
Figure A: This Print Report form offers a dynamic list of reports from which a user can select to preview or print.
 The Containers collection's contents
DAO uses the Containers collection to gather information about database objects that aren't native to DAO, such as Forms and Reports. This collection also includes Modules and Scripts, or saved macros. DAO considers each of the four a separate Container object. So, for instance, to refer to the container of reports in a database, you'd use
db.Containters("Reports")
where db is an object variable that represents a database. In turn, each Container consists of Documents that are the individual objects of the specific container type. So,
db.Containers("Reports").Documents("MyReport")
Reports("MyReport")
Some sample reports
To do so, select the Reports tab on the Database window, click New, and double-click Design View. When Access opens a blank report, place a Label control in the Detail section and type This is a Sales Report. Now, click the Save button and name the report Sales Report. Next, just for variety, we'll create a second report. To do so, in Sales Report's Design view, change the label's text to This is a Customer List. Select File/Save As from the menu bar and name the report Customer Listing. Now that we've created some reports, we're ready to build the Print Report form.
Creating a Print Report form
To create the form shown in Figure A, first select the Forms tab in the Database window, then click New. For our Print Options form, we won't need an underlying recordsource, so double-click Design View to open a blank form. First, let's add the combobox that contains the print options. To do so, if it's not already selected, click the Control Wizards button on the Toolbar. Next, click the Option Group button and click anywhere on the upper-left corner of the form's Detail section. When you do, Access opens the Option Group Wizard. Enter Preview, Normal, and Cancel as the label names and click Next twice. Now, we'll make our option values correspond to the OpenReport method's View argument constants. In this case, acPreview equals 2, acNormal equals 1. We'll use -1 for Cancel. Set these values now in the Wizard. Make the Preview option a 2, Normal a 1, and Cancel a -1. Click Next and select Toggle Buttons for the buttons' formatting. Click Next one last time, name the control Print Options, and click Finish. In Design view, double-click on the combobox to open the Properties sheet and name it optPrintOptions. Next, we'll add the listbox of reports.
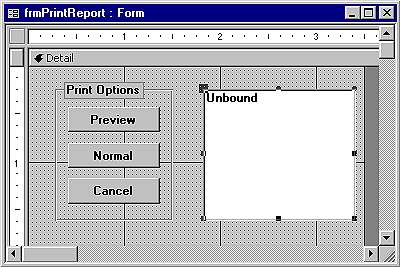
Figure B: We'll use the option button values as the View argument of the DoCmd.OpenReport method.

To add the listbox, click the Listbox button on the Toolbox and click anywhere to the left of the option group. When prompted, choose to type in your own values and click Next. However, we're actually going to let VBA fill this listbox with a dynamic list of reports, so for now click Next again and type Report List as the control's name. Click Finish to conclude the operation. In Design view, double-click on the combobox to open the Properties sheet and name it lstReportList. At this point, the form's basic design is complete, but it needs the additional adjustments in Table A. Once you've finished making these changes, we'll add the code that populates the listbox with report names. After Access creates the option group, your form's Design view should resemble Figure B.
Table A: PrintOptions properties
|
Object |
Property |
Value |
| Form |
Name |
frmPrintReport |
| Caption |
Print Report | |
| Default View |
Single Form | |
| Scroll Bars |
Neither | |
| Record Selectors |
No | |
| Navigation Buttons |
No |
Listing A: PrintOption's Open event
Private Sub Form_Open(Cancel As Integer)
Dim db As Database, rpt As Document, cnt As Container
Dim strRowSrc As String, RepName As String

Set db = CurrentDb
Set cnt = db.Containers!Reports

For Each rpt In cnt.Documents
    RepName = rpt.Name
    strRowSrc = strRowSrc & RepName & ";"
Next rpt

lstReportList.RowSource = strRowSrc

Set cnt = Nothing

Set db = Nothing
End Sub
Listing B: The option group's BeforeUpdate event
Private Sub optPrintOptions_BeforeUpdate(Cancel
As Integer)

If IsNull(lstReportList) Then
	MsgBox "Please select a report.", vbExclamation
Else
	If optPrintOptions > -1 Then
		DoCmd.OpenReport lstReportList,
optPrintOptions
	Else
		DoCmd.Close
		Exit Sub
	End If
End If

End Sub
To see how all of this works, close the Module, click the Save button, and click the Form View button. When you do, Access builds a list of reports from the database and uses the concatenated string as lstReportList's row source. At this point, select a report and click the Preview button. When you do, Access uses the report that you chose as the OpenReport method's ReportName argument, then utilizes the current value of optPrintOptions as the View argument and displays a preview of the report.
Resetting the option buttons
Notice that when you close the report and return to the Print Options form, the Preview button remains depressed. If you want to preview another report, you'll need to select a different toggle button, then click Preview again. To fix this behavior, you can set the option group's value back to null after you make a selection. To do so, we'll add a bit of code to the option group's AfterUpdate event. Return to the form's Design view and click the Code button. In the Module window, select optPrintOptions from the Object dropdown list, then select AfterUpdate from the Procedure dropdown list. At the insertion point, enter
optPrintOptions = Null
Filtering the report list
Using the Reports container provides a dynamic way to build the list of reports without a lot of additional tinkering, since there's no need to build a table of report names that must be updated whenever you create a new report. However, as is, some of the reports in the list may not be suitable to print. Subreports are a good example. Without the master report, a subreport probably won't make much sense. Chances are you don't want a user to print one. Also, if you've used a naming convention, then your report names probably begin with an rpt--not very user-friendly. To filter the reports in the list, you can use several string comparison techniques to test for specific text patterns in the report names (assuming you've used consistent naming conventions, of course!), then skip the unwanted reports when you build lstReportList's RowSource.
For example, suppose you've used sub as the last three characters for each subreport in your database. Now you want to exclude them from the list of reports on the Print Report form. To do so, you can add the following condition to the Open procedure's For Each...Next loop. We also included code to strip rpt from the beginning of a report name.
For Each rpt In cnt.Documents
	If Right(rpt.Name, 3) <> "sub" Then
		If Left(rpt.Name, 3) = "rpt" Then
			RepName = Right(rpt.Name,
Len(rpt.Name) - 3)
		Else
			RepName = rpt.Name
		End If
		strRowSrc = strRowSrc &
RepName & ";"
	End If
Next rpt
Often, you'll want to offer users a method for printing reports other than the Database window. In this article, we've shown you one easy way to provide them with an alternative.
Copyright © 1999, ZD Inc. All rights reserved. ZD Journals and the ZD Journals logo are trademarks of ZD Inc. Reproduction in whole or in part in any form or medium without express written permission of ZD Inc. is prohibited. All other product names and logos are trademarks or registered trademarks of their respective owners.