
In this article, we'll show you how to use the Windows NT Backup program to back up your data. We'll also show you how you can use the Backup program in conjunction with the Windows NT Schedule service to simplify and automate the backup process.
The lowdown on the Windows NT backup utility
You can quickly launch the Windows NT Backup utility (Backup) by clicking Start | Programs | Administrative Tools | Backup. As you can see in Figure A, Backup has a GUI interface that's fairly easy to use. Through Backup, you can back up both local and remote drives by selecting either an incremental, differential, or full backup. Once you've backed up your data, you can also use Backup to quickly perform a restore.
Figure A: Windows NT Backup has an easy-to-use GUI
interface.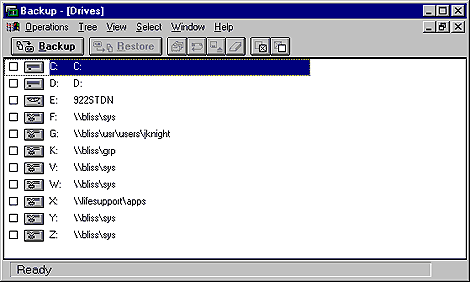
The downside
Although the Backup utility is an easy way to protect your data, its simplicity is also one of its biggest faults. The utility doesn't provide many of the more advanced features that you'll get with a costly third-party product. For example, as Figure A shows, you can only back up mapped network drives--not the entire network. Therefore, this utility wouldn't provide the flexibility that's needed by most large organizations. Backup is also limited in that it won't back up open or locked files. So, to avoid having to kick users off the network, you'll have to run your backup at night--a major drawback if you run a 24-hour operation. Don't be surprised if you launch Backup and get the message shown in Figure B. This message is indicative of the most frustrating feature of the Backup utility--tape drives are the only supported backup device. You can't back up to another hard disk, Zip drive, or JAZ drive.
Figure B: Backup doesn't support any backup device other than
tape drives.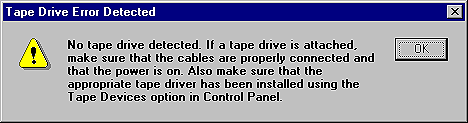
Despite these drawbacks, many small organizations don't have any option other than to use the free Backup utility that's included with Windows NT. Fortunately, there are some things that you can do to make the utility more livable, such as automating your daily backup.
The technique
Automating your daily backup is a process that involves several steps. The Backup GUI can't be used to schedule your backups, so you must run the command line Ntbackup program from a batch file. This batch file is then used in combination with the at command and the Windows NT Schedule service. Keep in mind that all users have access to use either the Backup GUI or the Ntbackup command. However, they can only back up folders and files that they have access to. As an administrator, you can back up any folder or file on the network.
Creating the batch file
The first step to automating your daily backup is to create a batch file using Notepad. To do so, open Notepad and enter the Ntbackup command with the appropriate parameters, using the following syntax:
Ntbackup operation path [/a] [/v] [/r]
=>[/d "text"] [/b] [/hc:{on|off}] [/t
=>{option}] [/l "filename"] [/e]
=>[/tape:{n}]
The parameters and their descriptions for this syntax are shown in Table A.
Table A: The syntax for the Ntbackup command parameters and descriptions
| Parameter | Description |
| Operation | Will be set to backup. |
| Path | Indicates the folders that are to be backed up. |
| /a | Indicates that you want to append the data to the end of the last backup set. If not used, the backup will overwrite any data on the tape. |
| /v | If used, the backup will verify that the data was placed on the tape. |
| /r | Indicates that you want to restrict access to the backup data. |
| /d "text" | Allows you to provide a description of the backup data between the quotation marks. |
| /b | If used, the local Registry will also be backed up. |
| /bc:{on|off} | Indicates whether or not you want to use hardware compression. |
| /t {option} | Specifies the type of backup that you want to take place; either normal, copy, differential, incremental, or daily. |
| /l "filename" | If used, a log file will be kept with the filename specified that has the full details of the backup. |
| /e | Only used if the /l parameter is used and indicates that the log should only include a summary of the backup. |
| /tape:{n} | Used only if you have multiple tape drives attached to your computer. Indicates which drive to back up to using the drive number. |
To help you enter the correct syntax, you should first outline the details of your backup. These details include what folders you want to back up, how often, and at what time you want the backup to occur. For example, assume that you have only one server and that you want to back up all the files and folders on the server's C drive. Your users work Monday through Friday from 7:00 A.M. until 7:00 P.M., but sometimes as late as 10:00 P.M. Therefore, since no files will be in use after 10:00 P.M., you can schedule your backup to run at 11:00 P.M. on weekdays. There's no need to run the backup on the weekend, if no changes are being made to your data.
For this scenario, you need to use the following syntax in your batch file:
Ntbackup backup C:\ /v /d "Daily backup
=>of user directory" /t normal
Notice that we added the /v parameter to the command line to verify the backup. This is because you don't want to wait until it's time to restore data to find out that your backup hasn't been working all along. You can run into any number of problems with a backup and the time to catch them is now--before it's critical.
We chose the \t normal parameter to indicate that we want a complete backup of the specified path because it helps minimize confusion when it's time to do a restore. As Table B shows, there are five different types of backups. It can be confusing to differentiate the various types, so we've provided a description of each in Table B. Because you're running the backup on a daily basis, you could also use any of the other backup types to ensure that you get the most recent data.
Table B: Available backup types
| Backup Type | Description |
| Normal | Performs a full backup of your data. |
| Copy | Copies the files from the disk to the tape. Files aren't marked to indicate that this option was used. |
| Differential | Performs a backup of only those files that have changed since the last backup was run. Files aren't marked to indicate that this option was used. |
| Incremental | Performs a backup of only those files that have changed since the last backup was run. Files are marked to indicate that this option was used. |
| Daily | Performs a backup only of those files that have changed the day the backup is run. Files aren't marked to indicate that this option was used. |
Once you've created the batch file, save it to a separate folder on the server, such as C:\Backup. Select Save from the File menu, locate the Backup folder, and type Backup.bat in the File Name text box. Make sure that you select All Files from the Save As Type dropdown list box and click Save. Close Notepad and you're now ready to create the backup schedule.
Scheduling the backup job
In order to automate the Backup batch file that you just created, the Windows NT Schedule service must be running on the system where the batch file will be run. You can check to see if this service is running by double-clicking on the Services applet in Control Panel. Scroll through the Service list box to locate the Schedule service shown in Figure C. Click the Start button if the Status column doesn't indicate that the service is already started. If the Schedule service is set to manual startup, you'll have to follow this procedure every time you reboot your server. You can easily change it so that the service starts up automatically by double-clicking on the Schedule entry to open the Service dialog box shown in Figure D. Select the Automatic option button and click OK. Now, close the Services dialog box.
Figure C: Open the Services applet to verify if the Schedule
service is already started.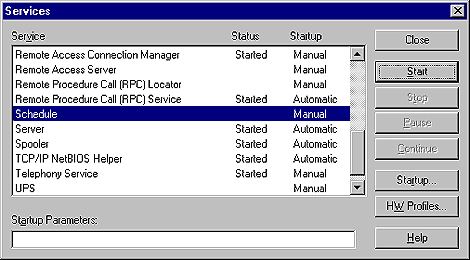
Figure D: You can change the Schedule service startup from
manual to automatic so that it starts every time you reboot your
server.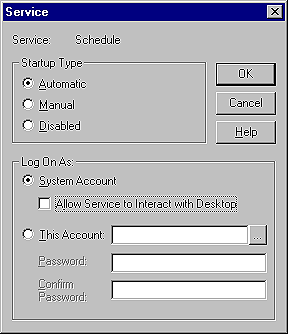
Once you have the Schedule service running in the background, you can use the at command in combination with Backup.bat to schedule the backup job. The syntax for the at command is shown in Figure E. Once you schedule the backup job, you can also use the at command to delete the job.
Figure E: Use the at command to schedule the backup job.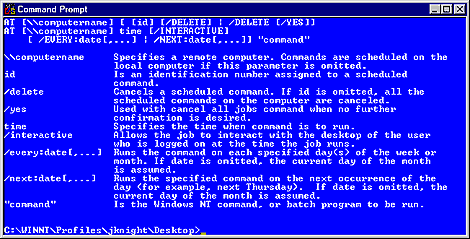
For our previous example, the following syntax would be used at the command prompt:
at 23:00 /every:M,T,W,Th,F "
=>C:\Backup\Backup.bat"
Notice that we didn't use the \\computername parameter because we're scheduling the command on the local computer.
When you press the [Enter] key, the command prompt will display a message that it Added a new job with job ID=#. You'll want to keep track of this ID number in case you need to delete the job at a later date. You can verify if the job was scheduled simply by typing at at the command prompt. As Figure F shows, the at command will return all the information about the scheduled job.
Figure F: Type at to return information about the scheduled
job.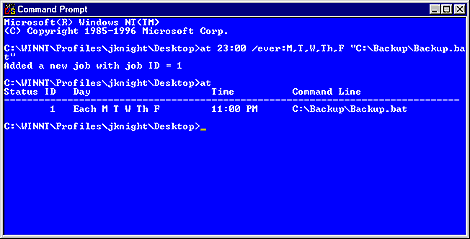
Conclusion
Sometimes, when you don't have a large technical budget at your disposal, you need to find creative ways to work with what you have. In this article, we've shown you how to use and automate the limited backup program included with the Windows NT operating system to protect your most critical data.
Copyright © 1999, ZD Inc. All rights reserved. ZD Journals and the ZD Journals logo are trademarks of ZD Inc. Reproduction in whole or in part in any form or medium without express written permission of ZD Inc. is prohibited. All other product names and logos are trademarks or registered trademarks of their respective owners.