
Once you get your Windows 2000 servers installed as Active Directory domain controllers, it's time to start creating objects in your AD database. In this article, we'll look at the types of objects that are created in your AD by default; the types of objects you can create and how you create them; and then once you have objects in your AD database, how you manage them. So let's get started!
Active Directory Users And Computers
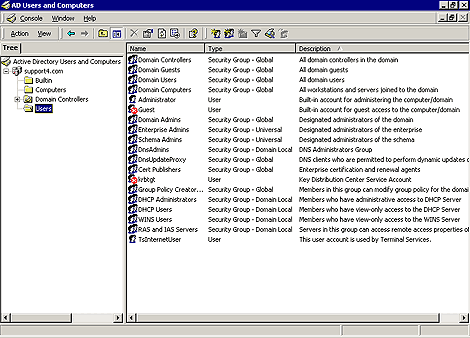
You manage the objects (resources) in your Active Directory using the pre-configured Microsoft Management Console (MMC) Active Directory Users And Computers. You'll find it in Start | Programs | Administrative Tools. This tool is installed automatically when you promote a Windows 2000 server to become an AD domain controller (DC). As shown in Figure A, the AD Users And Computers console displays the AD objects that represent your domain's resources. These objects can be either container objects--objects that contain other objects and that you'll typically see displayed as folders in the directory management tools included with Windows 2000, or leaf objects--objects that represent actual resources in your domain, such as users, printers, or network shares.
Figure A: Use the pre-configured MMC console AD Users And
Computers to manage AD objects.
During the Active Directory promotion process, several AD container objects are created. These container objects are the same whether you upgrade from a previous version of Windows NT or complete a new installation of Windows 2000 Server. However, when you upgrade from a previous version of Windows NT, the information contained in your SAM database is transferred to these containers. There are four containers that you'll see in the default view, as shown in Figure B. Let's take a look at these containers and their purposes.
Figure B: You'll see four default container objects in AD Users
And Computers.
The default container objects
The first default container object you'll see is the Builtin container. This container holds leaf objects that represent the local security groups for your domain. This is the only default container object that you'll find you can't move the default objects out of. The Computers container is the second default container. It holds the computer accounts for all Windows 2000 and Windows NT computers that are members of your domain. If you upgrade from a previous version of Windows NT, you'll find that the Active Directory Installation Wizard has migrated your domain's Windows NT computer accounts to this container.
The third default container is the Domain Controllers container. This container holds a computer account for each of the AD DCs in your domain.
The Users container is the final default container. This container holds all user accounts and global security groups for your domain. If you upgrade from a previous version of Windows NT, you'll find your domain user accounts have been migrated to this container.
Creating Active Directory objects
In your AD database, you can create the types of objects shown in Table A. You create objects by right-clicking on a container object in the AD and choosing New from the pop-up menu. From the New menu, you select the type of object you want to create. You can see the choices available in Figure C. A wizard guides you through the creation of the object type you select.
Figure C: You can use the Container shortcut menu to create a
new AD object.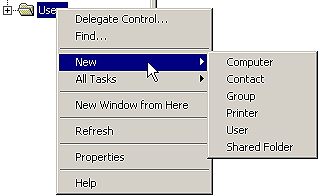
Table A: Types of objects you can create in your AD databse
| Object | Description |
| Computer | A leaf object that represents a computer on the network. For Windows NT workstations and servers, this is the computer account. |
| Contact | A leaf object that's an account without any security permissions. You can't log on to the network as a contact. Typically, you use contacts to represent external users for email. |
| Group | A container object that can contain users, computers, and (when Windows 2000 is operating in Native Mode) other groups. Just like in Windows NT, groups simplify the management of large numbers of objects. |
| Organizational Unit | A container object that's used to logically organize other AD container and leaf objects, such as users, groups, and computers, in much the same way that folders are used to organize files on your hard drive. |
| Printer | A leaf object that represents a shared printer on your network. |
| User | A leaf object that's a security principal in the AD. Your users log on to the network with these credentials, and you can assign access permissions based on this object. |
| Shared Folder | A leaf object that represents a shared folder on your network. |
Every object you create must have a distinguished name (DN)--a name that identifies the object plus the path through its container hierarchy. Each object also has a relative distinguished name (RDN), which is simply the name of the object itself. RDNs must be unique within the container that holds then. If an object's RDN is unique within its container, then its DN will be unique in the AD. Let's take a look at creating one of the most common AD objects--a user.
Creating a user account
The wizard for creating a new user has three screens. The first screen is where you enter the different names for the account, as shown in Figure D.Figure D: You must define a user's full name, logon name, and
UPN when you create a new user. 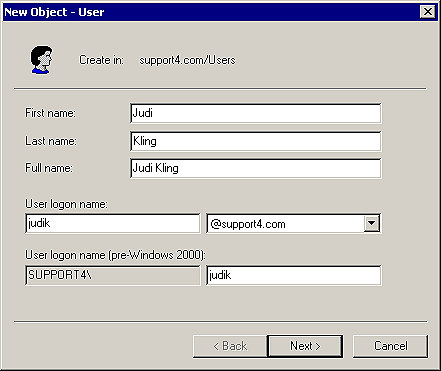
When you create a user account, the full name must be unique within its container, just like any other AD object. However, the logon name for the account must be unique to your entire domain. When you create a user account, you'll also specify a user principal name (UPN). The UPN is based on the Internet standard RFC 822. It also has two parts linked together by the @ symbol:
Figure E: You can define an initial password for the new user as
well as force the user to change the password at next logon. 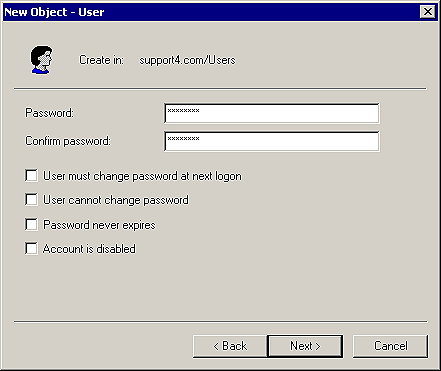
The third and final screen is a summary screen. It shows you the final characteristics of the object you're about to create. If you notice any mistakes, you can use the Back button to go back through the wizard and correct them.
Modifying an object's properties
You'll notice that when you created the user object, there wasn't a lot of information you could set in the wizard. This is true of all objects you create in the AD. The creation wizard will prompt you for the minimal information needed to establish the object in the AD. Each object has many more properties (attributes) that can be set. Once an object is created, you can modify its properties to enter the values for any additional attributes. To do this, right-click on the object. You'll find a shortcut menu of the most commonly used commands to manage the object. If you choose Properties, it opens a Properties dialog box specific for the type of object you selected. On this Properties dialog box, you'll be able to specify the values for any available attributes for the object. Let's take a look at the Properties dialog box for a user object as an example.
Modifying a user object
The pages of the Properties dialog box for a user object are shown in Figure F. On each of the pages, you can set the types of information found in Table B.
Table B: Properties you can configure for a user object.
| Type | Description |
| General | Here you record general user information such as first name, last name, display name, account description, office location, telephone numbers, email address, and Web page addresses. |
| Address | On this page you record address information. By default, you have fields for Street, P.O. Box, City, State/Province, ZIP/Postal Code, and Country/Region. |
| Account | Use this page to set the user's logon name, set logon hours, specify which computers the user may log on to, and set account options and expiration information. |
| Profile | Here you set a path to a user profile and a logon script for the user. You can set the location of the user's home directory either locally or on a server. In addition, you can specify a network path where the user's shared documents folder resides. |
| Telephones | On this page, you record all types of phone numbers for the user. Using the Other buttons, you can record multiple phone numbers for each of the fields. There's also a general comment area that accepts text. |
| Organization | This is where you'd specify a user's organizational information such as title, department, company, manager's name, and list any direct reports. |
| Remote Control | You use this page to configure Terminal Services remote control settings. Terminal Services allows your clients to run interactive Windows-based applications in a multi-session environment from a remote server. The client accepts input from the user, all processing is done on the server, and then the client displays the output. You might remember this technology called Hydra. You use Terminal Services to enable thin clients on your network. |
| Terminal Services Profile | Here you set additional Terminal Services configuration such as setting the Terminal Services user profile and home directory. |
| Member Of | Just like with Windows NT, you can add a user to groups from within the properties of the user account. Use this page to do it. |
| Dial-in | Here's where you'd grant or deny remote access permissions and set options on the dial-in connection for the user. |
| Environment | Here you specify a program that you want to run on the computer at logon. You also configure whether client connections will be established at logon. |
| Sessions | Use this page to configure Terminal Services timeout and reconnection settings. |
Figure F: Use the Properties dialog box for a user object to
define additional attributes for each user.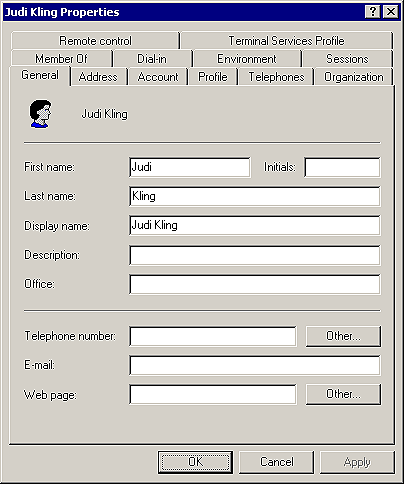
The schema
At this point, you might be wondering "Who decided what types of objects I can create in the AD?" or better yet "Who set the options or attributes for each object?" The answer is very simple--Microsoft. The entity that defines all the possible objects, attributes, and values that can exist in your AD database is the schema. The schema also specifies the required attributes for a particular object (such as a logon name for the user we just created) and those that are optional (like the user's phone number).
Microsoft included a default schema with the AD, which should be sufficient to meet at least the initial needs of most users. However, the AD is extensible, meaning that you can customize it by adding a new object or attribute type, changing the definition of an attribute, or changing whether a particular attribute is required or optional. That however, is beyond this article, so let's look at creating a few more different types of objects in the AD.
Utilizing organizational units in the AD
You can create organizational units (OUs) in your AD to logically group your enterprise's resources to either pattern your business hierarchy and organizational structure with OUs such as Sales and Marketing, or your systems administration model for IS support with OUs such as New York and Boston. Microsoft recommends that you use OUs to group your enterprise's resources if you want your AD structure to reflect the details of your company's structure and organization; if you want to be able to delegate administrative control over smaller groups of users, groups, and resources; or if your company's organizational structure is likely to change at a later time. You'll notice, as shown in Figure G, that OUs are represented in Active Directory Users And Computers as a folder with a book icon. The default Domain Controllers container has this same icon. This distinction enables you to apply group policies to this object type. (Group Policies are Windows 2000's superset of Windows NT 4.0's System Policies. In a nutshell, they're used to define computer and user configurations, manage applications on users' desktops, specify security options and assign scripts, and control Registry settings.)
Figure G: Organizational units in Active Directory Users And
Computers appear with a folder icon.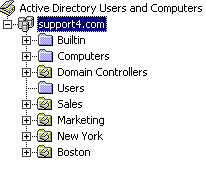
Moving AD objects
Once you have an OU created, you'll want to move resources from the default container objects to the OU that reflects either their position in your business structure or who controls them administratively. Moving an object in the AD is quite simple; you right-click the object and choose Move. You're now presented with a dialog box showing the hierarchical structure of the container objects in your domain's AD. As seen in Figure H, you select the container object you want the object to be moved to and then click OK. As easy as that, the object is moved to a different container in the AD. One thing you might have noticed is that you can move objects within the AD in only your domain. Unfortunately, you can't move AD objects between domains in your forest.
Figure H: Use the Move dialog box to move objects from one
container to another.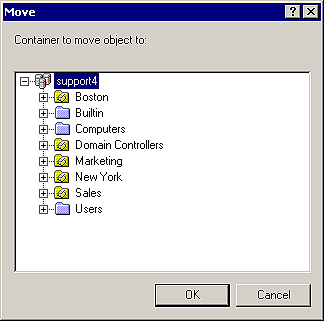
Creating a group object
Just like in Windows NT, groups are used to manage user and computer access to shared resources or to create email distribution lists. In Windows 2000, this access isn't limited to the domain in which the group was created! Groups can be used to apply permissions in any domain in your forest. This is different than OUs, which are used to create collections of AD objects for administrative purposes and are limited to the domain in which you created them. When you choose Group from the New menu, the New Object - Group wizard prompts you for the information you need to create a new group. The first and only screen in the wizard asks you for a group name, a group type, and a group scope, as in seen Figure I.
Figure I: Use the New Object - Group wizard to specify the name,
scope, and type for a new group.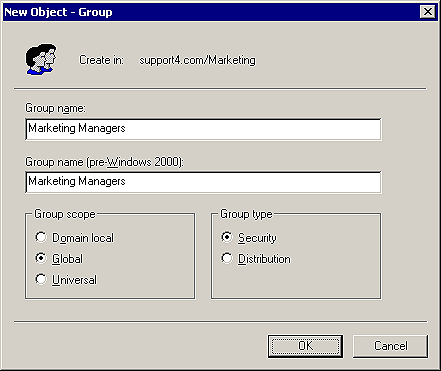
Let's look at the group type first. Windows 2000 has two types of groups, security groups and distribution groups. The Windows 2000 operating system uses only security groups. You'll use these security groups to assign permissions on shared resources and AD objects. Distribution groups are used only by applications, and the application must use them for non-security functions.
For example, an Exchange user might use a distribution group to send an email to a collection of users. You should know, however, that while distribution groups can't be used for security purposes, your security groups can be used by mail applications as email distribution lists. If your domain is operating in Native Mode, you can switch the group type from Security to Distribution or vice versa.
Next, let's look at group scope. Each security and distribution group has a scope attribute that defines how you can use the group in your forest. There are three group scopes: domain local, global, and universal. See Table C for descriptions of each.
Table C: Group Scopes
| Scope | Description |
| Domain local | Used to assign access permissions to resources in a single domain. This means that you can only use this group to assign permissions to resources in the domain where the group resides. However, domain local groups can contain members from any Windows NT 4.0 or Windows 2000 domain in your forest. |
| Global | Used to assign permissions to resources in any domain in your forest. The caveat here is that global groups can contain members from only the domain where the group exists. |
| Universal | This group scope, which is only available if your domain is operating in Native Mode, is used to assign access permissions to resources in any domain in your forest. In addition, universal groups can contain members from any Windows 2000 domain in your forest. |
At this point, you might be thinking "Why would I use any other group scope than universal? It gives me everything I could want!" The answer is because Universal groups and their members are listed in the Global Catalog (GC).
Each time the GC replicates between domains in your forest, universal group members are included. Like universal groups, global and domain local groups are listed in the GC; however, their members aren't. By using global and domain local groups where appropriate, you can reduce the size of your AD GC, thus dramatically reducing the replication traffic that occurs to keep the GC up to date.
When choosing your group scope, you should choose carefully. When your domain is operating in mixed mode, you can't change the group scope. If you're operating in Native Mode, you're allowed to convert global to universal only if the global group isn't a member of another global group, or convert domain local to universal only if the domain local group doesn't contain another domain local group as one of its members.
Now that you know about group scopes, let's briefly talk about the simplest part of creating a new group--the group's name. When you create a name for your group, global and domain local groups must be unique to the domain where you create them. Universal groups, however, must be unique to your forest.
Adding members to your groups
In Windows 2000, your groups can contain a maximum of 5,000 members. However, when your domain is operating in Native Mode, you can nest groups (make a group a member of another group), thus effectively increasing the number of members a group has. A group nested in another group would count as one member to the parent group, but the nested group could contain another 5,000 members of its own. Just like in previous versions of Windows NT, there are two ways to add members to a group in Windows 2000. As you saw earlier in this article, you can use the Member Of page on each individual user's Properties dialog box to add the user to multiple groups at one time, or you can use the Members page of the group's Properties dialog box to add multiple members to the group at one time. And how do you get to the Properties dialog box of the group? That's right--by right-clicking on the group and choosing Properties.
Publishing a folder in the AD
Including a shared folder in the AD is a two step process. You must first create and share the folder, and then publish the folder in the AD. Publishing the shared folder in the AD is optional. If you don't publish a shared folder in the AD, it's still accessible to clients by browsing in an Explorer window such as My Network Places. "So why would I want to publish it?" you ask. By publishing a share folder in the AD, you enable clients anywhere in your forest to search for it by its RDN or by an attribute. It's not necessary for them to know the physical location of the share.
Since the first part of the process, sharing a folder, isn't new, let's talk about the second part of the process--publishing the folder in the AD. Select any container object in your AD, and choose New | Shared Folder. The New Object wizard has a single screen, as shown in Figure J. Here you enter a name for the share in the AD (this can be different from the folder's share name) and the UNC path to the share. Click OK, and voila, you have an AD published share!
Figure J: Use the New Object--Shared Folder wizard to publish a
shared folder. 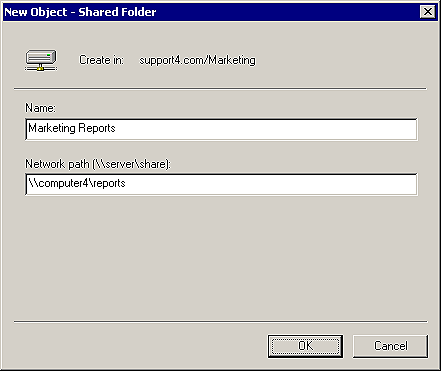
Publishing a printer in the AD
You create a printer in Windows 2000 just like you did in previous versions of Windows NT--by using the Add Printer Wizard. (The Add Printer Wizard is still located in Start | Settings | Printers.) When you share a printer, it's automatically published in the AD with the name servername-printername. There are no separate steps to publish a shared printer in the AD like there is for a shared folder. You'll find the printer displayed in Active Directory Users And Computers under the computer where it was created, as seen in Figure K, but only if you change the View menu to enable Users, Groups, And Computers As Containers. You can move the printer object to any AD container object, just like any other AD object--by right-clicking and choosing Move. It doesn't have to stay under the computer where it resides.
Figure K: Active Directory Users And Computers displays a
published printer below the computer on which it is shared.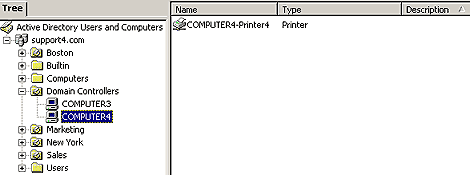
Unlike most other AD objects, the printer exists as an entity outside of the AD. The Properties dialog box for the printer object in the AD only control printer attributes in the AD (mostly used by users to search for a particular printer). You control all of a printer's configuration and security by using the printer's Properties dialog box in the Printers folder.
Creating a contact
Creating a contact object is straightforward. The New Object wizard, shown in Figure L, prompts you for the first name, last name, and display name. Windows 2000 fills in the Full Name automatically by combining the First Name and Last Name that you enter. The Full Name is editable though, so you can change the default if you choose. You use the Properties dialog box for the contact to enter information similar to the General, Address, Telephones, Organization, and Member Of pages in the user object type Properties dialog box.
Figure L: You can use the New Object wizard to create a
contact.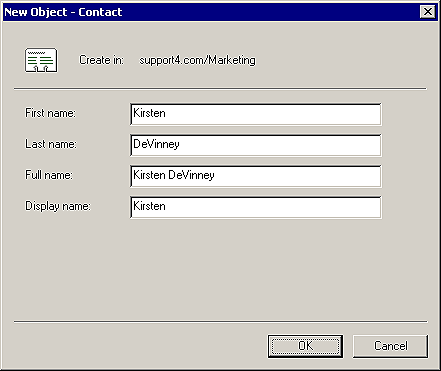
Conclusion
So now you're ready to start populating your AD database with Computer, Contact, Group, Organizational Unit, Printer, User, and Shared Folder objects! The New Object wizard guides you through the information you need to enter to create each individual object type, so there aren't any "Gotchas!" that you have to remember in creating each object type. After you've created your objects, you manage each object by using the choices from their shortcut menus or from within each object's Properties dialog box. You organize your AD objects by moving them into Organizational Units that represent your business structure or systems administration model. Once you get used to it, we believe you'll find your AD database is easy to manage by using Active Directory Users And Computers.
Copyright © 1999, ZD
Inc. All rights reserved. ZD Journals and the ZD Journals logo are trademarks of ZD
Inc. Reproduction in whole or in part in any form or medium without
express written permission of ZD Inc. is prohibited. All other product
names and logos are trademarks or registered trademarks of their
respective owners.