![[ Automating Office with VBA ]](aov-logo.gif)
![[ Automating Office with VBA ]](aov-logo.gif)
It happens more often than you may like--you create a split database with tables in one MDB and the user interface in another. You then link the data tables to the front-end piece. Everything works fine, until you move the front-end to someone else's machine and they've mapped their network drives to different letters than you have. As a result, when Access searches for the linked data tables on drive such-and-such, it can't find them. And no, the user's directory can't be mapped to drive such-and-such because that's where their CD-ROM drive resides. Of course, one option is to alter the drive mappings on your own system so they're in line with the user's. But most likely, the database's front-end will be distributed to multiple users, and you simply can't account for all possible variations.
It's true that users could simply use the Linked Table Manager to reconfigure the attachments. However, if you use synchronization to coordinate changes to these subordinate databases, every time you synch them up, the drive letters will reflect those in the master. As a result, the users will constantly need to use the Linked Table Manager whenever they synchronize.
Also, what if a user remaps their network drive after they've received the database? Or, what if, as occasionally happens, Access loses the link to the table altogether? Fortunately, you can avoid all of these potential pitfalls by using the utility we'll provide in this article. We'll use this utility to validate the links to all attached tables on startup and replace faulty drive letters with universal naming conventions (UNC).
So what's a UNC?
Universal naming conventions are a way to name files among computers on a network so that a single file will have the same pathname no matter which network computer accesses it. For example, if the directory C:\SharedDirectory\Filename.ext is on the computer ServerName, a user on another computer can open \\ServerName\SharedDirectory\Filename.ext to access the file. The same goes for attached tables in Access. If you link a table through, say, E:\SharedDirectory\Filename.mdb, then you can also use \\ServerName\SharedDirectory\Filename.mdb. Unfortunately, when you use the GetExternalData/Link Tables option from the menu bar in Access, the application doesn't give you the option to use the UNC. In order to do so, you'll need to set a table's connection property manually via VBA.
The ValidateLinks() UDF
Listing A shows the user-defined function that we'll use to validate links to attached tables in our database on startup.
Listing A
Public Function ValidateLinks()
Dim db As Database
Dim tdf As TableDef
Dim strPath As String
Dim varTest As Variant
Dim blnBadLink As Boolean
Dim strSysmsg As String
Const cnst_LinkErr = 3265

On Error GoTo Attach_Err
blnBadLink = False
Set db = CurrentDb()

strSysmsg = "Updating Table Links...Please Wait."
SysCmd acSysCmdSetStatus, strSysmsg

For Each tdf In db.TableDefs
        If tdf.Attributes = dbAttachedTable Then
                strPath = "\\JUPITER\Shared2
                        \IMAExampl\DataDB.mdb"

                'force error if table not accessible
                'due to bad link
                varTest = tdf.Fields(0).Name

                If blnBadLink Then
                        blnBadLink = False
                        With tdf
                        .Connect = ";Database=" & strPath
                        .RefreshLink
                        End With
                End If
        End If
Next tdf

Attach_Err_Exit:
        SysCmd Action:=acSysCmdClearStatus
        db.Close
        Set tdf = Nothing
        Set db = Nothing
        Exit Function

Attach_Err:
        Select Case Err
        Case cnst_LinkErr:
                db.TableDefs(tdf.Name).Connect = ""
                blnBadLink = True
                Resume Next
        Case Else:
                MsgBox Err.Description
                Resume Attach_Err_Exit
        End Select

End Function
After setting up and assigning initial values to various variables, the procedure loops through all the database tables. When it encounters an attached table, it sets the variable varTest to the name of the table's first field. However, if the attached table's link is no longer valid, the
varTest = tdf.Fields(0).Name
statement generates an error. This is because as far as Access is concerned the table--and therefore the Fields collection--doesn't exist. In the error-handling section, the function determines which error was triggered. If it's the cnst_LinkErr error, or 3265, then the code blanks the table's Connect property and sets the blnBadLink variable to True. Next, it resumes execution of the UDF. The procedure uses the UNC connection in the strPath variable to remap the table's link, then refreshes that link so the database points to the new directory.
Using the ValidateLinks() UDF
To take advantage of this UDF, you'll need to have a network connection on your computer. We'll map a shared file to a drive letter, then create two databases. One will be housed on the network drive and contain the Employees table from the Northwind database. This will represent the data, or back-end, of our split database. Next, we'll create the front-end section on a local drive and link the Employees table to it. After we create the ValidateLinks() function, we'll remap the network drive to another letter and watch the UDF in action. To begin, let's create the shared folder and map the network drive to it.
Map the network drive
To start, launch Windows Explorer and select Tools/Map Network Drive. When you do, Windows displays the Map Network Drive dialog box shown in Figure A.
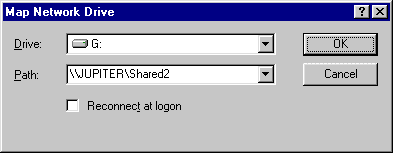
Figure A: Use this dialog box to map the G: drive to your network directory.
From the Drive dropdown list box, select G, (or whichever drive letter you have available). Then, from the Path dropdown list, choose your server name or type \\YourServerName. For example, here at ZD Journals, we use a shared directory on a network server named Jupiter. So, as shown in Figure A, we used the path \\JUPITER\Shared2 where Shared2 is the name of the common folder. We'll use this same path throughout the article. Simply replace this with your server's name.
Now, double-click on the G drive, then right-click in the right-hand pane of Windows Explorer. Select New/Folder from the resulting shortcut menu and name the new folder IMAExampl. When you've finished, your Windows Explorer should look similar to ours, as shown in Figure B.
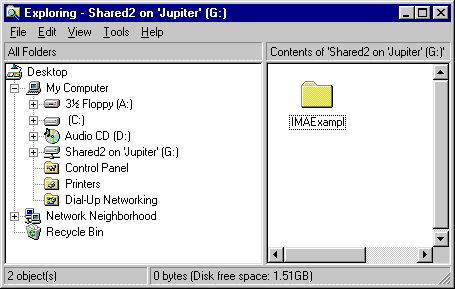
Figure B: We'll place the Employees table in a database contained in the IMAExampl folder.
Create the databases
To create the split database, launch Access and open a blank database. Name it DataDB and save it on the G drive in the IMAExampl folder.
As mentioned earlier, we'll use the Employees table in the Northwind database to provide the data for our example. To import this table, select File/Get External Data/Import from the menu bar. Then, find Northwind.mdb in the resulting file directory. This database is usually found in the C:\Program Files\Microsoft Office\Office\Samples folder. When you've found it, highlight it and click Import.
Finally, in the Import Objects dialog box, choose the Employees table and click OK. Access will import the Employees table into DataDB.mdb. Now, we'll attach this table to another database on your local hard drive. At this point, open another blank database to serve as the front-end piece. This time, name it FrontEndDB.mdb and save it on your C drive (or whatever letter you're using for your local hard drive). Next, select File/Get External Data/Link Tables. Find and double-click on the DataDB.mdb database in the IMAExampl folder on your G drive. Then, select the Employees table from the Link Tables dialog box and click OK. When you do, Access attaches the table to the database.
Our split database is currently set up like it would be when we distributed it. Now, let's replicate the problem caused when other users have mapped their network drives to different letters.
The trouble with drive letters
Return to Windows Explorer. Select Tools/Disconnect Network Drive to display the Disconnect Network Drive dialog box shown in Figure C.
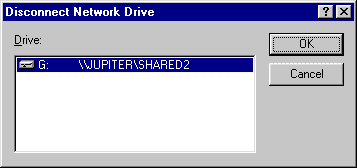
Figure C: With this dialog box, we can remove the drive mapped to letter G.
Select the G drive and click OK. When Windows asks you to verify your choice, click Yes. After a brief pause, Windows Explorer removes the G drive from the list in the left-hand pane. Now, using the steps outlined previously, map the same network drive to letter H.
Toggle back to Access, and select the Tables tab on the Database window. Next, double-click on the Employees table. When you do, Access displays the error message box shown in Figure D.
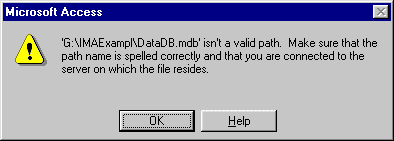
Figure D: Because we remapped the network drive to a different letter, Access can no longer find the attached table.
At this point, we're ready to add the ValidateLinks() UDF to the database to alleviate this problem.
The UDF and AutoExec macro
To add the ValidateLinks() UDF, select the Modules tab in the Database window and click New. At the insertion point, enter the code from Listing A. Don't forget to replace the \\Jupiter\Shared2 portion of the strPath variable with the name of your own network drive. When you've finished, save the module as UNC_Utility. Chances are, you'll want to validate the tables' links whenever the database opens, so let's create a quick AutoExec macro to do so. In the Database window, select the Macros tab, then click New. Use Figure E as a guide to complete the macro.
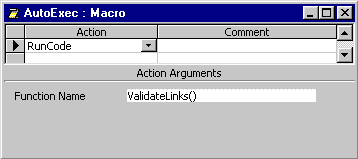
Figure E: This macro ensures that the attachments are verified whenever the database opens.
After you've finished, save it as AutoExec. Now, whenever you open the database, Access will run the ValidateLinks() UDF. To test the macro, double-click on the AutoExec macro in the Database window. This time when you try to open the Employees table, Access shows the data without a glitch.
Startup forms and AutoExec
One common feature frequently included in databases is a form that opens automatically when the database starts. These forms may or may not be switchboard forms. Normally, you indicate which form you want to open this way in the database's Startup options. Beware, however, that if you do so, Access loads the form before it runs the AutoExec macro. As a result, if the form uses one of the linked tables as its recordsource, and the attachment has indeed gone bad for whatever reason, you'll still get the error message shown in Figure D even if you use our ValidateLinks() UDF. To avoid this behavior, simply place an OpenForm command as the second action in the AutoExec macro and remove the form from the Startup options.
Error values
Also, you've probably noticed that in the UDF, we created a constant to trap for a specific error, which we assumed would mean we needed to re-attach the linked table. The actual description of this error, though, is Item Not Found In This Collection. Because this error could occur for reasons other than a broken link, if you use this same technique in your own procedures, you'll want to make sure you know exactly at what point the function generates the error. Otherwise, there may be bugs that don't get resolved.
Conclusion
As we've shown, you can't count on network drive letters being consistent throughout various network computers. To avoid the potential problems caused by different mappings, you can use the custom utility that we've provided in this article.
Copyright © 1999, ZD
Inc. All rights reserved. ZD Journals and the ZD Journals logo are trademarks of ZD
Inc. Reproduction in whole or in part in any form or medium without
express written permission of ZD Inc. is prohibited. All other product
names and logos are trademarks or registered trademarks of their
respective owners.