![]()
The UserForm
For our example, we'll create the simple dialog box shown in Figure A.
Figure A: After you enter a description of the revisions in the text box and click Edit Document, you'll be free to edit the associated Word document accordingly.
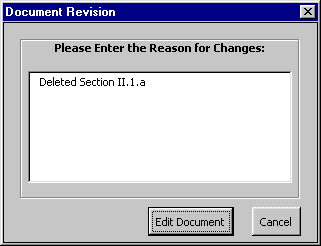
This dialog box prompts you for a description of the change whenever you open the document. If you supply a reason, then the UserForm inserts the contents of the text box into the document as hidden text and lets you modify the document accordingly. If you click the Cancel button, or the Close button in the UserForm's top-right corner, the dialog box closes the document as well as the form.
Build the UserForm
To begin, we'll create a UserForm to serve as our gatekeeper. First, open Word and save a blank document as GenericContract. We'll format this document later, so for now, press [Alt][F11] to open the Visual Basic Editor. In the Project Explorer window, select the GenericContract Project, then choose Insert/UserForm from the menubar. When you do, the VBE inserts a blank form. Figure B shows the Design view of the dialog box we created.
Figure B: This UserForm will prompt you to enter revision explanations when you open the GenericContract document.
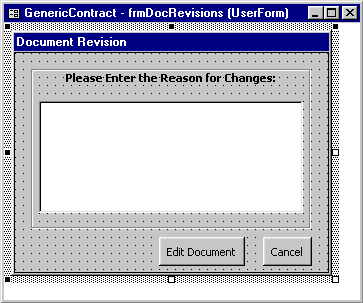
Use Figure B as a reference to position the controls and buttons. Table A lists the properties we added to the form and its controls. When you're finished with the form, we'll attach the code to the two buttons.
Table A: UserForm and control properties
| Object | Property | Value |
|---|---|---|
| UserForm | (Name) | frmDocRevisions |
| BorderStyle | 1 - fmBorderStyleSingle | |
| Caption | Document Revision | |
| Height | 184.5 | |
| KeepScrollBarsVisible | 0 - fmScrollBarsNone | |
| Width | 240.75 | |
| Label | (Name) | lblText |
| BackStyle | 0 - fmBackStyleTransparent | |
| Caption | Please Enter the Reason for Changes: | |
| Font | Tahoma (Bold) | |
| Height | 120 | |
| SpecialEffect | 3 - fmSpecialEffectEtched | |
| TextAlign | 2 - fmTextAlignCenter | |
| Width | 210 | |
| TextBox | (Name) | txtReason |
| Height | 84 | |
| Width | 198 | |
| CommandButton | (Name) | cbnCancel |
| Caption | Cancel | |
| Height | 21.75 | |
| Width | 36.75 | |
| (Name) | cbnEditp | |
| Caption | Edit Document | |
| Height | 21.75 | |
| Width | 64.5 |
Attach the code
Let's attach the code for the Cancel button's Click event first. To do so, while still in the UserForm's Design view, right-click the cbnCancel button, then select View Code from the shortcut menu. The VBE opens a code module for the button's Click event. At the insertion point, enter the code from Listing A between the beginning and ending Sub statements. As you can see, this procedure determines whether the txtReason textbox contains text. If it does, then VBA prompts you to verify that you actually want to cancel the revision. If you choose Yes, then the code closes the UserForm and the document--which is also what it does if there isn't any text in txtReason.
Listing A
Private Sub cbnCancel_Click()
Dim intResponse As Integer
Dim mymsg As String
intResponse = vbNo
If Me.txtReason <> "" Then
  mymsg = "Are you sure you want" & vbCr & _
    "to cancel revisions?"
  intResponse = MsgBox(mymsg, vbYesNo + vbQuestion, _
    "Please Verify")
Else
  intResponse = vbYes
End If
If intResponse = vbYes Then
 Unload Me
 ActiveDocument.Close _
	savechanges:=wdDoNotSaveChanges
End If
End Sub
Attach cbnEdit's Click procedure
Listing B contains the cbnEdit button's Click event procedure. This code inserts the revision explanation into the document as hidden text. To attach the code to the cbnEdit button, select cbnEdit from the Module window's Object dropdown list. By default, the VBE provides the Click event procedure, which is exactly what we want. Enter the code from Listing B as the Click event.
Listing B
Private Sub cbnEdit_Click()
If Me.txtReason <> "" Then
	Dim InsertRange As Range
	Unload Me
	With ActiveDocument
		Set InsertRange = .GoTo(wdGoToBookmark, , , _
			"RevisionText")
		With InsertRange
			.Expand (wdParagraph)
			.InsertParagraph
			InsertRange = Me.txtReason & _
				" -- LAST REVISION DATE:" &
					Now & vbCr
			.Font.Hidden = True
			.Collapse wdCollapseStart
		End With
		.Bookmarks.Add Name:="RevisionText", _
			Range:=InsertRange
		.Save
		InsertRange.MoveEnd wdParagraph
	End With
	Set InsertRange = Nothing
End If
End Sub
Add the QueryClose event code
Our next bit of code prevents someone from closing our gatekeeper UserForm by clicking the Close button in the form's upper-right corner. It takes advantage of the form's QueryClose event. This event passes two arguments: Cancel and CloseMode. You're no doubt familiar with the Cancel argument--setting this equal to False cancels the event. The CloseMode indicates how you've closed the UserForm. To enter Listing C, select UserForm from the Module window's Object dropdown list, then choose QueryClose from the Procedure dropdown list. This bit of code checks to see if the CloseMode equals the vbFormControlMenu constant, which means you've closed the form from the control menu, or clicked the X button in the form's top-right corner. If you have, then the procedure cancels the QueryClose event and transfers control to the cbnCancel_Click event, which closes the document as well as the UserForm, preventing document changes without an explanation.
Listing C
Private Sub UserForm_QueryClose(Cancel As Integer, _
    CloseMode As Integer)
If CloseMode = vbFormControlMenu Then
    Cancel = True
    Call cbnCancel_Click
End If
End Sub
Displaying the UserForm
Finally, we need to add four code lines so that frmDocRevisions opens automatically whenever GenericContract does. In the Project Explorer window, double-click on the ThisDocument item in the GenericContract Project. When you do, the VBE displays a new, blank Module window. Select Document from the Object dropdown list, then select Open from the Procedure dropdown list. At the insertion point, enter
If Not Me.ReadOnly Then
    Load frmDocRevisions
    frmDocRevisions.Show
End If
Format GenericContract
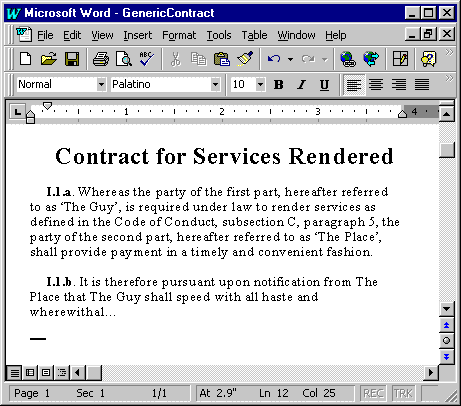
For our last step, we'll make a few modifications to the document itself. To do so, press [Alt][F11] to switch back to Word and the GenericContract document. If it's not already there, move the insertion point to the top of the first page. You may have noticed in Listing B that the code inserts the revision explanation at a Bookmark named RevisionText. While the procedure will recreate this bookmark each time you use the UserForm, initially we must create it ourselves. To add the bookmark, select Insert/Bookmark from the menubar. Type RevisionText as the bookmark's name, then place a check in the Hidden Bookmarks check box. Finally, click Add to insert the new bookmark into the document.
Next, press [Enter] and type in whatever text you want. Figure C shows the generic contract we created.
Figure C: Our gatekeeper form will prevent changes to this document unless you provide an explanation for those changes.
When you're finished adding your text, save the document once more, then close and re-open GenericContract. This time, the UserForm appears and prompts you for a revision explanation. If you press the form's Close (X) button or Cancel button, VBA closes both the document and the UserForm. If you enter a revision explanation, like we did, Word inserts the explanation at the top of the document, as shown in Figure D.
Figure D: The UserForm inserted the hidden revision explanation into the top of our document.
