![]()
|
This article may contain URLs that were valid when originally published, but now link to sites or pages that no longer exist. To maintain the flow of the article, we've left these URLs in the text, but disabled the links.
|

| Ken Spencer |
| Using the Visual InterDev 6.0 FormManager |
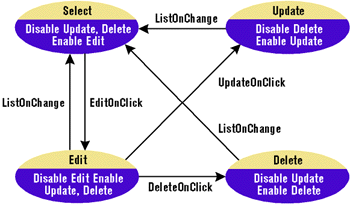
The new FormManager design-time control is a state machine—it manages the state of the controls that you use in a page. A state machine is an application or control that implements state diagrams. A state diagram describes a finite set of states (conditions) that can occur in the system. This means that all the states are known to the system. State diagrams have long been used to design control systems for various implementations. When you use a microwave oven that has a computer control, that control system has a state machine in it. This state machine handles the various interactions that users have with the system, reliably performing certain tasks over and over. Wouldn't it be nice to create a state machine in your Web application that makes it as reliable as a piece of hardware? That's where the FormManager comes in. Figure 1 shows what a state diagram for a Web application might look like. Each oval represents a state the application may be in. The name for the state is shown in the yellow area. The text inside the purple area lists the actions that will occur for each state. For instance, the Select state will disable the Update and Delete buttons while enabling the Edit button. |
 |
| Figure 1: A State Diagram for a Web App |
The arrows indicate the allowable state transitions. For instance, if the application is in the Select state, it can move to the Edit state. There is no way for it to go to any other state. This is part of the beauty of the state diagram and a state machine: you can define exactly how your application will behave. Tracing the arrows from one state to another will allow you to discover the interactions of each state in the application.
FormManager is like a super design-time control in that it uses all the other design-time controls on the page. The FormManager is used to build pages that have various states of operation. Say you have a page that contains a listbox and several Textbox design-time controls. When a user selects an item from the list, you display the data in the textboxes. The user needs to be able to enter Edit mode to make changes or delete the record. The user also needs to have the option of creating a new record, which would require a New mode.
This is where the FormManager comes in. It can manage the entire process of switching modes and setting the various design-time controls to different states for each mode. The FormManager does all this with no code—you don't need to set up select statements or other types of logic to track the modes the page goes through. The only code you need to add is the code that handles the specific actions of your application. Let's take a look at an example.
Creating a Form
Normally, I create a page with the various design-time controls that make up the interface before I set up the Form Manager. This lets me test the page and make sure the database connections work with a simple form. Next, I will add the FormManager, define the various modes, and add any script code necessary to perform specific actions for each mode.
 |
| Figure 2: CustomerOrders.asp Page |
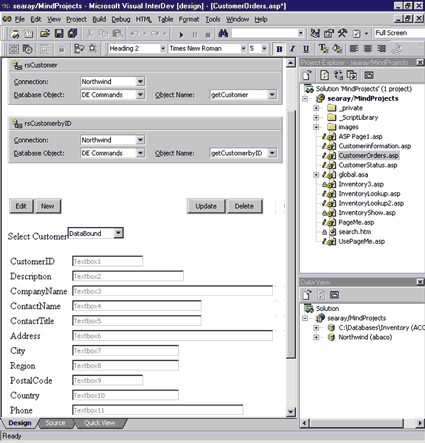
The sample application I created uses the Northwind sample database that ships with Visual Studio® 6.0 and SQL Server™ 7.0. Figure 2 shows the ASP file I created for this application (CustomerOrders.asp). This page uses two Recordset design-time controls, one for the Customer table (rsCustomer) that pulls all rows from the table and another (rsCustomerbyID) for the customer table that pulls only one record by CustomerID column. Both of these recordsets use Data Command objects to retrieve the data:
|
| The SQL for the Data Command objects is: |
|
| The page also contains a listbox whose lookup properties are bound to rsCustomer. CustomerID is the bound field while CompanyName is the lookup field. Four button
design-time controls, btnNew, btnUpdate, btnEdit, and btnDelete, will control the interaction of the form.
Last but not least, the page contains a textbox for each field in rsCustomerbyID that I want to update. The textboxes were generated by dragging the getCustomerbyID data command and dropping it on the page, then dragging the fields from the command and dropping them under the recordset created when getCustomerbyID was dropped on the page. You also need to uncheck the "Automatically open the recordset" checkbox for rsCustomerbyID. This setting is found on the Implementation page of the recordset's properties. If I were building this part of the application with ASP script, I would need to publish the results to another page to interpret the user's actions or add this code page to process the results. Instead, I am going to use the FormManager control to manage these actions. At this point, I can begin to work with the FormManager and put the actions of the page in place, letting this control drive the state management. The FormManager uses several terms that define the various elements the FormManager addresses (see Figure 3). After you drag the FormManager design-time control from the Toolbox and drop it on the page after the last design-time control in the file, the next step is to define the modes for the page. I've decided that this page will require three modes of operation (or states), one for each type of operation the form will perform:
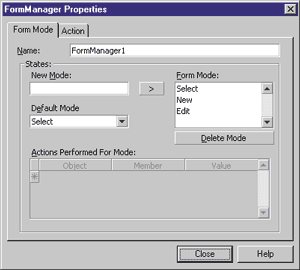
To define a mode, open the FormManager's properties. Enter the mode's name in the New Mode box, then click the > button to add the mode. Enter the Select, New, and Edit modes. The first mode you entered automatically becomes the default mode when the page displays. Figure 4 shows the Form Mode property page with the three modes defined.
|
 |
| Figure 4: Form Mode Property Page |
Since the FormManager is really a state manager, it knows about modes (states). Now that you have defined the modes, you can define the actions that occur when a mode becomes active. For instance, when the Select mode becomes active, the actions defined for it on the Form Mode page occur.
You can define a set of all types of actions for various objects on the page. For instance, you can set properties or execute methods of a design-time control such as a textbox. You can also use actions with any design-time controls such as recordset controls.
To define an action, select the mode the action applies to in the Form Mode box. As soon as you select a mode, the actions currently defined for that mode will show up in the Actions Performed For Mode grid at the bottom of the property page. Of course, the grid will be blank when you select a newly defined mode.
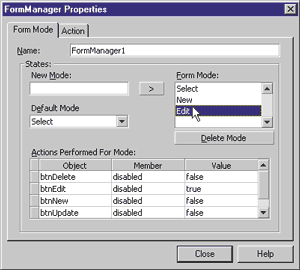
Next, click once in the object column in the first row of the grid. This will display a dropdown list of all the objects on the page. When you select an object from the list, the properties and methods for that object will populate the member list on the same row. To complete the action definition, you select a property or method from the member list. If you select a property, you need to enter the value to set the property to in the Value list. Figure 5 shows the actions for the Edit mode for the sample page.
 |
| Figure 5: Actions Performed for the Edit Mode |
In this sample, design-time controls for the various modes are either enabled or disabled when a mode change occurs. The modes and the object settings for the actions are defined in Figure 6.
Once you have set the actions for the page, click the Action tab. Using this property page, you can define the actions that change the form's mode and actions that occur before the mode change occurs (see Figure 7). For instance, when the user clicks the Edit button, the form needs to change to the Edit mode. You define the actions that trigger a transition in the Form Mode Transitions section of this property page. To define a action to trigger a transition, use these steps:
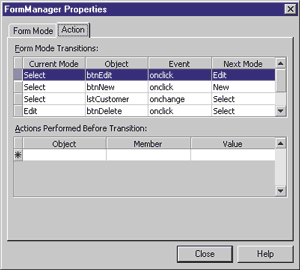 |
| Figure 7: The Action Tab |
In addition to the three transition actions shown in Figure 7, there is one more action that is not shown:
|
| It's easy to define the transition modes because the FormManager takes your settings and generates the code. For
instance, you don't need to add lots of code to make the
transitions; the FormManager does it for
you. But you will add some code to work with the modes to make the form functional.
The Actions Performed Before Transition section of this page allows you to define another set of actions for an event. For instance, you could select a Recordset object and trigger an UpdateRecord method when a mode changes. To set these actions, you select the line in the Current Mode section that indicates the current mode, then you can set the actions that occur before the transition from that mode. In this sample, I am not using this grid. Adding the Code The first change I made after finishing with the Form Manager was to insert a PageObject design-time control. Then I added the thisPage_onenter event handler and used it to add a blank entry as the first item in the list. To complete this page, I added several procedures and event handlers. The event handlers were entered using the Script Outline in the Source Editor. You insert an event handler using the Script Outline by exposing the Server Objects and Events tab, then finding the object in the list and exposing it. Then you can double-click an event to add the event handler for it to the ASP code in the file. The complete ASP code for CustomerOrders.asp is shown in Figure 8. Next, add this event handler for the listbox: |
|
|
Notice that CustomerID is defined outside of the subroutine code. This is necessary to make the variable global to the page so it can be used to set the parameter for the rsCustomerbyID recordset. If the variable is dimensioned inside the event handler routine, it will have local scope within that procedure and the recordset will not be able to see it. This will generate a runtime error when the user selects an entry from the list.
The event handler takes the bound value for the item the user selects from the list and places it in the CustomerID variable. The other two lines close, then reopen the recordset. Now, let's define two general-purpose procedures. The ClearFields procedure clears all the textboxes. The SetList procedure is used when the listbox needs to be reset, say after a user enters a new record using the New mode. The first line in the procedure clears the listbox. The next line adds the blank entry to the list again, as it was cleared along with the other list entries. |
|
| Next, the requery method repopulates the recordset from the database: |
|
| My next step was to add the event code for the buttons. The New button uses this code to clear the textboxes, then executes the addRecord method to add a new empty record to the recordset: |
|
| The Update button first calls the updateRecord method to post the changes to the database. Then it uses the SetList procedure to reload the query. |
|
| In a production application, you should only execute requery when you need to. You could set this action to occur when an update occurs after a new record is added.
Conclusion At this point, you have a functional application. You can see how the FormManager makes it easy to define the modes and actions that a typical form takes. Now for the hard part. Be careful when setting the values for properties or methods in FormManager. For instance, the following error occurred when I accidentally selected the Ad-vise method set when I intended to select Disabled, then viewed the page in the browser: |
|
| This is confusing until you realize that the FormManager is implemented in JScript, and invalid
values have been passed to a method. You can use the debugger to walk through the code and try to find the error. You can also look up the line in the source editor by its line number and determine which design-time control the error is occurring in. Then you can look over the method and property settings and make sure they are correct. |
From the March 1999 issue of Microsoft Internet Developer.