![]()
 beyond@microsoft.com |
| Ken Spencer |
| IIS 5.0, COM+, and Windows 2000 |
This month I am going to take a practical tour of Windows 2000 from the perspective of the developer and system administrator. To illustrate my findings and work through various scenarios, I am going to use Visual InterDev® running on Windows NT® 4.0 to create a Web application that will run on Windows 2000. Creating the application in this way will expose security and other issues as I go through the process. I used Windows 2000 RC1 to perform these tests.
Starting Out
|
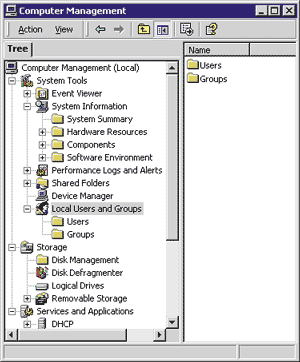 |
| Figure 1: The Computer Management App |
| To add a user, I expanded the Local Users and Groups folder, then selected the Users folder. Next, I right-clicked in the Users folder and selected New User to create the new account. This process is similar to the way you perform the task in Windows NT 4.0. To add a user to the group, I had to close the New User dialog, then open the properties for the account. I clicked on the Member Of tab, and then clicked Add to add the reference to the proper group. This process was simple, but takes a bit of poking around if you are not familiar with the Windows 2000 interface.
Now that I had the correct user on the Windows 2000-based server, I finished adding the new project with Visual InterDev and everything went smoothly. To test Internet Information Services (IIS) 5.0, I created a simple Active Server Pages (ASP) app and viewed it. No problems. So far, creating the Web project and getting it working with IIS 5.0 is just like working with IIS 4.0, so I decided to add a bit of database code to test the ActiveX® Data Objects (ADO). The first step in creating the new application involved creating a data source on the Windows 2000 server. But how? The ODBC Data Sources Control Panel applet is missing. To manage your data sources in Windows 2000, you must use the ODBC Data Source Administrator, which looks surprisingly like the ODBC Control Panel applet you got with Windows NT 4.0. To open the ODBC Data Source Administrator, select Data Sources (ODBC) from the Programs | Administrative Tools menu. I created the ASP code in Page2.asp (shown in Figure 2) to test the database features. This page uses ADO to create a simple output page. Since I was building the app with Visual InterDev on Windows NT 4.0, I was using ADO 2.1. Windows 2000 includes ADO 2.5, which provides many enhancements over ADO 2.1. It was interesting to see that the Visual InterDev features such as IntelliSense® worked fine on Windows NT 4.0, even though the application was hosted on Windows 2000. Of course, this works because Visual InterDev is running locally on the Windows NT-based system, while the server is running Windows 2000. IntelliSense picks up its information from the ADO type library on the Windows NT-based system. This might cause problems for developers who are using one version of ADO on their workstation and another on the server. Once I completed the ASP code, I viewed the page in the browser. Bingo! I got exactly the results I expected. Viewing the page works as it should. So moving applications to Windows 2000 might not be a big deal. As long as the Windows 2000-based server is set up with IIS and the correct data sources are in place, the application should work. If the application uses the Scripting Object Model (SOM), then that must, of course, be installed on the Windows 2000-based server as well. Now, let's assume that you want to change the IIS configuration of your app. You can do this with the Internet Service Administrator (ISM) as you did with IIS 4.0. You start the ISM from Programs | Administrative Tools. As you'll see, the ISM sports a couple of major (and minor) enhancements. One of these changes is the ability to restart IIS directly via the ISM without rebooting the computer. This is necessary once in a while when something goes wacky in IIS or one of your applications. Now you can right-click the computer icon in the ISM, then select Restart IIS from the context menu. This will display the dialog shown in Figure 3. The dropdown list allows you to select the service or feature that you want to restart. You can either choose to stop Internet services, start Internet services, reboot the server, or restart Internet services (the default). |
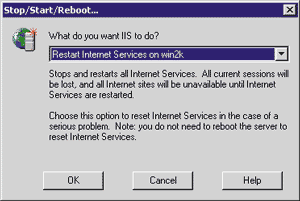 |
| Figure 3: Restarting Internet Services |
|
Once you have selected an option, click OK to trigger the action. The selected action will take place after a certain interval of time (this was 30 seconds for IIS). There is also an End Now button you can click to abort the timeout and trigger the action immediately.
You can also shut down or restart IIS with the iisreset.exe utility. A description of the options for this command can be found in the Restarting IIS section of the online documentation. You should always use either the ISM or the iisreset.exe utility to start, restart, or stop IIS because IIS consists of several services. Using these utilities makes sure they are started or stopped correctly as a group. There are some operational differences between IIS 4.0 and IIS 5.0. One of the big changes is in performance. IIS 5.0 should be much faster than IIS 4.0 when it comes to running your applications. This is great news as IIS 4.0 was already pretty efficient. IIS 5.0 can also compress static files before it sends them to the browser. This can add another boost to the performance of your application for browsers that provide compression support. It is possible to change the properties for both IIS and individual virtual directories and applications. You can change the properties for IIS by selecting the computer icon in the ISM, then clicking the Properties icon. This will open the property page shown in Figure 4. |
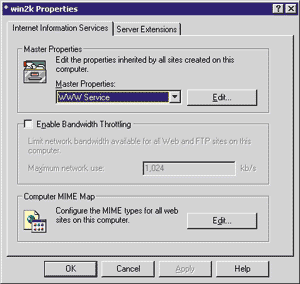 |
| Figure 4: IIS Properties |
|
You can select either the WWW or FTP service from the Master Properties list, then click the Edit button to change those properties. The Server Extensions property page shown in Figure 5 allows you to configure the Server Extensions. You can also open this property page from the Microsoft Management Console (MMC). You can start the MMC with the Server Extensions snap-in loaded by selecting Server Extensions Administrator from the Programs | Administrative Tools menu.
|
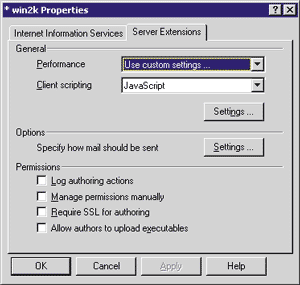 |
| Figure 5: Server Extensions Properties |
|
Anyway, back to the Internet Information Services properties page. To change the properties for the WWW service, select it from the Master Properties list, then click Edit. This opens the property pages for the WWW service just as it did in IIS 4.0. You will see a few differences here, such as the Service page. The Service page is used to select the default Web site for the IIS 3.0 admin interface. You can also change the HTTP Compression settings from the Service page.
You open the properties for an individual application or directory just as you did in IIS 4.0. One of the first things you will notice in the application properties is the Application Protection dropdown list at the bottom of the page. You now have three options for application protection, as shown in Figure 6. As you might expect, you change the application protection by selecting the mode from the list and applying it. There are also some surprises in store at several places in the ISM. For instance, if you right-click an application or directory that uses Server Extensions, then select All Tasks, you will be presented the options shown in Figure 7. The options you see for the All Tasks and other submenus will change depending upon your original selection. You can also open the ISM from the Computer Management snap-in. Under the Services and Applications folder, select the Internet Service option to open the ISM snap-in.
COM+
|
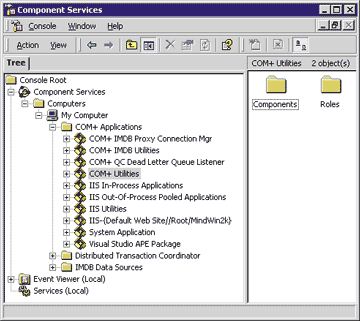 |
| Figure 8: The Component Services Console |
|
The Component Services console shows several entries that include "IMDB" in the name. At press time, word is the in-memory database (IMDB) features in Windows 2000 have been pulled and are not expected to appear in the final product. (They may still be found in RC2, so be aware that they are not expected to stay around.)
Second, the interface to Component Services does seem familiar. Take a look at the application folders. MTS used Packages to manage components. COM+ groups components in Applications instead of Packages. The IIS In-Process Applications folder contains an entry for the IISWAM.W3SVC component. This is the IIS process, and it represents the IIS in-process applications. The IIS Out-Of-Process Pooled Applications contains the IISWAM.OutOfProcessPool component, which represents the pooled processes. The Transaction List and Transaction Statistics pages are used to monitor what is happening with the system and the components executing on it. These pages are in the Distributed Transaction Coordinator folder. You can also access the Event Viewer from the MMC. The Event Viewer snap-in loads automatically with the Component Services snap-in. You can also load the Performance Monitor snap-in and have these features at your fingertips.
Conclusion
|
From the November 1999 issue of Microsoft Internet Developer.