July 1999
![]()
| The Tools You'll Need to Build Embedded Apps: Windows CE Toolkit for Visual C++ 6.0 |
| The great thing about developing for Windows CE is that you can use the same tools and technologies you've been using to develop desktop applications-Visual C++, Visual Basic, COM, ATL, and MFC to build applications for the Handheld PC, the Palm-size PC, and even the Auto PC. |
| This article assumes you're familiar with Windows CE, Visual C++, Visual Basic |
|
Code for this article: WinCEToolkits.exe (81KB) Steve Zimmerman is the president and cofounder of Code Marine (http://www.codemarine.com), a consulting and mentoring company located in Cary, North Carolina. Get in touch with Steve at steve@codemarine.com.
|
|
I'll openly confess that I've always thought that any computer not beefy enough to support its own compiler was a niche development market to be strictly avoided, but the latest generation of devices powered by Microsoft® Windows® CE—in its increasingly full-featured flavors—has caused me to take another look. And I must admit that I like what I see.
In this article, I'll report my findings and take you on an in-depth tour of the features found in the Microsoft Windows CE Toolkit for Visual C++® 6.0 and, in somewhat less detail, the Microsoft Windows CE Toolkit for Visual Basic® 6.0. Along the way I'll discuss Windows CE support for COM, the Active Template Library (ATL), ActiveX® controls, and MFC. For in-depth information about features that will be made available in future releases of Windows CE, refer to "Updated with New Kernel Features, Windows CE 3.0 Really Packs a Punch" by Doug Boling, also in this issue. The great thing about developing for Windows CE is that you can use the same tools and technologies you've been using to develop desktop applications— Visual C++, Visual Basic, COM, ATL, and MFC—to build applications for the Handheld PC (H/PC), the Palm-size PC, and even the Auto PC. Of course, not every platform supports every feature (see Figure 1), but the code you write for Windows CE will likely look remarkably similar to the code you've been writing for the desktop. What makes such a feat possible is a combination of two things: the surprisingly rich Windows CE Platform SDKs, which are based on a subset of the Windows desktop development APIs, and the fertile development environment provided by the Windows CE Toolkits for Visual C++ and Visual Basic. To try your hand at developing for Windows CE, you don't even initially need a Windows CE-based device. That's because each Windows CE Platform SDK—for the Palm-size PC, the Auto PC, the Handheld PC, and the recently released Windows CE, Handheld PC Pro Edition—contains an emulation environment that lets you develop and test Windows CE-based applications under Windows NT®. Of course, if you plan to redistribute your Windows CE-based software, you'll want to make sure you thoroughly test your code on all of the hardware platforms you're planning to support because there are subtle differences in the way they each implement the Windows CE APIs. The SDKs are available for download at http://msdn.microsoft.com/cetools. Figure 2 outlines the basic topology of the recently released Handheld PC Pro Edition Platform SDK. The other SDKs, while not quite as full-featured, contain essentially the same layout. Each SDK consists of three basic elements: an emulation environment, header files and libraries that define the Windows CE system APIs and subset versions of MFC and ATL, and a Platform Manager that facilitates communication between the desktop and the Windows CE-based device. Since Windows CE supports several microprocessors, there are different sets of device-side binaries provided for each chipset. Unfortunately, none of the various Platform SDKs provide the compilers required to actually build Windows CE binaries, so you'll need to license at least one of the two Toolkits to do Windows CE-based development. The Windows CE Toolkit for Visual C++ contains cross-compilers that allow you to create binaries for several processor families supported by Windows CE, including the Hitachi SH series, the MIPS processor, and the PowerPC. Moreover, the toolkit is fully integrated with the Visual C++ 6.0 development environment, so you can use the power and productivity of the familiar features you've grown to love: the AppWizard, the ClassView, IntelliSense®, the ATL Object Wizard, the Resource Editor, the ClassWizard, and so on. Toolkit Integration The Visual C++ development environment consists of a lightweight shell (MSDEV.EXE) along with a myriad of MFC-based plug-in DLLs called packages that each implement a subset of functionality via a common set of interfaces. For example, the ClassView is implemented as a package called devclvw.pkg, and the Resource Editor is contained in devres.pkg. The AppWizards are also implemented as a set of plug-in DLLs with the .awx extension. Because of this granularity, it's relatively easy for Microsoft to add new functionality to the development environment without breaking existing features. When you install the Windows CE Toolkit for Visual C++ 6.0, the setup program copies several package files and wizard files into the MSDev98\Bin hierarchy that add Windows CE-specific features to the Visual C++ shell, including Windows CE-specific AppWizards, various changes and additions to the Options property sheet, and a WCE Configuration toolbar, as shown in Figures 3 and 4. Installing the toolkit doesn't prevent you from continuing to develop desktop applications; it simply adds additional support for Windows CE. (The only negative side effect I have found is that installing the toolkit appears to break the New Windows Message Handler dialog for ATL-based ActiveX controls.) If you decide to uninstall the toolkit, the uninstaller returns Visual C++ 6.0 to its pristine desktop development-only state. |
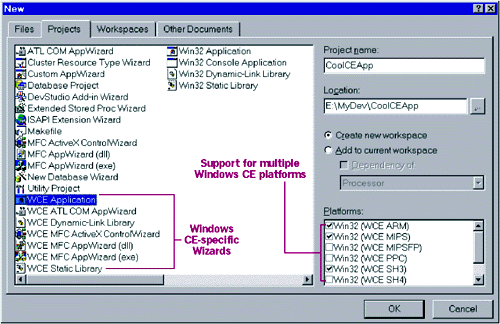 |
| Figure 3 Toolkit Wizards and Platform Support |
|
A very nice aspect of the toolkit integration with the Visual C++ development environment is that it lets you target all of the standard shipping versions of Windows CE (versions 2.0, 2.01, 2.10, and 2.11) from within a single project. (As of this writing, the prerelease version of the Auto PC Platform SDK only supports version 5.0 of the Windows CE Toolkit for Visual C++, but I expect that the SDK will work with version 6.0 by the time it is released.) To switch compilation from one Windows CE operating system or processor family to another, you simply change the active configuration using the WCE Configuration toolbar. That's not to say you won't need a sprinkling of Windows CE version-aware #define statements in your code—you almost certainly will. After all, the Auto PC user interface is drastically different than that of the H/PC Pro Edition. But if you're planning to support multiple flavors of Windows CE, the integrated toolkit allows you to do so from a single code base, with a minimal amount of effort. |
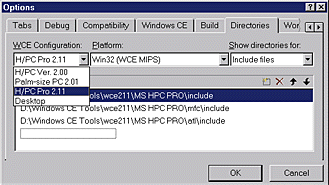 |
| Figure 4 Configuration Options |
|
The best part about the toolkit integration within the Visual C++ shell is that you can debug applications running on your Windows CE-based device as if they were running on your local machine. The Platform Manager copies a Windows CE-based application named cemon.exe onto the remote device, which then communicates with the debugging environment on the desktop. You use the same debugging environment as you do for desktop applications, breakpoints and all. When the remote debugger steps into your code, the desktop debugger needs to open the .pdb files associated with the code that is being debugged so that you can follow along. Often, the Visual C++ debugger will ask you to help it find a local copy of the remote file that is being debugged. Make sure you point the debugger to the correct version of the file. For example, if you're debugging an MFC application on an H/PC Pro Edition device with a MIPS processor running Windows CE 2.11, you'd need to point the debugger at the Windows CE Tools\Wce211\MS HP Pro\MFC\lib\mips folder. Remote Tools In addition to integration with the desktop development environment, the Windows CE Toolkit for Visual C++ provides several invaluable tools you'll use to test and debug your Windows CE-based applications: Remote File Viewer, Remote Heap Walker, Remote Process Viewer, Remote Registry Editor, Remote Spy++, and Remote ZoomIn. When you run each of these applications for the first time, the Platform Manager establishes a connection with the Windows CE-based device and downloads the appropriate client files. The lightweight client communicates with the remote tool that runs on the desktop. For example, when you first run the Remote Process Viewer (see Figure 5), the Platform Manager downloads processor-specific versions of several files: cepwcli.exe, toolhelp.dll, cetlstub.dll, and tlcesrv.dll. The client process, cepwcli.exe, sends information about the processes, modules, and threads running on the device back to the desktop using Windows sockets. Since screen space, application size, and memory usage are highly valued commodities under Windows CE, it makes sense to have the user interface for these "development use only" tools run on the desktop rather than on the device itself. |
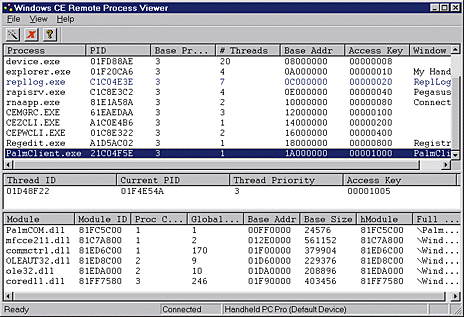 |
| Figure 5 The Remote Process Viewer |
|
Call it laptop envy if you will, but I wish there were scaled-down, self-contained versions of those tools that ran standalone under Windows CE, especially the H/PC Pro Edition. What's worse is that most of these tools cannot communicate with the Windows CE emulator, so you have to wait until you've deployed the application on an actual device to use diagnostic tools like Remote Spy++. With these drawbacks in mind, I wrote a nearly full-featured Windows CE version of the Registry Editor, which I'll get to later on, that runs on all platforms except the Auto PC. The Windows CE Toolkit for Visual C++ 6.0 adds seven Windows CE-specific AppWizards to the Visual C++ environment (see Figure 3). Each wizard closely resembles one of the wizards used for desktop development, albeit with some limitations. I won't describe all seven AppWizards in detail here, but will instead focus on the two that you're likely to use most often: the WCE MFC AppWizard and the WCE ATL COM AppWizard (which you'll use in conjunction with the ATL Object Wizard to create Windows CE-based COM components). MFC for Windows CE Similar to the regular MFC AppWizard used for desktop development, the WCE MFC AppWizard helps you build single document interface (SDI) or dialog-based applications under Windows CE. But the WCE MFC AppWizard doesn't give you the option to build multi-document interface (MDI) applications because Windows CE doesn't currently support the MDI child window APIs. Nor does the wizard provide options for other features such as ODBC/DAO databases, compound documents, or the Messaging API (MAPI) due to inherent lack of operating system support for those elements. That's to be expected because Windows CE is designed to be small, portable, and fast—occasionally at the expense of fringe features. |
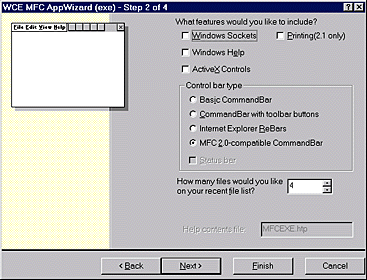 |
| Figure 6 WCE AppWizard |
|
What you might not expect, though it makes sense when you think about it, is that the three Windows CE platforms that support MFC—the Palm-size PC, Handheld PC, and Handheld PC Pro Edition—do not necessarily support all of the features included in the WCE MFC AppWizard. As shown in Figure 6, the AppWizard provides options for ActiveX controls, various combinations of toolbars and status bars, Windows sockets, and even printing. But not all of these features work on every device. Most notably, ActiveX controls are not supported on the first-generation Palm-size PC (Windows CE 2.01), and the MFC CControlBar class—from which the CToolBar, CStatusBar, CDialogBar, and CReBar classes are derived—is not implemented under versions of Windows CE prior to 2.01. To use the WCE MFC AppWizard effectively, you must decide beforehand what flavors of Windows CE you're planning to support and know the limitations of each one (see Figure 7 ). Because MFC for Windows CE fully supports the venerable Document/View architecture, the code generated by the WCE MFC AppWizard looks nearly identical to the code generated by its desktop counterpart. In fact, the CWinApp, CDocument, and CView-derived code is a carbon copy of the code generated by the regular wizard. The only significant differences reside in the CMainFrame code, especially in applications that must support Windows CE 2.0. Early versions of MFC for Windows CE (versions 2.0 and earlier) made use of a CCommandBar class to implement rudimentary toolbar functionality. The CCommandBar class requires that an application toolbar be defined as a hand-coded structure rather than using resource-based toolbar definitions as in the more sophisticated CToolBar class. So backwards-compatible MFC applications have CMainFrame code that looks something like that shown in Figure 8. A Simple Registry Editor As I mentioned earlier, I'm a bit disappointed that there isn't a version of the registry editor that runs directly on my Windows CE-based device. Sure, I can view my device's registry remotely when I'm connected to my desktop PC (assuming I've installed the Windows CE toolkit on every desktop I plan to synch with), and the Windows CE emulator has a scaled-down registry editor I can use during the early stages of development. But I find myself wanting a more functional registry editor that runs on my NEC MobilePro—one that I can use while I'm sitting in the back of a taxi on the way to the airport. As a demonstration of MFC features for Windows CE (and to satisfy my Regedit cravings), I built a registry editor that runs under Windows CE. Although I've only tested it on one Windows CE-based device, I've written the code so that it supports Windows CE for the Palm-size PC, for the Handheld PC, and the H/PC Pro Edition using a single code base. My Regedit application is uncomplicated; it simply mimics the look of the desktop Regedit application as closely as possible using the tree view and list view combination made famous by the Windows 95 Explorer. But since I want my editor to work just as well on the Palm-size PC (which has more pixels from top-to-bottom than it does from left-to-right) as it does on the Windows CE H/PC Pro Edition, I had to make the code smart enough to use screen real estate effectively (see Figure 9). |
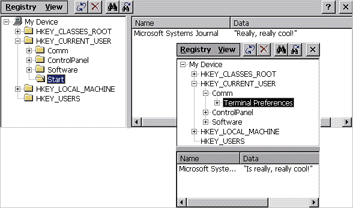 |
| Figure 9 Screen Sizes |
| As you can see, the list view appears at the right of the tree view on the H/PC and H/PC Pro Edition, but underneath the tree view on the Palm-size PC. I chose to add these "smarts" using runtime screen-size detection rather than a preprocessor #define switch in order to avoid coupling the functionality to a specific version of Windows CE (see Figure 10 ). |
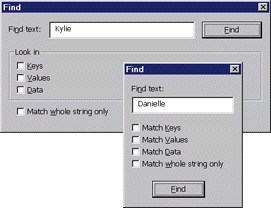 |
| Figure 11 Device-specific Dialogs |
|
Since the Palm-size PC screen is so much smaller than that of the H/PC, I had to design two dialog resources for each dialog (see Figure 11). When I tried to design a dialog box so that it fit nicely within the confines of the Palm-size PC screen, it invariably looked ridiculously small on the H/PC. So I simply provided two resources for each dialog (using the same resource IDs for the elements on each dialog, of course) and used a #define to determine which one to display: |
|
| Admittedly, I might have chosen a more robust runtime approach based on the dimensions of the screen, but I'll leave that as an exercise for the motivated reader.
The most challenging problem I faced while attempting to support three different versions of Windows CE using a single code base was that the toolbar code (or lack thereof) under MFC for Windows CE 2.0 does not gray out the toolbar buttons associated with disabled menu items. As shown in Figure 12, the Delete button remains enabled even when the user highlights an item that can't be deleted. |
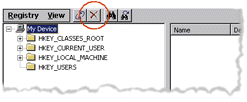 |
| Figure 12 Button Trouble |
|
To solve this problem, I had to add special version-specific code to manually update the button state in the CWinApp::OnIdle handler (see Figure 13 ). The complete source code for my registry editor (along with the other samples described in this article) is available for download at the top of this page.
ATL for Windows CE Since the ATL is already a very lightweight framework—one could argue that it's not even a framework at all—the code generated by the WCE ATL COM AppWizard should look very similar, if not identical, to the code generated by its desktop counterpart. However, since COM under Windows CE does not currently support Microsoft Transaction Server (MTS), marshaling, or the apartment model (more on that later), the wizard has only a single option: whether to add support for MFC. As with components developed for desktop versions of Windows, it's nice to know that you have the freedom to add a bloated, single-threaded MFC DLL to your lean, mean COM components, but it's not generally recommended. (OK, OK, the size of the MFC DLLs under Windows CE is nothing to make fun of, but they are still bulky compared to the size of a "pure" ATL component.) In Figure 14, I've compared the sizes of various DLLs under Windows NT versus the size of those running on the Windows CE emulator. Obviously, the Windows CE DLLs are much leaner, but what's even better is that the code doesn't appear to be getting appreciably bloated as the sophistication of Windows CE increases. The ATL Object Wizard for Windows CE currently supports a whopping nine components, such as support for simple objects, dialog boxes, and various flavors of ActiveX controls—including the nifty composite control! This is especially keen since Pocket Internet Explorer 3.0, which ships with H/PC Pro Edition devices running Windows CE 2.11, now supports ActiveX controls. Pocket Internet Explorer doesn't yet support VBScript, but I predict you'll see that feature soon, making ActiveX control development under Windows CE more attractive than ever. If you examine the Attributes page of the ATL Object Wizard Properties dialog box for Windows CE (see Figure 15), you'll notice that it has the same layout as its full-featured equivalent, except that several of the options are unavailable. Since COM for Windows CE doesn't currently support apartments or marshaling (see the "COM for Windows CE" sidebar), you can only specify the Single or Free threading models. The tempting but dangerous freethreaded marshaler option is completely unavailable. In my opinion, the Single and Free qualifiers are rather misleading because Windows CE currently supports only the multithreaded apartment, and has no mechanism to enforce method synchronization on an object. In other words, there isn't a Service Control Manager policing object activation requests to make sure that threads with incompatible synchronization requirements get a proxy to your object instead of a direct interface pointer. |
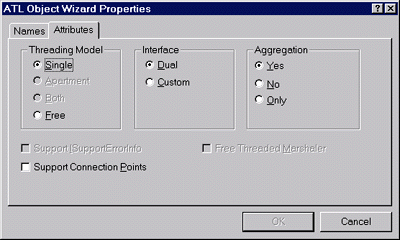 |
| Figure 15 Properties for Windows CE |
|
So unlike developing ATL-based COM components for the Windows desktop, when you choose Single or Free in the ATL Object Wizard for Windows CE, you're simply specifying whether you think instances of your coclass will be accessed simultaneously from more than one thread. Under Windows CE, the COM runtime will do absolutely nothing to make sure your assumption is correct. If it is safe to assume single-threaded access—in the case of an ActiveX control, for example—then specifying Single allows ATL to relax its internal thread synchronization primitives, thereby increasing the efficiency of your COM component, although only by a few instructions. It's not clear to me why the Supports ISupportErrorInfo checkbox is disabled under Windows CE. ATL for Windows CE provides single-interface-per-component support for the ISupportErrorInfo interface via the ISupportErrorInfoImpl class, and the CComCoClass class (sounds redundant, doesn't it?) provides a handy Error method that provides additional information to client applications in the event that one of your methods returns a negative HRESULT. ActiveX Control Development The ATL support found in Windows CE 2.0 and 2.11 makes it a snap to develop ActiveX controls. You'll find that the code you write for Windows CE will be nearly identical to the code you're used to writing for desktop-based ActiveX controls. Two differences worth noting are that Windows CE doesn't currently support the HRGN object or its associated APIs and that Windows CE-based devices use a pointing stick instead of a mouse (meaning that attempting to respond to WM_MOUSEMOVE messages is a useless endeavor). The real difficulty in developing ActiveX controls for Windows CE is not so much in the implementation phase, but rather in the testing and distribution phase. Suppose you've used the Windows CE Toolkit for Visual C++ to develop a really hot Windows CE-based ActiveX control. One of your clients wants to use your control within a Visual Basic form, and another client wants to use the control inside an MFC-based dialog box. Fair enough, but how do they use your control within the context of their Windows NT-based development environment? You've provided an ActiveX control that only runs under Windows CE, but—just like you—your clients are actually developing their application for Windows CE under Windows NT. Obviously, then, you must provide at least two versions of the ActiveX control: one that's compiled under Windows NT so that it can be dropped onto the Visual Basic form or MFC-based dialog box, and one version for each supported Windows CE version and processor family. In theory, the Windows NT version of your control need not be fully functional. It must simply provide enough functionality to be dropped onto a form and configured via its property pages. Unfortunately, you may find that it's actually more work to maintain a dumbed-down Windows NT-specific version of the control than it is to keep the control fully portable across Windows NT and Windows CE. Either way, you'll need to have the ActiveX control registered on both platforms in order for other developers
to design applications using your control. The sidebar, "Desktop ActiveX Controls," outlines the necessary steps
to convert your WindowsCE-based ActiveX control into a desktop control. In the sample code that accompanies this article, I have included a modified version of the ATL Polygon sample that supports a minimal version of the control for Windows NT for inclusion in desktop-based design tools. Windows CE Toolkit for Visual Basic 6.0 I won't spend much time talking about the Windows CE Toolkit for Visual Basic 6.0, but I do want to mention a few important points. First of all, the Visual Basic runtime under Windows CE is based on VBScript (vbscript.dll). This means it supports type libraries and ActiveX controls, but has no comprehension of vtables or early binding. It treats every component as a generic IDispatch pointer. Despite this limitation, the Windows CE Toolkit for Visual Basic 6.0 allows you to use the "Dim variable As type" statement to use the IntelliSense Auto List Members feature, which displays a list of valid member variables or functions for a selected class or structure. It does not provide true early binding because all variables in the Windows CE Toolkit for Visual Basic default to the VARIANT data type. The Windows CE Toolkit for Visual Basic supports the CreateObjectWithEvents API that allows you to handle events from nonvisible ActiveX controls or other Automation-compliant COM components, and supports the ability to turn error handling on and off using On Error Resume Next and On Error Resume 0. |
|
| Despite those improvements, I'm a bit disappointed that the toolkit for Visual Basic still does not support integrated debugging. When you debug an application, the toolkit fires off a separate application (see Figure 16) rather than using the built-in debugger that fans of Visual Basic have grown to love. Hopefully future versions of the Windows CE Toolkit for Visual Basic will provide fully integrated debugging. |
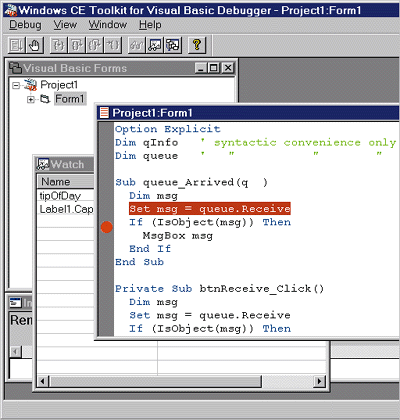 |
| Figure 16 Visual Basic Debugger for Windows CE |
|
Perhaps the most important thing to point out about the Windows CE Toolkit for Visual Basic 6.0 is that you cannot add your own ActiveX controls to a Visual Basic form unless you have first registered them with the Windows CE Control Manager. The Control Manager keeps a record of the Windows CE ActiveX controls that are registered on both the desktop and the remote device. To insert your control onto a Visual Basic form, you must do three things: download and register the Windows CE version of your control on the target device, build and register a desktop version of your control as described in the sidebar, "Desktop ActiveX Controls," and explicitly register your ActiveX control as a Desktop Design Control using the Add New Control option in the Control Manager utility (see Figure 17). |
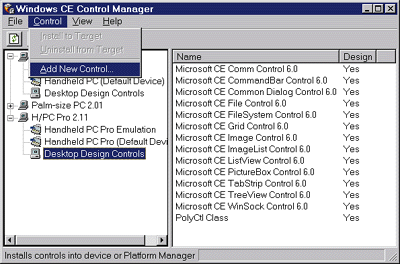 |
| Figure 17 Adding a New Control |
|
COM Support
Unfortunately, ATL is not currently supported on Windows CE 2.01, most likely because that version doesn't support IDispatch, the Automation data types, or ActiveX controls. Even without those things ATL would still be helpful, but I suspect that removing those features from the ATL source code would involve a good amount of work. Nonetheless, it's important to understand that Windows CE 2.01 does indeed support COM. To prove it, I developed a very simple coclass that exposes a single interface: |
|
| I then wrote a Windows CE-based MFC client applica-tion that simply creates an instance of the coclass and calls the GetFortune method to its heart's content. Since the Windows CE Toolkit for Visual C++ does not support the #import directive, I shared a single IDL file between both the client and server projects. Each project builds its own identical version of the necessary files using the MIDL compiler.
To make this work, I had to tweak the stdafx.h file that I borrowed from the ATL source code: |
|
| The first two #define statements just tell the compiler to ignore the fact that Windows CE has an outdated RPC header file. Since Windows CE doesn't support RPCs at all, you simply want to suppress this message. The #pragma statements include the import libraries that are needed to make COM calls.
Since Windows CE 2.01 doesn't support the Automation data types, I also had to include the following hack so I could use the BSTR data type. I wanted to do this so that I could support more than one Windows CE operating system using the same code base. Ideally, I should have length-prefixed the string passed back by my SysAl- locString substitute, but I'll leave that as an exercise for the avid reader. |
|
|
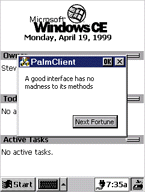
| Figure 18 Auspicious Fortune |
| The client application creates an instance of the Fortune Cookie object and calls its GetNextFortune method each time the user clicks the Next button (see Figure 18). |
|
|
Conclusion I've given you an overview of the features provided by the Windows CE Toolkit for
Visual C++, including its support for MFC, ATL, and ActiveX controls. Even if you don't have a Windows CE-based device, you should give the Windows CE Toolkit for Visual C++ a spin. It will be exciting to watch the progress and evolution of Windows CE as the future brings more eye-popping features. Happy coding!
|
From the July 1999 issue of Microsoft Systems Journal.