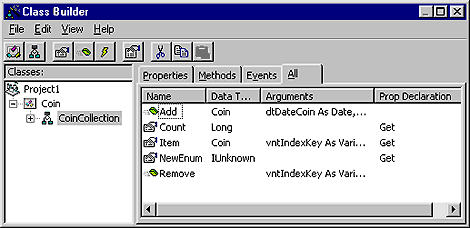

With the introduction of classes to Visual Basic 5.0, the language came that much closer to becoming truly object-oriented. However, when it came time to create a custom class or collection, you may have found it extremely labor-intensive coding in all the default properties and methods, such as Add, Count, and Item. Also, depending on the aggregate collection's complexity, it may have become difficult sorting out all the relationships between the various classes and collections. Thankfully, Visual Basic provides a new add-in called the Class Builder Utility to help simplify class construction. This helpful tool lets you create and view class hierarchies in an explorer-type environment. In addition, it automatically provides a code template for the standard and custom class properties and methods you specify. In this article, we'll show you how to use this great new tool to create a set of classes that encapsulate a coin collection, as shown in Figure A. Before we build the example, however, let's take a look at this add-in and a few of its more noteworthy features.
Figure A: The Class Builder provides a user-friendly way to
build and model classes and collections.
The Class Builder Add-in
First and foremost, you'll need to make the Class Builder available to VB's IDE. (We'll use VB 5.0) To do so, open a new project and select Add-Ins / Add-In Manager from the menu bar. When VB displays a list of available add-ins, select VB Class Builder Utility, (in VB 6.0, also select the Loaded/Unloaded check box in the Load Behavior section) and click OK. When you do, VB loads the Class Builder Wizard and makes it available in the Add-ins menu option. To open the Wizard, select it from the dropdown menu. VB displays the utility shown in Figure A, (blank of course). At start-up, the Wizard provides two fairly self-explanatory options, Add New Class and Add New Collection. If you click either of these buttons, the Builder prompts you for the new class' name, then adds the new class to the Object Model pane. If you create a new collection, you must also specify the class to fill it with. Once you've added the class or collection, you can then attach new properties, methods, events, or even enumerations.
After you complete the class structure, the Update Project command ([Ctrl]S) on the File menu inserts the classes and collections into the project. Until you actually use this option, you can manipulate any aspect of the class structure that you want in the Class Builder utility. However, once inserted into the project, you must manually modify the existing code. Now that we've familiarized ourselves with the utility, let's use it to build the coin collection.
Build the Coin class
As we mentioned, we'll create a coin collection made up of individual coins, so let's build the Coin class first. To do so, we'll create a simple class that will encapsulate basic data and functions related to a coin. To start, in the class builder utility click the Add New Class button. When the wizard displays the Class Module Builder dialog box, enter Coin as the Name, then click OK. The builder adds the Coin class to the hierarchy window.
Add the Coin's properties
To create the Coin's properties, select the class, and then click on the Properties tab. Next, right-click in the property window and select New Property from the resulting shortcut menu. The wizard displays the Property Builder dialog box. Table A defines the properties that we'll use for this class. We'll create the Coin's date property first. To do so, enter dtDateCoin as the name, then select Date as the property's Data Type. Figure B shows the completed dialog box. Click OK to add the property to the Coin class.
Table A: The Coin class' properties and methods
|
Property |
Data Type | Description |
|---|---|---|
| dtDateCoin |
Date |
Date of the coin. |
| intQuality |
Integer |
Quality of the coin. |
| strName |
String |
Name of the coin |
Figure B: Define a class' properties in the Property Builder
dialog box.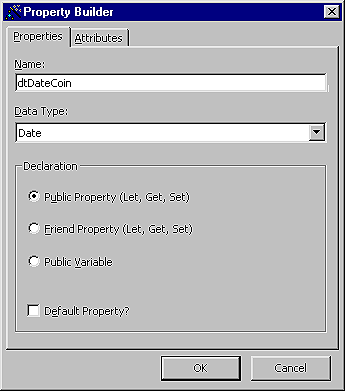
NOTE: If necessary, you can also declare a property as the class' Default property--like the Value property of most built-in classes. Each class or collection can have only one default property and one default method.
Enter the remaining properties outlined in Table A. For our example, keep all of the declarations as Public properties. After you finish adding the properties, we'll move on to the methods.
Insert a few methods
Table B lists the Coin class' two methods. To add them, make sure you've selected the Coin class in the Object Pane, then click on the Methods tab. Right-click in the Methods pane and select New Method from the shortcut menu. When you do, the wizard displays the Method Builder dialog box, which looks a little different from the Property Builder dialog box. In addition to the method's name, use this section to declare the method's arguments and return data type. Also, you can declare the method's scope as Friend, which makes the method available only to objects in the same project.
Table B: The Coin's methods
| Method | Return Date Type | Arguments | Argument Data Type | Description |
|---|---|---|---|---|
| MarketValue |
Double |
MarketFactor |
Double |
Determines the market value of the coin. |
| Sell |
Double |
Price |
Double |
Sells the coin and returns a price
|
Now, in the Method Builder dialog box, enter MarketValue as the Name, then click the Add A New Argument button. In the Add Argument dialog box, name the argument MarketFactor and give it a Double data type. Click OK to add MarketFactor to the method's argument list. Finally, give this method a Double Return Data Type. Follow the steps we just outlined to add the Sell method from Table B. When you've finished, click the All tab in the Class Builder utility. At this point, the Coin class should look like Figure C.
Figure C: The Class Builder lists all the Coin class'
properties, methods, events, and enums in one convenient view.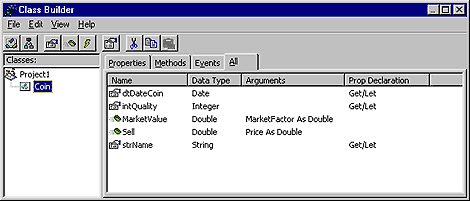
The Class Builder code template
Before we create the coin collection, lets review the code that the class builder generates. To do so, press [Ctrl]S. When you do, the wizard adds the class to the project. Now, close the Class Builder. VB displays the Coin Class module window. Figure D shows a partial listing of the code. (We deleted most of the REM statements.)
Figure D: The Class Builder provides a code template for the
classes and collections that you define.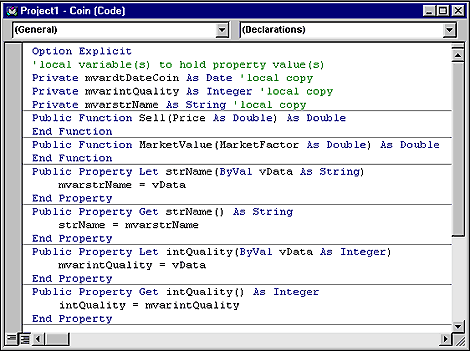
Notice that the Class Builder not only created all of the appropriate property Let and Gets, as well as the methods and their arguments, but also the private member variables that store the class' internal data. We essentially have a complete template in place that's ready for coding. Now lets create a collection to hold our coins.
Create the CoinCollection
To begin, re-launch the Class Builder and click the Add New Collection button. Name the collection CoinCollection. As we mentioned earlier, you must also stipulate what class fills the collection, so in the Collection Of section, select the existing Coin class. Figure E shows the completed Collection Builder dialog box. Click OK to complete the process. When you do, the Class Builder automatically creates several standard--and probably very familiar--properties and methods. Table C briefly describes each one.
Figure E: The Collection Builder dialog box lets you fill the
collection with new or existing classes.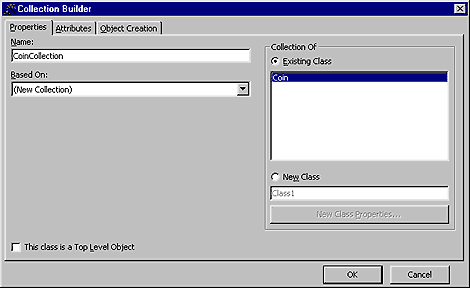
Table C: CoinCollection standard properties and methods
| Property | Description |
|---|---|
| Count |
The number of items in the collection. |
| Item |
A specific item in the collection. |
| NewEnum |
Provides For Each...Next enumeration of the
collection |
| Method | Description |
| Add |
Adds a new item to the collection. |
| Remove |
Removes an item from the collection.
|
With these properties and methods, you manage the coin collection. You can even add in custom properties and methods of your own. For example, you might add a method called TotalValue to calculate the total collection value. (Talk about notable properties and methods added!) For our purposes, the standard methods and properties will do, so press [Ctrl]S to insert the collection into the project. Close the Class Builder to return to the IDE. We'll utilize the CoinCollection in a sample application next.
Create the sample application
For our example, we created a simple application that allows you to add various coins to the coin collection. Use Figure F as a guide to build the application's form, and enter the settings from Table D.
Figure F: This sample application will add the coins you specify
into a coin collection.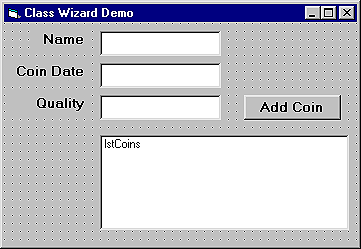
Table D: The example form's objects and settings.
| Object | Property | Value | Description |
|---|---|---|---|
| Form |
Name |
frmClassWizDemo |
|
| Caption |
Class Wizard Demo |
||
| Label |
Name |
lblName |
Label for the coin's name |
| Caption |
Name |
||
| Name |
lblCoinDate |
Label for the coin's date | |
| Caption |
Coin Date |
||
| Name |
lblQuality |
Label for the coin's quality | |
| Caption |
Quality |
||
| Textbox |
Name |
txtName |
Textbox for the coin name |
| Name |
txtCoinDate |
Text box for entering the coin date | |
| Name |
txtQuality |
Text box for entering the quality of the coin
| |
| Command Button |
Name |
cmdAddCoin |
Command button to add the coin to the collection
|
| Caption |
Add Coin |
||
| Listbox |
Name |
lstCoins |
List box to display the collection's coins
|
Attach the form's code
Listing A shows the form's code, which consists of a globally declared instance of the CoinCollection class, and cmdAddCoin's Click event procedure. To attach the code, right-click on the form and select View Code from the shortcut menu. When the IDE opens the form's Module window, enter the code from Listing A. As you can see, the Click event adds a coin to the collection. Notice that the procedure never actually deals directly with the Coin class. The CoinCollection class handles all of that for us.
Listing A: clsClassWizardDemo.frm - Code to utilize the coin collection class
Dim clsCC As New CoinCollection

Private Sub cmdAddCoin_Click()
Dim dtcoin As Date

' Build the date. We assume a year only
' is entered.
dtcoin = CDate("01/01/" & txtCoinDate.Text)

'Add in the coin to the collection.
clsCC.Add dtcoin, txtQuality.Text, txtName.Text, clsCC

PopulateList

txtName.Text = "
txtQuality.Text = "
txtCoinDate.Text = "
End Sub
In addition to the Click event, we created a subroutine called PopulateList, as seen in Listing B. This procedure displays all of the coins in the form's list box. To do so, it iterates through the coins in the collection and retrieves the requested property values. It then inserts the property values into the list box. (The CoinCollection's NewEnum property lets you use For Each...Next enumeration with a custom collection class. To find out more about this handy property, read "Implement For Each...Next Enumerations For Collections" in this month's issue.)
Listing B: The PopulateList procedure
Private Sub PopulateList()
' Subroutine to populate the list box with
' coin data

Dim cnCoin As Coin
Dim strName As String
Dim intDateCoin As Integer
Dim intQuality As Integer

lstCoins.Clear

' Build the name header for the list box
' We pad the text to ensure the header
' is uniformly displayed
strName = "NAME" & Space(30)
strName = Left(strName, 30)

' Add in the header
lstCoins.AddItem strName & Chr(9)
& "DATE" _
	& Chr(9) & "QUALITY"

For Each cnCoin In clsCC
	With cnCoin
	' Build the coin name and pad it with spaces
	' so that the columns will line up in the
	' text box
		strName = .strName & Space(30)
		strName = Left(strName, 30)

		intDateCoin = Year(.dtDateCoin)
		intQuality = .intQuality
	End With

	' Add the coin to the list box
	lstCoins.AddItem strName & Chr(9) & _
		intDateCoin & Chr(9)
& intQuality
Next cnCoin
End Sub
Conclusion
When you build complex Visual Basic applications, the Class Builder utility can be an invaluable tool for modeling the initial class structure and easily updating it later. The collection capability provides a quick way to build groups of items and easily aggregate many classes. In this article, we've introduced you to this great, new tool.
NOTE: If you find that you need to move to more robust modeling tool than the Class Builder, the Visual Basic 6.0 Enterprise Edition offers the Visual Modeler tool. This tool provides sophisticated modeling tools as opposed to simple class building. On the other hand, learning this advanced tool requires a little more study than the quick and easy class builder.
Copyright © 1999, ZD
Inc. All rights reserved. ZD Journals and the ZD Journals logo are trademarks of ZD
Inc. Reproduction in whole or in part in any form or medium without
express written permission of ZD Inc. is prohibited. All other product
names and logos are trademarks or registered trademarks of their
respective owners.