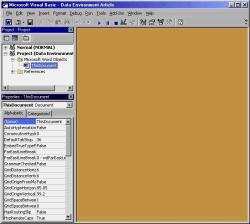
FIGURE 2: The Visual Basic Editor.
In the past few years, we've seen a number of data access strategies emerge from the hallowed halls of Microsoft. First, they gave us DAO (Data Access Objects), a good format for accessing local data with a reasonably simple set of commands. Unfortunately, this format wasn't so good for accessing remote data in the form of client/server data sources.
To cope with this, Microsoft provided us with RDO (Remote Data Objects). This offered a far more robust solution for connecting to remote data sources; it also offered speed advantages. However, the commands required to make RDO operate are far more complex than those of DAO, which means a large amount of re-training for desktop developers wanting to access remote data sources.
In the third volume of their data access trilogy, Microsoft has given us ADO (ActiveX Data Objects). These are designed to replace all preceding strategies with one set of simple tools for accessing data, no matter where it resides.
Introducing the Data EnvironmentWith the advent of Visual Basic 6, we've also been provided with a graphical tool with which to manipulate ADO. For some time, we had a tool called the User Connection designer, which was a graphical tool provided to simplify the complexities of creating RDO connections within our projects. As a tool, it had a number of limitations when compared with the Data Environment designer (see FIGURE 1).
|
Functionality |
User Connection designer |
Data Environment designer |
|
Data Access exposed using... |
RDO |
ADO |
|
Objects exposed include... |
only one RDO connection with multiple queries. |
multiple ADO Connection and Command objects within one Data Environment object. |
|
Events exposed include... |
only events from the User Connection object. |
all ADO events for the Connection and Command object. |
|
Direct data binding... |
cannot be used as a direct data source. |
can be directly bound to controls on a form. |
|
Programmatic access exposes... |
queries as methods from the User Connection object with one ResultSet property. |
Command objects as methods from the Data Environment object, with one Recordset property per Command object. |
|
Design environment provides... |
a basic view that only displays the list of queries in the User Connection. |
two views of objects that list Connection and Command objects, as well as the Field objects returned from each Command object. |
|
Data Sources used ... |
ODBC only. |
OLE DB data sources, as well as ODBC data sources. |
FIGURE 1: Comparison of the Data Environment designer and the User Connection designer (from MSDN April, 1999).
As well as overcoming some of the limitations of the User Connection designer, the Data Environment designer provides us with a great deal of useful functionality that we can use to enhance the development process. In the following list, you can see the functionality supported by the Data Environment beyond that provided by the User Connection:
Until recently, the functionality of the Data Environment hasn't been available to Microsoft Office programmers. With the advent of the Developer Edition of Office 2000, however, we've been given a chance to use the Data Environment (and other special ActiveX designers), albeit in a slightly restricted way.
Restricted AccessThe main restriction to the use of the Data Environment with the Office products is that it can only be used in a new project. This means it cannot be incorporated natively (i.e. in the Visual Basic Editor) within the existing project that is associated by default with the particular Office document you've created.
To overcome this limitation and use the full functionality of the Data Environment, you need to make the project containing the Data Environment into a DLL that can be referenced from another project. The advantage of this is that the Data Environment/Data Access code, etc. can be written once, then used wherever it's needed. Let's build the DLL.
A Wordy ExampleFor this example of using the Data Environment, we're going to use Word 2000 as the host application. The first thing to do is open a new document in Word, then start the Visual Basic Editor (VBE) by selecting Tools | Macro | Visual Basic Editor, or by pressing [Alt][F11]. You'll be presented with the default VBE, as shown in FIGURE 2. There will be at least two projects: Normal, a generic project that contains objects that apply to all documents, and the project that applies specifically to the current document.

FIGURE 2: The Visual Basic Editor.
Unless you've already done so, you'll need to make the Data Environment designer (an ActiveX object) available to the editor. This is done by selecting Insert | Components, or by pressing [Ctrl]t. When the dialog box shown in FIGURE 3 appears, choose the Designers page and check Data Environment. There are a number of other designers you can select, including the old User Connection designer. (Note: The Insert | Components menu option, and most of the ActiveX designers, will not be available unless you have installed Microsoft Office 2000 Developer.)
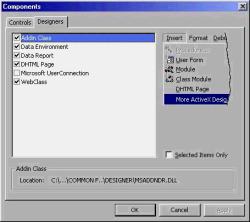
FIGURE 3: The Components dialog box.
Now, when you select the Insert menu, you'll see a menu item for Data Environment. Initially, however, it's disabled. To use the Data Environment, you need to create a new project by selecting File | New Project, and then selecting Empty Project from the New Project dialog box.
The new project will appear in the Project explorer. You can insert a new Data Environment by selecting Insert | Data Environment from the main menu bar, or the project's popup menu (displayed by right-clicking in the project window). A branch named Designers will be added to the project tree; the Data Environment will be within this group. Double-click on the specific designer to display it in the editor (see FIGURE 4).
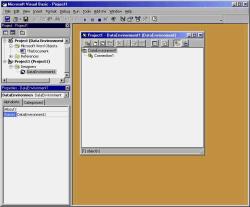
FIGURE 4: The Data Environment designer.
It's important to understand the concepts behind ADO to fully utilize the editor. First, you must make a connection to a database. Doing this in the Data Environment is as simple as selecting the Connection object that's been placed in the designer by default, named Connection1. Right-click it to display the popup menu, and select Properties. This will open a dialog box with four pages (see FIGURE 5).
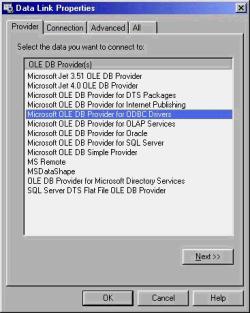
FIGURE 5: Selecting the data provider from
the Properties pop-up menu.
The first page, titled Provider, is used to select which provider to use to access the data. To connect to an Access 2000 database, choose Microsoft Jet 4.0 OLE DB Provider, or, to connect to a SQL Server or MSDE database, choose Microsoft OLE DB Provider for SQL Server. After selecting the preferred provider, press the Next button, or choose the Connection page shown in FIGURE 6.
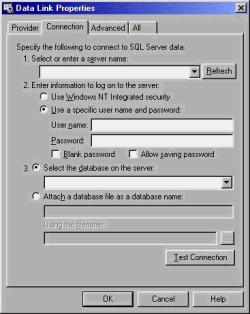
FIGURE 6: Selecting the database to connect
to using the chosen data provider.
This page allows you to connect to a specific database using the provider previously chosen. If you're connecting to an Access database, you can select a database and a user name, then test the connection. To connect to SQL Server, choose a server, a user name, and a database before testing the connection.
The Advanced and All pages allow you to specify other specific permissions or properties. For those familiar with ADO, this dialog box effectively provides a graphical front end to the connection string you would normally build to make an ADO connection.
Command Your DataOnce we have a connection, it's time to start adding commands to the connection to allow us to access some data. These can take the form of an object contained within the database. In the case of Access, that would be a table object. For SQL Server, you could also have stored procedures and views, or a SQL statement that extracts data.
To add a command to the Data Environment, right-click the connection, and from the popup menu, choose Add Command. This will add a command below the connection, named Command1. Now change the properties of the command by selecting Properties from its popup menu. This will display a dialog box with six pages (see FIGURE 7).
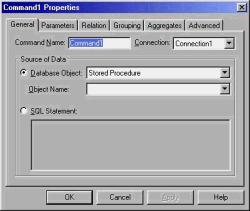
FIGURE 7: Building a command using the
Command Properties dialog box.
The General page allows you to select either a type of database object and then the specific object to use, or to enter a SQL statement. The other pages allow you to perform more complex operations with the data, such as adding aggregate fields, creating groups, or setting up master/detail relations with other command objects. (We'll look at these in more detail in the second half of this two-part series.) The Advanced page allows you to specify specifics about the ADO command, such as the locking status and the cursor locations. (For specific information about ADO, see the MSDN documentation.)
We've created a connection to a database, and a command that will return a Recordset. We can continue to add commands to the current connection, or we can add even more connections to the Data Environment that can access different databases. We can use any of these commands within the current project by referencing them in code.
Adding an External InterfaceAs mentioned earlier, you can only add a Data Environment (or any of the new ActiveX designers) to a new project. To use the functionality provided by the data environment in a project associated with an Office document, we need to wrap the Data Environment project up as a DLL. We can then use this DLL from within the main project. This is much easier than it sounds, and actually provides us the benefit of making the Data Access code portable.
To allow access to the Data Environment commands, we need to write public functions that return results from the Data Environment. They're public because it must be possible to access them from outside the DLL. This is simple; all that's required is a public function that returns a Recordset. This Recordset is populated by the specified command object. The code in FIGURE 8 first checks if the Recordset is already open, and opens it if it isn't. The return value of the function is the Recordset from the Data Environment.
      ' Make the Recordset of customer
      information from the
      ' Data Environment available outside the
      DLL.
      Public Function
      CustomerRS() As Recordset

        On  Error
      GoTo CustomerRS_Err

         If (deExample.deTest.rsCustomers.State = _
              adStateClosed)
      Then
          deExample.deTest.rsCustomers.Open
         End If

         Set CustomerRS = deExample.deTest.rsCustomers

      CustomerRS_End:
         Exit  Function

      CustomerRS_Err:
         Select  Case Err
           Case
      Else
            HandleGeneralError Err,
      _
              "Function
      CustomerRS", "deTest"

      GoTo CustomerRS_End
        End  Select

      End
      Function
FIGURE 8: The CustomerRS function opens and returns the Recordset.
Now that we've added a function to access the data from the Data Environment, it's time to turn this into a DLL so it can be accessed from other projects. Again, this is a simple process. Simply select File | Make <projectname>.dll, and provide a location to save the DLL.
Accessing the Data Environment DLLNow that we've created a DLL, it's time to connect to it from another project. This can be the project associated with a document, or even the Normal project that contains all the global Word functions.
To do this, you must first add a reference to it. This is done by selecting the project you're interested in and then selecting Tools | References. This opens a dialog box with a list of all the components you can set references to from within your VBA application. To set a reference, find the component you want and check it. The name displayed in the list is either the name you gave to the project, or, if you chose to add a description to the properties of the DLL project, this will be shown in the list in place of the project name. If the new component doesn't appear in the list, it may be necessary to browse the hard drive and find the DLL to use. Once done, it will be added to the list and selected for you.
When you have a reference to your DLL, you can use it by instantiating it as you would any object, then using the functions that were declared to allow access to the data. See the code in FIGURE 9 for an example of code that accesses the Recordset exposed by the CustomerRS function. This code starts a new instance of the Data Environment DLL, then sets the RecordSource of one of the new ADO grids to be the Recordset returned by the CustomerRS function.
     ' Use the Recordset from the Data Environment DLL
      ' for customers to populate a grid.
      Private Sub btnLoadGrid_Click()


        On  Error
      GoTo btnLoadGrid_Click_Err

         Dim objDE As  New deExample.deTest
         Set grdCustomers.DataSource = objDE.CustomerRS

      btnLoadGrid_Click_End:
         Exit  Sub

      btnLoadGrid_Click_Err:
         Selectc  Case Err
           Case
     Else
          HandleGeneralError Err,
      _
              "Function
      btnLoadGrid_Click", _
             "Data
      Environment Article"
          GoTo
      btnLoadGrid_Click_End
        End  Select

      End  Sub
FIGURE 9: Code to fill an ADOgrid from the Data Environment DLL.
When you press the Load Grid button on the form, the grid will be filled with customer records through the Data Environment DLL (see FIGURE 10).
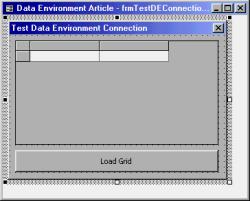
FIGURE 10: Test form with the ADO grid.
In this first article of a two-part series, we looked at the basics of creating a Data Environment, adding connections and commands, and making these available to other VBA projects by wrapping the Data Environment in a DLL. In summary, the process is as follows:
1) Open the VBE from one of the Office products, and create a new project.
2) Add the Data Environment designer to the project.
3) Create one or more connections to a database.
4) Add one or more commands to each connection to access data in the database.
5) Add some public functions to the Data Environment to allow access to the individual commands.
6) Make the project into a DLL.
7) Add a reference to the DLL in your main project.
8) Create an instance of the DLL and make calls to the public functions you defined to access the Data Environment data.
In the second part of the series, we'll look at more complex functionality that can easily be implemented using the Data Environment, and some of the other areas of interest that have not been covered in this introduction to the Data Environment.
The example files referenced in this article are available for download.
Matt Nunn is a consultant with Dunstan Thomas, a Microsoft Solution Provider Partner, based in Portsmouth, England. He is an MCSD and has been working with Microsoft Office and other Microsoft development tools for six years. You can drop him a line at mailto:mnunn@dthomas.co.uk or mailto:matt.nunn@dial.pipex.com.
|
Copyright © 1999 Informant Communications Group. All Rights Reserved. • Site Use Agreement • Send feedback to the Webmaster • Important information about privacy |